
Craft the Cutest DIY Paper Easter Basket: An Easy & Adorable Bunny Craft
As Easter approaches, the excitement of egg hunts and sweet treats fills the air. A cherished tradition for many is presenting a beautifully filled Easter basket. However, creating an elaborate basket can sometimes be time-consuming and expensive. What if there was a delightful alternative that’s not only incredibly simple and cost-effective but also charmingly unique? Look no further!
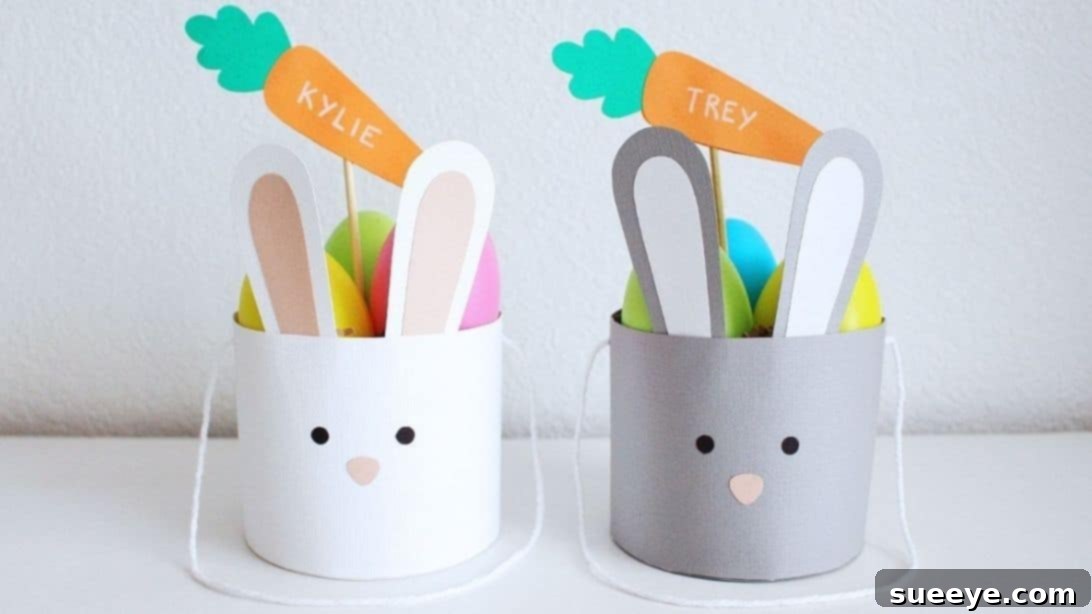
This comprehensive guide will walk you through crafting an adorable paper Easter basket, perfect for holding small treats or as a festive decoration. Inspired by the clever techniques shared by createwithjenn on YouTube, this DIY project is designed for everyone, from seasoned crafters to beginners looking for a quick and rewarding activity. In just a few minutes, you can assemble several charming bunny baskets, ready to bring smiles. Plus, personalizing each basket with a name adds an extra special touch, making it a memorable gift for children and loved ones.
Why Choose a DIY Paper Easter Basket?
Opting for a handmade paper Easter basket offers numerous advantages, making it an increasingly popular choice for families:
- Budget-Friendly: One of the most significant benefits is the minimal cost. Using readily available paper and a few basic craft supplies means you can create beautiful baskets without breaking the bank, leaving more budget for delightful Easter goodies.
- Quick and Easy: Unlike complex sewing or weaving projects, this paper craft can be completed in a surprisingly short amount of time. It’s perfect for last-minute preparations or when you want to involve children in a simple, engaging activity.
- Fully Customizable: Paper offers endless possibilities for personalization. Choose from a wide array of colors, patterns, and textures to match your Easter theme or the recipient’s favorite hues. You can add unique embellishments, glitter, or even hand-drawn designs.
- Eco-Conscious Choice: By using paper, you’re opting for a renewable resource. If you choose recycled paper or repurpose materials, you can make this craft even more environmentally friendly, teaching valuable lessons about sustainability.
- Fun for All Ages: This project is wonderfully adaptable for various skill levels. Younger children can assist with gluing and decorating, while older kids and adults can enjoy the precision of cutting and assembly. It’s a fantastic family bonding activity.
- Unique and Heartfelt: A handmade gift always carries more sentimental value. These charming bunny baskets are not just containers; they are a token of effort and love, sure to be cherished long after the Easter treats are gone.
Gathering Your Crafting Supplies
Before you begin, ensure you have all the necessary materials laid out. Having everything organized will make the crafting process smooth and enjoyable. Most of these items are standard craft supplies you might already have at home.
- White Paper: Standard printer paper, primarily for initial measurements and some structural elements.
- Cardstock Paper (White, Orange, Pink, Green): Essential for the basket’s durability and creating vibrant bunny features and carrot accents. The sturdiness of cardstock will ensure your basket holds its shape well.
- Pencil: For marking measurements and tracing templates.
- Scissors: A good pair of sharp scissors is crucial for clean cuts, especially for intricate shapes.
- Ruler: For precise measurements, ensuring your basket’s dimensions are accurate.
- Compass: To draw perfect circles for the basket’s base.
- School Glue: For general paper adhesion. Opt for a quick-drying formula if possible.
- String: To create a sturdy and decorative handle for your basket.
- Pom-pom: A small, fluffy pom-pom makes an adorable bunny tail.
- Skewer: Used to attach the personalized carrot name tag to the basket.
- Hot Glue Gun and Glue Stick: For quick and strong bonds, particularly useful for attaching the ears and pom-pom tail securely. Adult supervision is recommended when using a hot glue gun.
Step-by-Step Guide to Crafting Your Adorable Bunny Basket
Now, let’s dive into the fun part: assembling your paper Easter basket! Follow these detailed instructions carefully to ensure a beautiful and sturdy result.
Phase 1: Building the Basket Core
Step 1: Forming the Basket Body
Begin by cutting a rectangle from your white cardstock measuring 12 inches in length and 3¼ inches in height. This will form the main cylindrical body of your basket. On one of the longer sides, mark a ¼-inch strip. This marked area will serve as your gluing flap. Carefully roll the rectangle into a cylinder, ensuring the ends meet perfectly. Apply a thin, even line of school glue along the ¼-inch marked strip and firmly press the overlapping edge to secure the cylinder. Hold it in place for a moment until the glue sets.
Step 2: Reinforcing the Rim and Preparing the Base
Next, take a standard sheet of printer paper. Along its longer side, fold about ½ inch inward and make a crisp crease. Cut along this crease to create a long, thin strip. This strip will reinforce the top rim of your basket. Apply glue along one edge of this strip and carefully attach it around the inside and under the upper rim of your rolled paper basket body. This adds strength and a neat finish. For the base attachment, take the bottom overlapping section of the long strip (the part that extends below the main cylinder) and cut small, evenly spaced slits all around its circumference. These slits will help the base adhere smoothly. Set the main basket body aside.
Step 3: Creating and Attaching the Sturdy Base
To create a stable base for your basket, use your compass to draw a perfect circle with a diameter of 3¾ inches on your white cardstock. Carefully cut out this circle. Now, apply school glue generously to the slitted underside of your basket body. Center the cut-out circular base onto this glued area, ensuring it’s firmly pressed against the slits. Work your way around, pressing each slit upwards against the base for a secure attachment. Trim away any excess paper around the base for a clean, professional finish.
Phase 2: Bringing the Bunny to Life
Step 4: Adding Adorable Facial Features
For the bunny’s eyes, you have a couple of options. The simplest is to use a small hole punch on a piece of black paper to create two perfect circles. Alternatively, you can color small circles black with a marker or simply draw them directly onto the basket. For the nose, cut a small triangle shape from pink cardstock, making sure to round the corners slightly for a softer, more bunny-like appearance. Carefully glue the eyes and nose onto the front of the basket body, positioning them to create a cute and expressive face.
Step 5: Crafting and Attaching the Bunny Ears
The ears are essential for the bunny character! First, create a template for the outer ear. This template should measure approximately 1⅜ inches wide and 3¾ inches tall, shaped like a classic bunny ear. Use this template to cut two identical outer ears from your white cardstock. Next, cut a slightly smaller version of this ear shape from pink cardstock for the inner ear. Glue the smaller pink inner ear onto the center of each white outer ear. Once dry, apply a dab of hot glue to the bottom edge of each assembled ear and securely attach them to the back of the basket’s upper rim, positioning them slightly apart to give your bunny character.
Phase 3: Adding Finishing Touches & Functionality
Step 6: Creating a Functional Handle
To make your basket easy to carry, you’ll add a handle. Using a hole punch, create a small hole on each side of the basket, just below the rim and aligned with each other. Take a length of your chosen string (consider a material that’s comfortable to hold). Thread one end of the string through one hole from the outside in, and tie a secure knot on the inside to hold it in place. Repeat this process for the other side of the basket, ensuring the string forms a comfortable loop for the handle. Double-check that both knots are tight to prevent the handle from coming loose when the basket is filled.
Step 7: Attaching the Fluffy Tail and Personalized Tag
No bunny is complete without a fluffy tail! Take your pom-pom and, using a hot glue gun, securely attach it to the back of the basket, near the bottom. This adds a charming 3D element to your bunny craft. For the personalized carrot name tag, draw a carrot body template measuring approximately 1¼ inches wide by 3¼ inches long on a piece of paper. For the leaves, draw a separate template about 1½ inches wide by 1¾ inches high. Trace the carrot body onto orange cardstock and the leaves onto green cardstock, then carefully cut them out. Glue the green leaves to the top of the orange carrot body. Once dry, use a marker to write a name clearly on the orange part of the carrot. Finally, take your skewer, cut off the pointed end for safety, and attach the carrot name tag to the blunt end with a small amount of glue. Insert the skewer into the basket’s rim or side, positioning the carrot tag proudly in front.
Tips for the Perfect Paper Easter Basket
To ensure your DIY paper Easter basket turns out flawless and lasts through the festivities, consider these additional tips:
- Use Quality Cardstock: The sturdiness of your basket largely depends on the paper you use. Opt for medium to heavy-weight cardstock for the main body and base to prevent it from sagging or tearing, especially if you plan to fill it with treats.
- Allow Glue to Dry: Patience is key in crafting. Ensure each glued section is completely dry before moving on to the next step. This prevents pieces from shifting and ensures a strong, durable basket. Hot glue provides instant adhesion for many components, but school glue needs time.
- Involve the Kids Safely: This is a fantastic project for children. Let them help with tracing, cutting (with safety scissors or supervision), gluing, and decorating. Assign age-appropriate tasks to keep them engaged and foster their creativity.
- Decorate with Flair: Don’t limit yourself to the basic design. Encourage creativity! Kids can draw patterns, add stickers, glitter, ribbons, or even attach small plastic flowers to their baskets for extra personalization.
- Explore Different Themes: While the bunny is a classic Easter motif, you could adapt this basic basket shape to other themes. Imagine a chick basket with yellow paper and feather accents, or a spring flower basket with colorful petals.
- Consider Basket Fillers: Shredded paper (crinkle cut or tissue paper) makes an excellent filler, providing a soft bed for treats. You can also use green paper strips to mimic grass, enhancing the Easter theme.
- Practice Makes Perfect: If it’s your first time crafting, don’t worry if the first basket isn’t absolutely perfect. Each attempt will refine your skills, and you’ll soon be a paper basket pro!
Personalizing Your Easter Creation
One of the most heartwarming aspects of DIY crafting is the ability to infuse personality into your creations. While the carrot name tag is a wonderful starting point, there are countless ways to make each paper Easter basket uniquely special:
- Color Schemes: Move beyond traditional white and pink! Experiment with pastel blues, lavenders, or vibrant yellows for your bunny. Use patterned cardstock for the basket body to add visual interest.
- Embellishments: Add small bows near the ears, stick-on gems for sparkling eyes, or tiny fabric flowers. A touch of glitter glue can make the ears or nose sparkle.
- Hand-Drawn Details: Encourage children to draw little whiskers, eyelashes, or even blush on the bunny’s cheeks. These small artistic touches make each basket truly one-of-a-kind.
- Filling with Thought: Beyond chocolates, consider adding small, non-candy items like mini notebooks, stickers, temporary tattoos, or small toy figures that match the recipient’s interests.
- Messages of Love: Instead of just a name, you could write a short, sweet message on the carrot tag or on the inside rim of the basket, making it an even more personal keepsake.
Conclusion: A Delightful and Easy Easter Craft
Crafting a DIY paper Easter basket is a wonderfully rewarding experience that combines creativity, affordability, and the joy of giving. This simple bunny basket project, inspired by createwithjenn’s fantastic tutorial, proves that you don’t need elaborate materials or extensive time to create something truly special for Easter. Whether you’re making a single basket for a loved one or a whole fleet for an Easter gathering, these charming paper creations are sure to be a hit.
So gather your supplies, invite your family to join in the fun, and embark on this delightful crafting adventure. You’ll not only save money but also create beautiful, personalized memories that will be cherished for years to come. Happy crafting and a very Happy Easter!
*All image credit belongs to createwithjenn via YouTube. Follow and subscribe to her channel for more amazing DIY tutorials!