
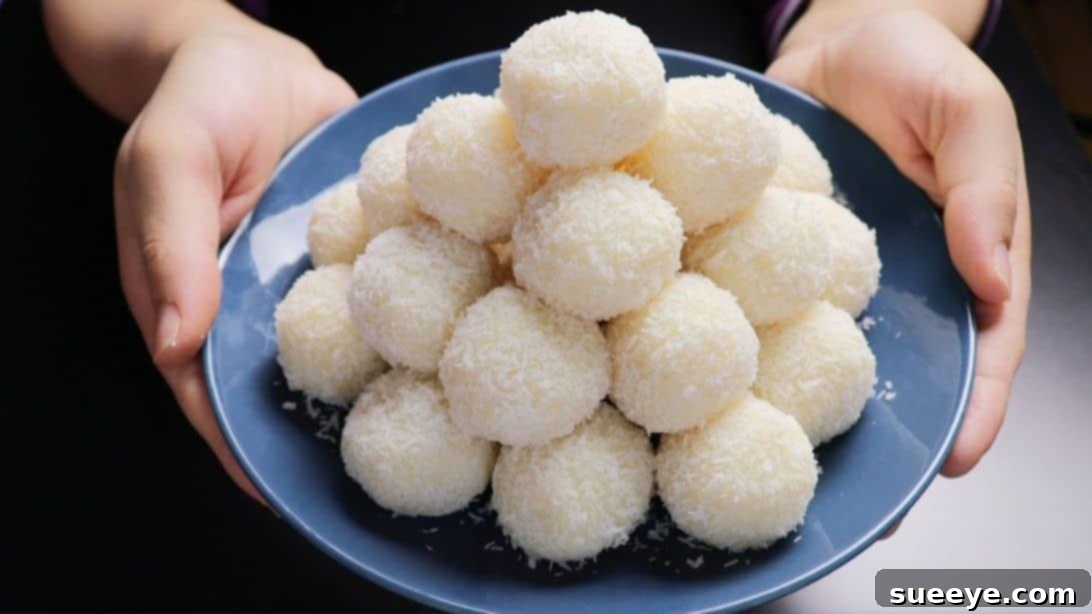
Irresistible 3-Ingredient No-Bake Milk Balls: Your Easiest Dessert Solution
In the world of home baking and sweet treats, few things bring as much joy and satisfaction as a delicious dessert that requires minimal effort. As someone who absolutely loves whipping up scrumptious recipes without even needing to turn on the oven, I’m always on the lookout for innovative and simple ideas. Recently, I stumbled upon a game-changer: these incredible 3-ingredient no-bake milk balls, a brilliant creation discovered through the fantastic channel Quick Simple & Delicious on YouTube. The moment I saw them, I knew I had to try them immediately, especially since I already had all the necessary ingredients in my pantry.
Who would have thought that such a mouthwatering dessert could be conjured up with just a mere three components? The delightful combination of sweet, creamy condensed milk perfectly binding the fragrant desiccated coconut, all elevated by the satisfying crunch of a hidden almond, creates an truly irresistible bite. These little spheres of joy are not only super easy to make, but they also come together incredibly fast, making them perfect for last-minute cravings, spontaneous gatherings, or simply a sweet treat to brighten your day. Whether you’re a child or an adult, these charming milk balls are guaranteed to be a hit with everyone. Get ready to impress your taste buds and your loved ones with this effortlessly delicious recipe!
Why You’ll Fall in Love with These No-Bake Milk Balls
These coconut almond milk balls aren’t just a dessert; they’re a revelation for anyone seeking simplicity without compromising on taste. Here’s why this recipe will quickly become a cherished favorite in your kitchen:
- Unbelievably Simple: With only three core ingredients, this recipe strips away all complexity. No fancy techniques, no intimidating equipment – just pure, unadulterated dessert magic.
- No Baking Required: Perfect for hot summer days, busy schedules, or when you just don’t feel like heating up your kitchen. These treats come together without ever touching an oven.
- Quick to Prepare: From start to finish, you’re looking at a minimal time commitment. The hands-on prep is incredibly fast, allowing you to enjoy your delicious creation sooner.
- Irresistible Flavor and Texture: The creamy sweetness of condensed milk, the aromatic chewiness of coconut, and the delightful crunch of an almond create a harmonious symphony of flavors and textures in every bite.
- Crowd-Pleaser for All Ages: Kids adore them for their sweetness and fun size, while adults appreciate their elegant simplicity and decadent taste. They’re perfect for school lunchboxes, party platters, or a sophisticated coffee accompaniment.
- Versatile & Customizable: While perfect as is, this recipe also serves as a fantastic base for various flavor enhancements and personal touches, which we’ll explore later.
- Budget-Friendly: Utilizing common and affordable ingredients, these milk balls are kind to your wallet, proving that gourmet taste doesn’t have to come with a hefty price tag.
The Simple Ingredients You’ll Need
The beauty of this recipe lies in its minimalist ingredient list. Each component plays a crucial role in creating the perfect balance of flavor and texture. Ensure you have these fresh, quality ingredients on hand:
- 2 and 3/4 cups of Desiccated Coconut: This is the star of our show, providing the signature texture and tropical aroma. Desiccated coconut is dried, finely grated coconut meat, essential for absorbing the condensed milk and forming a firm ball. Make sure it’s unsweetened to control the overall sweetness of the dessert.
- 1 can of Condensed Milk (approximately 14 oz or 397g): Sweetened condensed milk is the magical binder and primary sweetener. Its thick, creamy consistency is what holds the coconut together, imparting a rich, milky flavor and a delightful chewiness to the balls.
- 1/2 cup of Desiccated Coconut (for coating): A separate portion of coconut is reserved for rolling the finished balls. This adds an extra layer of coconut flavor, a beautiful snowy appearance, and prevents the balls from sticking together.
- 1/4 cup of Almonds (whole or blanched): These provide an unexpected and delightful crunch in the center of each milk ball. Almonds are not only tasty but also add a touch of sophistication and a lovely textural contrast to the soft coconut. You can use raw or blanched almonds.
Step-by-Step Guide to Making Your Irresistible Milk Balls
Creating these delightful no-bake milk balls is incredibly straightforward. Follow these detailed instructions to ensure perfect results every time:
Step 1: Prepare the Coconut Base Mixture
Begin by combining the primary ingredients for your milk ball base. In a spacious mixing bowl, add the 2 and 3/4 cups of desiccated coconut along with the entire can of condensed milk. Using a sturdy spatula or your hands, mix everything thoroughly. It’s important to ensure that the condensed milk is evenly distributed and fully coats all the coconut flakes. Continue mixing until the mixture comes together into a cohesive, somewhat sticky “dough.” It should be firm enough to hold its shape when pressed.
Step 2: Allow the Mixture to Rest
Once your coconut and condensed milk mixture is well combined, cover the bowl with a clean kitchen cloth or plastic wrap. Let it sit undisturbed at room temperature for approximately 10 minutes. This resting period is crucial as it allows the desiccated coconut ample time to absorb the moisture from the condensed milk. This absorption process results in a softer, more pliable mixture that is much easier to handle and shape into perfect balls without crumbling.
Step 3: Prepare the Almonds for Insertion
While the coconut mixture is resting, prepare your almonds. Place the 1/4 cup of almonds into a small pot and cover them with water. Bring the water to a rolling boil over high heat and let the almonds simmer for about 5 minutes. Boiling helps to soften the almond skins, making them much easier to remove. Once boiled, immediately drain the hot water and rinse the almonds thoroughly with cold water. This sudden temperature change helps to loosen the skins further. Using your fingers, gently squeeze each almond; the skin should slip off easily. Discard the skins. Finally, blot the peeled almonds completely dry with a paper towel. Ensuring they are dry will help them adhere better within the coconut mixture.
Step 4: Form, Coat, and Serve Your Delicious Milk Balls
Now comes the fun part! Remove the cover from your rested coconut mixture. Take about a tablespoon or so of the mixture and flatten it slightly in your palm. Place one prepared almond in the center of the flattened dough. Carefully enclose the almond within the coconut mixture and gently roll it between your palms to form a smooth, uniform ball. Aim for a size that’s easy to pop into your mouth.
Next, pour the remaining 1/2 cup of desiccated coconut onto a shallow plate. Roll each formed milk ball in this shredded coconut, ensuring it’s completely coated on all sides. This not only adds a beautiful finish but also enhances the coconut flavor and texture. Repeat this process with the remaining coconut mixture and almonds until all your delicious no-bake milk balls are formed and coated. Arrange them on a serving platter and enjoy them immediately, or chill them for an even firmer texture. These treats are best served at room temperature or slightly chilled.
Expert Tips for Perfect No-Bake Milk Balls Every Time
While this recipe is incredibly forgiving, a few simple tips can elevate your 3-ingredient no-bake milk balls from delicious to absolutely perfect:
- Chill for Firmness: For a firmer texture and easier handling, consider chilling the prepared coconut mixture in the refrigerator for 20-30 minutes before shaping. This makes the balls less sticky. You can also chill the finished milk balls for an hour before serving.
- Lightly Oil Your Hands: If the mixture is too sticky, lightly coat your hands with a tiny bit of neutral oil (like vegetable or coconut oil) before rolling. This will prevent sticking and make the process smoother.
- Even Ball Size: Use a cookie scoop or a measuring spoon to ensure all your milk balls are roughly the same size. This not only makes them visually appealing but also ensures consistent portions.
- Quality Desiccated Coconut: While any desiccated coconut will work, opting for a high-quality, fresh product will significantly impact the flavor and aroma of your milk balls.
- Don’t Skip the Almond Prep: Boiling and peeling the almonds might seem like an extra step, but it significantly improves the texture and makes the nut easier to bite into, contrasting beautifully with the soft coconut.
- Storage is Key: Store your finished milk balls in an airtight container in the refrigerator. This will keep them fresh and firm for up to a week.
Delicious Variations to Explore
While the classic 3-ingredient recipe is a triumph on its own, it also provides a fantastic base for creativity. Feel free to experiment with these variations to customize your no-bake milk balls:
- Nutty Alternatives: Not an almond fan? Substitute with other nuts like pecans, walnuts, hazelnuts, or even pistachios for a different flavor profile. Just remember to blanch and peel them if desired. For a nut-free version, simply omit the nut entirely or replace it with a mini chocolate chip.
- Flavor Boosters: Add a splash of vanilla extract (1/2 teaspoon) to the coconut mixture for a classic flavor, or try almond extract to enhance the nuttiness. A pinch of ground cardamom can also introduce an exotic, aromatic twist.
- Chocolate Lovers’ Dream: Melt some good quality chocolate (milk, dark, or white) and dip half or all of the finished milk balls into it. Let them set on parchment paper for an extra layer of decadence. You can also mix mini chocolate chips directly into the coconut mixture.
- Fruity Twist: Finely grate some lemon or lime zest into the coconut mixture for a bright, citrusy zing that complements the coconut beautifully.
- Colorful Treats: For holidays or themed parties, add a few drops of food coloring to the condensed milk mixture before combining it with the coconut. Red for Valentine’s, green for Christmas, or pastel shades for Easter!
- Seed Power: For added nutrition and texture, consider mixing in a tablespoon of chia seeds or flax seeds into the coconut mixture.
Serving Suggestions for Your Sweet Creations
These versatile no-bake milk balls are perfect for a variety of occasions:
- Everyday Treat: Keep a batch in the fridge for a quick, satisfying snack or a delightful after-dinner bite.
- Party Platter Essential: Their bite-sized nature and appealing look make them a fantastic addition to any dessert spread for parties, potlucks, or family gatherings.
- Coffee or Tea Companion: Pair them with your favorite hot beverage for a moment of sweet indulgence.
- Homemade Gift: Package them in a pretty box or cellophane bag tied with a ribbon for a thoughtful and delicious homemade gift.
- Kid-Friendly Snack: A healthier alternative to processed sweets, these are perfect for lunchboxes or after-school snacks.
Frequently Asked Questions (FAQs)
Can I substitute desiccated coconut?
Desiccated coconut is key for this recipe’s texture and ability to bind. While you might try finely shredded sweetened coconut, you may need to adjust the amount of condensed milk as it will already contain sugar and possibly more moisture. Unsweetened desiccated coconut is recommended for best results and sweetness control.
How long do these no-bake milk balls last?
When stored in an airtight container in the refrigerator, these milk balls can stay fresh and delicious for up to 5-7 days. Their flavor tends to deepen slightly after a day or two.
Can I freeze them?
Absolutely! These milk balls freeze beautifully. Place them in a single layer on a baking sheet to freeze solid, then transfer them to a freezer-safe bag or airtight container. They can be frozen for up to 1-2 months. Thaw them in the refrigerator for a few hours before serving.
What if I don’t like almonds or nuts?
No problem at all! You can simply omit the almonds for a plain coconut milk ball. Alternatively, you can insert a mini chocolate chip, a dried cranberry, or even a small piece of candied ginger for a different surprise center.
Are these suitable for special diets (e.g., vegan, gluten-free)?
This recipe is naturally gluten-free. To make it vegan, you would need to use a dairy-free sweetened condensed milk alternative (often made from coconut milk or oat milk). Ensure all other ingredients are also vegan-certified if following a strict vegan diet.
A Sweet Conclusion: Your New Go-To Dessert
There you have it – a remarkably simple, incredibly delicious, and endlessly customizable recipe for 3-ingredient no-bake milk balls. This dessert truly embodies the joy of effortless creation, proving that you don’t need a pantry full of ingredients or hours in the kitchen to whip up something truly special. The harmonious blend of sweet condensed milk, aromatic coconut, and the satisfying crunch of almonds makes these treats utterly irresistible, appealing to palates of all ages.
Whether you’re looking for a quick snack, an easy party dessert, or just a little something sweet to brighten your day, these no-bake milk balls are the perfect solution. So go ahead, gather your three simple ingredients, and experience the pure delight of making these bite-sized wonders yourself. Don’t forget to visit Quick Simple & Delicious on Youtube for more amazing and easy recipes that can inspire your culinary adventures for any occasion or gathering. Happy cooking, and even happier eating!