
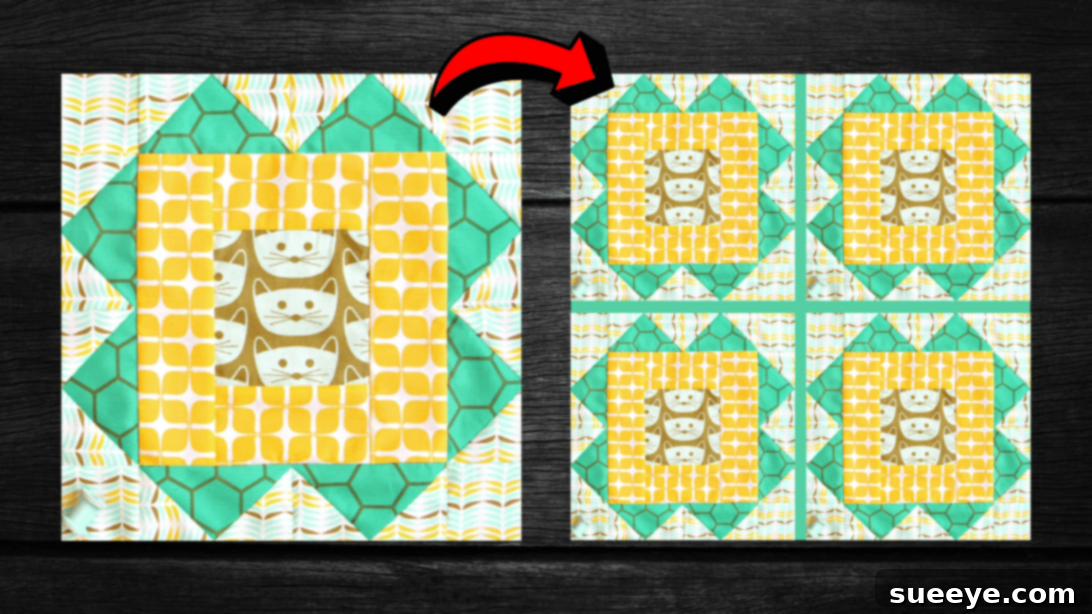
Master the Easy Prairie Home Quilt Block: A Beginner-Friendly Tutorial
Embark on a delightful quilting journey with the enchanting Prairie Home Quilt Block. This exquisite pattern, brought to life by the creative minds at Art Gallery Fabrics on YouTube, offers a refreshing blend of simplicity and elegance. Designed with the novice quilter in mind, it predominantly features accessible techniques like crafting flying geese units, alongside basic fabric strips and squares. If you’ve been searching for a rewarding new hobby or a charming project to adorn your home, this tutorial is your perfect starting point. The beauty of this block lies in its straightforward construction; many enthusiasts find they can complete a single block in a surprisingly short amount of time, making it ideal for both quick gifts and larger, intricate quilt designs.
The “Prairie Home” aesthetic evokes a sense of timeless comfort, rustic charm, and natural beauty—qualities perfectly captured in the gentle design of this quilt block. Its versatility means it can be incorporated into a wide array of projects, from cozy throws and decorative wall hangings to unique placemats and sophisticated table runners. Beyond its visual appeal, quilting offers a meditative and fulfilling experience, allowing you to create something beautiful with your own hands. This guide will walk you through each step, ensuring a smooth and enjoyable crafting session. For visual learners, remember to complement these written instructions with the detailed video tutorial provided by Art Gallery Fabrics.
RELATED: Donna’s Prairie Points Runner Quilt Tutorial (No Pattern Needed)
Essential Materials for Your Prairie Home Quilt Block
Before diving into the creative process, gathering all your necessary tools and materials is crucial. Having everything at hand ensures a seamless and enjoyable quilting experience. The Prairie Home Quilt Block is designed to be approachable, requiring standard quilting supplies that many crafters already possess. Here’s a comprehensive list to prepare you for success:
- 4 Distinct Print Fabrics: The magic of this block truly shines with a thoughtful selection of fabrics. Choose four complementary or contrasting prints that resonate with the “prairie home” theme – think gentle florals, subtle plaids, understated geometrics, or rich solids that evoke warmth and coziness. Labeling them A, B, C, and D will help keep your project organized.
- Marking Pen, Pencil, or Chalk: Precision is key in quilting. A fabric-specific marking tool that is easily erasable or washes out will be essential for drawing lines on your fabric without leaving permanent marks.
- Ruler: A clear, sturdy quilting ruler with accurate measurements is indispensable for precise cutting and marking. Look for one with clear markings and a non-slip grip.
- Scissors or Rotary Cutter and a Cutting Mat: While sharp fabric scissors are always useful for small adjustments, a rotary cutter combined with a self-healing cutting mat will drastically improve your cutting accuracy and speed, especially for straight lines and multiple layers of fabric. Always exercise caution when using a rotary cutter.
- Fabric Pins: Essential for holding fabric layers securely in place before stitching. Fine, sharp pins with glass heads are often preferred as they glide smoothly through fabric and are heat-resistant for pressing.
- Needle and Thread: A good quality sewing machine needle suitable for quilting, along with a strong polyester or cotton thread that matches or subtly blends with your chosen fabrics.
- Iron, for Pressing: A reliable iron is perhaps one of the most underrated tools in quilting. Proper pressing after each seam is vital for achieving flat, accurate blocks and a professional finish. A dry iron or steam iron can be used, depending on preference.
- Sewing Machine: Any basic sewing machine capable of a straight stitch will suffice. Ensure it’s in good working order and you’re comfortable with its operation.
Precise Cutting Requirements for Your Quilt Block
Accuracy in cutting is the foundation of a beautifully pieced quilt block. Take your time with this step, double-checking your measurements before making any cuts. These dimensions are tailored for the Prairie Home Quilt Block to ensure all pieces fit together perfectly:
Fabric A (Center Square)
- 1 square @ 4½ inches x 4½ inches
Fabric B (Inner Frame Strips)
- 2 strips @ 2½ x 4½ inches
- 2 strips @ 2½ x 8½ inches
Fabric C (For Flying Geese Units)
- 2 squares @ 5¼ inches x 5¼ inches
Fabric D (Corner Squares & Flying Geese Details)
- 4 squares @ 2½ inches x 2½ inches
- 8 squares @ 2⅞ inches x 2⅞ inches
Step-by-Step Guide: Crafting Your Prairie Home Quilt Block
With your materials prepped and your fabrics precisely cut, you’re ready to bring your Prairie Home Quilt Block to life. This section will guide you through each sewing and pressing step. Remember to maintain a consistent ¼-inch seam allowance throughout your project for the best results. Pressing after each seam is crucial for flat, accurate blocks that will fit together seamlessly.
Phase 1: Constructing the Center Panel
Step 1: Assembling the First Inner Frame
Begin with your central Fabric A square (4½ inches). Take two of the shorter Fabric B strips (2½ x 4½ inches). Align one Fabric B strip with the top edge of the Fabric A square, right sides together. Pin securely along the seam line. Repeat this for the bottom edge of the Fabric A square with the second Fabric B strip. Stitch both strips in place using a precise ¼-inch seam allowance. Once stitched, carefully press the seams open or towards the darker fabric. Pressing open helps to reduce bulk, while pressing towards the darker fabric often hides the seam allowance more effectively. Choose the method that best suits your fabric choices and desired outcome. This forms the initial core of your block.
Step 2: Completing the Center Block Frame
Now, take the remaining two longer Fabric B strips (2½ x 8½ inches). These will form the side borders of your central unit. Align one longer Fabric B strip with one of the raw side edges of the unit you just created in Step 1, right sides together. Pin thoroughly. Repeat this for the opposite side with the second longer Fabric B strip. Stitch both strips with a consistent ¼-inch seam allowance. After stitching, press these seams open or towards the darker fabric as you did before. Take care to ensure all seams are flat and smooth. At this point, you will have a framed center block unit that will serve as the canvas for your flying geese. Set this completed unit aside.
Phase 2: Creating the Iconic Flying Geese Units
The Flying Geese unit is a classic quilting element, and this block utilizes a simple “stitch and flip” method. You will be making several of these for the border of your block.
Step 3: Initial Markings and Stitching for Flying Geese
Gather your two Fabric C squares (5¼ inches) and eight of your smaller Fabric D squares (2⅞ inches). On the wrong side of each of the eight Fabric D squares, use your marking pen, pencil, or chalk to draw a single diagonal line from one corner to the opposite corner. This line will serve as your stitching guide. Now, take one Fabric C square and place two of the marked Fabric D squares on two opposite corners of the Fabric C square. Align them so the diagonal lines meet in the center and extend towards the corners of the larger square. Pin these small squares in place. Stitch *on either side* of the drawn diagonal line, ¼ inch away from the line on both sides. This technique is often referred to as “snowballing” the corners.
Step 4: Cutting and Pressing the First “Wings”
Carefully cut apart the unit you just stitched along the marked diagonal line. You will now have two separate units. Take each unit and press the Fabric D triangles open, away from the Fabric C center. This will reveal two “wings” of your flying geese. Now, take one of these units and place another marked Fabric D square at the remaining lower corner, aligning it with the raw edge. Pin it in place, ensuring the diagonal line is correctly oriented for the next stitch. Stitch on either side of this new marked line with a ¼-inch seam allowance, just as you did in the previous step.
Step 5: Completing and Trimming Flying Geese Units
Once stitched, cut this unit apart along the marked line, yielding two more pieces. Press the newly attached Fabric D triangles open. At this stage, you should have units that resemble the classic flying geese shape. To ensure uniformity and crisp edges, trim each of these flying geese units to a precise 2½ inches x 4½ inches rectangle. Use your ruler and rotary cutter to carefully square them up. This step is critical for ensuring your block lays flat and square. Repeat the entire process from Step 3 through Step 5 to create a total of eight perfectly trimmed flying geese units. You will need these for the outer border of your block.
Phase 3: Final Assembly of the Quilt Block
Step 6: Assembling the Outer Border and Finishing the Block
You now have your central framed block unit and eight finished flying geese units. It’s time to bring them all together. First, sew two flying geese units together, end to end, to form a strip. Repeat this process three more times, so you have four strips, each consisting of two flying geese units. These strips will form the four sides of your block’s outer border. Next, stitch two of these flying geese strips to the top and bottom edges of your center framed block (created in Step 2). Press these seams open or towards the darker fabric. Finally, stitch the remaining two flying geese strips to the left and right sides of your partially assembled block. This will complete the main frame of the quilt block.
The very last step involves filling the four empty corners of your newly assembled block. Take your four small Fabric D squares (2½ inches). Align one of these squares with each of the four remaining raw corners of the block, right sides together. Stitch them in place using a ¼-inch seam allowance. Press these final seams. You have now completed your beautiful Prairie Home Quilt Block! Take a moment to admire your work, ensuring all seams are pressed flat and the block lies square.
*All image credit belongs to Art Gallery Fabrics via YouTube. Follow and subscribe to her channel for more inspiring quilting tutorials and fabric ideas!
Beyond the Block: What to Do with Your Prairie Home Creation
Congratulations on completing your Prairie Home Quilt Block! This charming block is more than just a practice piece; it’s a versatile foundation for countless creative projects. Here are a few ideas to inspire your next quilting adventure:
- Mug Rug or Hot Pad: A single finished block makes a fantastic mug rug or hot pad. Simply add a layer of batting and a backing fabric, quilt as desired, and bind the edges for a quick and useful item.
- Pillow Cover: Two blocks sewn together, or one block framed with sashing, can be transformed into a beautiful decorative pillow cover, adding a touch of handmade charm to any couch or bed.
- Table Runner or Placemats: Create a series of these blocks (e.g., three for a runner, one for each placemat) to adorn your dining table. This is a wonderful way to practice consistency in your piecing.
- Part of a Larger Quilt: Of course, the ultimate goal for many blocks is to become part of a larger quilt. Imagine a collection of Prairie Home blocks, perhaps interspersed with solid squares or sashing, forming a cozy throw, a baby quilt, or even a full-sized bed quilt. Experiment with different fabric combinations for each block to create a unique sampler quilt.
- Wall Hanging: Frame a single block or a small grouping with simple borders, add a sleeve for hanging, and you have a lovely piece of textile art for your home.
Tips for Continuing Your Quilting Journey
The Prairie Home Quilt Block is an excellent stepping stone into the wider world of quilting. Here are some general tips to keep in mind as you continue to explore this rewarding craft:
- Practice Makes Perfect: Don’t be discouraged if your first blocks aren’t absolutely perfect. Each block you create will hone your skills in cutting, sewing, and pressing.
- Experiment with Fabrics: While this tutorial uses specific fabric designations, don’t hesitate to experiment with different color palettes and fabric prints. Consider seasonal themes, holiday colors, or personal favorites to make each project uniquely yours.
- Invest in Good Tools: As you progress, you might find certain tools (like a rotating cutting mat or specialized rulers) can significantly improve your efficiency and accuracy.
- Join a Community: Connect with other quilters online or in person. Sharing tips, asking questions, and showcasing your work can be incredibly inspiring and supportive.
- Learn to Quilt and Bind: Once you’ve mastered piecing blocks, the next steps are layering with batting and backing (creating a “quilt sandwich”), quilting through all layers, and finally, binding the edges for a finished look. There are many resources available to guide you through these final stages.
Embrace the Joy of Quilting
Creating the Prairie Home Quilt Block is more than just a sewing project; it’s an invitation to a world of creativity, relaxation, and personal satisfaction. Whether you’re a seasoned quilter looking for a charming new pattern or a beginner taking your very first stitches, this block offers a rewarding experience with beautiful results. The simplicity of its construction, combined with the timeless appeal of its design, makes it an instant classic.
We encourage you to gather your fabrics, fire up your sewing machine, and embark on this delightful journey. Don’t forget to refer back to the detailed instructions and the excellent video tutorial by Art Gallery Fabrics for comprehensive guidance. Once your block is complete, feel the pride of a handmade creation and imagine the possibilities for turning it into a cherished item for your home or a heartfelt gift for a loved one. Happy quilting!