
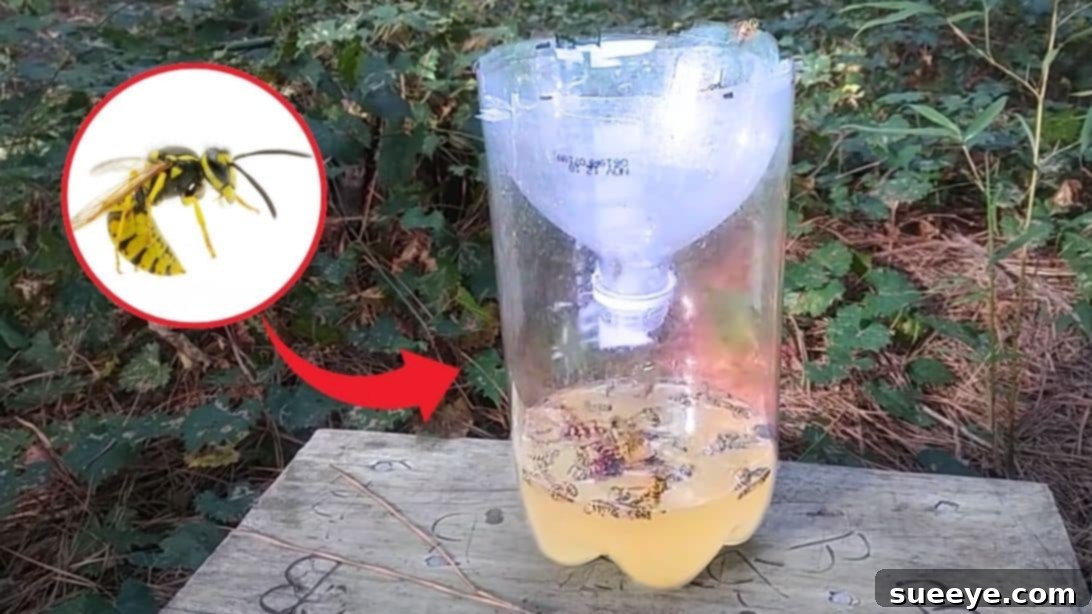
DIY Yellow Jacket Trap: Your Simple Guide to Natural Pest Control
Are aggressive yellow jackets making your outdoor gatherings a nightmare? Don’t let these unwelcome guests ruin your summer fun. While store-bought chemical solutions exist, many homeowners are seeking safer, more natural, and environmentally friendly alternatives. If you’re looking for an incredibly effective, yet remarkably simple and cheap solution, you’ve come to the right place. Inspired by the ingenious trick shared by Clayton Darwin, this DIY yellow jacket trap works like magic, helping you reclaim your yard with minimal effort and cost.
Understanding Yellow Jackets: Why They Are a Problem
Often mistaken for honey bees due to their similar black and yellow stripes, yellow jackets are distinctly different and far more aggressive. These insects are predatory social wasps known for their territorial nature and painful stings. Unlike bees, which can typically sting only once, yellow jackets can sting multiple times, making them a significant nuisance and even a danger, especially for those with allergies. They are highly sensitive to sound and vibration, which means approaching their nests can provoke a swift and aggressive response, leading to multiple stings from an entire colony.
Yellow jackets are most active during late summer and fall when their colonies reach peak size and they begin searching for sugary foods and proteins to sustain their growing numbers and developing queens. This is when they become particularly bothersome around picnics, barbecues, and outdoor eating areas. Their relentless presence can truly diminish the enjoyment of your outdoor living space, making an effective control method essential.
The Appeal of a Natural, DIY Solution
When dealing with pests, many people prefer to avoid harsh chemicals that can pose risks to pets, children, and beneficial insects. This homemade yellow jacket trap offers a fantastic all-natural alternative. It leverages common kitchen ingredients to create an irresistible lure for yellow jackets, drawing them away from your family and food. Not only is this method safe, but it’s also incredibly cost-effective, using items you likely already have around the house. You won’t need to spend a fortune on specialized pesticides or complicated equipment.
This approach isn’t just about killing pests; it’s about smart, targeted pest management that minimizes environmental impact while maximizing results. If you’ve tried various methods to get rid of yellow jackets without success, this simple sugar, water, and apple juice solution combined with a clever trap design might be the game-changer you need.
RELATED: Looking for more natural pest control tips? Check out our guide on How to Get Rid of Ants in Your Yard or Driveway and discover How to Use Baking Soda for Pest Control.
Essential Materials for Your Effective Yellow Jacket Trap
Gathering your materials is the first and easiest step in creating your homemade yellow jacket trap. Most of these items are readily available, making this a truly accessible DIY project.
- Empty Soda Bottle (2-liter recommended): This forms the main structure of your trap. Any clean plastic soda bottle will work, providing the perfect shape for our funnel design.
- Marker: For marking the precise cutting line on your bottle.
- Scissors (sharp): Essential for making a clean and accurate cut through the plastic bottle. Exercise caution when handling.
- Sugar: The primary attractant, providing the sweetness that yellow jackets crave.
- Water: To dissolve the sugar and create the liquid bait solution.
- Apple Juice (or other fruit juice): Adds another layer of fruity sweetness and aroma, making the bait even more irresistible to yellow jackets.
- Blade or Knife: Useful for making initial small cuts or precise adjustments, especially for the securing tabs. Handle with extreme care.
- Baker’s Yeast (optional but highly recommended): A secret ingredient that enhances the trap’s effectiveness by fermenting the sugar solution, producing CO2 and additional attractants.
Step-by-Step Guide: Crafting Your Yellow Jacket Trap
Follow these detailed steps to construct a highly effective yellow jacket trap that will draw wasps away from your outdoor activities.
Step 1: Prepare Your Soda Bottle
Begin by taking your empty soda bottle. Using a marker, draw a line around the bottle just above the top edge of its label. This line will serve as your guide for cutting. Once marked, remove the label from the bottle completely to ensure a clear working surface and to avoid any confusion during the cutting process.
Step 2: Create the Irresistible Bait Solution
Now, it’s time to prepare the sweet lure. Add a generous amount of sugar, water, and apple juice to the bottom part of the bottle. A good general ratio is to have the amount of sugar equal to the combined amount of water and apple juice. For instance, if you use 1 cup of water and 1 cup of apple juice, you would add 2 cups of sugar. Secure the cap back onto the bottle tightly and shake vigorously until all the sugar is completely dissolved and the ingredients are well combined. Alternatively, for easier mixing, you can combine these ingredients in a separate bowl first, stir until the sugar is dissolved, and then carefully pour the mixture into the bottle. Ensure the solution is thoroughly mixed for maximum attraction.
Step 3: Cut the Bottle
With your sharp scissors, carefully cut the soda bottle along the marked line you drew in Step 1. You will now have two main pieces: the bottom section containing your bait solution, and the top section (the funnel part) with the bottle’s opening.
Step 4: Transform the Top Section into a Funnel
Take the top part of the bottle you just cut. Before assembling, carefully use a blade or knife to create several small holes around the side of this top section. These holes are crucial as they will allow the irresistible aroma of your bait to escape, attracting yellow jackets from a wider area. Next, remove the bottle cap from the top section. Once the cap is off, invert this top piece and place it upside down into the bottom part of the bottle, so that the narrow opening points downwards into the bait solution. This creates a funnel effect, making it easy for wasps to enter but extremely difficult for them to escape.
Step 5: Secure the Trap’s Structure
To ensure your trap remains stable and the top funnel piece stays securely in place, you’ll create interlocking tabs. Make three small cuts on one side, extending through both the inverted top piece and the bottom base of the bottle. For each cut, fold one tab inwards towards the center of the bottle and fold the adjacent tab outwards. Repeat this process two more times on different sides of the bottle (creating a total of three sets of cuts and folds). This ingenious method creates sturdy connections that will hold the two bottle halves together without the need for glue or tape, forming a robust and inescapable trap.
Step 6: Optimize and Deploy Your Trap
Your yellow jacket trap is almost ready for deployment! To significantly enhance its effectiveness and speed up the trapping process, add a small amount of baker’s yeast to the solution. The yeast will initiate fermentation, producing carbon dioxide and additional appealing scents that are highly attractive to yellow jackets. Once the yeast is added, gently swirl the trap to mix it in. Place your finished trap in areas where you frequently observe yellow jacket activity. For best results, position the trap in a shaded spot. This prevents the bait from evaporating too quickly and keeps the fermentation process active, ensuring a continuous release of attractants. Position them away from your main seating areas but close enough to where you’ve seen the wasps, drawing them to the trap rather than your picnic.
Optimizing Your Trap for Maximum Effectiveness
While the basic design is effective, a few additional tips can supercharge your DIY yellow jacket trap:
- Strategic Placement: Place traps strategically around the perimeter of your yard, especially near gardens, compost piles, trash cans, or any area where yellow jackets forage. Avoid placing them directly where people gather, as you want to draw the wasps away, not towards, your family.
- Refresh the Bait: Over time, the bait solution will evaporate or become less potent. Check your traps every few days and replenish the solution as needed. If the trap is full of wasps, carefully empty and clean it before refilling.
- Add a Protein Source (Optional): While the sweet solution is excellent, yellow jackets also seek protein, especially earlier in the season. A small piece of raw meat or tuna can be added to the trap for added appeal, though this may also attract other insects or animals.
- Multiple Traps: For larger yards or significant yellow jacket problems, consider setting up multiple traps in different locations to cover more ground and maximize your catch rate.
Safety Precautions and Best Practices
Working with yellow jackets, even with a trap, requires caution. Always remember:
- Avoid Disturbing Nests: If you locate a yellow jacket nest (often underground, in wall voids, or hanging from structures), do NOT attempt to disturb it yourself. Yellow jackets are extremely aggressive when their nest is threatened. Contact a professional pest control service for nest removal. This trap is designed for foraging wasps, not direct nest elimination.
- Handle Traps with Care: When checking or emptying traps, wear gloves and long sleeves. Approach the trap cautiously, preferably in the early morning or late evening when yellow jackets are less active.
- Proper Disposal: After a trap has served its purpose, ensure all wasps are deceased before emptying. Dispose of the contents in a sealed bag or container to prevent any lingering attraction or accidental escapees.
- Know Your Allergies: If you or anyone in your household has a severe allergy to insect stings, extra precautions are necessary. Always have an EpiPen readily available if prescribed, and consider professional pest control as a primary option.
Reclaim Your Outdoor Space with This DIY Yellow Jacket Trap
With this simple, natural, and highly effective DIY yellow jacket trap, you can significantly reduce the presence of these aggressive wasps in your yard. Enjoy your barbecues, garden parties, and quiet afternoons outdoors without the constant buzz and threat of stings. By following these easy steps and optimizing your trap placement, you’ll be well on your way to a more peaceful and pest-free environment. Give Clayton Darwin’s ingenious method a try, and prepare to be amazed by the results!
More Home & Garden Solutions
- How to Get Rid of Ants in Your Yard or Driveway
- How to Use Baking Soda for Pest Control