
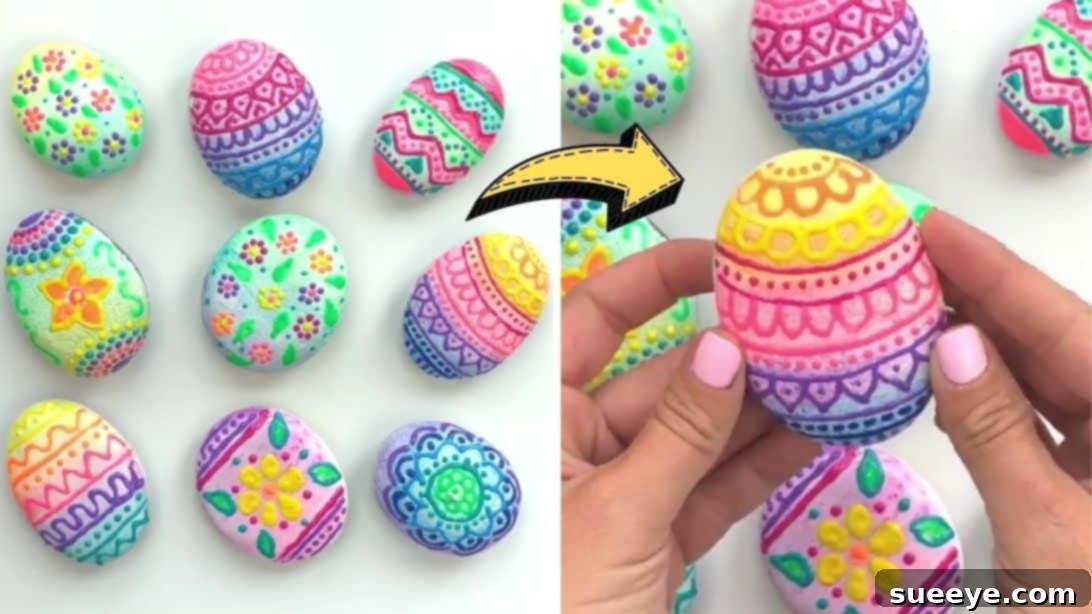
This Easter, why not embrace a creative and sustainable alternative to traditional dyed eggs? Dive into the delightful world of Easter rock painting! These charming painted rocks are not only super adorable and festive, but they’re also surprisingly easy to create, making them a perfect craft for all skill levels. You don’t need advanced artistic talent or specialized tools; just a willingness to experiment with vibrant 3D neon fabric paint. In no time, you’ll have a unique collection of beautifully decorated Easter rocks that will add a special touch to your holiday celebrations. Whether you’re looking for a fun family activity, a lasting decoration, or a unique gift, this comprehensive guide will walk you through everything you need to know. For detailed, step-by-step instructions on how to prepare your rocks and unleash your creativity, continue reading below. You can also watch the inspiring video tutorial by TulipColorCrafts on YouTube, who shared this incredible idea!
Rock painting has soared in popularity as a relaxing and rewarding craft, and transforming ordinary stones into Easter masterpieces is a delightful twist. Unlike delicate real eggs, these painted rocks are durable, reusable year after year, and can even withstand outdoor elements if sealed properly. This makes them ideal for garden decor, unique elements in Easter egg hunts (without the mess!), or simply brightening up your indoor space. It’s an accessible craft that encourages creativity, fine motor skills, and provides a wonderful opportunity for family bonding. Get ready to gather your materials and let your imagination flourish as we embark on this colorful journey to create stunning, long-lasting Easter treasures that will surely impress your guests and bring joy to your home.
Essential Materials for Your Easter Rock Painting Project
Gathering the right supplies is the first step to a successful and enjoyable crafting experience. For this particular Easter rock painting project, we’ll focus on materials that make the process simple, fun, and produce vibrant, textured results. Ensure you have everything laid out before you begin to streamline your creative flow.
- Tulip Dimensional Neon Fabric Paint (Various Colors): This is the star of our project! Dimensional fabric paint, often referred to as “puffy paint,” creates a raised, textured effect that adds a unique 3D quality to your designs. The neon colors will ensure your Easter rocks pop with vibrant, spring-like energy, capturing the festive spirit of the season. Having a variety of colors, such as pink, orange, yellow, green, and blue, will allow for endless creative combinations and patterns, making each rock truly unique. Look for paints that are designed for fabric but can also adhere exceptionally well to other surfaces like rocks, providing a durable and washable finish (though washing rocks might not be your primary concern!).
- Egg-Shaped Rocks: While any smooth, clean rock can work for general painting, selecting egg-shaped rocks will immediately give your creations an unmistakable festive Easter theme. These can often be found at craft stores, garden centers, or even collected from nature if you’re lucky enough to find suitably smooth ones from riverbeds or beaches. Ensure they are relatively flat on one side for easier painting and stable display, preventing them from rolling away while you work.
- White Acrylic Paint (or Primer): A crucial base layer for achieving truly vibrant colors! Applying a coat of white paint acts as an excellent primer, creating a uniform, bright surface for your colorful designs. This ensures that the neon fabric paint colors appear more vivid, saturated, and true to their hue, rather than being absorbed or dulled by the natural, often earthy color of the rock. Any standard white acrylic craft paint will do, offering good coverage and quick drying times.
- Paintbrush (Various Sizes Recommended): You’ll need at least one brush for applying the white base coat. A wider, flat brush (e.g., 1/2 inch or 1 inch) is ideal for quickly and evenly covering the rock surface. For adding background colors with fabric paint (if you choose to brush it on instead of piping directly for large areas) or for fine details if you incorporate other paints, a smaller, softer brush (e.g., a round or detail brush) might be useful. Even if you’re primarily piping with the dimensional paint, a paintbrush is essential for the initial steps of priming.
- Water (for rinsing brushes) & Paper Towels/Old Cloths: Always have a container of water on hand to clean your brushes thoroughly between colors and prevent cross-contamination. Paper towels or an old cloth are indispensable for drying brushes, blotting excess paint, and cleaning up any accidental spills or drips, keeping your workspace tidy.
- Newspaper or Protective Covering: Protect your work surface from paint spills and drips by laying down old newspapers, a plastic tablecloth, or a craft mat. This makes cleanup significantly easier and protects your furniture.
Having these materials readily available before you begin will streamline your crafting process and help you focus on the most enjoyable part: decorating!
Step-by-Step Guide to Painting Your Easter Rocks
Ready to transform plain rocks into enchanting Easter decorations? Follow these easy steps to create your collection of festive painted rocks. Remember, patience with drying times is key for vibrant, lasting results.
Step 1: Prepare Your Canvas – Cleaning and Priming the Rocks
The foundation of any great painting project is proper preparation. Start by giving your chosen egg-shaped rocks a thorough rinse under running water. This will help remove any loose dirt, dust, tiny grit, or debris that might prevent the paint from adhering properly, ensuring a smooth and clean surface for your artwork. Once rinsed, make sure your rocks are completely dry. You can air-dry them for several hours, place them in the sun, or gently pat them with a clean towel. Any lingering moisture can negatively affect paint adhesion and extend drying times.
Next, it’s time to apply your primer. Using your paintbrush, apply a thin, even coat of white acrylic paint all over one side of each rock – this will be your primary design area. This white base serves several important purposes: it creates a uniform, light surface, ensures that your vibrant neon colors truly pop against a bright background, and helps the dimensional fabric paint adhere better and show its true color without being influenced by the rock’s natural hue. Don’t worry if the first coat isn’t perfectly opaque; a thin, even layer is more important than a thick, blotchy one for proper adhesion and drying. Once applied, set the rocks aside in a well-ventilated area and allow them to dry completely. Depending on the paint’s thickness and ambient humidity, this could take anywhere from 20 to 60 minutes. Once the first side is dry, you may carefully flip them over and paint the other side if you wish for a fully painted rock, allowing that to dry as well before handling extensively.
After the white base coat is fully dry, you have an optional but highly recommended step: applying background colors. Grab a clean paintbrush and begin brushing on different colors of your fabric paint or other acrylic paints to create interesting backgrounds. You could go for solid pastel colors like light blue, mint green, or soft yellow, create subtle gradients by blending two colors, or even simple washes of translucent color. This layering technique adds depth and interest, making your finished Easter rocks more visually appealing. For instance, a light blue base could represent the spring sky, or a soft green could mimic fresh grass, providing a lovely canvas for your main dimensional designs. Allow each background layer to dry completely before proceeding to the next step; patience here prevents smudging and ensures crisp designs.
Step 2: Unleashing Your Creativity – Adding Dimensional Designs
Once your background paints are thoroughly dry and cured (which may take a few hours for fabric paint, ensure it’s not tacky to the touch), it’s time for the most exciting part: piping the dimensional fabric paint directly onto the surface of each rock. This is where the magic happens, and your rocks transform into unique Easter artworks. The fine tip of the fabric paint bottle allows for precise application, creating raised lines and dots that give your designs a wonderful tactile, 3D quality that makes them truly stand out.
There’s no limit to what you can create! Let your imagination guide you. Here are some design inspirations to get you started:
- Classic Easter Motifs: Draw adorable bunnies with fluffy tails, cheerful chicks hatching from shells, tiny carrots, or even intricate miniature Easter egg patterns directly onto your rock. You can outline shapes and then fill them in, or create abstract interpretations.
- Spring Flora: Pipe delicate spring flowers like daisies (simple dots for petals around a center), tulips, or daffodils. You can also create flowing vines, intricate leaves, or abstract floral patterns using various dot sizes and lines.
- Geometric Patterns: Experiment with classic polka dots (easy to create with varied pressure), bold stripes, playful zig-zags, mesmerizing spirals, or even checkerboard designs for a modern and eye-catching look. The raised texture of the paint makes even these simple patterns incredibly engaging.
- Abstract Art: Don’t feel confined by specific shapes! Let your hand guide you. Swirls, squiggles, free-form organic patterns, or even random arrangements of dots and lines can be surprisingly beautiful and don’t require any pre-planning or drawing skills.
- Words & Messages: If you have a steady hand, you can even pipe short words like “Joy,” “Spring,” “Bloom,” or “Happy Easter” onto your rocks, making them personalized messages.
Don’t be afraid to mix and match colors and patterns. You can use one color for outlines and another for filling in, or create multi-colored polka dots by layering different hues. Practice on a piece of scrap paper or cardboard first to get a feel for the paint flow, the amount of pressure needed, and how quickly the paint comes out. Take your time and enjoy the creative process. Once you’ve completed your designs on all the rocks, carefully set them aside in a flat, undisturbed area where they won’t be accidentally touched or moved. It’s absolutely crucial to let them dry completely. Dimensional fabric paint can take anywhere from 4 to 24 hours (or even longer for very thick applications) to fully cure, depending on the thickness of the application and ambient humidity levels. Resist the urge to touch them until they are absolutely dry to the touch to avoid smudging or ruining your beautiful work.
Displaying and Gifting Your Easter Rock Creations
Once your beautifully painted Easter rocks are completely dry and cured, it’s time to showcase them! Their versatility allows for numerous creative display options, making them perfect for adding a touch of handmade charm to any space or occasion.
- Vase or Bowl Display: Arrange your finished Easter rocks aesthetically in a small decorative vase, a clear glass bowl, or even an antique candy dish. You can enhance the look by filling the container with colorful cut-out paper strips, faux green Easter grass, small decorative beads, or even natural moss to mimic a charming nest.
- Easter Baskets: Incorporate them into your traditional Easter baskets alongside chocolates, candies, and small toys. They make wonderful, lasting keepsakes that add a personal, handmade touch to a gift that might otherwise be entirely store-bought.
- Garden Decor: Place them strategically in your flower beds, along a garden path, nestled among potted plants, or on a porch step to add a cheerful splash of color to your outdoor space. If they will be displayed outdoors long-term and exposed to elements, consider applying a clear, weather-resistant acrylic sealant (available in spray or brush-on forms) after the paint is fully cured for extra durability and protection against fading or moisture.
- Table Centerpieces: Arrange a collection of painted rocks as a unique and conversation-starting centerpiece for your Easter brunch or dinner table. Combine them with fresh spring flowers, candles, or other festive elements for a cohesive look.
- Window Sills and Shelves: Brighten up any indoor space by lining them up on a window sill, a fireplace mantelpiece, or shelves. Their vibrant colors will catch the light and draw attention.
- Easter Rock Hunt: For a fun and eco-friendly twist on the classic egg hunt, hide your painted rocks around the house or garden. Children will love finding these colorful, artistic treasures, and you won’t have to worry about broken shells or melted chocolate!
For an extra special touch, you can also consider creating a small drawstring pouch to hold one or more of your painted rocks. Pipe and paint a cute bunny, chick, or delicate floral design onto the fabric pouch itself. Fill the inside with soft green plastic grass or shredded paper strips, then gently insert your custom-painted rocks. This makes for a charming, personalized Easter gift, a lovely party favor, or a unique way to present your beautiful rock creations.
Why Choose Easter Rock Painting?
Beyond the simple joy of crafting, painting rocks for Easter offers a multitude of benefits that make it a truly special and worthwhile activity:
- Eco-Friendly & Sustainable: Unlike single-use plastic eggs or real eggs that eventually decompose or are discarded, painted rocks are incredibly durable and can be reused year after year. This makes them a significantly more environmentally conscious and sustainable choice for your Easter decor and traditions, reducing waste and promoting mindful consumption.
- Unleash Creativity for All Ages: There are truly no strict rules when it comes to rock painting! It’s a fantastic outlet for creative expression for everyone, from young children experimenting with colors and textures to adults crafting intricate designs. Each rock becomes a unique work of art, reflecting individual style, imagination, and personal touch.
- Durability & Longevity: These painted treasures won’t crack, spoil, or melt. Once the paint is fully cured (and especially if sealed for outdoor use), they can withstand various weather conditions, making them long-lasting keepsakes that you can cherish for years to come.
- Fun for All Skill Levels: Rock painting is an incredibly inclusive activity. It’s simple enough for toddlers to dab on colors and enjoy the process, and yet intricate enough for experienced crafters to create detailed masterpieces. It’s a wonderful, low-pressure family bonding activity during the holiday season, where everyone can participate and feel proud of their creations.
- Unique Gifts & Decorations: Hand-painted rocks make incredibly thoughtful, personal, and heartfelt gifts. As decorations, they stand out beautifully from mass-produced items, adding a genuine, handmade charm and warmth to your home’s Easter display.
- Therapeutic & Relaxing: The act of painting and focusing on detailed work can be incredibly meditative and calming. It provides a wonderful opportunity to slow down, reduce stress, and promote mindfulness, offering a peaceful escape from daily routines.
- Community & Connection: Painted rocks have also become a part of a wider community movement, where people paint rocks and hide them in public places for others to find, enjoy, and re-hide. While this project focuses on personal decor, the spirit of spreading joy through rock art is a lovely aspect.
Pro Tips for Successful Easter Rock Painting
To ensure your Easter rock painting experience is as smooth, enjoyable, and rewarding as possible, keep these extra tips in mind:
- Source Smooth Rocks: The smoother the rock surface, the easier it will be to paint and the better your detailed designs will look. Avoid very porous, crumbly, or overly textured rocks for this project, as they can absorb paint unevenly or make intricate piping difficult.
- Ventilation is Key: Always work in a well-ventilated area, especially when using paints and allowing them to dry. This helps dissipate any fumes and speeds up the drying process.
- Practice Makes Perfect (or at least better!): If you’re new to using dimensional fabric paint, try practicing your lines, dots, and shapes on a piece of scrap paper or cardboard first. This helps you get a feel for the paint flow, the amount of pressure needed, and how to create consistent lines and forms before applying it to your actual rocks.
- Layering Colors Strategically: For more complex or multi-colored designs, allow each distinct color or section to dry partially before adding the next adjacent color. This prevents colors from bleeding into each other, ensuring crisp lines and vibrant, separate hues.
- Consider a Sealer for Longevity: If your rocks will be displayed outdoors, applying a clear acrylic sealant (available in spray or brush-on forms from craft stores) after the paint has fully cured will provide an extra layer of protection. This shields your beautiful designs from moisture, dirt, and harmful UV fading, ensuring their vibrancy and longevity.
- Embrace Imperfection: Remember, handmade items have character and charm! Don’t stress over minor imperfections; they add to the uniqueness and authenticity of your creations. The beauty lies in the personal effort and creativity.
- Clean Up Promptly: Clean your paintbrushes, paint bottle tips (if they get clogged), and any spilled paint immediately after use with soap and water. This prevents paint from drying on the bristles or nozzles, preserving your tools for future crafting sessions.
- Allow Ample Drying Time: Patience is a virtue in rock painting. Rushing the drying process can lead to smudges, tacky surfaces, or designs that don’t fully set. Always give your rocks generous drying time, especially for thick applications of dimensional paint.
Creating these vibrant Easter rocks is a delightful way to celebrate the season, express your creativity, and make lasting memories. Whether you choose to display them prominently, gift them to loved ones, or hide them for a festive hunt, these unique, hand-painted treasures are sure to bring smiles, spark conversations, and brighten your holiday. Enjoy the process and happy crafting!
*All these images are credited to TulipColorCrafts via YouTube. We highly recommend visiting their channel and subscribing for more fantastic crafting inspiration and engaging tutorials!
Easy Easter Rock Painting Tutorial: Your Guide to Festive DIY Decorations