
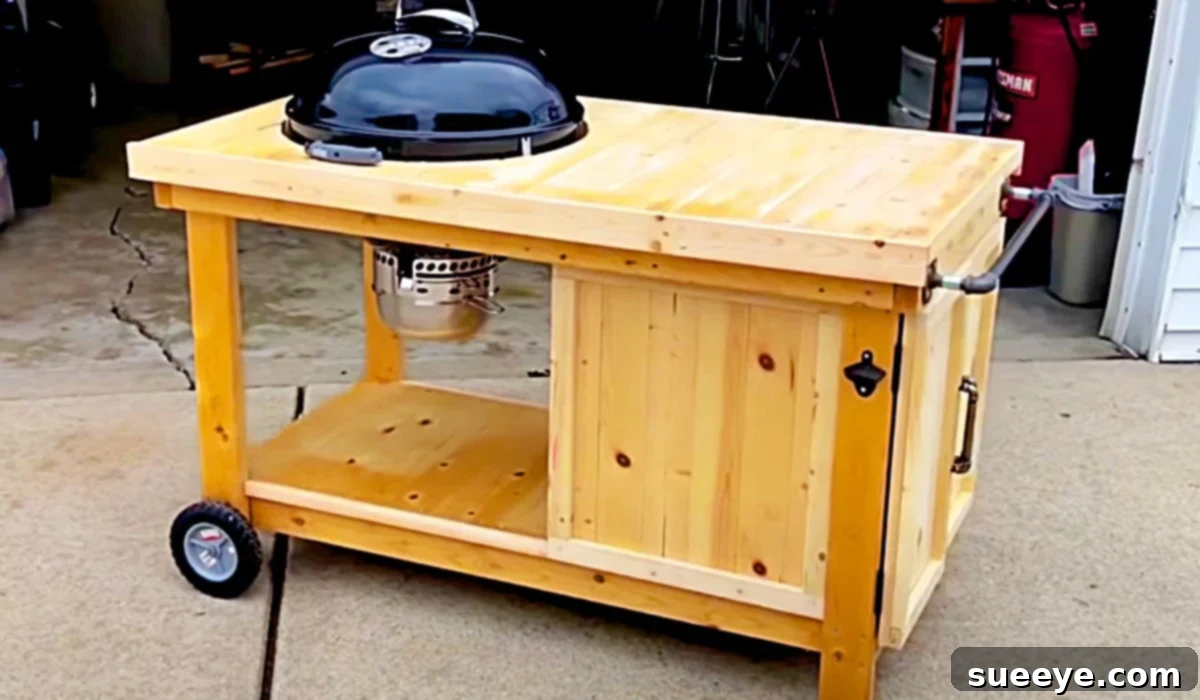
Build Your Own Easy Weber BBQ Cart: The Ultimate DIY Grill Workstation
There’s nothing quite like the sizzle of a steak or the aroma of smoky ribs wafting from a classic Weber Kettle grill. It’s an iconic piece of backyard cooking equipment, cherished by enthusiasts worldwide. However, many Weber owners encounter a common frustration: the lack of dedicated workspace and storage. You’ve got your grill, but where do you put your tongs, your seasonings, your cutting board, or even just a cold drink? This dilemma often leaves grill masters feeling a little disorganized and yearning for a more streamlined cooking experience. If you’ve ever found yourself juggling plates and tools, searching for a spot to rest your basting brush, or wishing for an extra surface while entertaining, you’re not alone. The quest for an efficient and organized outdoor cooking setup often leads to the same question: how can I enhance my Weber Kettle’s functionality?
Thankfully, the solution doesn’t require purchasing an expensive, pre-made outdoor kitchen. The answer lies in a brilliant DIY project: building a custom Weber BBQ cart. This isn’t just about adding a surface; it’s about transforming your grilling routine. We were incredibly inspired by an awesome and surprisingly easy-to-build Weber BBQ cart design shared by William Casper on YouTube. His ingenious plans offer a practical, stylish, and highly functional solution to the common storage and surface space problem. We were so impressed, we couldn’t wait to delve into the details and share how this project can elevate your own outdoor cooking game.
Why a DIY Weber BBQ Cart is a Game-Changer for Grill Enthusiasts
Investing time into building your own Weber BBQ cart goes far beyond simply having a place to put your grill. It revolutionizes your entire outdoor cooking experience, offering a multitude of benefits that enhance convenience, organization, and enjoyment:
- Unmatched Convenience: Imagine having everything you need within arm’s reach. Your marinades, spices, extra charcoal, grilling tools, and even a trash bag can all be neatly stored in dedicated spaces. No more running back and forth to the kitchen or fumbling for misplaced items. This cart transforms your grilling area into a self-sufficient workstation.
- Superior Organization: Clutter can quickly dampen the joy of grilling. A custom cart provides intelligent storage solutions, from spacious shelves for larger items to integrated hooks for hanging tongs and spatulas. Keeping your tools organized not only saves time but also prolongs their lifespan.
- Ample Workspace: The greatest advantage is the generous counter space it provides. Prepare your ingredients, rest cooked meats, chop vegetables, or simply hold your plate and a cold beverage, all without leaving your grill. This eliminates the need for makeshift side tables or constantly moving items around.
- Enhanced Portability & Flexibility: Most DIY cart designs, including William Casper’s inspiration, incorporate sturdy caster wheels. This means you can effortlessly move your Weber kettle and its entire workstation wherever the party is, or simply tuck it away neatly when not in use. Enjoy grilling on your patio, deck, or even move it to a sunny spot in the yard.
- Boosted Aesthetics & Patio Appeal: A well-built wooden cart adds a touch of rustic charm and sophistication to any outdoor living space. It transforms your grill from a standalone appliance into a central feature of your patio or deck, creating a cohesive and inviting atmosphere for entertaining friends and family.
- Personalization & Customization: Unlike off-the-shelf options, building your own cart allows for complete personalization. Choose your preferred wood type, stain, or paint color. Add unique accessories like bottle openers, magnetic tool strips, or custom cutting board inserts to truly make it your own.
Essential Materials for Your Easy Build Weber Cart Project
Embarking on any DIY project begins with gathering the right materials and tools. William Casper’s design emphasizes an “easy build” approach, meaning the materials are generally accessible and the construction process is straightforward. While the video tutorial provides precise measurements and quantities, here’s a general overview of what you’ll typically need to construct your functional Weber kettle workstation:
- Wood for the Structure: The core of your cart will be built from wood. Depending on your preference and budget, you might use:
- Pressure-Treated Lumber: Excellent for outdoor use due to its resistance to rot and insects. Commonly used for the main frame.
- Exterior Grade Plywood: Ideal for shelves and larger surfaces, offering stability.
- Hardwood (e.g., Cedar, Teak, Ipe): For a more premium finish, especially for the main countertop. These woods are naturally weather-resistant and beautiful but come at a higher cost.
- Pine or Fir: More economical choices, but will require thorough sealing and regular maintenance for outdoor longevity.
You’ll need various dimensions of boards for the frame, legs, shelves, and the main top surface.
- Hardware for Assembly:
- Exterior-Grade Screws: Stainless steel or galvanized screws are crucial to prevent rust and ensure the longevity of your cart in outdoor conditions.
- Wood Glue: Provides additional strength and stability to joints, especially for the frame and shelves.
- Caster Wheels: Four heavy-duty caster wheels, preferably with locking mechanisms, to allow for easy movement and secure positioning.
- Handles: Decorative and functional handles for any integrated storage compartments or simply for aesthetic appeal.
- Towel Rail: A metal or wooden rail to conveniently hang grilling towels, aprons, or oven mitts.
- Hooks: Small utility hooks for hanging tongs, spatulas, and other grilling tools.
- Finishing Supplies:
- Sandpaper: Various grits (from coarse to fine) for smoothing surfaces and preparing the wood for finishing.
- Wood Stain or Exterior Paint: To protect the wood from UV rays, moisture, and general wear, and to customize the look of your cart.
- Wood Sealer/Polyurethane (Exterior Grade): Provides an additional layer of protection, especially for the main countertop, making it resistant to spills and easy to clean.
- Brushes or Rollers: For applying stain, paint, or sealer.
- Rags: For wiping excess stain or cleaning up.
- Basic Woodworking Tools:
- Measuring Tape and Pencil: For accurate measurements and markings.
- Circular Saw or Miter Saw: For precise cuts of your lumber.
- Drill/Driver: For pre-drilling holes and driving screws.
- Clamps: Essential for holding pieces securely in place while gluing or screwing.
- Safety Gear: Safety glasses, gloves, and hearing protection are paramount for any woodworking project.
- Router (Optional): For creating clean edges or recesses, such as the cutout for the Weber kettle.
Step-by-Step Guide to Building Your Easy Weber BBQ Cart (Summary)
While William Casper’s video tutorial is the definitive guide for this project, offering visual instruction and precise dimensions, we can outline the general steps involved. This summary will give you a clear idea of the process, encouraging you to watch the full video for detailed execution. This project is designed to be accessible even for those with moderate woodworking experience, focusing on clear cuts and straightforward assembly:
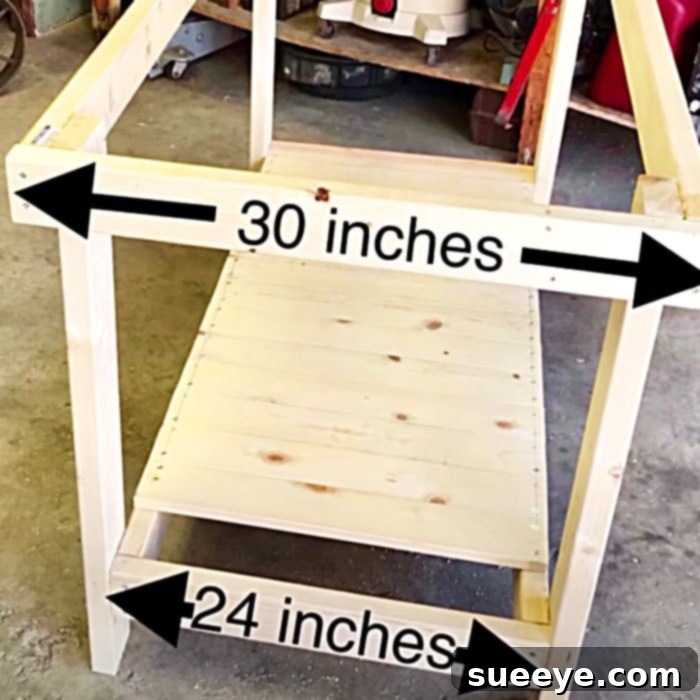
Step 1: Planning, Measuring, and Cutting Your Wood
Begin by thoroughly watching William Casper’s video. Understand the full scope of the project before making any cuts. Once you have a clear plan, use your measuring tape and pencil to mark all your wood pieces according to the video’s specified dimensions. Accuracy here is key to a sturdy and level cart. Use your saw to carefully cut all the frame pieces, shelf components, and countertop sections. Labeling your pieces can be helpful for assembly.
Step 2: Constructing the Main Frame
The foundation of your cart is its frame. This typically involves assembling four vertical legs and connecting them with horizontal support beams at the top, middle (for shelves), and bottom. Use exterior-grade wood glue on all joints before securing them with screws. Ensure all corners are square and the frame is level. This initial framework will dictate the overall stability and dimensions of your finished cart.
Step 3: Building and Installing Shelving Units
Once the main frame is solid, you’ll integrate the internal shelving. The video will guide you on how to construct these shelves, often involving simple rectangular frames that fit within your main structure. Secure these shelves using screws, ensuring they are level and capable of holding the weight of your grilling accessories, charcoal, or other supplies. You might opt for one large lower shelf and a smaller middle shelf, depending on the design.
Step 4: Crafting and Attaching the Countertop with Weber Integration
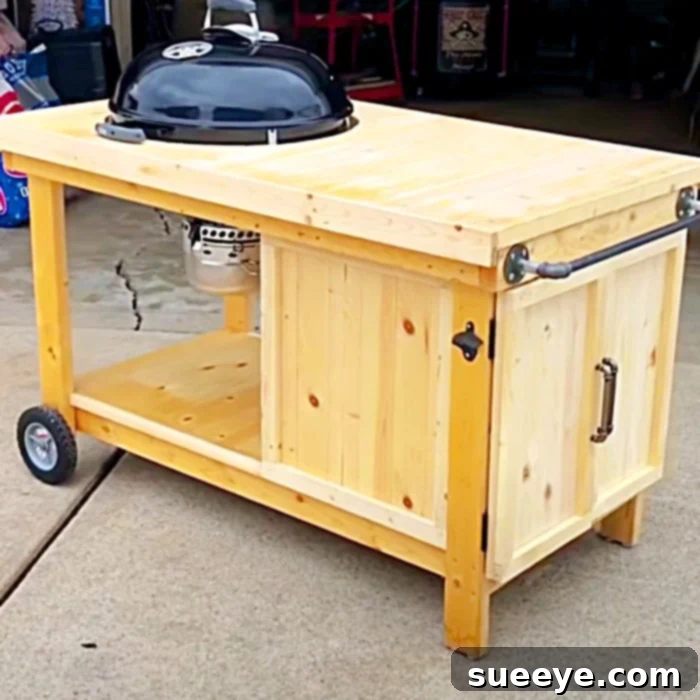
This is where your Weber Kettle finds its home. You’ll need to create a sturdy top surface, often from a wider plank or multiple planks joined together. The crucial part is accurately marking and cutting out a circular opening on the top left side (as shown in the images) that perfectly cradles the Weber kettle. This cutout should allow the kettle to sit securely and flush with the countertop surface. Once the cutout is made, sand the edges smooth and then carefully attach the entire countertop to the top of your main frame using screws from underneath for a clean finish.
Step 5: Adding Wheels and Functional Accessories
Now, it’s time to add the mobility and final touches. Flip the cart over and securely attach the four heavy-duty caster wheels to the bottom of the legs. Ensure at least two of these wheels have locking mechanisms. Then, attach your chosen handles to the designated storage areas or sides, and install the towel rail on one end of the cart. This is also a good time to add any other personalized accessories like hooks for tools or a bottle opener.
Step 6: Finishing for Durability and Aesthetics
The final step is crucial for both the longevity and appearance of your DIY Weber cart. Thoroughly sand all surfaces, paying extra attention to any rough edges or splinters. Wipe down the cart to remove all sawdust. Then, apply your chosen exterior-grade wood stain or paint, followed by a durable outdoor sealer or polyurethane. Multiple thin coats are usually better than one thick coat. Allow ample drying time between coats and before placing your Weber kettle onto the cart. This protective layer will shield your beautiful new workstation from the elements, ensuring it looks fantastic on your patio or porch for years to come.
Why William Casper’s Easy Build Design Stands Out
In the vast landscape of DIY projects, William Casper’s Weber BBQ cart design truly distinguishes itself through its brilliant blend of simplicity, functionality, and aesthetic appeal. His approach demystifies what might seem like a complex woodworking task, breaking it down into manageable steps that yield impressive results. The design is exceptionally well-thought-out, providing not just a platform for the grill but also ample, usable counter space – a feature often lacking in standard Weber setups. Furthermore, the integrated storage solutions mean that everything from charcoal bags to grilling spices has its proper place, reducing clutter and enhancing the overall cooking workflow. This design doesn’t just hold your grill; it creates a dedicated, efficient, and visually appealing outdoor cooking station that will undoubtedly become the envy of your neighbors. To fully grasp the genius of this project and follow along with the detailed instructions, be sure to watch William Casper’s comprehensive tutorial on YouTube.
Maximizing Your New BBQ Cart: Tips and Ideas for an Enhanced Grilling Experience
Once your magnificent new Weber BBQ cart is complete, the possibilities for enhancing your outdoor cooking setup are endless. This isn’t just a functional piece; it’s a canvas for further customization and a hub for unforgettable culinary moments. Here are some ideas to help you maximize its potential:
- Personalize with Paint or Stain: While a natural wood finish is beautiful, consider painting your cart to match your patio furniture or outdoor decor. A pop of color or a specific stain can truly make it unique. Remember to use exterior-grade paints and stains for durability.
- Add Smart Storage Solutions: Beyond the built-in shelves, think about magnetic strips for metal tools, a dedicated spice rack mounted on the side, or even a small cutting board that slides into a custom slot. Small bins or baskets can also help organize smaller items on the shelves.
- Install a Bottle Opener: A wall-mounted bottle opener on one of the cart’s sides is a classic and convenient addition, perfect for refreshing beverages while you grill.
- Consider a Trash Bag Holder: Attach a simple hook or a collapsible holder for a trash bag to keep your workspace clean and tidy as you cook, making cleanup a breeze.
- Lighting for Evening Grilling: If you often grill after dusk, consider adding battery-operated LED strip lights under the countertop or a clip-on grill light to illuminate your cooking surface and tools.
- Regular Maintenance: To ensure your wooden cart stands the test of time, establish a routine of cleaning and maintenance. Reapply a wood sealer or stain annually, especially if it’s exposed to harsh weather conditions, to protect against moisture and UV damage.
- Dedicated Prep Area: Designate a specific section of your countertop for food prep. You might even integrate a custom-fitted cutting board directly into a portion of the surface for ultimate convenience.
This easy-build Weber BBQ cart project is more than just a woodworking endeavor; it’s an investment in your grilling passion and an upgrade to your outdoor living space. By following William Casper’s fantastic design, you’ll transform your basic Weber Kettle into a fully functional, highly organized, and aesthetically pleasing outdoor kitchen workstation. Say goodbye to the frustrations of limited space and hello to a seamless, enjoyable, and efficient grilling experience. So, gather your materials, watch the tutorial, and get ready to build the ultimate accessory for your Weber Kettle. Your patio, and your taste buds, will thank you!