
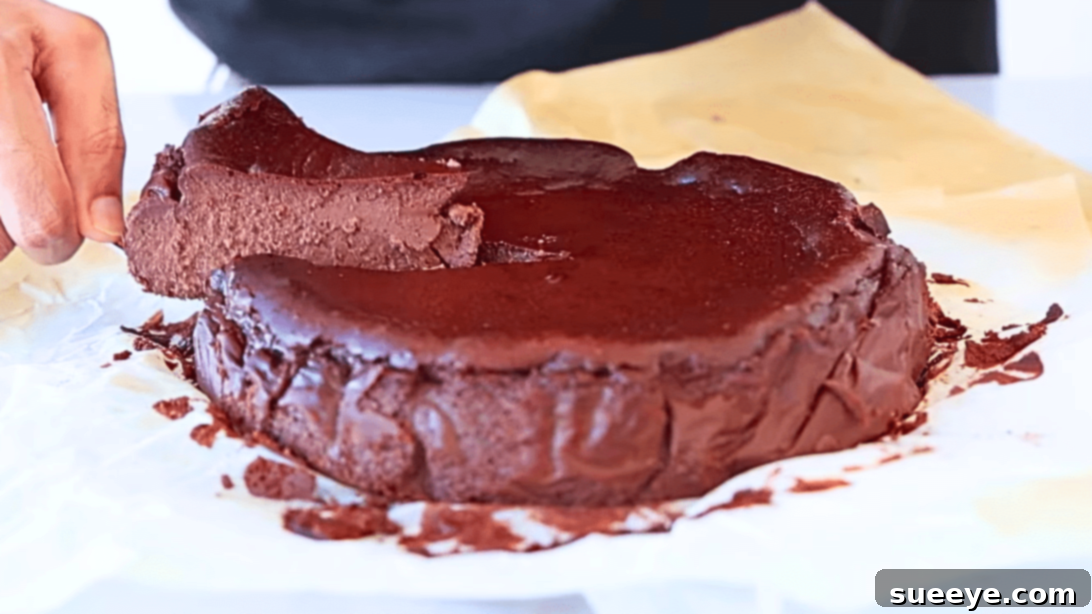
Ultimate Homemade Chocolate Basque Cheesecake: A Decadent Journey
The Basque Burnt Cheesecake has captivated dessert lovers worldwide with its rustic charm and unbelievably creamy texture, crowned by a distinctively caramelized, ‘burnt’ exterior. While the classic version is a masterpiece in itself, imagine elevating this culinary delight with the profound richness of dark chocolate. This isn’t just a dessert; it’s an experience – a symphony of deep cocoa notes and velvety smoothness that promises to become your new obsession.
I genuinely adore Basque cheesecake for its unique balance of richness and delicate creaminess, a treat I never tire of savoring. Its versatility with various flavors and toppings is remarkable, but this chocolate iteration? It transcends delicious, reaching an entirely new level of indulgence.
RELATED: 6-Ingredient High Protein Cheesecake Recipe
You might believe such an exquisite dessert requires a visit to a high-end patisserie, but we’re thrilled to show you that a truly exceptional Chocolate Basque Cheesecake is well within your reach, right in your own kitchen. No need for fancy equipment or complex techniques – just a few quality ingredients and this fantastic recipe. Learn how to craft this gourmet delight at home with this comprehensive guide inspired by the brilliant insights from The Cooking Foodie on YouTube. Prepare to impress everyone with your baking prowess!
Why Chocolate Basque Cheesecake Stands Out
Unlike traditional cheesecakes that aim for a uniform, pale golden finish, the Basque Burnt Cheesecake proudly sports a deeply caramelized, almost charred top. This “burnt” crust isn’t a flaw; it’s the signature feature, imparting a wonderfully complex, smoky-sweet flavor that beautifully contrasts with the incredibly smooth, almost custard-like interior. When you infuse this unique profile with premium dark chocolate, the result is nothing short of sensational. The chocolate adds an extra layer of richness and a subtle bitterness that perfectly balances the sweetness, creating a dessert that feels both rustic and incredibly sophisticated.
This dessert is surprisingly simple to make, forgiving of imperfections, and yields a show-stopping result every time. It’s the perfect treat for special occasions, a comforting indulgence, or simply a way to elevate your everyday dessert repertoire. Its rustic charm means there’s no need for a perfectly smooth top or an unblemished crust – the beauty lies in its imperfect perfection.
Essential Ingredients for Your Decadent Chocolate Basque Cheesecake
Creating this masterpiece starts with selecting the right ingredients. Quality truly makes a difference in the final taste and texture of your Chocolate Basque Cheesecake. Ensure all cold ingredients are brought to room temperature before you begin – this is a crucial step for achieving a smooth, lump-free batter.
- 3¼ cups (approximately 750g) of full-fat cream cheese, at room temperature: The foundation of your cheesecake’s creamy texture. Full-fat cream cheese is essential for richness and proper setting.
- 1 cup (200g) of granulated sugar: Provides the sweetness that balances the tang of cream cheese and the bitterness of dark chocolate.
- 1 cup (about 170g) of high-quality dark chocolate (60-70% cocoa solids): This is where the deep chocolate flavor comes from. Opt for a good baking chocolate bar or couverture chocolate for the best results.
- 1 tbsp (8g) of unsweetened cocoa powder: Enhances the chocolate flavor, adding depth and a slightly darker hue to the cheesecake.
- 5 large eggs: Act as a binding agent, providing structure and contributing to the cheesecake’s custardy texture. Ensure they are at room temperature.
- 1½ cups (360ml) of heavy cream (at least 36% milk fat): Adds luxurious richness and contributes significantly to the smooth, melt-in-your-mouth consistency.
- 1 tsp of vanilla bean paste or extract: A classic complement to chocolate, enhancing its flavor profile. Vanilla bean paste offers a more intense flavor and visual specks.
- ¼ tsp of fine sea salt: A pinch of salt is vital for balancing and enhancing all the sweet and savory notes in the cheesecake, preventing it from tasting overly sweet.
- 3 tbsp (25g) of all-purpose flour or cornstarch: A small amount of starch helps stabilize the cheesecake, preventing cracks and ensuring a smooth set without making it dense.
Step-by-Step Guide: Crafting Your Chocolate Basque Cheesecake
Follow these detailed steps to create a show-stopping Chocolate Basque Cheesecake that will impress everyone. Remember, preparation and attention to detail are key to achieving that perfect balance of burnt exterior and creamy interior.
Step 1: Prepare Your Oven and Pan, Melt the Chocolate
Begin by preheating your oven to a high temperature of 410°F (210°C). This high heat is crucial for achieving the signature caramelized crust of the Basque cheesecake. Next, prepare a 9-inch springform pan. Grease it thoroughly with nonstick cooking spray or a generous smear of butter, then line it with two sheets of parchment paper. Make sure the parchment paper overhangs the sides by at least 2 inches – this will create the rustic, crinkled edge characteristic of the cheesecake and make removal much easier.
Place your dark chocolate in a heat-proof bowl. Gently melt the chocolate using a microwave, heating in short 30-second intervals. After each interval, stir the chocolate well to distribute the heat evenly and prevent burning. Continue this process until the chocolate is completely smooth and melted. Once melted, set it aside to cool slightly to lukewarm; you don’t want to add hot chocolate to your cream cheese mixture.
Step 2: Prepare the Luscious Batter
In a large mixing bowl, combine the softened cream cheese and granulated sugar. Beat them together with an electric mixer for about 2 to 3 minutes on medium speed, or until the mixture is beautifully smooth, light, and creamy. Scrape down the sides of the bowl to ensure everything is incorporated. Now, gradually add the slightly cooled melted chocolate to the cream cheese mixture. Continue mixing until the chocolate is fully incorporated and the batter is smooth and uniformly colored, without any streaks.
Next, add the eggs, one at a time, beating well after each addition. This ensures each egg is fully emulsified into the mixture, creating a stable and cohesive batter. Incorporate the heavy cream and vanilla bean paste, mixing on low speed just until they are combined. Be careful not to overmix at this stage. Finally, sift the all-purpose flour (or cornstarch) and add the salt over the batter. Gently mix on the lowest speed only until the dry ingredients are just incorporated. Overmixing after adding the flour can lead to a tough cheesecake, so stop as soon as you see no more dry streaks.
Step 3: Bake, Cool, and Chill to Perfection
Carefully pour the smooth, rich batter into your prepared springform pan. The batter will be quite fluid, which is normal. Place the pan into your preheated 410°F (210°C) oven. Bake for approximately 40 to 55 minutes. The exact baking time can vary depending on your oven, so keep a close eye on it. The cheesecake is ready when its top is deeply golden brown, almost burnt, and the center still has a slight jiggle when gently shaken. This jiggle is key – it indicates a perfectly creamy interior that will set as it cools.
Once baked, remove the cheesecake from the oven and let it cool completely at room temperature for about 2 hours. This gradual cooling allows the cheesecake to set without cracking. After it has reached room temperature, transfer the cheesecake to the refrigerator and let it chill for a minimum of 4 hours, or ideally, overnight. Chilling is crucial for the cheesecake to firm up properly, enhancing its texture and deepening its flavors. When you’re ready to serve, carefully remove the cheesecake from the springform pan, peel away the parchment paper, slice into generous wedges, and enjoy this extraordinary dessert!
Expert Tips for a Flawless Chocolate Basque Cheesecake
Achieving a perfect Chocolate Basque Cheesecake is simpler than it looks, especially if you keep a few key tips in mind. These insights will help you avoid common pitfalls and ensure your dessert is a triumph every time.
1. Room Temperature Ingredients are Non-Negotiable
This is perhaps the most critical tip. Ensure your cream cheese, eggs, and heavy cream are all at room temperature. Cold ingredients don’t emulsify well, leading to a lumpy batter and a less smooth final texture. Plan ahead and take them out of the refrigerator at least an hour before you start baking.
2. Quality Dark Chocolate Makes a Difference
Since chocolate is a star ingredient here, invest in high-quality dark chocolate (60-70% cocoa solids). This will provide a richer, more complex flavor profile than chocolate chips or lower-quality chocolate, which often contain more sugar and stabilizers. The better the chocolate, the more profound the flavor of your cheesecake.
3. Do Not Overmix the Batter
Once the flour is added, mix only until just combined. Overmixing develops the gluten in the flour, which can lead to a dense, rubbery cheesecake instead of the desired light and creamy texture. Similarly, avoid over-beating the eggs excessively after they are incorporated.
4. Embrace the “Burnt” Top
Don’t be afraid of the high oven temperature or the deeply caramelized top. This characteristic ‘burnt’ crust is what defines a Basque cheesecake and provides a wonderful textural and flavor contrast to the creamy interior. It’s meant to be dark, almost black in places, with a smoky, bitter-sweet taste.
5. The Importance of Chilling
While the cheesecake is delicious slightly warm, it truly shines after a thorough chill. Refrigerating it for at least 4 hours, and preferably overnight, allows the flavors to meld and the interior to set into that signature dense, creamy consistency. Patience is a virtue here!
6. Parchment Paper is Your Friend
Using plenty of parchment paper that extends well above the pan’s rim is essential. It not only prevents sticking but also helps create the beautiful, rustic, crinkled edges that are part of the Basque cheesecake’s charm. It also makes lifting the finished cheesecake out of the springform pan incredibly easy.
Serving Suggestions and Creative Variations
Your homemade Chocolate Basque Cheesecake is already a showstopper, but a few simple additions can elevate it even further. Consider these serving suggestions and variations to make your dessert experience truly unforgettable:
- Fresh Berries: The tartness of fresh raspberries, strawberries, or a mix of berries provides a beautiful counterpoint to the richness of the chocolate.
- Whipped Cream or Crème Fraîche: A dollop of lightly sweetened whipped cream or a spoonful of tangy crème fraîche adds another layer of creaminess and cuts through the intensity of the chocolate.
- Dusting of Cocoa Powder: A light dusting of unsweetened cocoa powder or confectioners’ sugar can add a professional finish and a slight textural contrast.
- Coffee or Espresso Sauce: A drizzle of strong coffee or espresso reduction would complement the dark chocolate notes wonderfully.
- Orange Zest: Grated orange zest sprinkled over the top or incorporated into the batter can add a bright, citrusy aroma and flavor that pairs beautifully with chocolate.
- Spicy Kick: For an adventurous twist, add a pinch of cayenne pepper or chili powder to the batter for a subtle warmth that enhances the chocolate.
- Different Chocolates: Experiment with different types of chocolate, such as milk chocolate for a sweeter version, or even a blend of dark and semi-sweet for a nuanced flavor.
Storing Your Chocolate Basque Cheesecake
This cheesecake stores wonderfully, allowing you to enjoy its deliciousness for days. Once thoroughly chilled, cover the cheesecake loosely with plastic wrap or aluminum foil. Store it in the refrigerator for up to 4-5 days. For longer storage, you can slice the cheesecake into individual portions, wrap each slice tightly in plastic wrap, and then place them in an airtight container. Frozen slices can last for up to 1-2 months. Thaw them in the refrigerator overnight before serving for the best texture and flavor.
Making this Chocolate Basque Cheesecake at home is not just about baking; it’s about creating a moment of pure culinary bliss. The ease of preparation combined with the utterly decadent results makes this recipe a must-try for any dessert enthusiast. So, gather your ingredients, follow these steps, and prepare to indulge in one of the most remarkable chocolate cheesecakes you’ll ever taste!
Your kitchen is about to become your favorite bakery. Enjoy every rich, creamy bite!
*All image credit belongs to The Cooking Foodie via YouTube. Follow and subscribe to his channel for more incredible recipes and culinary inspiration!