
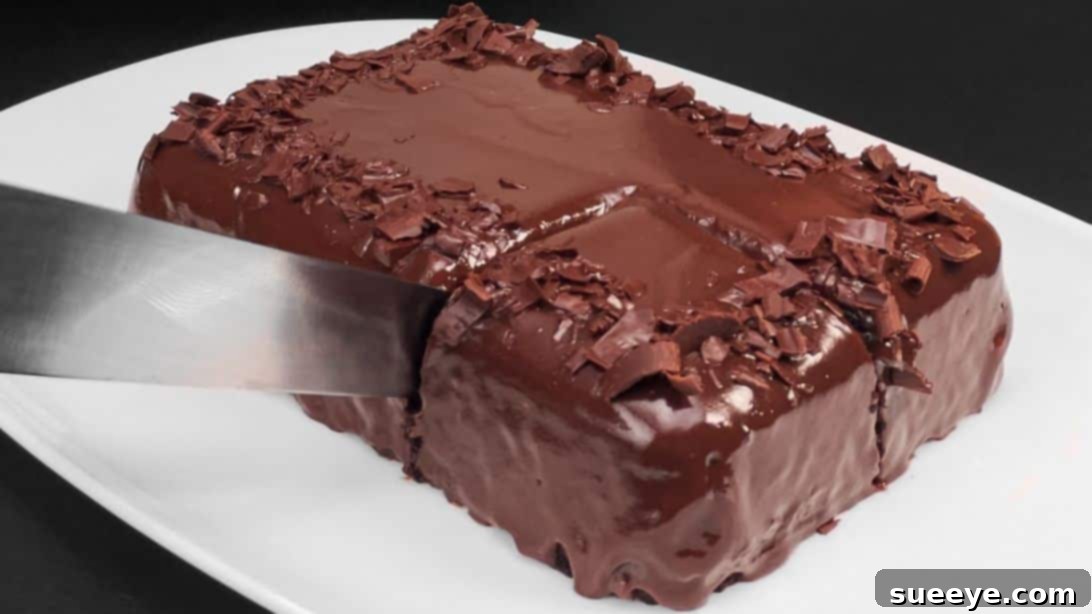
Effortless No-Oven Chocolate Oreo Cake: Your Ultimate Guide to a Delectable Treat
Imagine indulging in a rich, moist chocolate cake without ever having to preheat an oven. Sounds like a dream, right? Well, it’s a delicious reality! This comprehensive guide will walk you through creating an amazing no-oven chocolate cake using simple, readily available ingredients like popular Oreo biscuits, high-quality chocolate, fresh milk, and a touch of baking powder. Whether you’re a seasoned baker looking for a quick fix or a complete novice stepping into the delightful world of desserts, this straightforward recipe is designed specifically for you.
Forget the complexities often associated with traditional baking. This innovative no-oven method harnesses the power of your stovetop to create a perfectly cooked cake that’s both tender and incredibly flavorful. In just a few minutes of active preparation and a little patience during the cooking process, you’ll have a stunning chocolate cake ready to be devoured. It’s the perfect solution for satisfying those sudden sweet cravings, impressing guests, or simply enjoying a homemade treat without the fuss of conventional baking equipment. So, gather your ingredients, prepare your pan, and let’s embark on this exciting culinary adventure together to create a delightful dessert that’s as easy as it is delicious.
Why Choose a No-Oven Chocolate Cake? Discover the Benefits!
The concept of baking a cake without an oven might seem unconventional, but it offers a myriad of practical and appealing benefits that make it an incredibly attractive option for home cooks and dessert lovers alike:
- Unparalleled Simplicity: One of the most significant advantages is the sheer ease of preparation. There’s no need for specialized baking equipment, complex techniques, or precise temperature regulation. If you have a stove and a basic cooking pan, you possess all the tools necessary to create this culinary masterpiece.
- High Accessibility: This recipe is a game-changer for individuals who might not have access to a conventional oven, such as students living in dorms, apartment dwellers with limited kitchen space, or those looking for an alternative baking method during kitchen renovations.
- Energy Efficiency: Using a stovetop to “bake” a cake often consumes significantly less energy compared to heating up a large, power-hungry oven. This makes it a more eco-friendly and cost-effective choice, especially if you’re mindful of your energy consumption.
- Quick Preparation Time: The actual hands-on time required for this recipe is remarkably minimal. This allows you to whip up a delicious, satisfying dessert even on the busiest of days when time is of the essence.
- Beginner-Friendly: For those new to baking, this recipe serves as an ideal starting point. It builds confidence in the kitchen by delivering consistently delicious results with very little room for error, encouraging further culinary exploration.
- Perfect for Warm Weather: During the hotter months, the last thing you want is to heat up your entire kitchen by running an oven. This no-oven method allows you to enjoy baking without breaking a sweat, keeping your home cool and comfortable.
- Unique Texture Profile: Cakes cooked using this stovetop method often develop a uniquely moist, dense, and almost fudge-like texture that is incredibly satisfying and distinct from traditional oven-baked cakes.
Essential Ingredients for Your No-Oven Chocolate Masterpiece
The true beauty of this recipe lies in its elegant simplicity and the humble yet powerful ingredients it calls for. Each component plays a vital and complementary role in crafting the perfect texture, profound flavor, and overall success of your no-oven cake. Here’s a detailed look at what you’ll need, along with insights into why each ingredient is crucial:
- 65 pieces of Oreo biscuits: These universally beloved chocolate sandwich cookies are undoubtedly the star of our cake. They form the rich, dark chocolate base and contribute a delightful hint of creaminess from their signature vanilla filling. Ensuring you have the correct quantity is key to achieving the cake’s structure and intense flavor.
- 500ml (approximately 2 cups) of milk: Milk serves as a crucial liquid binder, bringing together the crushed cookie crumbs to form a smooth, workable batter. It is also instrumental in contributing to the cake’s ultimate moistness and luxurious consistency. While any type of milk (dairy or non-dairy alternatives like almond or oat milk) can be used, full-fat dairy milk will typically yield a richer, more indulgent cake.
- 1¼ cup of chocolate, plus extra for garnish: Chocolate is indispensable, providing both the deep, satisfying flavor within the cake itself and forming the luscious, glossy ganache topping. For the best results, opt for good quality dark or semi-sweet chocolate chips, or finely chop a chocolate bar. The additional chocolate for garnish adds a sophisticated visual appeal and an extra layer of irresistible chocolatey goodness.
- 1 tsp of baking powder: Despite this not being a traditional oven-baked cake, baking powder acts as our essential leavening agent. It reacts with the heat from the stovetop and the moisture within the batter to create internal bubbles, giving our cake its desirable lift and wonderfully tender, airy crumb. Without it, the cake would be significantly denser.
Step-by-Step Directions: Crafting Your Delicious No-Oven Cake
Follow these meticulously detailed instructions carefully to ensure your no-oven chocolate cake turns out perfectly every single time. Precision, attention to detail, and a touch of patience will be your best allies throughout this rewarding process.
Step 1: Preparing the Oreo Base and Creamy Filling for the Cake Batter
The foundation of our magnificent cake begins with the beloved Oreo biscuits. This initial stage involves carefully separating their components and preparing them optimally for their delicious transformation into a rich cake batter.
- Methodically Separate the Oreos: Begin by carefully twisting open each of the 65 Oreo biscuits. With a small spoon or knife, gently scrape off the distinct white cream filling from one half of each cookie. Place all the chocolate cookie halves into a large, sturdy mixing bowl. Keep the separated cream filling in a small, separate saucepan, as it will be smoothly incorporated into the milk later.
- Achieve Finely Crushed Cookies: Using a sturdy potato masher, the back of a large spoon, or for ultimate efficiency, a food processor, crush the cookie halves until they achieve a very fine, powder-like consistency. The finer and more uniform the crumbs, the smoother and more consistent the texture of your finished cake will be. Ensure there are absolutely no large chunks or pieces remaining.
- Prepare the Creamy Milk Mixture: Place the saucepan containing the reserved Oreo cream filling on your stovetop. Set the heat to a very low setting. Add the 500ml of milk to this saucepan. Begin to gently and continuously whisk the milk and Oreo filling together. Continue whisking constantly until the cream filling has completely melted and is smoothly and uniformly incorporated into the milk, forming a slightly thickened, homogenous liquid. Once smooth, remove the saucepan from the heat.
- Combine Dry Ingredients Thoroughly: Add the 1 teaspoon of baking powder directly into the bowl of finely crushed Oreo cookies. Using a whisk or a clean spoon, gently but thoroughly mix them together until the baking powder is evenly and consistently distributed throughout all the cookie crumbs. This crucial step ensures a uniform rise for your cake during the cooking process.
- Generously Prepare Your Baking Vessel: Select a baking dish that is appropriate in size and can comfortably fit inside a larger, deep pan (which will serve as your stovetop “oven”). Brush the entire bottom and all the inner sides of your chosen baking dish very generously with a neutral-flavored oil, such as vegetable, sunflower, or canola oil. This step is absolutely critical to prevent the cake from sticking.
- Precisely Line with Parchment Paper: Cut a piece of parchment paper to perfectly fit and cover the entire bottom surface of your baking dish. Carefully place this parchment paper neatly into the dish. Once in place, brush more oil generously over the surface of the parchment paper. This dual layer of greasing and lining creates an infallible barrier, guaranteeing effortless and clean removal of your finished cake.
Step 2: Assembling, “Baking” on the Stovetop, and Finishing Your Cake with Ganache
Now that all your ingredients are meticulously prepped and your baking pan is ready, it’s time to bring the cake to life through the unique stovetop “baking” method and crown it with a glorious chocolate topping.
- Form the Cake Batter: Carefully pour the warm, creamy milk and Oreo filling mixture (prepared in step 3) into the large bowl containing the finely crushed Oreo cookies and baking powder (from step 4). Using a spatula or a whisk, gently fold and mix all the ingredients together until they are thoroughly combined and you achieve a smooth, consistent chocolate batter. Be mindful not to overmix, as this can lead to a tougher cake texture.
- Transfer Batter to Baking Dish: With care, pour the entire chocolate batter into your meticulously prepared baking dish. Gently spread the batter evenly using a spatula, ensuring the top surface is relatively flat. This promotes even cooking and a beautiful presentation.
- Set Up for Stovetop “Baking” Environment: Place your baking dish, now filled with the cake batter, inside a larger, deep pan. This larger pan will create a sealed environment for steam cooking. If your larger pan does not have a tight-fitting lid, you can effectively use aluminum foil to create a secure, airtight seal, trapping the steam inside.
- Begin Stovetop Cooking: Cover the larger pan tightly with its lid or the aluminum foil. Place the entire setup on your stovetop over the absolute lowest possible heat setting. Allow the cake to “bake” for approximately 40 to 50 minutes. It’s important to note that the exact cooking time may vary slightly depending on your specific stove’s heat distribution and the size and material of your pans.
- Perform the Doneness Check: To accurately test if the cake is thoroughly cooked, gently insert a clean toothpick or a thin skewer into the very center of the cake. If the toothpick comes out completely clean, without any wet batter clinging to it, your cake is perfectly cooked. If it emerges with wet batter, continue cooking for another 5-10 minutes and then re-test.
- Crucial Cooling Process: Once the cake is cooked, remove the large pan from the heat, but allow the cake to remain inside its baking dish. Let the cake cool down completely at room temperature. This is an absolutely crucial step; attempting to remove a warm cake can cause it to break or crumble. Patience here ensures structural integrity.
- Demold and Trim for Presentation: Once thoroughly cooled, carefully remove the cake from its baking dish. Gently peel off the parchment paper from the bottom. If the top surface of your cake appears slightly uneven, you can carefully trim it level using a serrated knife for a more polished and professional aesthetic.
- Prepare the Silky Chocolate Ganache: Place a clean, dry saucepan on your stove over very low heat. Break the remaining 1¼ cup of chocolate into smaller, more manageable pieces and add them to the saucepan. Pour about 4½ tablespoons of milk into the saucepan with the chocolate.
- Melt and Whisk to Perfection: Continuously whisk the chocolate and milk mixture over the low heat until the chocolate has completely melted and is smoothly and lusciously incorporated with the milk. The result should be a glossy, homogenous ganache. Remove from heat immediately once this smooth consistency is achieved.
- Garnish and Serve Your Masterpiece: Pour the warm, silky chocolate ganache evenly over the cooled cake, allowing it to drip attractively and naturally down the sides. For an extra touch of elegance, flavor, and texture, garnish the top with some finely shaved or shredded chocolate. Slice the cake into your desired portions, serve with pride, and savor this incredibly easy and utterly delicious no-oven chocolate treat!
Expert Tips for Achieving No-Oven Chocolate Cake Perfection
While this recipe is wonderfully straightforward, incorporating a few expert tips can truly elevate your cake from simply good to absolutely phenomenal, ensuring consistent success every time:
- Maintain Consistent Low Heat: This is arguably the most crucial tip. Maintaining a very low, consistent heat throughout the cooking process is paramount. Too high heat will cause the bottom of the cake to burn before the center has a chance to cook through, resulting in an uneven texture.
- Ensure a Tight-Fitting Lid: Always ensure your large pan is covered as tightly as possible. This traps steam effectively, creating a humid, oven-like environment that is essential for cooking the cake evenly and keeping it incredibly moist. If your pan lid isn’t perfectly tight, use aluminum foil to create a robust, airtight seal.
- Patience During Cooling is Key: Do not, under any circumstances, rush the cooling process. A fully cooled cake is significantly easier to handle, demold, and decorate without any risk of breaking or crumbling. Allowing it to cool completely enhances its structural integrity.
- Invest in Quality Chocolate: For the most luxurious and profound chocolate flavor, both in the cake batter and especially in the ganache, use good quality chocolate. The difference in taste and texture will be remarkably noticeable and well worth the investment.
- Avoid Overmixing the Batter: Once you’ve added the wet ingredients to the dry, mix just until all ingredients are barely combined and no dry streaks remain. Overmixing the batter can develop the gluten in the cookie crumbs, leading to a tougher, less tender cake.
- Consider Your Pan Size: Select a baking dish that is neither too shallow (to prevent overflowing) nor excessively deep (to ensure even cooking) for your large stovetop pan. The right pan size promotes optimal heat distribution.
- Parchment Paper is Your Best Friend: Absolutely do not skip the parchment paper lining. It is an invaluable tool that guarantees your cake releases effortlessly from the pan, preventing any sticking or tearing.
- Trust the Toothpick Test, Not Just the Timer: While the 40-50 minute cooking time is a helpful estimate, remember that stoves vary greatly. Always rely on the toothpick test to confirm doneness, as it is the most accurate indicator.
Creative Variations and Customizations for Your Cake
This basic no-oven chocolate Oreo cake recipe serves as a fantastic, versatile canvas for your culinary creativity. Feel free to experiment and customize your delicious creation to suit your personal tastes or specific occasions. Here are some inspiring ideas:
- Explore Different Cookies: While Oreos are classic, don’t hesitate to experiment with other types of chocolate sandwich cookies, digestive biscuits, or even crushed graham crackers for a subtly different base flavor and texture.
- Introduce Nutty Additions: For an added layer of crunch and rich flavor, fold in a handful of finely chopped nuts such as walnuts, pecans, almonds, or even hazelnuts into the cake batter before cooking.
- Enhance with Flavor Extracts: A small dash of vanilla extract, almond extract, peppermint extract, or a hint of instant coffee or espresso powder can beautifully deepen and complement the chocolate flavor profile.
- Spice Things Up: For an unexpected and delightful warmth, consider adding a tiny pinch of ground cinnamon, a touch of chili powder (for a Mexican hot chocolate feel), or even a sprinkle of cardamom.
- Incorporate Fresh Fruit and Zest: Grate some fresh orange zest into the chocolate ganache for a bright citrusy note, or adorn the top of the cooled cake with fresh berries like strawberries, raspberries, or blueberries for a refreshing contrast.
- Experiment with Alternative Toppings: Beyond chocolate shavings, consider garnishing your cake with colorful sprinkles, crushed peppermint candy pieces, a dollop of fresh whipped cream, a luxurious drizzle of caramel sauce, or a delicate sprinkle of flaky sea salt on the ganache to cut through the sweetness.
- Add a White Chocolate Swirl: After pouring the dark chocolate ganache, gently drizzle some melted white chocolate over it. Then, use a toothpick or skewer to artfully swirl the two chocolates together for a stunning marbled effect.
Serving Suggestions and Optimal Storage Instructions
Once your magnificent no-oven chocolate Oreo cake is ready, it’s time to enjoy it! This cake is absolutely delightful on its own, but here are a few suggestions for serving and best practices for storing any leftovers:
- Serve at Your Preferred Temperature: While typically served at room temperature or slightly chilled, a slice that is still slightly warm with a wonderfully melting ganache can be an incredibly comforting and indulgent experience.
- Perfect Pairings: This rich and decadent chocolate cake pairs wonderfully with a refreshing scoop of creamy vanilla bean ice cream, a generous dollop of freshly whipped cream, or simply a tall glass of cold milk to balance the sweetness.
- Ideal for Any Occasion: This cake is versatile enough for various occasions – from casual family desserts and impromptu gatherings to potlucks, birthday celebrations, or simply as a comforting treat to brighten any ordinary day.
- Storage Instructions: To maintain its freshness and delightful texture, store any leftover cake in an airtight container at room temperature for up to 2-3 days. For extended freshness, you can refrigerate it for up to 5 days. Always ensure it is well-covered to prevent it from drying out or absorbing other food odors.
- Freezing for Later: If you wish to prepare ahead or save some for a later date, an unfrosted cake can be tightly wrapped first in plastic wrap and then in aluminum foil. It can then be frozen for up to 1 month. When ready to serve, thaw the cake in the refrigerator overnight before applying the ganache and serving.
Frequently Asked Questions About This No-Oven Cake Recipe
We’ve compiled answers to some common questions you might have about making this unique and increasingly popular no-oven chocolate cake. These insights should help clarify any concerns and ensure your baking success:
- Q: Can I use different types of cookies instead of Oreos for the base?
- A: Absolutely! While Oreos provide a classic and beloved flavor profile, you are encouraged to experiment with other chocolate sandwich cookies, traditional digestive biscuits, or even crushed graham crackers for a different textural and flavor base. Just be mindful that you might need to slightly adjust the milk quantity if the alternative cookies absorb liquid differently.
- Q: What if I don’t have baking powder available? Will the cake still work?
- A: Baking powder is a crucial leavening agent that provides the cake with its desirable lift and lighter texture. If you omit it, the cake will still cook through and be delicious, but it will be significantly denser, resembling more of a rich brownie or a fudge-like dessert rather than a traditional cake texture.
- Q: Is it possible to adapt this cake recipe to be vegan-friendly?
- A: Yes, this recipe adapts wonderfully to a vegan diet! Many popular Oreo varieties are accidentally vegan (always double-check the label for specific brands). For the milk, simply use any plant-based milk (such as almond milk, soy milk, or oat milk), and ensure that your chosen chocolate for both the cake and the ganache is certified dairy-free.
- Q: My cake isn’t cooking properly in the middle, what could be the issue?
- A: If your cake is cooking unevenly, with the edges done but the center still raw, it typically indicates two main possibilities: either the heat on your stovetop is too high, causing the outside to cook too quickly, or the lid on your large pan isn’t tight enough, allowing essential steam to escape. Ensure the heat is kept very low and that the pan is securely sealed. You might need to extend the cooking time at a consistently lower temperature.
- Q: How can I ensure I get a perfectly smooth and glossy chocolate ganache?
- A: To achieve a beautifully smooth and glossy ganache, start by using good quality chocolate and chopping it finely. Melt it over very low heat with the milk, whisking continuously and gently. If, by chance, your ganache appears to split or curdle, try adding a tiny bit more warm milk (half a teaspoon at a time) and whisk vigorously until it emulsifies and comes back together smoothly.
Conclusion: Your New Favorite Way to Bake and Indulge!
This effortless no-oven chocolate Oreo cake recipe truly proves that you don’t need a professional-grade kitchen, an expensive oven, or advanced baking skills to create something utterly magical. With minimal fuss, a handful of simple ingredients, and the ingenuity of stovetop cooking, you can conjure up a rich, incredibly moist, and utterly delicious chocolate cake that is perfect for any occasion – from a casual weeknight treat to a special celebratory dessert.
It stands as a testament to the fact that some of the most satisfying and delightful culinary experiences can emerge from the most unexpected and accessible methods. So go ahead, embrace this delightful recipe, give it a try, and discover the sheer joy and simplicity of “baking” a spectacular cake right on your stovetop. Your taste buds, your family, and perhaps even your traditional oven will undoubtedly thank you for this wonderfully convenient and incredibly tasty innovation!
*Thanks to Useful and quick via YouTube for all images used here. If you loved this ingenious recipe, then you’ll surely find her other creative videos equally inspiring. We highly recommend giving her channel a visit and hitting that subscribe button for more fantastic kitchen ideas!