
For many home cooks, shredded chicken is an indispensable ingredient. Whether you’re whipping up tacos, filling sandwiches, enriching soups, or preparing a week’s worth of meals, the demand for perfectly shredded chicken is constant. However, the process of shredding can often feel like the most tedious part of meal preparation, especially when dealing with large quantities.
What if we told you there are incredibly smart, time-efficient methods that can transform this chore into a breeze? We’re diving deep into three fantastic techniques, including a game-changing hack popularized by MOMables – Laura Fuentes on Youtube, that will revolutionize the way you approach shredded chicken. From traditional hand-shredding to an ingenious appliance trick, you’ll learn how to achieve the perfect texture for any dish with minimal effort. Get ready to save time, reduce kitchen stress, and elevate your cooking!
The Versatility of Shredded Chicken: A Culinary Staple
Before we dive into the “how,” let’s appreciate the “why.” Shredded chicken is a beloved ingredient for its incredible versatility and ease of incorporation into countless dishes. It’s a lean protein that readily absorbs flavors, making it ideal for everything from quick weeknight dinners to elaborate party spreads. Imagine having a batch of perfectly shredded chicken ready to go. You could effortlessly create:
- Quick Tacos & Burritos: A flavorful filling in minutes.
- Comforting Soups & Stews: Adding body and protein to any broth.
- Healthy Salads: A satisfying topping for leafy greens or pasta salads.
- Hearty Sandwiches & Wraps: Elevating your lunch game.
- Delicious Casseroles: The foundation of family favorites.
- Meal Prep Gold: Portion out for various meals throughout the week.
Having a go-to method for shredding chicken quickly means less time in the kitchen and more time enjoying delicious, homemade food. Let’s explore the methods that will make this culinary dream a reality.
Essential Prep: Cooking Your Chicken for Perfect Shredding
No matter which shredding method you choose, the quality of your shredded chicken starts with how it’s cooked. Tender, moist chicken is key to easy shredding. Overcooked, dry chicken will be tough and stringy, making the shredding process a struggle. Here are a few popular ways to cook chicken breasts for optimal shredding:
- Boiling/Poaching: A classic method. Simply place chicken breasts in a pot, cover with water or broth, and simmer until cooked through (internal temperature of 165°F / 74°C). This keeps the chicken incredibly moist.
- Baking: Season chicken breasts and bake at 375°F (190°C) for 20-30 minutes, or until cooked. Cover with foil to retain moisture.
- Instant Pot/Pressure Cooker: Place chicken breasts, a cup of liquid (water or broth), and seasoning in your Instant Pot. Cook on high pressure for 8-10 minutes, followed by a natural release. This yields incredibly tender chicken.
- Slow Cooker: Cook chicken breasts on low for 3-4 hours or high for 2-3 hours with a little liquid. The chicken will be so tender it practically falls apart.
Once cooked, allow your chicken to rest for 5-10 minutes. This helps redistribute the juices, resulting in more flavorful and easier-to-shred meat. The temperature of the chicken also plays a role in which shredding method is most comfortable and effective.
Master These 3 Easy Ways To Shred Chicken Breasts Fast
#1 Shredding Chicken By Hand: The Traditional & Texture-Perfect Method
The simplest and most traditional method requires no special tools, just your hands. This technique is ideal when you desire larger, more robust shreds for dishes where the texture of the chicken is meant to stand out, such as a hearty chicken salad or a chunky chili. It’s also perfect for smaller batches where setting up equipment might feel like overkill.
How to Do It:
- Cool Down (or Warm Up!): For optimal comfort and safety, allow your cooked chicken breasts to cool slightly until they are warm enough to handle comfortably, but not scalding hot. Some prefer to let them cool completely, which can make the muscle fibers firmer and easier to separate cleanly.
- Prepare Your Workspace: Place the chicken breasts on a clean cutting board or in a shallow bowl.
- Begin Pulling: Using your fingers, grasp one end of the chicken breast and begin pulling the meat apart along the natural grain. Chicken breast fibers run lengthwise, so pulling in this direction will yield long, uniform shreds.
- Adjust as Needed: Continue pulling and tearing until you achieve your desired shred size. You can make them as fine or as chunky as you like by simply adjusting the force and direction of your pull.
Pros:
- Excellent control over shred size and texture.
- No special equipment needed.
- Ideal for smaller batches or when you want larger, more rustic pieces.
Cons:
- Can be time-consuming and messy for large quantities.
- Requires direct contact with warm chicken.
Tips for Success: Consider wearing disposable gloves if you find handling warm chicken unpleasant or for easier cleanup. Ensure your chicken is not overcooked, as dry chicken is much harder to shred by hand.
#2 Shredding Chicken with Two Forks: The Classic Upgrade for Warm Chicken
When your chicken breasts are still hot from cooking, or if you prefer to avoid directly touching the meat, the two-fork method is your reliable friend. This technique is a step up in efficiency from hand-shredding, offering a good balance between speed and control, yielding a medium-textured shred perfect for most applications.
How to Do It:
- Keep it Hot: This method works best when the chicken is still warm or hot, as the muscle fibers are more pliable and easier to separate.
- Position Your Forks: Place a cooked chicken breast on a sturdy cutting board or in a shallow dish. Hold one fork firmly with its tines pressed into the chicken to stabilize it.
- Start Pulling: With the second fork, place its tines into the chicken adjacent to the first fork. Begin pulling the second fork away from the first, moving in opposite directions. The tines will catch the fibers and tear the meat into shreds.
- Rotate and Repeat: Rotate the chicken breast as you work, continuing to pull the meat apart until all of it is shredded to your desired consistency. For finer shreds, keep going over the same areas.
Pros:
- Faster than hand-shredding, especially for multiple chicken breasts.
- No direct contact with hot chicken.
- Offers good control over shred size, producing a versatile medium texture.
Cons:
- Can still be a bit tiring on the hands for very large quantities.
- Requires sturdy forks.
Tips for Success: Use forks with sturdy tines that won’t bend under pressure. A deep bowl can help contain the chicken and prevent it from sliding around as you shred. The warmer the chicken, the easier it will be to shred with forks.
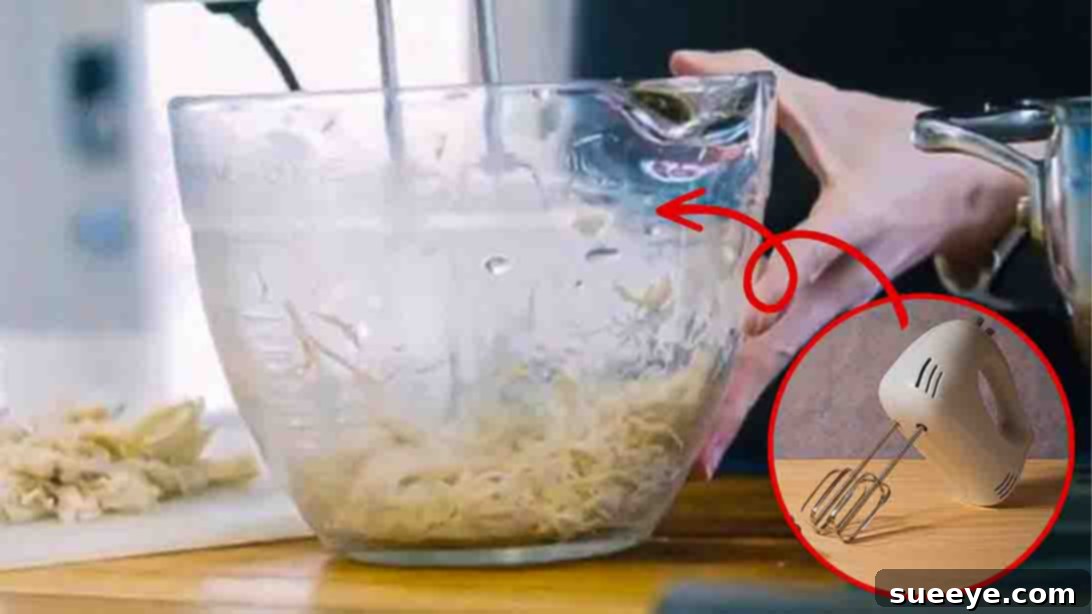
#3 Shredding Chicken with a Hand Mixer: The Ultimate Time-Saving Hack
Prepare to have your mind blown. This method, ingeniously shared by experts like MOMables – Laura Fuentes, is nothing short of a kitchen revelation. If you regularly cook large batches of chicken or simply want the fastest, most effortless way to achieve perfectly shredded meat with a fine, consistent texture, the hand mixer technique is your new best friend. It’s a game-changer for meal prep!
How to Do It:
- Gather Your Tools: You’ll need a cooked chicken breast (still warm is ideal, but not strictly necessary), a deep mixing bowl, and your trusty hand mixer with beaters attached. Ensure the chicken is fully cooked and tender.
- Place Chicken in Bowl: Put the chicken breasts directly into the deep mixing bowl. Don’t overcrowd the bowl; work with 2-4 breasts at a time, depending on the size of your bowl and mixer.
- Start Mixing: Insert the beaters into the chicken. Begin mixing on the lowest speed setting. The beaters will effortlessly catch the chicken fibers and start pulling them apart.
- Increase Speed (Cautiously): As the chicken begins to shred, you can gradually increase the speed of the mixer. Move the mixer around the bowl, ensuring all pieces of chicken are caught by the beaters.
- Monitor Texture: Watch the chicken closely. Within 30-60 seconds, your chicken breasts will be perfectly shredded. Stop as soon as you reach your desired consistency to avoid over-shredding, which can turn the chicken into a paste.
Pros:
- Extremely Fast: Shreds chicken in mere seconds, even large quantities.
- Effortless: Requires virtually no physical effort from you.
- Consistent Texture: Produces uniformly fine shreds, ideal for dips, spreads, or fillings where a smooth texture is desired.
- Perfect for Large Batches: The ultimate method for meal prepping.
Cons:
- Less control over shred size; typically results in finer shreds.
- Requires an appliance (hand mixer).
- Can be messy if the bowl isn’t deep enough or if you start at too high a speed.
Tips for Success: A deep bowl with high sides is crucial to prevent chicken from flying out. Start on the lowest speed and gradually increase. Don’t overmix; stop as soon as the chicken is shredded to avoid a mushy texture. This method works best with very tender, moist chicken.
Choosing Your Shredding Champion: Which Method is Right for You?
Each method has its strengths, and the best choice often depends on your specific needs:
- For Chunky Texture & Small Batches: Go with your hands.
- For Medium Texture & Warm Chicken: The two-fork method is a reliable choice.
- For Speed, Efficiency, & Fine Texture (especially large batches): The hand mixer is your undisputed champion.
Don’t be afraid to experiment! Try all three to see which one you prefer for different culinary applications. You might find yourself using the hand mixer for meal prep Sunday and the two-fork method for a quick weeknight dinner.
General Tips for Perfectly Shredded Chicken Every Time
- Don’t Overcook: This is paramount! Dry chicken is hard to shred and lacks flavor. Aim for an internal temperature of 165°F (74°C).
- Keep it Moist: Cooking chicken in liquid (broth, water, or even its own juices) helps retain moisture, making it much easier to shred.
- Rest Your Chicken: Always allow cooked chicken to rest for at least 5-10 minutes before shredding. This allows juices to redistribute, resulting in more tender and flavorful meat.
- Season Well: Season your chicken before cooking for maximum flavor. You can also add a pinch of salt and pepper or your favorite spices after shredding.
- Consider Temperature: As noted, hand-shredding is best with slightly cooled chicken, while forks and mixers handle warm chicken with ease.
Storage Solutions for Your Shredded Chicken
Once you’ve mastered these shredding techniques, you’ll likely want to make large batches for future use. Properly stored shredded chicken can be a lifesaver for quick meals:
- Refrigeration: Store shredded chicken in an airtight container in the refrigerator for up to 3-4 days.
- Freezing: For longer storage, freeze shredded chicken in airtight bags or containers for up to 2-3 months. Portion it out into meal-sized servings for easy thawing. Thaw overnight in the refrigerator or use the defrost setting on your microwave.
Conclusion: Shredding Chicken Made Simple and Swift
Shredded chicken doesn’t have to be a dreaded kitchen task. With these three easy and efficient methods, you can quickly transform cooked chicken breasts into a versatile ingredient ready for any recipe. Whether you prefer the control of your hands, the classic simplicity of two forks, or the revolutionary speed of a hand mixer, you now have the tools and knowledge to make shredded chicken effortlessly.
Experiment with each method to discover your favorite, and don’t forget to share these incredible kitchen hacks with your friends and family. They’ll thank you for making their meal prep a whole lot easier and more enjoyable. Happy cooking!