
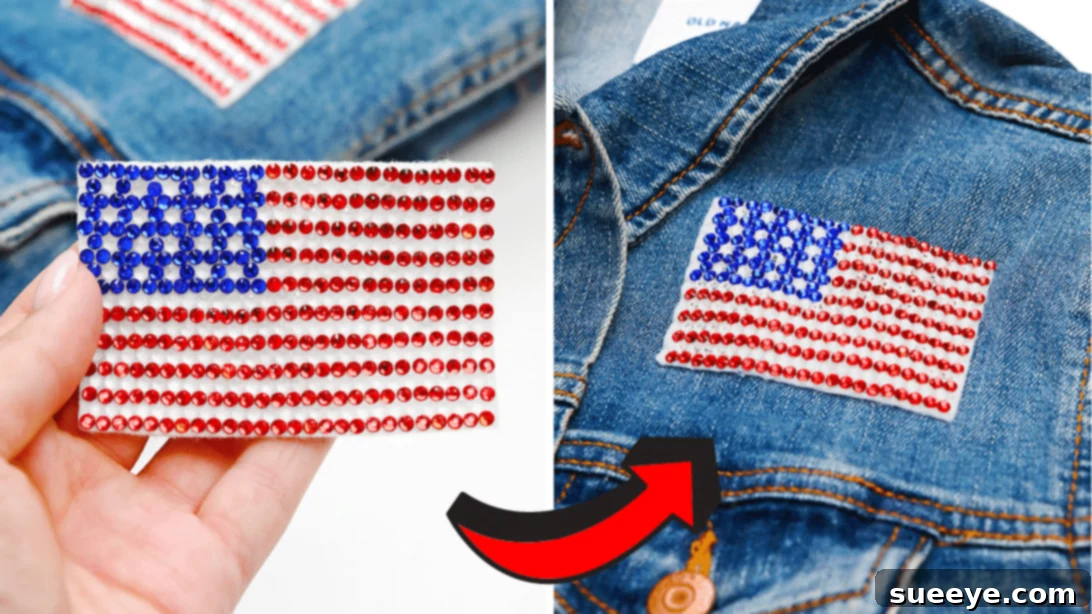
There’s no better way to showcase your national pride and love for your country than with a handmade, sparkling American flag patch! This beautiful rhinestone creation allows you to express your patriotism in a unique and dazzling way. Whether you choose to adorn your favorite jacket, customize a denim bag, or add a touch of sparkle to any piece of clothing, this DIY patch promises to be an awesome, eye-catching accessory. Forget generic store-bought items; a handcrafted rhinestone patch offers a personal touch that truly stands out and reflects your dedication.
Creating this stunning American flag rhinestone patch is surprisingly simple and much quicker than you might initially imagine. It’s a rewarding craft project that yields impressive results, making it perfect for crafters of all skill levels, even beginners. Once you’ve mastered this design, you might even find yourself inspired to create more rhinestone patches with various patriotic motifs or other custom designs in the future. If you’re eager to add some sparkle to your wardrobe and proudly flaunt your national spirit, join us as we learn how to make this fabulous patch. This detailed guide, inspired by the fantastic video tutorial from One Little Project on YouTube, will walk you through every step to ensure your success in creating a truly brilliant patriotic accessory.
Why Craft Your Own American Flag Rhinestone Patch?
Beyond the sheer joy and therapeutic benefits of creating something with your own hands, there are numerous compelling reasons to embark on this DIY project. Firstly, a handmade patch offers unparalleled personalization. You get to choose the exact shade of red, white, and blue rhinestones, determine the ideal size of your patch, and even select the specific quality of felt, ensuring it perfectly suits your aesthetic and the item you intend to embellish. This level of customization is simply not available with mass-produced patches, making your creation truly unique.
Secondly, crafting your own rhinestone patch is a wonderfully cost-effective alternative to purchasing ready-made rhinestone patches, which can often be quite expensive. With a few affordable materials, you can achieve a high-quality, dazzling accessory without breaking the bank. You gain the satisfaction of a unique, high-quality accessory while also saving money. Moreover, crafting can be an incredibly relaxing and rewarding creative outlet. This project provides a tangible way to channel your artistic energy while celebrating a significant national symbol. It’s an excellent activity for individuals seeking a mindful hobby, families looking for a fun group project, or even as a thoughtful, customized gift for fellow patriots. Imagine the pride you’ll feel wearing or gifting a piece that truly reflects your dedication, creativity, and love for your country. This project is more than just making a patch; it’s about expressing identity and passion through the art of crafting.
Gathering Your Supplies: Essential Materials for a Dazzling American Flag Rhinestone Patch
Before diving into the creative process, gathering all your materials is crucial for a smooth and enjoyable crafting experience. The right supplies will not only make the process easier but also ensure your patch is not only beautiful but also durable and long-lasting. Here’s a comprehensive list of what you’ll need to create your sparkling American flag patch:
- White Felt: This will serve as the sturdy foundation for your patch. Opt for a good quality felt that is firm enough to hold its shape well, yet still easy to cut cleanly. Its crisp white color will provide a vibrant background, allowing the red, white, and blue rhinestones to truly pop and shine. Consider a medium-weight felt for optimal results.
- Rhinestone Glue or B7000 Adhesive: A strong, clear-drying adhesive is absolutely essential for securely attaching your rhinestones to the felt. B7000 glue is highly recommended by experienced crafters for its superior bond, flexibility, and precise applicator tip, which minimizes mess. However, any good quality rhinestone or fabric glue specifically designed for embellishments will work. Always ensure that your chosen glue dries completely clear to avoid any visible residue that could detract from the patch’s sparkle.
- Red Rhinestones: These gems will form the iconic red stripes of the American flag. You’ll need a sufficient quantity to create several prominent rows. Consider purchasing a pack with a slightly higher count than you estimate, just in case.
- Clear or White Rhinestones: These are vital for creating the crisp white stripes and for artfully representing the stars within the blue field. Having both clear and white options allows for subtle variations in sparkle and texture; clear rhinestones will give a brilliant, diamond-like shimmer, while white rhinestones offer a more opaque, pearl-like effect.
- Blue Rhinestones: These are crucial for forming the blue canton—the rectangular field in the upper left corner of the flag—which symbolizes vigilance, perseverance, and justice. The depth and vibrancy of your blue rhinestones will significantly impact the overall look of your flag.
- Sharp Scissors: A pair of sharp, dedicated fabric scissors is indispensable for precisely cutting your felt base. Using sharp scissors will ensure clean edges without fraying, which contributes to a more professional and polished final product.
- Wax Rhinestone Picker (or Tweezers): This specialized tool is invaluable for picking up and accurately placing tiny rhinestones. The wax tip allows you to easily grab individual rhinestones, position them precisely on the glue dots, and release them without getting glue on your fingers or accidentally damaging the delicate gems. If you don’t have a wax picker, fine-tipped crafting tweezers can also work, though they might require a bit more practice for precise placement.
Having all these items readily available and organized before you begin will streamline your crafting process, prevent interruptions, and ultimately help you achieve a truly professional and stunning finish for your patriotic rhinestone patch.
Step-by-Step Guide: Crafting Your Own American Flag Rhinestone Patch
Now that you have meticulously gathered all your materials, let’s embark on the exciting journey of creating your very own sparkling American flag patch. Follow these detailed steps carefully to ensure a stunning and precise result that you’ll be proud to display:
Step 1: Preparing Your Felt Base
Begin by taking your chosen white felt. Using your sharp scissors, carefully cut a clean, rectangular piece. This felt rectangle will serve as the sturdy base for your entire American flag design. The size of this rectangle will directly determine the final dimensions of your patch, so consider where you plan to attach it and cut accordingly. Ensure your cuts are as straight and precise as possible for a professional and polished finish. Once your felt base is perfectly shaped, it’s time to start laying the iconic stripes. Along the very bottom edge of the felt fabric, using your rhinestone glue, dab a neat row of small, consistent dots of adhesive. It’s crucial to leave a small allowance or margin (about 1/8 to 1/4 inch) around all the edges of the felt. This not only creates a clean, intentional border around your design but also provides ample space for stitching the patch onto a garment or accessory later, if desired. Work in small sections to prevent the glue from drying prematurely before you can place your rhinestones.
Step 2: Laying the First Stripes – Red and White
With your first row of glue dots meticulously placed along the bottom edge, it’s time to add the vibrant red rhinestones. Using your wax rhinestone picker (or fine-tipped tweezers), carefully pick up each individual red rhinestone and gently place it directly onto a glue dot. Apply a light, even pressure to ensure good contact between the rhinestone, glue, and felt base. Strive for a consistent line and spacing. Once you’ve completed the first red stripe, create another identical row of small glue dots directly above the newly placed red rhinestones. For this next row, select your clear or white rhinestones and meticulously place them onto these new glue dots, forming a crisp white stripe. The alternating pattern of red and white is fundamental for accurately representing the American flag. Maintaining even and consistent spacing between all rhinestones is key for a uniform, polished, and visually appealing appearance that truly sparkles.
Step 3: Building the Flag – Stripes and the Blue Field
Continue the process of adding alternate rows of red and white rhinestones, diligently working your way upwards on the felt base. Cover approximately halfway up the total height of your rectangular felt with these stripes. This ensures you leave sufficient space in the upper left quadrant for the blue canton, which will contain the stars. Now, shift your focus specifically to the upper left side of your patch, which will become the blue field. In this designated rectangular area, begin placing your blue rhinestones. To elegantly represent the stars within the blue field, you will alternate each blue rhinestone with a clear or white rhinestone. This clever technique, clearly demonstrated in the original video tutorial, creates a subtle yet brilliant starry effect against the rich blue background, embodying the iconic design of the American flag’s “field of stars.” Pay close attention to the arrangement and pattern to achieve a realistic and dazzling starry appearance.
Step 4: Completing the Design and Curing
Once you’ve successfully established the blue field and its twinkling starry pattern, proceed to fill the remaining spaces on the right side of the blue rhinestones by extending the alternate red and white stripe pattern. Ensure these newly added stripes align seamlessly and consistently with the lower red and white stripes of the flag, maintaining continuity across the entire design. Double-check all your rhinestone placements across the entire patch, making any necessary minor adjustments while the glue is still pliable and wet. After all the rhinestones are perfectly in position and you are satisfied with the design, it is absolutely crucial to allow the glue to dry and cure completely. This curing process typically takes approximately 24 hours for most rhinestone adhesives, though specific drying times can vary based on the particular glue used and environmental factors like humidity and temperature. Resist the urge to handle, move, or manipulate the patch during this critical drying period to prevent any rhinestones from shifting, detaching, or misaligning. Once fully dry and securely bonded, your dazzling American flag rhinestone patch is robust, beautiful, and proudly ready to be stitched onto your chosen garment or accessory, transforming it into a vibrant beacon of patriotism and personal style!
Tips for a Flawless and Long-Lasting Rhinestone Patch
Achieving a truly perfect and durable finish on your rhinestone patch involves a few expert tips and techniques that can significantly enhance your crafting experience and the quality of your final product:
- Practice Makes Perfect: Especially if you’re new to working with rhinestones and adhesives, consider practicing your technique on a small, insignificant scrap piece of felt first. This allows you to get a comfortable feel for the glue consistency, master the use of the picker tool, and perfect your rhinestone placement without any pressure on your main project.
- Work in Good Lighting: Proper and ample lighting is absolutely essential for seeing tiny glue dots and even tinier rhinestones clearly. This prevents errors, ensures precise placement, and allows you to appreciate the sparkle as you go. A well-lit workspace can make all the difference.
- Use a Template (Optional but Recommended): For very precise designs or if you desire perfect symmetry, you might consider drawing a faint outline of the flag’s stripes and the blue field directly onto your felt using a fabric marker that vanishes or washes out. This outline can serve as an invaluable guide for your rhinestone placement, ensuring accuracy and consistency.
- Mind the Glue Application: Always apply glue sparingly. Using too much adhesive can cause it to seep out from under the rhinestones, creating a messy appearance and potentially dulling their sparkle once dry. Small, consistent, and controlled dots of glue are key to a clean finish and strong bond.
- Ensure Even Spacing: Strive for utterly consistent spacing between your rhinestones, both within a row and between rows. This meticulous attention to detail creates a neat, professional-looking pattern for your flag’s stripes and stars, elevating the overall aesthetic of your patch.
- Allow Ample Drying Time: Patience is more than a virtue; it’s paramount in rhinestone crafting. Rushing the drying process can lead to rhinestones falling off, the glue not bonding properly, or the entire patch being less durable. Always follow the adhesive manufacturer’s recommendations for curing time, which typically ranges from 24 to 72 hours for a full, robust, and permanent bond.
- Consider Rhinestone Sizes and Shapes: While the tutorial suggests standard rhinestones, don’t be afraid to experiment! Using slightly different sizes for the blue field (perhaps smaller ones for the “stars” and larger ones for the background blue) can add more depth, dimension, and visual interest to your flag patch, making it truly bespoke.
Creative Ways to Flaunt Your DIY American Flag Patch
Once your beautiful, sparkling American flag rhinestone patch is complete and fully cured, the possibilities for showcasing your patriotism and personal style are truly endless! Your handmade masterpiece deserves to be displayed proudly. Here are some popular and creative ideas for where you can proudly display your handmade masterpiece, transforming ordinary items into extraordinary statements:
- Apparel Customization:
- Jackets: Elevate a plain denim jacket, a classic leather vest, or even a casual bomber jacket by sewing your patch onto the back, shoulder, or chest for a truly custom and patriotic statement piece that turns heads.
- Jeans & Shorts: Adorn a back pocket, a thigh, or the cuff of your favorite jeans or denim shorts. This adds a subtle yet striking touch of sparkle to your everyday wear.
- Hats & Caps: Give an instant patriotic upgrade to a plain baseball cap, a stylish sun hat, or a cozy beanie by attaching your patch. It’s a fantastic way to personalize headwear.
- Shirts & Sweatshirts: A subtle placement on a t-shirt sleeve or a more prominent spot on the front or back of a sweatshirt can transform casual wear into a unique expression of national pride.
- Accessory Embellishments:
- Bags & Backpacks: Personalize your tote bag, backpack, messenger bag, or fanny pack, making it easily identifiable, distinctly stylish, and proudly patriotic.
- Pouches & Wallets: Add a touch of flair to a plain makeup pouch, a pencil case, a sunglass case, or even a fabric wallet for a personal touch.
- Keychains: For a smaller patch, consider attaching it to a sturdy keyring to create a unique and sparkling patriotic keychain accessory.
- Home Decor Accents:
- Pillows: Stitch your patch onto a plain throw pillow to effortlessly add a patriotic and sparkling touch to your living room, den, or bedroom decor.
- Banners: Integrate it into a larger DIY patriotic banner or garland for holiday celebrations like the Fourth of July, Memorial Day, or Veterans Day.
- Quilts & Blankets: If you’re an experienced sewer, consider incorporating it into a patriotic themed quilt or decorative blanket.
- Unique Gift Ideas: A handmade American flag rhinestone patch makes an incredibly thoughtful and personal gift for veterans, active service members, history enthusiasts, or anyone who loves to celebrate their country and appreciates a handmade touch.
Remember, the patch is designed to be stitched on, ensuring a permanent and incredibly secure attachment to almost any fabric item you choose. Let your imagination be your guide in finding the perfect spot for your shimmering symbol of national pride and craftsmanship!
Caring for Your Rhinestone Patch: Keeping It Sparkling and Secure
To ensure your beautiful, custom-made American flag rhinestone patch remains dazzling, vibrant, and securely attached for many years to come, proper care and maintenance are absolutely essential. Rhinestones can be delicate, and the glue bond, while strong, benefits significantly from careful handling, especially when it comes to cleaning:
- Hand Washing is Highly Recommended: For any garments or items adorned with your rhinestone patch, hand washing is almost always the safest and most gentle option. Use cool water and a mild, gentle detergent designed for delicate fabrics. Gently agitate the water around the patch without scrubbing directly on the rhinestones themselves, which could dislodge them or weaken the adhesive.
- Avoid Harsh Chemicals: Never use bleach, strong stain removers, or aggressive cleaning agents near your rhinestone patch. These chemicals can severely damage the glue bond, dull the sparkle of the rhinestones, or even alter their color. Stick to mild, pH-neutral detergents.
- Gentle Drying Process: After washing, gently squeeze out any excess water from the item. Do not wring or twist the fabric vigorously, as this motion can put stress on the rhinestones and adhesive, potentially causing them to loosen or fall off. Instead, lay the item flat on a clean, dry towel or hang it delicately to air dry. Avoid machine dryers at all costs, as the high heat and vigorous tumbling action can permanently weaken the glue bond, melt certain types of rhinestones, and almost certainly lead to rhinestones detaching.
- Ironing Precautions: If you need to iron the garment to which your patch is attached, always turn the item inside out and iron around the patch area. If ironing directly over the patch is unavoidable, place a thick, protective cloth (like a clean towel or pressing cloth) over the rhinestones and use the lowest possible heat setting. Direct, high heat can melt the adhesive or damage the rhinestones themselves.
- Careful Storage: Store garments or accessories with rhinestone patches carefully to prevent snagging. Avoid cramming them into tight drawers or closets where rhinestones might be scratched, rubbed off, or caught on other items. Hanging items or storing them flat in a designated space is ideal.
- Promptly Address Loose Rhinestones: Periodically inspect your patch for any signs of loose or wobbly rhinestones. If you notice any becoming detached, reattach them immediately with a tiny dab of your rhinestone glue. Addressing these minor issues promptly can prevent further loss and preserve the integrity of your patch.
By diligently following these simple yet effective care instructions, you can preserve the brilliance, sparkle, and integrity of your DIY American flag rhinestone patch, allowing you to display your patriotism with pride and confidence for many years to come, ensuring your handcrafted item remains a cherished possession.
Celebrate Your Craft and Country!
Creating your very own American flag rhinestone patch is a wonderfully rewarding and deeply satisfying project that beautifully combines the joy of DIY crafting with a profound expression of national pride. It’s an easy, relatively quick, and incredibly budget-friendly way to add a deeply personalized, sparkling touch to your belongings, transforming them into truly unique statements of style and patriotism. Whether you’re eagerly preparing for an upcoming patriotic holiday, diligently searching for a meaningful and handmade gift, or simply wish to infuse some extra sparkle and personal flair into your everyday items, this comprehensive tutorial has provided all the guidance, tips, and inspiration you need to succeed.
We wholeheartedly encourage you to embark on this creative journey and experience for yourself the immense satisfaction that comes from wearing or gifting a piece you’ve crafted with your own hands, infused with love and care. Remember, the true beauty of DIY lies in its incredible versatility, the endless possibilities it offers, and the powerful ability to make something truly and uniquely your own. Don’t hesitate to visit One Little Project’s channel on YouTube for even more inspiring craft ideas, detailed tutorials, and to subscribe to discover an endless array of creative possibilities. We would love for you to share your dazzling American flag rhinestone patches with us and, in doing so, inspire countless others to embrace their inner crafter and celebrate their country with sparkle!
*All images are credited to One Little Project via YouTube. Be sure to visit her channel and subscribe for more fantastic DIY content and creative inspiration!