
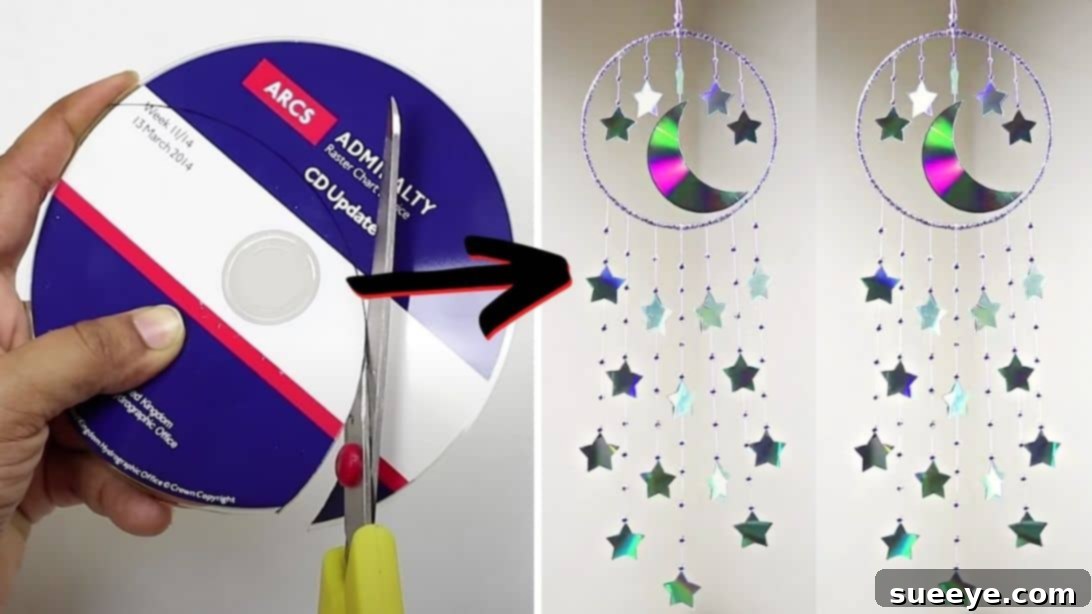
Transform Your Old CDs into Shimmering Moon and Star Hanging Decor: An Eco-Friendly DIY Guide
Do you have a collection of old, unused CDs gathering dust in a drawer or box? Instead of letting them contribute to landfill waste or simply taking up valuable space, why not give them a dazzling new purpose? This incredibly creative and rewarding DIY project allows you to upcycle those forgotten discs into a breathtaking piece of hanging decor, featuring celestial moon and star motifs. Imagine the gentle shimmer of light reflecting off these repurposed treasures, adding a unique and personalized touch to any room in your home. It’s a fantastic way to blend environmental consciousness with artistic expression, creating something truly beautiful and inspiring from what many might consider obsolete junk.
This craft is surprisingly simple to execute and requires only a handful of readily available materials, many of which you might already have around the house. You can complete this charming project in just a few hours, making it an ideal weekend activity or a quick creative break that yields stunning results. Not only is it incredibly budget-friendly, but the profound sense of accomplishment you’ll feel turning mundane items into a captivating work of art is truly priceless. Get ready to gather your old CDs and embark on this delightful crafting journey, inspired by the innovative design from NPS Crafts on YouTube, who shared this brilliant idea for repurposing everyday items into extraordinary home decor.
Materials for Your Celestial CD Decor:
Before you dive into transforming your old compact discs, ensure you have all the necessary supplies within reach. Gathering everything beforehand will make the crafting process significantly smoother, more enjoyable, and allow you to maintain your creative flow without interruptions.
- Approximately 10-12 Old CDs (the more you have, the greater your options for variations and creativity!)
- Lighter (for carefully heating and smoothing the edges of the cut CD pieces – use with extreme caution!)
- Silver beads or pearls (small to medium size, for elegant embellishments and creating visual interest)
- White cotton thread (strong and relatively thin, ideal for hanging and securely tying your decorative elements)
- Hot Glue Gun
- Hot Glue Sticks (ensure you have plenty, as you’ll use them for securing lace and quick fixes)
- Strong Craft Glue (e.g., E6000 or super glue, essential for durable, long-lasting adhesion between CD pieces)
- Paper (for creating precise templates for your shapes)
- Scissors (sharp and robust, suitable for cutting both paper templates and carefully trimmed CD pieces)
- Marker (a fine-tip marker works best for tracing patterns accurately onto the CDs)
- Large Metal Ring (approximately 4-6 inches in diameter, serving as the foundational structure for your hanging decor)
- Silver Lace or Decorative Ribbon (for wrapping the metal ring, adding a polished and attractive finish)
Step-by-Step Directions: Crafting Your Recycled CD Hanging Decor
Step 1: Preparing the Celestial Shapes from Your CDs
The first and most crucial step involves transforming your flat, circular CDs into the beautiful star and moon shapes that will form the core of your hanging decor. Precision in cutting and careful handling of materials are key at this stage.
- Create Star Templates: Begin by making two distinct star patterns on a piece of paper. For the smaller stars, draw a star that comfortably fits within a 4×4 cm (approximately 1.5×1.5 inches) square. For the slightly larger stars, create a pattern that fits within a 4.5×4.5 cm (approximately 1.8×1.8 inches) square. Carefully cut these paper star templates out with your scissors.
- Trace and Gently Heat CDs: Using your fine-tip marker, trace the smaller star template onto the shiny side of several CDs. Repeat this process with the larger star template. Your goal is to cut out a total of 14 large-sized stars and 10 small-sized stars. Before cutting each traced star, gently and briefly heat the underside of the CD along the traced lines with a lighter. This vital step softens the plastic, making it significantly easier to cut without causing the CD to crack or splinter. Always exercise extreme caution when using a lighter: ensure you work in a well-ventilated area, keep flammable materials away, and consider wearing heat-resistant gloves or using pliers to hold the CD. Adult supervision is highly recommended.
- Cut Out Your Stars: Once the plastic is slightly softened from the brief heating, use your sharp scissors to carefully cut out all your traced star shapes. You’ll notice the heated plastic cuts much more smoothly than cold, brittle plastic. Set all the beautifully cut stars aside, ready for assembly.
- Craft Crescent Moons: For the iconic crescent moon shapes that will form a centerpiece, take two full CDs. Slightly overlap one CD over the other to achieve the desired crescent silhouette. Trace this outline accurately with your marker. As with the stars, gently heat the traced lines on the CD with a lighter before carefully cutting out two identical crescent moon pieces. These two pieces will be joined to create a single, prominent moon pendant.
- Assemble Long Star Strands (Create Four): Now, let’s create the longer hanging strands that will give your decor its cascading effect. Take one small star and apply a strong craft glue (such as E6000 or super glue) evenly over its non-shiny, “wrong” side. Take a single length of white cotton thread, approximately 24-30 inches long, and create a small, neat loop at one end. Place this looped end onto the glued star, ensuring the loop extends slightly beyond the star’s top point, allowing it to serve as a hanging point later.
- Attach Second Star and Anchor Bead: Get another small star and align its wrong side precisely with the first glued star, effectively sandwiching the thread securely in between the two star halves. Press firmly for several seconds to ensure robust adhesion. Once the two stars are securely joined, forming a single star pendant, insert a silver bead at the very top point of the star, just above the loop you created. This bead acts as a decorative anchor and helps define the top of the star.
- Add More Decorative Beads: Continue by inserting four more silver beads onto the thread, ensuring you leave approximately one inch of space between each bead for visual appeal. To “lock” each bead securely in place and prevent it from sliding down the thread, simply insert the thread through the bead a second time, creating a small, almost invisible knot or loop around the thread itself before gently tightening. This technique keeps the beads neatly spaced and fixed.
- Incorporate More Stars and Beads: Approximately one inch above the final bead you just secured, attach another pair of small stars using the exact same gluing and sandwiching method described in step 5. After this second pair of stars is firmly in place, insert four more beads onto the thread, again spaced about an inch apart and secured using the double-thread technique. Leave a generous excess thread of about 4-5 inches from the last bead; this will be used for tying the strand to the main ring.
- Repeat for Multiple Strands: Repeat steps 5 through 8 three more times to create a total of four long, identical hanging star strands. Set these aside to dry thoroughly while you work on other components.
- Make Shorter Star Strands (Create Five): To introduce visual interest and varying lengths, create five shorter versions of your star strands. These shorter pieces will typically feature only one pair of stars at the bottom, followed by two beads at the very top of the thread, similar to the initial section of the longer strands. You have creative freedom here: experiment with different arrangements and lengths for these shorter pieces to add more personal flair. For instance, some might have three beads, others just one, or even simply a single star pendant.
- Construct the Moon Centerpiece: For the captivating focal point of your decor, take one of your prepared crescent moon pairs. Securely attach this pair at the very bottom of a separate length of white cotton thread (approximately 18-20 inches long) using your strong craft glue, following the same sandwiching technique you used for the stars. About an inch above the moon pair, securely attach one pair of your large stars. For an extra touch of sparkle and emphasis, consider adding a single silver bead to one pointed side of the star pair. This will create a striking and unique centerpiece for your hanging decor.
- Prepare the Metal Ring: Take your large metal ring. Begin by tightly and neatly wrapping the silver lace or decorative ribbon around the entire circumference of the ring. Ensure there are no visible gaps and that the wrapping is even and smooth. Secure both ends of the lace firmly with hot glue, making sure the glued points are discreetly hidden for a professional finish. This step gives your base structure a polished and attractive appearance.
- Assemble the Decor on the Ring: Now for the exciting part – bringing all your meticulously crafted elements together! Start looping your prepared hanging pieces (the four long star strands, the five shorter star strands, and the central moon piece) over the bottom section of the wrapped metal ring. As you attach each piece, ensure it is tied approximately one inch away from the ring itself to allow for natural movement, sparkle, and flow.
- Secure and Arrange for Balance: For each piece, knot the excess thread several times securely around the silver lace-wrapped ring. Once firmly tied, carefully trim any excess thread close to the knot for a clean look. Arrange the pieces alternately according to their length and pattern to create an aesthetically pleasing and balanced display. A good starting point is to place your four longer star strands evenly around the ring, with the prominent moon centerpiece positioned strategically between two of the shorter star pieces to highlight it. Distribute the remaining shorter pieces to fill the gaps and create a full, harmonious, and dazzling look.
- Create the Top Hanging Loop: To easily hang your completed decor, take a double length of white cotton thread (using two strands together makes it extra strong and durable). Fold this double thread in half, then tie a secure knot at the end, creating a robust loop. Insert this loop over the topmost center of the metal ring, ensuring it’s securely in place. Finally, insert two silver beads at the very top of this hanging loop, just above the ring, to provide a beautiful finishing touch and add visual balance to the entire piece.
- Safety First with the Lighter: When heating the CDs, always work in a very well-ventilated area, preferably near an open window or outdoors. Use a pair of pliers or tongs to hold the CD securely while heating to protect your fingers from heat. Keep a glass of water nearby in case of accidental scorching or if you need to quickly cool a piece.
- Practice Makes Perfect: If you’re new to cutting CDs, it’s highly recommended to try practicing on a couple of scrap CDs first. This will help you get a better feel for how much heat is needed to soften the plastic without melting it, and how to cut smoothly and precisely without causing cracks or uneven edges.
- Strategic Glue Choices: While a hot glue gun is excellent for quick tacking, securing the lace around the ring, and making minor adjustments, a stronger craft glue like E6000 or super glue is absolutely essential for bonding the CD pieces together for long-term durability and to prevent them from separating over time. Always allow ample drying time for these stronger glues, following the manufacturer’s instructions.
- Customization is Key: Don’t be afraid to experiment and unleash your creativity! You can use different colored threads, various types and sizes of beads, or even small decorative charms to personalize your decor. For a different look, you could paint parts of the CDs with acrylic paint for opaque colors, or apply glitter for an extra dose of sparkle before sealing them with a clear coat.
- Varying Lengths and Shapes: Create a more dynamic and visually interesting piece by varying the lengths of your hanging strands more dramatically. This adds depth and movement. You could also experiment with other simple geometric shapes like circles, small diamonds, or teardrops if you have extra CDs and want to expand your design.
- Alternative Rings: If you don’t have a metal ring readily available, don’t despair! You can easily substitute it with a sturdy embroidery hoop, a thick gauge wire bent into a perfect circle, or even a robust cardboard ring wrapped tightly in fabric or ribbon as an equally effective and attractive alternative base.
- Gentle Storage: When it comes time to store your beautiful decor, especially if it’s seasonal, wrap it gently in soft tissue paper, bubble wrap, or place it in a box with soft padding. This will prevent the delicate CD pieces from scratching, getting damaged, or becoming tangled.
- Significant Environmental Impact: By repurposing old CDs, which are made of non-biodegradable polycarbonate plastic, you actively participate in reducing waste and diverting plastic materials from overflowing landfills. This seemingly small act contributes positively to a larger environmental effort.
- Budget-Friendly Decor: Why invest a fortune in mass-produced, often generic decorations when you can create something truly unique, stunning, and personal using materials you already own and might otherwise discard? This project is incredibly cost-effective, allowing you to beautify your home without breaking the bank.
- Personalized and Unique Touch: Handmade decor adds an unparalleled sense of character, warmth, and individuality to any space that store-bought items often lack. Each piece tells a story, reflects your personal style, and infuses your home with a bespoke charm.
- Boost to Creative Expression: Engaging in DIY projects like this is a wonderful and fulfilling way to express your creativity, explore new crafting techniques, and enjoy a rewarding hobby. It’s a fantastic outlet for imaginative thinking and hands-on creation.
- Thoughtful and Unique Gift Idea: A meticulously handmade moon and star hanging decor makes for a truly thoughtful, heartfelt, and unique gift for friends, family, or loved ones. It’s perfect for housewarmings, birthdays, holidays, or any special occasion, conveying care and personal effort.
- Educational for Children: This project can also be a fantastic educational opportunity for older children and teenagers (with adult supervision, especially when using the lighter) to learn about recycling, sustainability, and the joy of creating something beautiful from discarded items.
Step 2: Creating Shorter Strands, Centerpiece, and Final Assembly
With your long, shimmering star strands prepared, it’s time to add variety, construct the celestial centerpiece, and bring all the beautiful elements together onto the main decorative ring.
Tips for a Perfect Recycled CD Decor Project:
To ensure your moon and star hanging decor turns out spectacular and to make your crafting experience even more enjoyable and successful, consider these helpful tips:
The Benefits of Upcycling Your CDs: More Than Just Decor
This project offers far more than just a beautiful new decoration for your home. It embodies several valuable principles and provides numerous advantages:
Conclusion: Your Sparkling Recycled Masterpiece
Congratulations! You’ve now successfully transformed a pile of obsolete compact discs into a radiant and captivating piece of celestial art. This shimmering moon and star hanging decor is not just a testament to clever recycling but also a truly beautiful and eye-catching addition to any bedroom, living room, nursery, or even a covered patio. Its reflective surfaces will catch and scatter light, creating a magical ambiance and serving as a delightful conversation starter for anyone who sees it.
We hope you thoroughly enjoyed this journey of creative upcycling, turning forgotten items into a dazzling display that brings joy and beauty into your home. Remember, the possibilities for repurposing and giving new life to old objects are truly endless, and every DIY project you undertake contributes in its own unique way to a more sustainable, creative, and beautiful world. Embrace the sparkle!
These amazing images are all credited to NPS Crafts via YouTube. Be sure to check out their channel for even more inspiring content, innovative ideas, and fantastic creative tutorials!