
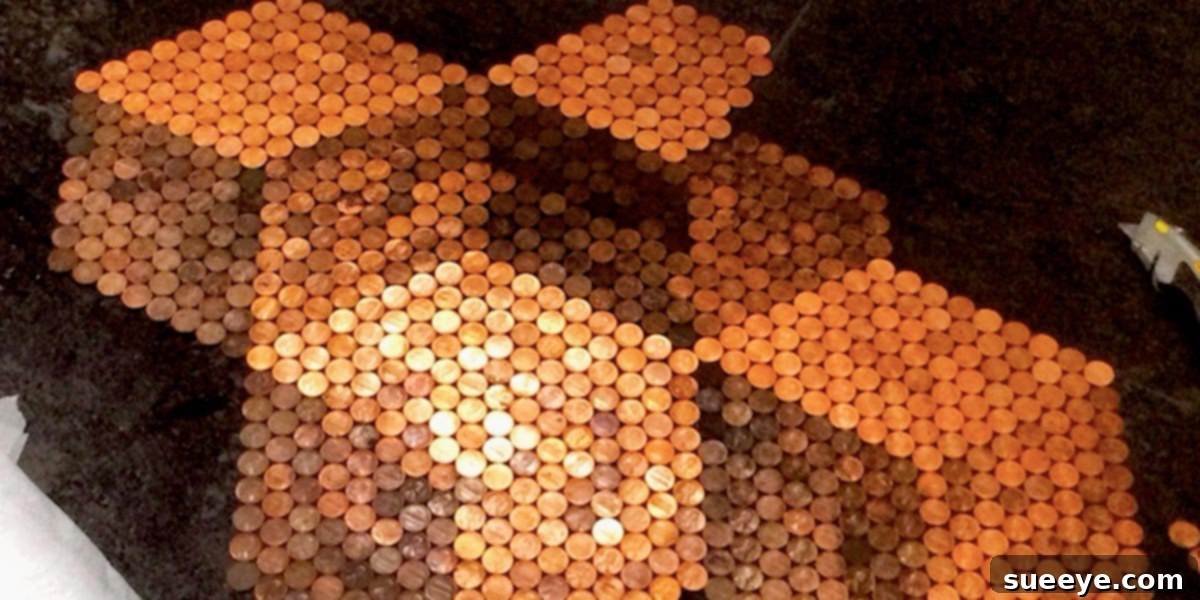
Transform Your Home with a Stunning DIY Penny Floor: An Upcycled Masterpiece
Embarking on a journey of homeownership is an exhilarating experience, filled with dreams of personalization and creating a space that truly reflects your unique style. As a new homeowner, I recently found myself swept up in the exciting world of do-it-yourself (DIY) projects. My new abode, while charming, presented certain areas that cried out for a touch of individual flair, something beyond the ordinary. It was during this exploration that a particular DIY project caught my eye and captivated my imagination: the incredible penny floor.
This concept wasn’t just another craft idea; it was a revelation. The visual appeal was absolutely mesmerizing, promising a finish that was both luxurious and deeply personal. After stumbling upon a comprehensive tutorial, I wasted no time diving in, and I can confidently say that the results have exceeded all expectations. My penny floor is nothing short of stunning, transforming a plain space into a focal point of admiration and conversation.
The Irresistible Allure of Penny Flooring: More Than Just Loose Change
In an age where the value of a single penny might seem diminished, this innovative approach breathes new life into these often-overlooked copper coins, restoring their worth in a magnificent, tangible way. The idea of repurposing materials, especially something as ubiquitous as pennies, deeply resonates with me. Coincidentally, I already had two large buckets brimming with these copper treasures, practically begging for a grander purpose. This project was not only an aesthetic choice but also a perfect solution for responsible upcycling.
A penny floor offers a remarkable blend of elegance, sustainability, and affordability, making it an increasingly popular choice for homeowners looking to infuse character and charm into their living spaces. It challenges conventional flooring norms, inviting creativity and a personal touch that mass-produced options simply cannot replicate.
A Budget-Friendly Luxury That Dazzles
Many dream of high-end, custom flooring but are often deterred by prohibitive costs. This is where the penny floor truly shines as a brilliant alternative. As eloquently highlighted by home design experts like Homeli, the concept gained widespread media attention when a couple from Chicago famously covered their 234-square-foot bedroom floor in copper coins. This monumental undertaking required an impressive 59,670 pennies. While that number might sound daunting, it translates to a mere $600 worth of currency.
When you juxtapose this cost against that of premium tiling, hardwood, or other specialized flooring materials, the value proposition of a penny floor becomes incredibly clear. You’re not just installing a floor; you’re creating a bespoke copper mosaic masterpiece for a fraction of the price. It’s a testament to the idea that true luxury can be achieved through ingenuity and resourcefulness, not just exorbitant spending.
An Eco-Conscious Choice for Sustainable Living
Beyond its aesthetic and financial benefits, the penny floor aligns perfectly with contemporary values of sustainability and eco-friendliness. In an era increasingly conscious of waste reduction, the ability to repurpose and upcycle materials is invaluable. Pennies, often accumulated in jars and forgotten drawers, rarely see active circulation anymore. Many people are left with pots full of these coins, while some even resort to discarding them.
Utilizing pennies as floor tiles transforms these “nuisance coins” into a beautiful, functional, and durable surface. It’s a powerful statement against disposable culture, giving a second, more glamorous life to items that would otherwise sit idle or be discarded. This commitment to reusing and upcycling not only enriches your home but also contributes positively to a more sustainable lifestyle.
The Unique Aesthetic: A Copper Mosaic Masterpiece
The visual impact of a penny floor is undeniably striking. The warm, metallic luster of copper coins, laid out in an intricate mosaic pattern, creates a dynamic surface that shifts and shimmers under different lighting conditions. Each penny, with its unique patina and subtle variations, contributes to a rich tapestry of texture and color. You can opt for a uniform look, carefully aligning each coin heads-up or tails-up, or embrace a more eclectic, random arrangement that highlights the individuality of each coin.
The choice of grout color also plays a pivotal role in defining the final aesthetic. A dark grout can create stark contrast, making each penny pop, while a lighter grout can soften the overall look, creating a more cohesive, subdued shimmer. Regardless of the design choices, a penny floor instantly becomes the focal point of any room, sparking conversation and admiration for its originality and craftsmanship.
Revolutionizing Installation: The Mindful Design Reno Approach
One of the primary reservations people often have about DIY penny floors is the perceived complexity and tediousness of the installation process. The thought of meticulously laying out thousands of individual coins, often on hands and knees, can be daunting, especially for those with physical limitations or simply a desire for efficiency. This is precisely why the ingenious technique pioneered by the woman behind Mindful Design Reno is nothing short of a game-changer.
Her method brilliantly sidesteps the back-breaking traditional approach, offering a solution that is both practical and incredibly effective. I’ve witnessed countless videos depicting people painstakingly arranging pennies while on all fours—a posture I know I’d never be able to recover from! Her technique eliminates this challenge, making the project accessible and enjoyable for a wider range of DIY enthusiasts.
A Game-Changer: Contact Paper and Picture Frames
The core of Mindful Design Reno’s revolutionary method lies in pre-assembling penny “sheets” off the floor. She ingeniously uses contact paper and cheap picture frames as temporary templates for her squares. This allows for the precise arrangement of pennies into manageable sections away from the final installation site. Here’s how it works and why it’s so effective:
- Off-Site Assembly: Instead of gluing individual pennies directly onto the floor, you create small, pre-arranged panels. This allows you to work comfortably at a table or workbench.
- Precision and Consistency: Using the grid of a picture frame helps maintain uniform spacing and alignment, ensuring a professional and consistent look across your entire floor.
- Reduced Physical Strain: No more kneeling or crawling for hours! This method drastically reduces the physical demands of the project, making it far more enjoyable and less fatiguing.
- Faster Installation: Once your penny sheets are prepared, the actual floor installation becomes significantly quicker. You’re laying down large sections rather than individual coins.
- Error Correction: It’s easier to adjust or correct patterns on a contact paper sheet than on an already glued-down floor.
This innovative approach transforms a potentially arduous task into an organized, efficient, and surprisingly enjoyable creative endeavor. It truly democratizes the penny floor project, making it achievable for almost anyone.
Planning Your Penny Project: From Concept to Copper Creation
While the penny floor project is incredibly rewarding, successful execution hinges on meticulous planning and preparation. Rushing into the installation without a clear strategy can lead to unforeseen challenges and less-than-perfect results. Think of it as laying the groundwork not just for your floor, but for a smooth and satisfying DIY experience.
Essential Preparations for a Flawless Finish
The foundation of any great floor lies in its subfloor. Before a single penny is laid, ensure your subfloor is impeccably clean, dry, level, and structurally sound. Any inconsistencies will be magnified in the final penny surface. Fill any cracks, sand down high spots, and ensure a smooth, uniform base. A properly prepared subfloor is crucial for the longevity and aesthetic appeal of your penny floor. Consider applying a good quality primer to ensure optimal adhesion for your chosen adhesive.
Design and Layout: Unleashing Your Creativity
This is where your artistic vision comes to life. Decide on your penny pattern: will it be a random mix of heads and tails, an organized grid, a spiraling design, or perhaps alternating shades of newer and older pennies for depth? Think about borders, central motifs, or even incorporating other materials. The grout color, as mentioned, is also a critical design choice. Experiment with different colors on a small test area to visualize the final effect. Some popular grout choices include black for high contrast, white for a softer, cleaner look, or even a metallic bronze to blend seamlessly with the copper.
Calculating Your Copper Cache
Accurately estimating the number of pennies required is vital. A general rule of thumb is approximately 250-300 pennies per square foot, though this can vary slightly depending on your chosen grout line width. Measure your area carefully and factor in a small buffer for mistakes or damaged coins. Sourcing your pennies can be an adventure in itself. Banks are a common source, often willing to provide rolls of pennies. Don’t underestimate your own collection, or those of friends and family. Some DIYers even organize “penny drives” to gather the necessary volume.
The Step-by-Step Journey: Bringing Your Penny Floor to Life
Once your planning is complete and your penny sheets are meticulously prepared using the Mindful Design Reno method, the actual installation onto your subfloor becomes a much more manageable and exciting phase. While specific products and techniques may vary, the general steps remain consistent. Remember, watching detailed video tutorials—like the one linked in the original article—is highly recommended to visualize each stage of the process.
Adhering Your Artistry
The choice of adhesive is crucial. A strong, flexible adhesive designed for flooring, such as thin-set mortar or a high-quality construction adhesive, is typically used. Apply the adhesive evenly to a manageable section of your prepped subfloor. Carefully lay your pre-assembled penny sheets onto the adhesive, pressing firmly to ensure good contact. Work methodically, section by section, ensuring proper alignment between each sheet and continuously checking for levelness. Small gaps between sheets will be filled by the grout.
Grouting for Durability and Definition
After the adhesive has fully cured (allow sufficient time as per product instructions), it’s time for grouting. This step is essential not only for sealing the gaps between pennies but also for providing structural integrity and defining the mosaic pattern. Mix your chosen grout according to the manufacturer’s directions, ensuring a consistent, workable paste. Apply the grout generously over the entire penny surface, using a rubber float to push it firmly into all the spaces. Work in small sections, wiping away excess grout with a damp sponge as you go, before it hardens. This prevents a hazy residue from drying on the pennies.
Sealing the Deal: Protecting Your Investment
Once the grout has cured, the final and perhaps most critical step is sealing your penny floor. This protective layer shields the copper from oxidation, corrosion, and wear, while also making the surface smooth, easy to clean, and enhancing its luster. Choose a high-quality, clear epoxy or polyurethane sealant designed for heavy-duty floor applications. Apply multiple thin coats as per product instructions, allowing adequate drying time between each. The sealant will give your floor a durable, glassy finish, locking in the beauty of the copper coins for years to come.
Living with a Penny Floor: Beauty and Practicality
A penny floor is not just a temporary art installation; it’s a durable, functional surface designed for everyday living. With proper care and maintenance, your copper masterpiece will continue to impress and stand the test of time, proving to be both beautiful and remarkably practical.
Maintenance Made Simple
Maintaining a sealed penny floor is surprisingly straightforward. Regular sweeping or vacuuming will keep dust and debris at bay. For cleaning, simply use a damp mop with a mild, pH-neutral floor cleaner. Avoid harsh chemicals or abrasive scrubbers, which could damage the sealant. Periodically, depending on foot traffic and the type of sealant used, you might need to reapply a fresh coat of sealant to maintain its protective qualities and shine. This proactive approach ensures your penny floor remains vibrant and resilient.
Addressing Common Misconceptions
Many potential DIYers have questions or concerns about penny floors. Let’s address a few common ones:
- Is it legal? Absolutely. Using pennies as a building material is not considered defacing currency, as long as you’re not trying to alter their monetary value for fraudulent purposes.
- Is it comfortable to walk on? Once properly grouted and sealed, a penny floor presents a surprisingly smooth and even surface, similar to any tiled floor. The tactile experience is unique, but not uncomfortable.
- Does it look cheap? Quite the contrary. A well-executed penny floor, with its intricate details and warm copper glow, often evokes a sense of bespoke luxury and artistry. It looks custom-made, not makeshift.
- Will the copper tarnish? While raw copper will naturally patina over time, a good quality sealant significantly slows down this process, preserving the bright, reflective quality of the coins. If a more antique, muted copper look is desired, a specific sealant can be chosen, or the reapplication frequency reduced.
Unleash Your Inner Artisan: Your Penny Floor Awaits!
The journey from contemplating a renovation to standing on your own hand-crafted penny floor is immensely satisfying. It’s a project that offers a rare combination of visual splendor, cost-effectiveness, environmental responsibility, and the deep personal gratification that comes from creating something truly unique with your own hands. The transformation it brings to a room is undeniable, creating a focal point that is both elegant and deeply personal.
My own experience has proven that this is a DIY endeavor well worth the effort—the results are absolutely stunning and elicit compliments from everyone who sees it. So, if you’re looking for a project that blends artistry with practicality, sustainability with luxury, I wholeheartedly encourage you to explore the world of penny flooring. Watch the step-by-step tutorials available online, gather your coins, and get ready to embark on a marvelous flooring project that will not only enhance your home but also become a proud testament to your creativity and ingenuity!