
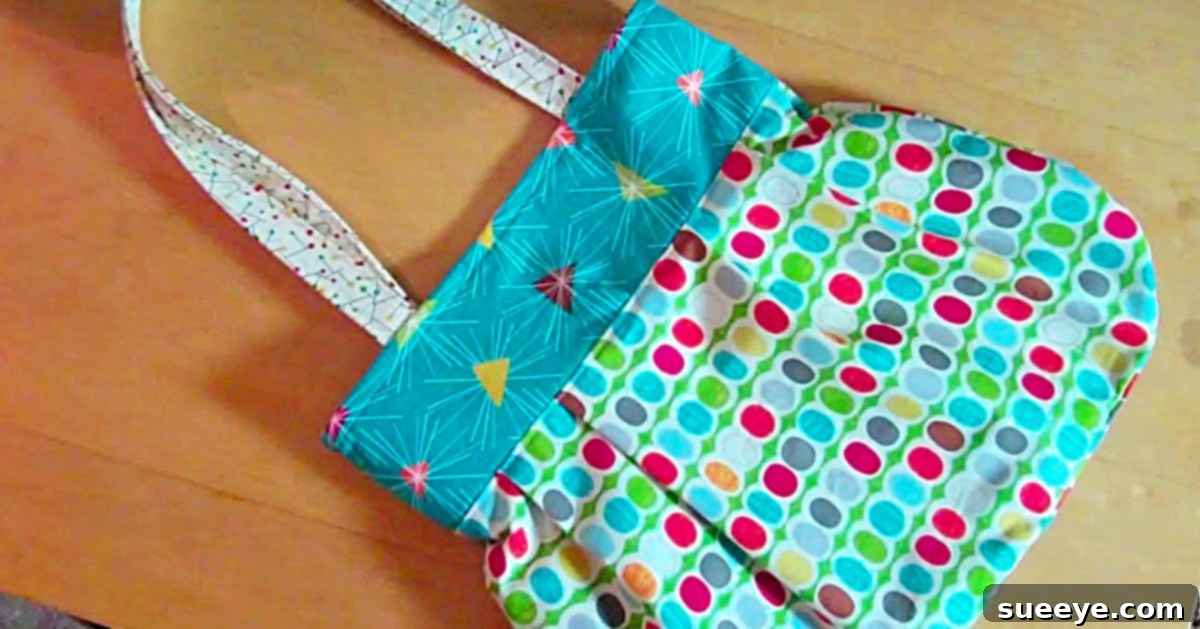
Craft Your Own Reversible Canvas Tote Bag: The Ultimate DIY Sewing Project
Discover the joy and practicality of creating your very own reversible canvas tote bag! This project stands out for two remarkable reasons: its ingenious design offers two distinct styles in one, and it leverages incredibly cost-effective materials. Imagine transforming a simple canvas drop cloth, readily available at any hardware store like Home Depot, into a chic and durable accessory. While canvas drop cloth provides an excellent foundation, feel free to explore other cotton or sturdy canvas fabrics to match your personal aesthetic.
One of the most appealing features of this DIY reversible bag is its open, no-closure design. This makes it an absolute dream for shopping trips, allowing you to seamlessly transfer purchases directly into your bag without fumbling with zippers or buttons. It’s not just a shopping companion; its versatility extends to a beach bag, a craft tote, or simply an attractive holder for items on your desk. The moment I envisioned its practicality, I was eager to start my own for all my daily needs.
Embarking on this sewing adventure begins with gathering your essential materials. For this project, you’ll primarily need two contrasting pieces of fabric – one robust canvas, such as the aforementioned Home Depot drop cloth, and another complementary cotton fabric for the lining and border elements. The beauty of this design lies in its simplicity. The sewing instructions are exceptionally straightforward, guiding you through each step. You’ll start by cutting your pattern pieces, then preparing your outer fabric layer and the stiff canvas drop cloth, and finally, bring them to life with your sewing machine.
The choice of interfacing is crucial for defining the structure and utility of your bag. If your primary goal is a soft, pliable tote bag simply for transport, a lighter interfacing will suffice. However, if you desire a bag that stands tall and holds its shape, making it an attractive organizational piece for a desk or craft room, I highly recommend using a heavy fusible interfacing. Fusible interfacing, which you iron directly onto your fabric, is an excellent option for beginners and seasoned sewers alike. It seamlessly integrates with your fabric, enhancing durability and giving your project a much more polished and professional finish. It truly transforms the fabric into a more substantial and resilient component, ensuring your handmade bag lasts for years to come.
Why Sew a Reversible Tote Bag? Unveiling Its Many Benefits
Beyond the satisfaction of creating something with your own hands, a DIY reversible tote bag offers a plethora of advantages that make it an indispensable accessory:
- Two Bags in One: The most obvious benefit is its dual functionality. With a simple flip, you have a completely different bag to match various outfits, moods, or occasions. It’s like having an instant wardrobe upgrade for your accessories.
- Eco-Friendly & Budget-Conscious: Repurposing materials like a canvas drop cloth not only saves money but also reduces waste. You’re giving new life to an inexpensive item, turning it into a stylish and practical piece.
- Customization at Its Best: From selecting contrasting fabrics to adding personalized embellishments, this project offers endless opportunities for creativity. You can truly make it your own, reflecting your unique style.
- Durability and Longevity: Canvas, especially when reinforced with heavy interfacing, creates an incredibly robust bag. It’s designed to withstand daily wear and tear, making it perfect for groceries, books, or craft supplies.
- Practical & Versatile: The open top makes it ideal for quick access to items, while the sturdy construction allows it to stand upright, making it functional in various settings, from a busy market to a quiet office.
- Skill Building: For those new to sewing, this project is an excellent way to practice fundamental skills like cutting, seaming, pleating, and strap construction.
Materials You’ll Need: Building Your Reversible Tote
Before diving into the creative process, ensure you have all your materials ready. A well-prepared workspace makes for a smoother and more enjoyable sewing experience.
- Fabric:
- 4 Rectangle Sections (19 inches across by 10 inches deep): This refers to two pieces for the outer bag and two matching or contrasting pieces for the inner lining. When purchasing fabric, consider both the main body and the top band/straps.
- Outer Fabric: A sturdy material like canvas (a canvas drop cloth from Home Depot is highly recommended for its cost-effectiveness and durability), duck cloth, or denim. Its robust nature makes the bag long-lasting.
- Lining Fabric: A medium-weight cotton, quilting cotton, or even another canvas. Choose a color or pattern that complements your outer fabric and creates an exciting contrast when reversed. Ensure enough fabric for the main body and for constructing comfortable, sturdy straps.
- 4 Rectangle Sections (19 inches across by 10 inches deep): This refers to two pieces for the outer bag and two matching or contrasting pieces for the inner lining. When purchasing fabric, consider both the main body and the top band/straps.
- Sewing Machine: Any standard sewing machine capable of handling medium-to-heavy fabrics will work. Ensure you have a fresh needle, ideally a denim or heavy-duty needle, to prevent skipping stitches when working with canvas.
- Scissors: A good pair of fabric shears is essential for clean, accurate cuts. Keep them sharp and dedicated solely to fabric.
- Thread: A strong polyester thread that matches or complements your fabrics. For canvas, consider a heavier-duty thread for added strength in seams and topstitching.
- Interfacing: This is critical for giving your bag structure and durability.
- Heavy Fusible Interfacing: Strongly recommended for a bag that stands up on its own. It’s ironed directly onto the wrong side of your fabric, adding stiffness and body. Ensure you have enough to reinforce the main body panels and potentially the straps.
- (Optional) Medium Fusible or Sew-in Interfacing: If you prefer a softer, more pliable bag, a medium-weight interfacing can be used.
- Basic Sewing Notions:
- Iron and Ironing Board: Absolutely essential for pressing seams open and flat, and for applying fusible interfacing. Do not skip this step!
- Measuring Tape or Ruler: For accurate fabric measurements and pattern cutting.
- Fabric Marker or Chalk: For marking cut lines, pleat positions, and strap attachment points.
- Pins or Fabric Clips: To hold fabric layers together securely while sewing.
Step-by-Step Directions: Crafting Your Reversible Canvas Tote Bag
Follow these detailed instructions to construct your beautiful and functional reversible tote bag. Take your time with each step, and remember that pressing your seams is key to a professional finish.
1. Prepare Your Fabric & Construct the Outer and Inner Bag Sections
Before cutting, pre-wash and iron all your fabrics to prevent shrinkage and ensure a smooth working surface. For the main body of the bag, you’ll be cutting four identical rectangle sections (19 inches wide by 10 inches deep), including a seam allowance around all sides. Two of these will be for your outer bag, and two for your lining.
First, cut your top band pieces for both the outer and inner bag from your chosen fabrics. These bands will give your bag a clean, finished look at the top edge. Now, take two of your main body fabric pieces (e.g., your canvas for the outer bag) and two corresponding top band pieces. Attach your heavy fusible interfacing to the wrong side of these outer fabric pieces, following the manufacturer’s instructions. This will give your bag its sturdy structure.
Next, you will sew the outer body of your bag to its respective top band. To add style and shape, create four evenly spaced pleats along the top edge of each main body panel before attaching the band. To do this, mark the pleat positions, fold the fabric, and press them flat. Pin the top band, right sides together, to the pleated top edge of your main body panel, matching raw edges. Stitch them together. Repeat this process for the other outer body panel, and then for both of your inner bag panels (lining fabric). You should now have four complete sections: two for the outer bag and two for the inner lining, each with its top band attached.
2. Assemble the Outer and Inner Bags, Creating the Reversible Feature
Now that you have your individual bag sections, it’s time to assemble them into the outer and inner components. Take your two outer bag sections (canvas with top band) and place them right sides together. Pin along the side seams and the bottom seam. Stitch these seams, leaving the top edge open. Repeat this exact process for your two inner lining sections (cotton with top band).
To create a flat, structured bottom for your bag (allowing it to stand up on a desk!), you’ll create box corners. At each bottom corner of both the outer and inner bags, align the side seam with the bottom seam, forming a triangle. Measure in from the point of the triangle (e.g., 2 inches), draw a line, and stitch across it. Trim the excess fabric, leaving a seam allowance.
Once both the outer and inner bags are sewn and have their box corners, it’s time to join them. Turn the outer bag right side out and leave the inner bag wrong side out. Place the outer bag inside the inner bag, ensuring their right sides are facing each other. Align the top raw edges perfectly, matching the side seams. Pin them all around the top. Stitch all along this top edge, but remember to leave a small gap (approximately 4-6 inches) along one side seam of the lining. This gap is crucial for turning your entire bag right side out. After stitching, clip the curves and corners if necessary, and press the seam open around the opening.
3. Sew Your Straps for Comfort and Durability
The straps are essential for carrying your beautiful new bag. You’ll need two strap pieces, typically cut from your chosen lining fabric or a matching canvas for extra strength. A good starting point for strap dimensions is about 3 inches wide by 25-30 inches long, but feel free to adjust this to your preferred length and width. If you want exceptionally sturdy straps, you can interface them as well.
To sew each strap, fold the fabric strip in half lengthwise, right sides together, and press. Stitch along the long raw edge to form a tube. Turn the strap right side out using a loop turner or a safety pin. Press the strap flat, ensuring the seam is neatly tucked inside. For a more professional look and added durability, topstitch along both long edges of each strap, about 1/8 inch from the edge. This also helps the strap maintain its shape.
4. Attach the Straps to Your Reversible Bag
With your bag turned right side out through the gap you left, carefully push out all the corners and seams to ensure a crisp finish. Now, it’s time to attach the straps. Determine the desired placement for your straps – typically centered over the side seams or slightly inward from the side seams, ensuring they are evenly spaced. Pin one end of a strap to the top edge of the bag, approximately 3-4 inches from the side seam. Make sure the strap is not twisted before pinning the other end to the corresponding position on the other side of the bag’s top edge.
Repeat this for the second strap. For maximum durability, stitch the straps securely in place using a strong box stitch or by sewing a square with an ‘X’ through it. This reinforcement will prevent the straps from pulling away from the bag, especially when carrying heavier items. Once your straps are firmly attached, you will close the turning gap in the lining. You can hand-stitch this opening closed with an invisible slip stitch for a clean finish, or you can topstitch around the entire top edge of the bag (approximately 1/8 to 1/4 inch from the edge) which will also close the gap and give a polished, tailored look to your tote.
Tips for Success and Customization Ideas
To ensure your reversible bag turns out beautifully and serves you well, keep these tips in mind:
- Press, Press, Press: Ironing your fabric and pressing your seams at every stage of the sewing process is the secret to a professional-looking finish.
- Seam Allowances: Be consistent with your seam allowances. A 1/2 inch or 5/8 inch seam allowance is standard for bags and provides extra strength.
- Reinforce Stress Points: Always backstitch at the beginning and end of seams, especially where straps are attached or where the bag will bear weight.
- Topstitching: Add topstitching along the top edge of the bag and the straps for a clean, finished look and added durability.
Personalize Your Reversible Tote:
- Embellishments: Before assembling, consider adding embroidery, stenciling, fabric paint, or patches to your canvas outer fabric.
- Pockets: Sew a simple patch pocket onto the lining fabric before joining the inner sections for added organization.
- Closures: While the original design is open, you could easily add a magnetic snap, a button and loop, or even a simple tie closure to the top band if desired.
- Strap Variations: Experiment with different strap materials like webbing, rope, or even faux leather for a different look and feel.
- Size Adjustments: Feel free to modify the dimensions to create a larger market tote, a smaller everyday bag, or even a clutch.
Conclusion: Your New Favorite Handmade Accessory
This reversible canvas tote bag is more than just a sewing project; it’s an opportunity to create a truly adorable, useful, and personalized accessory. From its humble beginnings as a canvas drop cloth to a versatile fashion statement, you’ll marvel at its transformation. The inherent durability of canvas, combined with the structural support of heavy interfacing, ensures that this bag is not just pretty but also incredibly practical for everyday use. Whether you’re heading to the grocery store, carrying books to the library, or simply need a stylish holder for your crafting supplies, this DIY tote is up to the task.
I wholeheartedly recommend this project to anyone looking for a rewarding sewing experience. The clear instructions and satisfying outcome make it a fantastic choice for both novice and experienced sewers. Embrace the chance to customize your bag, making it a unique reflection of your style. Enjoy the process of creation, and revel in the compliments you’re sure to receive on your beautiful, handmade reversible tote bag!