
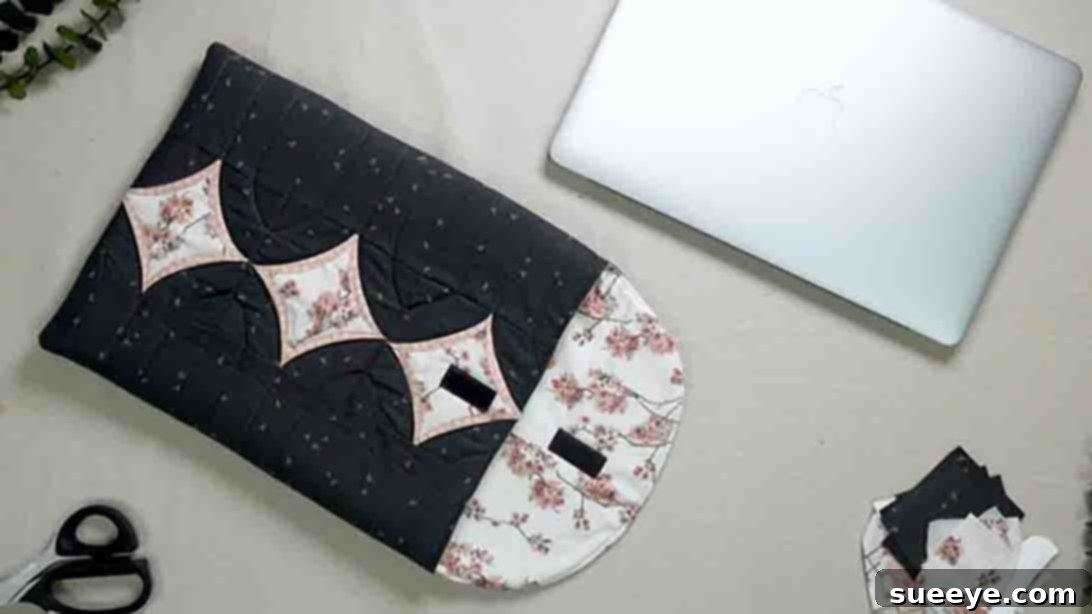
Embark on a delightful sewing journey with this inspiring quilted laptop case project, a true standout among handmade creations. Drawing inspiration from the detailed tutorial by Art Gallery Fabrics on YouTube, this project offers a rewarding challenge for quilters of all levels, especially those looking to advance their skills beyond basic stitches. Creating your own laptop sleeve not only provides superior protection for your device but also allows for an unparalleled touch of personal style. The satisfaction of crafting something both beautiful and functional is immense, making this project a fantastic way to express your creativity. If you’re ready to tackle a more intricate quilt design and achieve a professional-looking result, this comprehensive guide will walk you through every step. Prepare your materials and let’s dive into making a durable, chic, and personalized laptop case that you’ll be proud to use or gift!
Crafting Your Own Quilted Laptop Case: A Detailed Tutorial
In an age where our laptops are essential companions, protecting them with a custom-made, quilted sleeve is not just practical – it’s a statement. This project combines the art of quilting with functional design, resulting in a robust yet stylish case. Whether you’re safeguarding your device from daily bumps or simply want to carry it in style, this tutorial provides all the insights you need. We’ll explore material selection, precise cutting, intricate block assembly, and expert finishing touches to ensure your quilted laptop case is both protective and aesthetically pleasing.
Making a quilted laptop case is more than just a sewing task; it’s an opportunity to learn new techniques, refine existing ones, and enjoy the therapeutic process of fabric creation. This particular design, inspired by Art Gallery Fabrics, incorporates beautiful elements like carefully pieced blocks and cathedral window accents, elevating it beyond a simple pouch. Even if you’re a beginner, don’t shy away from this challenge! The detailed instructions below, coupled with the visual guidance from the original video tutorial, will make the process manageable and enjoyable. Plus, with a free downloadable pattern, you have everything you need to start this exciting DIY adventure.
Essential Materials for Your Quilted Laptop Sleeve
Gathering the right materials is the first crucial step in any successful sewing project. For this quilted laptop case, we’ve carefully selected fabrics and notions that ensure both durability and a professional finish. Investing in quality materials will not only make the sewing process smoother but will also result in a laptop case that stands the test of time and truly protects your valuable device.
- 1/2 yard printed fabric A: This will be one of your primary design fabrics, often used for repeating patterns or accent pieces within your blocks.
- 3/4 yard printed fabric B: As your main background or contrasting fabric, fabric B plays a significant role in defining the overall look of your quilt blocks.
- 5/8 yard printed fabric C: This fabric will be prominently featured in the unique “cathedral windows” technique, adding a delightful visual element.
- 5/8 yard solid-colored fabric D: Ideal for the inner lining, a solid fabric provides a clean finish and complements the patterned exterior without distracting from it.
- Template: Essential for precise shaping, especially for the top curve of the laptop case. Ensure your template matches the dimensions specified in the free pattern.
- Ruler: A clear acrylic quilting ruler with precise measurements is indispensable for accurate cutting.
- Rotary Cutter: For clean, quick, and precise cuts, a sharp rotary cutter is highly recommended. Always use it with a cutting mat.
- Pins: A good supply of sharp, fine pins will help you hold fabric pieces together securely before and during sewing.
- Hi-loft batting: This type of batting provides excellent cushioning and protection for your laptop, giving the case its padded, quilted feel.
- Velcro: For a simple yet secure closure, Velcro strips are an ideal choice, keeping your laptop safely tucked inside.
- Click here for the free pattern (PDF): Don’t forget to download and print this essential guide for all cutting dimensions and assembly diagrams.
Preparing Your Fabrics: Accurate Cutting is Key
Precision in cutting is paramount for any quilting project, as it ensures that all your pieces fit together perfectly, resulting in crisp seams and well-aligned patterns. Before you begin cutting, it’s a good practice to press all your fabrics to remove any wrinkles or creases. Use your rotary cutter, ruler, and self-healing mat for the most accurate results. Always double-check your measurements before making the final cut.
- From fabric A:
- Two 20 1/2″ x 4″ rectangles (for outer borders)
- Two 15 1/2″ x 4″ rectangles (for inner borders)
- Twenty-eight 3″ squares (for quilt blocks)
- From fabric B:
- Twenty-eight 3″ squares (for folded elements in quilt blocks)
- One 12 1/2″ x 15 1/2″ rectangle (for inner structure/lining piece)
- One 12 1/2″ x 20 1/2″ rectangle (for inner structure/lining piece)
- From fabric C:
- One 12 1/2″ x 20 1/2″ rectangle (for main lining piece)
- One 12 1/2″ x 15 1/2″ rectangle (for main lining piece)
- Seven 3″ squares on point (for cathedral window centers)
- From fabric D:
- One 12 1/2″ x 15 1/2″ rectangle (for batting backing/stabilizer)
- One 12 1/2″ x 20 1/2″ rectangle (for batting backing/stabilizer)
Step-by-Step Guide to Sewing Your Quilted Laptop Case
Now that your materials are prepped, it’s time to bring your vision to life. This section details each stage of the construction process, from piecing intricate blocks to assembling the final case. Take your time with each step, paying close attention to seam allowances (typically 1/4 inch for quilting) and pressing. Precision and patience will yield the best results.
Step 1: Constructing the Quilt Blocks
The foundation of your quilted laptop case lies in its meticulously pieced blocks. This step involves creating several smaller units that will eventually come together to form the main quilted panels. Accuracy here is crucial for the overall success of the project.
- Preparation: Begin by ensuring all your fabric pieces are accurately cut as per the cutting list. This foundational accuracy will prevent headaches later on.
- Folding Fabric B Squares: Take each of your twenty-eight 3″ squares from Fabric B. Fold each square diagonally, corner to corner, and press firmly to create a crisp fold line. These folded squares will form the distinctive layered look within your blocks.
- Block 1 Assembly (14 pieces):
- Take one folded square from Fabric B.
- Position it onto the bottom right corner of one 3″ square from Fabric A, aligning the raw edges.
- Sew along the raw edges or just inside the fold line to secure the folded square.
- Repeat this process to create a total of 14 Block 1 units.
- Block 2 Assembly (14 pieces):
- Similar to Block 1, take another folded square from Fabric B.
- Place it onto the bottom left corner of a different 3″ square from Fabric A, again aligning raw edges.
- Sew to secure.
- You will need 14 Block 2 units.
- Block 3 Assembly (14 pieces):
- Now, take one Block 1 unit and one Block 2 unit.
- Place them right sides together, aligning the edges where the folded Fabric B squares meet, and sew them together. This will create a larger block with Fabric B sections at opposing corners.
- Produce a total of 14 Block 3 units.
- Block 4 Assembly (7 pieces):
- Combine two Block 3 units by sewing them right sides together. This will form a larger square block, which will be the base for your “cathedral window” elements.
- You need to make seven of these Block 4 units. Press your seams open or to one side consistently to minimize bulk.
Step 2: Creating Cathedral Windows and Assembling the Case Panels
This step introduces the beautiful “cathedral window” effect and begins the process of assembling the front and back panels of your laptop case. This technique adds depth and a professional touch to your quilted design.
- Forming Cathedral Windows:
- Take one 3″ square from Fabric C, which you cut “on point” (meaning it’s oriented diagonally). Place it precisely at the center of one of your Block 4 units.
- Carefully grab the folded edge side of Fabric B from the Block 4 unit. Fold it over towards the edge of the Fabric C square, creating a small border around the central square.
- Topstitch this folded edge down, securing it in place.
- Repeat this folding and topstitching process on the remaining three sides of the Fabric C square. This technique will frame the Fabric C square beautifully, creating the distinctive cathedral window look.
- Perform this on all seven of your Block 4 units.
- Assembling the Front Panel:
- Lay out three of your completed Block 4 units in a row.
- Sew these three blocks together, right sides facing, to form the main front panel structure. Press seams open for a flatter finish.
- Next, take one of the 15 1/2″ x 4″ rectangles (from Fabric A) and sew it to each side of this 3-block structure. These rectangles will act as side borders for the front of your laptop case. This completes the front quilted panel.
- Assembling the Back Panel:
- Arrange four of your remaining Block 4 units in a row.
- Sew these four blocks together, right sides facing, to create a longer panel for the back of the case. Again, press seams carefully.
- Now, attach one of the 20 1/2″ x 4″ rectangles (from Fabric A) to each side of this 4-block structure. These will form the side borders for the back of your laptop case.
- Shaping the Top of the Back Panel:
- Using your designated template (from the free pattern), carefully trim the top edge of the 4-block structure (the back panel). This step creates the curved opening of your laptop case, giving it a sleek and finished appearance. Take care to align the template precisely to ensure a symmetrical curve.
Step 3: Quilting, Lining, and Final Assembly
This final stage brings all the components together, adding the crucial batting for protection and the lining for a clean interior. These steps are where your laptop case truly takes its final form and function.
- Quilting the Main Panels:
- Place your hi-loft batting on the back of the front quilted panel and the back quilted panel. Smooth out any wrinkles.
- Quilt these pieces as desired. Simple straight lines following the seams of your blocks, or diagonal lines, work beautifully and are easy for beginners. You can use a walking foot on your sewing machine to help feed the layers evenly. The quilting stitches secure the batting to the fabric, adding structure and durability.
- After quilting, carefully trim any excess batting from around the edges of both quilted panels, ensuring they maintain their original dimensions.
- Preparing the Inner Lining (Fabric D):
- Take your 12 1/2″ x 20 1/2″ rectangle and your 12 1/2″ x 15 1/2″ rectangle from Fabric D.
- Place them right sides together, aligning the long edges.
- Sew along the sides and the bottom edge, leaving the top open.
- Turn this lining piece right side out. This forms a simple pocket that will house your laptop.
- Assembling the Outer Shell (Fabric C):
- Take your 12 1/2″ x 20 1/2″ rectangle and your 12 1/2″ x 15 1/2″ rectangle from Fabric C. These will form the main outer lining.
- Place them right sides together and sew them together along the sides and bottom, similar to the Fabric D lining.
- Important: Leave a 3″ to 4″ gap unstitched at the bottom edge of this Fabric C lining. This gap is crucial for turning the entire case right side out later.
- Joining the Main Structure with Lining:
- Insert your quilted front and back panels (the “main structure”) into the Fabric C lining. Make sure the quilted panels are right sides out, and the lining is right sides in. Align the raw edges at the top opening.
- Pin all layers securely around the top edge.
- Sew them together along the top perimeter, careful to catch all layers evenly.
- After sewing, clip the corners of the seam allowance to reduce bulk, particularly around the curved top section. This will help the corners lie flat when turned.
- Finishing the Case:
- Carefully turn the entire laptop case right side out through the unstitched gap at the bottom of the Fabric C lining. Push out all corners gently to create a crisp shape.
- Once turned, hand-stitch or machine-stitch the gap in the lining closed. A ladder stitch is ideal for an invisible finish if hand-stitching.
- Press the entire case, paying attention to the edges.
- Topstitch around the entire perimeter of the top opening of the case. This not only adds a decorative touch but also helps the opening maintain its shape and provides extra durability.
- Finally, take your two pieces of Velcro. Decide on their optimal placement for a secure closure on your laptop case (usually near the top opening). Sew one piece of Velcro to the inside flap and the corresponding piece to the main body of the case. Reinforce with several lines of stitching for durability.
Your Custom Quilted Laptop Case Awaits!
Congratulations! You’ve successfully completed your very own quilted laptop case. This project, while challenging, is incredibly rewarding. The beauty of a handmade item like this is not just in its functionality but in the unique story it tells. Each stitch reflects your effort, creativity, and dedication.
This quilted laptop sleeve offers superior protection against scratches and minor impacts, thanks to the plush hi-loft batting. Beyond practicality, it’s a stylish accessory that expresses your personal aesthetic. Imagine pairing it with matching quilted accessories or choosing fabrics that perfectly complement your personal style or even the decor of your workspace. It also makes for an incredibly thoughtful and personal gift for friends, family, or colleagues.
Don’t forget that the free pattern used for this tutorial is a fantastic resource, providing precise measurements and diagrams that ensure your success. If you enjoyed this project, consider exploring other patterns from Art Gallery Fabrics or similar quilting communities. Each new project is an opportunity to expand your skillset and discover new joys in the world of fabric arts.
Share your finished quilted laptop case with us! We love seeing how different fabric choices and personal touches transform this design. Happy quilting!