
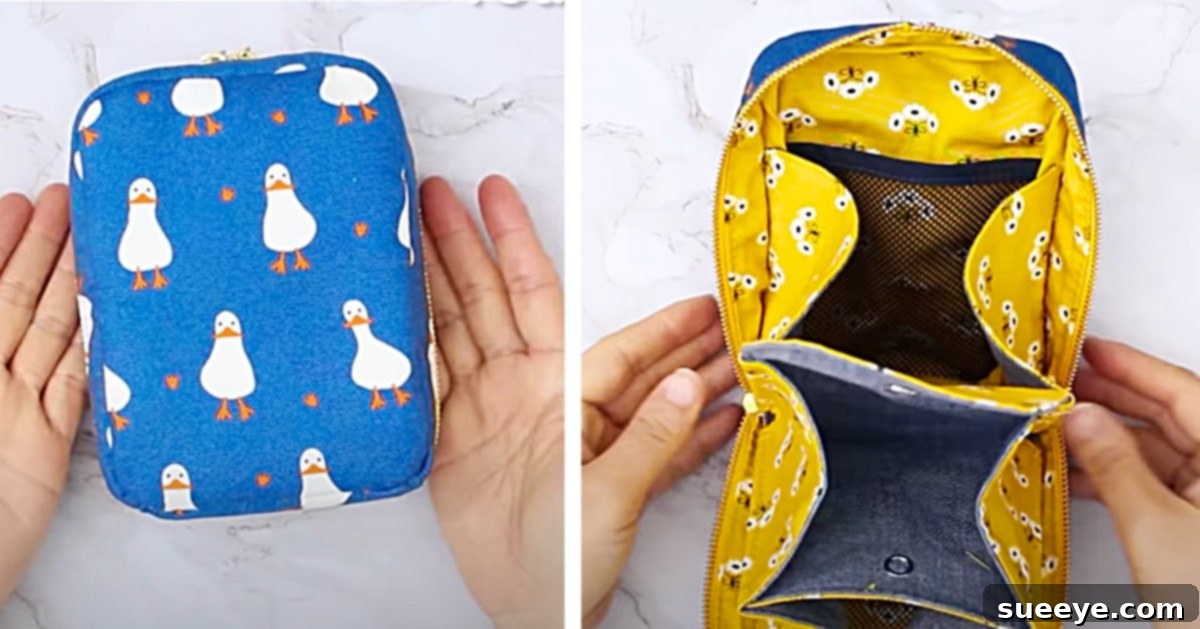
How To Sew A Multi-Pocket Zipper Pouch: Your Ultimate Organization Companion
Are you tired of rummaging through a cluttered bag for your art supplies, makeup, or craft notions? Do you wish for a beautifully organized solution that’s both practical and portable? Look no further! This comprehensive guide introduces you to an ingenious DIY multi-pocket zipper pouch – a project that promises to transform your daily organization woes into delightful order. Perfect for students, artists, crafters, or anyone on the go, this handmade pouch offers dedicated compartments for all your essentials, ensuring everything stays neatly in place.
The inspiration for this fantastic project came from a very personal need. When my daughter embarked on her new drawing class at the local art center, the sheer volume of supplies required a thoughtful storage solution. I needed something that could easily slip into her book bag, yet was robust and spacious enough to house pencils, erasers, brushes, and more. After extensively searching online for the perfect design, I stumbled upon a truly brilliant DIY multi-pocket pouch tutorial by Sewingtimes on YouTube. This particular design stood out because it not only offered ample space but also featured a secure top zipper closure and an internal multi-pocket layout that promised unparalleled organization for all her art tools.
What makes this specific zipper pouch design so exceptional? It’s the ingenious combination of functionality and ease of construction. The sewing instructions provided in the video are remarkably straightforward, guiding you through each step from cutting your fabric to assembling the final piece. Even if you’re a novice sewer, you’ll find the process manageable and rewarding. The end result is a durable, attractive, and highly functional organizer that can stand proudly on a desk or travel discreetly within a larger bag.
Why This Multi-Pocket Pouch? Unbeatable Benefits and Features
This isn’t just any zipper pouch; it’s a meticulously designed organizer crafted to bring order to your life. Here’s why this DIY project is an absolute must-try:
- Superior Organization: The multi-pocket design is its standout feature. Instead of a single cavernous space where items can get lost, multiple compartments allow you to sort and separate different tools. Think specific pockets for pencils, pens, markers, erasers, sharpeners, small brushes, or even makeup brushes and lipsticks.
- Enhanced Portability: Designed to fit comfortably into a backpack, book bag, or tote, this pouch is your perfect travel companion. Keep your essentials organized whether you’re heading to a class, a meeting, or simply moving from one room to another.
- Durable Protection: The secure zipper closure ensures that none of your valuable items fall out, even if the pouch gets jostled. When constructed with appropriate interfacing, the pouch provides a protective layer, safeguarding delicate items from damage.
- Versatile Use: While initially conceived for art supplies, the utility of this pouch extends far beyond. Imagine it as a chic makeup bag, a tech organizer for cables and chargers, a sewing notions holder, a first-aid kit, or a stationery organizer for work or school. Its adaptability makes it truly indispensable.
- Customization at Your Fingertips: This project is a fantastic canvas for your creativity. Choose fabrics that reflect your personality – vibrant patterns, elegant solids, or a quirky mix. The ability to select coordinating fabrics allows for a truly unique and personalized accessory.
- Desk-Friendly Design: With the right interfacing, this pouch isn’t just for transport. It can stand upright on your desk, transforming into an attractive and accessible holder for your most-used tools. No more digging through drawers; everything is within easy reach.
Materials: Gathering Your Crafting Essentials
Before you dive into the exciting world of sewing, let’s ensure you have all the necessary components. The beauty of this project lies in its relatively simple material list, allowing you to focus on the crafting process. Here’s a detailed look at what you’ll need:
- Two Kinds of Coordinating Fabric: This is where your creativity shines!
- Outer Fabric: This will be the visible exterior of your pouch. Opt for durable fabrics like quilting cotton, canvas, denim, or even faux leather for a more structured look. Consider patterns, colors, and textures that appeal to you.
- Lining Fabric: This will form the interior of your pouch and often the inner pockets. A coordinating solid color or a subtle pattern works wonderfully here. Remember that lighter colors can make it easier to see items inside the pouch.
- Pro Tip: Pre-wash and iron your fabrics before cutting to prevent shrinking and ensure a crisp finish.
- One Double-Sided Zipper: A double-sided zipper, also known as a two-way zipper or a separating zipper (depending on length, but typically a standard closed-end zipper is fine here, just ensure it’s long enough for the pouch opening), is ideal as it allows for easy opening and closing from either end, although a standard single-pull zipper also works perfectly. Choose a zipper color that complements your chosen fabrics. Nylon coil zippers are usually recommended for bags as they are durable and easy to sew through.
- Hard (Heavyweight) Interfacing: This is the secret to a pouch that maintains its shape and stands upright on a desk. Heavy interfacing provides significant structure and body. It’s crucial for achieving that “desk organizer” aesthetic and protecting contents.
- Soft (Lightweight to Medium Weight) Interfacing: For the inside walls and pockets, a softer interfacing is often preferred.
- Fusible Interfacing (Easiest to Work With): This type of interfacing has a heat-activated adhesive on one side. It fuses directly to your fabric with an iron, becoming an integral part of the fabric. This eliminates slipping during sewing, makes the fabric more stable, reduces fraying, and generally results in a much smoother, more professional finish, especially for beginners. Highly recommended for this project.
- Why Fusible? It bonds permanently, adding strength and body without making the fabric overly stiff. It also streamlines the sewing process significantly.
- Net (Mesh Fabric) for the Inside Walls of the Pouch: The mesh fabric is a clever addition for inner pockets. It allows you to see the contents at a glance, making it incredibly easy to locate specific items. It’s also lightweight and durable, perfect for visible organization.
- Essential Sewing Tools (Not listed but highly recommended):
- Sewing machine and coordinating thread
- Fabric scissors or rotary cutter and cutting mat
- Iron and ironing board
- Pins or fabric clips
- Seam ripper (just in case!)
- Fabric marker or chalk
- Ruler or measuring tape
Directions: Your Step-by-Step Guide to a Perfect Pouch
Embarking on this sewing journey is incredibly rewarding. The video tutorial by Sewingtimes on YouTube provides excellent visual guidance, which is invaluable for any sewing project. We’ll outline the general flow here, but watching the video will clarify every nuance.
Step 1: Preparation – Cutting and Interfacing Application
The foundation of any successful sewing project lies in precise preparation. Begin by carefully cutting all your fabric pieces according to the dimensions provided in the tutorial. Pay close attention to grainlines and pattern direction. This is also the stage where you’ll apply your interfacing.
- For the outer fabric pieces, iron on the heavy interfacing to provide the main structure. If using fusible interfacing, ensure your iron is at the correct temperature and apply even pressure until the interfacing is fully bonded.
- For the lining fabric and pocket pieces, apply the softer, fusible interfacing. This will give them a nice drape and body without being overly rigid, while also making them easier to handle and sew.
Step 2: Constructing the Outer Shell and Attaching the Zipper
This phase involves bringing the exterior of your pouch to life. The video does an exceptional job of demonstrating a quick and efficient method for zipper installation, often a daunting task for many sewers, but made simple here.
You will start by sewing the outer fabric pieces together, forming the basic shape of the pouch’s exterior. The zipper is then strategically incorporated into the top opening. The video’s technique for zipper attachment is particularly noteworthy – it’s super quick and yields a professional-looking finish without fuss. Take your time here, ensuring the zipper is centered and sewn securely for smooth operation.
Step 3: Crafting and Integrating the Inner Pockets
The multi-pocket design is what sets this pouch apart. This step focuses on creating those clever internal compartments and then securely sewing them into the pouch’s lining.
- You’ll use your lining fabric and the mesh fabric to construct individual pocket units. The mesh is fantastic for creating transparent pockets, allowing you to see the contents at a glance.
- Follow the video’s instructions carefully for folding, pressing, and stitching these pockets. Precision here ensures they lie flat and function perfectly.
- Once your inner pocket units are complete, they are sewn into the lining fabric that will form the inside of your pouch. This usually involves strategic placement and stitching along the edges, ensuring they are stable and robust enough to hold items without sagging.
Step 4: Assembling the Pouch and Finishing Touches
With the outer shell and the organized inner lining prepared, it’s time to bring everything together into a cohesive, functional pouch.
- The outer shell and the inner lining (with its attached pockets) are carefully positioned, usually right sides together, and sewn around the perimeter, leaving a small opening for turning.
- Once sewn, you’ll trim the seams, particularly the corners, to reduce bulk. Then, gently turn the entire pouch right side out through the opening. This is often a satisfying moment as the pouch takes its final form!
- Finally, the turning opening is neatly closed – either with a hidden hand stitch (ladder stitch) or by machine topstitching along the edge. A final press with the iron will give your new multi-pocket zipper pouch a crisp, professional finish.
Tips for a Perfect Sewing Experience
To ensure your multi-pocket zipper pouch turns out beautifully and lasts for years, consider these helpful tips:
- Pre-Wash Your Fabrics: Always wash and dry your fabrics before cutting, especially if they are cotton. This prevents potential shrinkage after your project is complete and ensures your dimensions remain accurate.
- Press, Press, Press: Ironing at every seam and stage makes an enormous difference in the finished look of your project. Crisp seams lie flatter and look more professional.
- Use the Right Needle: A sharp, new needle appropriate for your fabric type (e.g., universal needle for cottons, denim needle for heavier fabrics) will prevent skipped stitches and snags.
- Go Slow with Zippers: While the video makes zipper installation look easy, it’s still an area where patience pays off. Use a zipper foot on your sewing machine and sew slowly and steadily. Pins or clips can help hold the zipper in place.
- Invest in Quality Thread: A good quality polyester thread is strong and will withstand regular use. Matching thread color to your fabric (or a slightly darker shade if you can’t find an exact match) creates a seamless look.
- Test Stitches: Before sewing on your actual project, test your stitch length and tension on a scrap piece of your layered fabric and interfacing.
- Don’t Be Afraid to Unpick: Even experienced sewers make mistakes. A seam ripper is your friend! It’s better to unpick a seam and re-sew it correctly than to live with a crooked or poorly constructed finish.
Unleash Your Creativity: Variations and Customization
The beauty of a DIY project is the freedom to make it uniquely yours. Here are some ideas to customize your multi-pocket zipper pouch:
- Size Adjustments: Easily scale the pattern up or down to create different sized pouches. Make a smaller one for coins or earbuds, or a larger one for an entire art kit or travel essentials.
- Add a Wrist Strap or Handle: Attach a small loop or a D-ring during construction to add a wrist strap, making it even easier to carry. A longer handle could transform it into a small clutch.
- Embellishments: Personalize your pouch with embroidery, fabric paint, iron-on patches, or decorative topstitching.
- Clear Vinyl Pockets: Instead of mesh, use clear vinyl for some inside pockets. This offers complete visibility and is great for items that might leak, like small bottles.
- Themed Pouches: Create themed pouches for specific purposes: a “Travel Essentials” pouch, a “Sewing Notions” pouch, a “Kids’ Activity” pouch filled with small toys and crayons, or a “First Aid” kit.
- Hardware: Experiment with different zipper pulls (beads, charms) or add small metal feet to the bottom of the pouch for extra stability and protection.
Conclusion: Your New Favorite Handmade Organizer!
This multi-pocket zipper pouch is truly a game-changer for anyone seeking stylish and practical organization. From keeping art supplies in perfect order for a budding artist like my daughter, to streamlining your daily carry-all items, its versatility and functionality are unmatched. The clear, concise instructions from Sewingtimes make this an achievable project for sewers of all levels, promising a rewarding experience and a high-quality finished product.
So, gather your beautiful fabrics, fire up your sewing machine, and get ready to create an organizer that you’ll use and love for years to come. Not only will you enjoy the creative process, but you’ll also revel in the satisfaction of having a perfectly tidy space for all your necessities. Don’t just imagine an organized life; sew it into existence! Watch the Sewingtimes video tutorial today and start crafting your ultimate multi-pocket zipper pouch.