
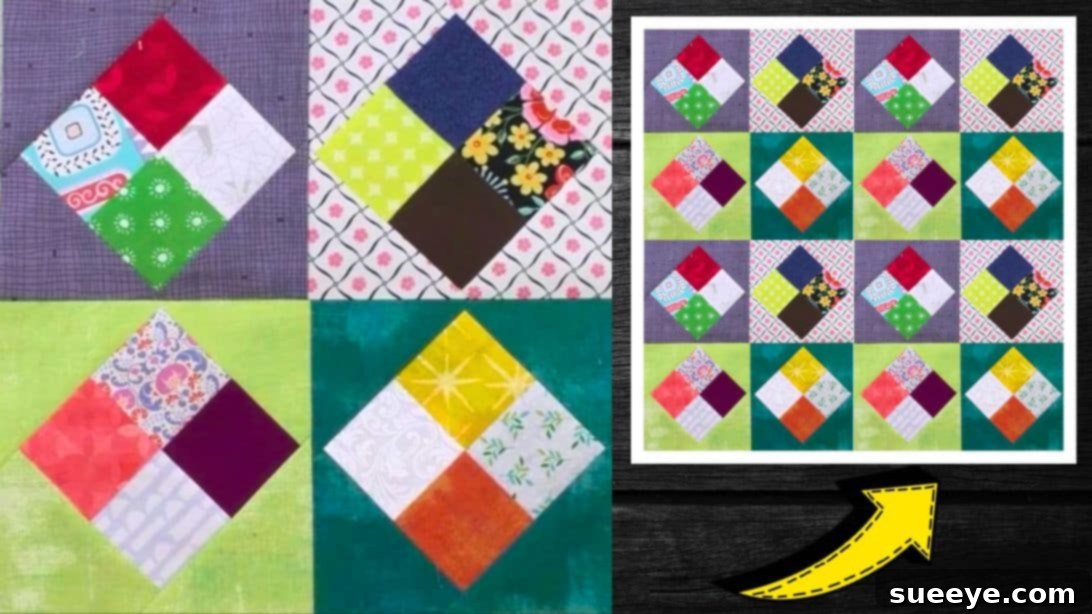
Embark on a delightful quilting journey with the mesmerizing Floating 4-Patch Quilt Block! This comprehensive tutorial, inspired by the expert guidance of Carol Thelen on YouTube, simplifies the creation of a stunning quilt block that appears to float effortlessly within its frame. Ideal for both absolute beginners and seasoned quilters looking for a quick and satisfying project, the Floating 4-Patch is a testament to how simple techniques can yield spectacular results. Forget complicated patterns and intricate piecing; this fail-proof method ensures a perfectly balanced block every time, even if it’s your very first foray into the rewarding world of quilting.
One of the greatest charms of the Floating 4-Patch Quilt Block is its incredible versatility. Whether you prefer a cohesive color scheme with subtle variations or a vibrant, eclectic mix of prints and solids, this block shines in any fabric combination. It’s an exceptional project for busting your fabric stash, transforming those cherished leftover scraps and remnants into a beautiful, functional piece of art. Imagine turning those small pieces from previous projects into a stunning quilt that tells a unique story of your creative journey and resourcefulness. This guide will meticulously walk you through each essential step, from selecting and preparing your fabrics to the final precise pressing and trimming, ensuring you gain confidence and enhance your quilting skills along the way. Get ready to dive into the rewarding craft of quilting, learn precise piecing techniques, and create a gorgeous Floating 4-Patch Quilt Block that you’ll be proud to showcase in your next masterpiece. Follow the detailed instructions below and complement your learning experience by watching Carol Thelen’s insightful video tutorial for visual clarity and expert tips.
Essential Materials for Your Floating 4-Patch Quilt Block
Before you begin the exciting process of stitching your beautiful Floating 4-Patch quilt block, gathering the right materials is a crucial first step for a smooth, enjoyable, and successful crafting experience. High-quality tools and carefully chosen fabrics will not only make the construction process easier but also contribute significantly to the professional and polished finish of your final block. Here’s a detailed list of everything you’ll need to get started on this captivating project:
- Assorted Fabrics (12 different prints recommended): The very heart and soul of any quilt block lie in its fabrics. For the Floating 4-Patch, utilizing a variety of 12 different fabric squares (or strips that you will cut into squares) allows for a dynamic and visually interesting block. Consider a mix of complementary colors, patterns, and scales to create depth and contrast, truly enhancing the “floating” effect. A combination of solids, small-scale prints, and larger motifs will make your central floating element truly pop. Don’t be afraid to experiment with your existing fabric stash – this block is incredibly forgiving and often looks its best with an eclectic and unexpected mix of textiles.
- Marking Pen, Pencil, or Chalk: Precision is paramount in quilting, and a reliable marking tool is essential for accurately drawing lines, marking cutting guides, or transferring pattern details onto your fabric. Choose a tool that is easily visible on your chosen fabrics and, most importantly, one that can be removed cleanly without leaving permanent marks or residue. Fabric-specific markers, pencils, or tailor’s chalk are generally recommended for their ease of use and removability.
- Quilting Ruler (Acrylic): A sturdy, transparent acrylic quilting ruler is an indispensable tool for achieving accurate cutting and precise measurements. Look for a ruler with clear, easy-to-read markings, ideally in inches, and a non-slip grip to prevent accidental slips while cutting. A 6×24 inch ruler is incredibly versatile for cutting strips of fabric, while smaller square rulers (e.g., 6.5×6.5 inches or 12.5×12.5 inches) are perfect for squaring up your finished blocks.
- Fabric Scissors or Rotary Cutter and a Cutting Mat: For precise and efficient fabric cutting, a rotary cutter paired with a self-healing cutting mat is a true game-changer. This powerful combination allows you to cut through multiple layers of fabric quickly and accurately, achieving crisp, straight edges that are absolutely vital for perfectly pieced blocks. If you don’t yet own a rotary cutter, a pair of sharp fabric scissors will certainly work, but ensure they are dedicated solely to fabric to maintain their sharpness and prevent fraying.
- Needle and Thread: You’ll need a good quality sewing machine needle suitable for quilting (a universal or microtex needle often works well) and an all-purpose polyester or cotton thread that beautifully complements your chosen fabrics. Consider a neutral color like white, cream, or light grey if you’re working with a wide variety of fabric colors, as it will blend seamlessly into your seams without drawing unwanted attention.
- Iron, for pressing: A well-functioning iron and a sturdy ironing board are non-negotiable tools for creating professional-looking quilt blocks. Pressing seams correctly at each stage of the construction process helps to flatten the fabric, reduce bulk at the seam lines, and ensures that your finished blocks lay flat and perfectly square. Remember to “press” (lifting and placing the iron firmly) rather than “iron” (gliding the iron back and forth), as gliding can distort your fabric pieces.
- Sewing Machine: While hand-piecing is a traditional and meditative option, a sewing machine will significantly speed up the construction process and provide consistent stitch length for durable, strong seams. Ensure your machine is in good working order, regularly cleaned, and has a ¼-inch quilting foot (also known as a patchwork foot) for achieving accurate and consistent seam allowances.
- Floating 4-Patch Quilt Block Pattern: This is your essential blueprint! You can easily download the specific pattern designed and provided by Carol Thelen to guide your precise cutting and piecing. Having the exact measurements and step-by-step instructions at hand will simplify your project significantly and help ensure a successful outcome. Click here to download the pattern directly and get started with your fabric preparation with confidence.
Step-by-Step Guide: Crafting Your Floating 4-Patch Quilt Block
Creating the Floating 4-Patch Quilt Block is a wonderfully straightforward and immensely satisfying process, making it an excellent choice for those new to quilting or anyone seeking a quick project with visibly impressive results. Follow these detailed, easy-to-understand steps to bring your beautiful block to life. Remember, precision and careful attention at each stage are your best friends for achieving a perfectly square, flat, and professional-looking finished block.
Step 1: Preparation and Precisely Cutting Your Fabrics
Your quilting journey begins with meticulous preparation. Start by downloading the provided Floating 4-Patch pattern from Carol Thelen. This invaluable pattern will furnish you with the exact measurements for all your fabric pieces, including the squares for the central 4-patch and the triangles for the floating frame. Once you have the pattern, carefully cut your 12 assorted fabrics into the specified shapes and sizes. Precision is absolutely paramount during this initial stage; accurate cutting directly leads to accurate and beautiful piecing later on. Use your rotary cutter, quilting ruler, and a self-healing cutting mat for the cleanest, straightest edges possible. If you’re using fabric scissors, make sure to mark your cutting lines clearly and precisely before making any cuts. For optimal results, consider pre-washing and ironing all your fabrics before cutting to prevent any unwanted shrinkage or dye bleeding and to ensure a perfectly flat, crisp surface for maximum accuracy. Applying a light spray starch can also be beneficial, as it helps to stabilize the fabric, making it easier to cut and sew consistently.
Step 2: Constructing the Initial 4-Patch Unit – The Heart of Your Block
The captivating “floating” illusion of this quilt block truly begins with the precise construction of its central element: a traditional 4-patch block. Thoughtfully select four different fabric squares that will form the vibrant heart of your design.
- Pairing and Stitching Fabric Strips: Take two of your chosen fabric squares. Lay one on top of the other, ensuring their right sides are facing together and all raw edges are perfectly aligned. Using your sewing machine and a consistent ¼-inch seam allowance (this is the standard in quilting and absolutely crucial for maintaining consistent block size), stitch precisely along one edge. Repeat this exact process with the remaining two fabric squares, creating two separate, neatly stitched fabric pairs.
- Pressing Seams for Flatness and Stability: After successfully stitching each pair, take them promptly to your iron and ironing board. Carefully press the seams open. Pressing seams open is a fundamental quilting technique that helps to significantly reduce bulk, creates a flatter and more stable block, and ultimately ensures that your finished quilt block will lie beautifully flat and smooth within your quilt. This step is vital for achieving a professional, high-quality finish.
- Joining the Fabric Pairs to Form the 4-Patch: Now, take your two previously stitched and pressed fabric pairs. Lay them right sides together, meticulously aligning the central seams where they are intended to meet. It is often incredibly helpful to “nest” the seams (push the seams of one pair in the opposite direction of the other) to ensure they lock together perfectly, thereby minimizing bulk and ensuring a perfectly aligned intersection. Pin them securely in place to prevent any shifting during stitching.
- Completing and Pressing the 4-Patch: Stitch along the newly aligned edge with a consistent ¼-inch seam allowance. Once stitched, carefully open your newly formed 4-patch block and give it a final, thorough press. Again, press the seams open or to one side, whichever method yields the flattest and most aesthetically pleasing result for your specific fabrics. You now have a perfectly pieced 4-patch unit, the central feature, ready for the next exciting stage of adding the floating frame.
Step 3: Adding the First Set of Triangles – Beginning the “Float”
This pivotal step is where the captivating “floating” illusion truly begins to take shape, as we strategically frame our meticulously constructed 4-patch center with contrasting triangles.
- Precise Triangle Placement: Select two fabric triangles that will form the initial part of the floating frame around your 4-patch. Lay one triangle on top of your completed 4-patch square, ensuring their right sides are facing together and the specific edges you intend to stitch are perfectly aligned. The triangle should neatly cover one side of your central 4-patch unit.
- Stitching the First Triangle: Carefully stitch the first triangle to the 4-patch with a precise and consistent ¼-inch seam allowance. Maintain an even stitch line for the best results.
- Stitching the Opposite Triangle for Balance: Now, take the second triangle and position it meticulously on the exact opposite side of the 4-patch, once again aligning right sides and edges flawlessly. Stitch this second triangle securely in place with the same consistent ¼-inch seam allowance. This careful placement creates a harmonious and balanced start to the framing process, essential for the overall aesthetic.
- Flipping Open and Pressing Seams: Gently flip open the newly stitched triangles away from the 4-patch center, revealing the initial framing. Take your block to the iron and carefully press these newly sewn seams open. A clean, flat press at this juncture is critically important to set the stitches, reduce bulk, and properly prepare the block for the subsequent steps, ensuring a smooth foundation.
- Trimming the “Nubs” (Dog Ears): You might observe small “nubs” or “dog ears” of excess fabric extending slightly beyond the edges of your block, particularly where the triangles meet. These are small protrusions of excess fabric from the points of the triangles. Using your quilting ruler and rotary cutter, carefully and precisely trim these nubs off. This step not only cleans up the edges of your block for a tidier appearance but also significantly aids in accurately aligning any future pieces that will be added.
Step 4: Completing the Floating Frame with Remaining Triangles and Squaring Up
With the first two triangles thoughtfully in place, we will now add the final two to complete the full floating effect and meticulously square up your block to its final dimensions.
- Rotating the Patchwork: Rotate your patchwork block 90 degrees. You should now clearly see the two remaining empty sides where the final two triangles will be skillfully attached to complete the frame.
- Stitching the Final Triangles: Take your remaining two fabric triangles. Align one on each of the empty sides, ensuring right sides are facing and all raw edges are matching precisely. Stitch each triangle securely in place with a consistent ¼-inch seam allowance, paying close attention to your stitch line.
- Final Pressing of the Entire Block: Once both of the final triangles are stitched, gently flip them open to fully reveal the completed framed effect of your Floating 4-Patch. Return to your ironing board and press these final seams open, ensuring the entire block is as flat, smooth, and free of puckering as possible. This final press helps to set all stitches and prepare the block for joining with others.
- Squaring Up the Block – The Critical Finishing Touch: The final and utterly crucial step in creating a flawless quilt block is to “square up” your block. Using your precise quilting ruler and sharp rotary cutter, carefully trim the block to the exact final dimensions specified in your pattern. Align your ruler with the seams and ensure all corners are at a perfect 90-degree angle. This essential step corrects any slight inaccuracies that may have occurred during your sewing and ensures that all your finished blocks will be the exact same size, which is absolutely vital for making quilt assembly much easier and resulting in a professional-looking quilt top. Take your time with this step, as it significantly impacts the final quality of your quilt.
Tips for Success and Design Inspiration
Achieving a beautifully crafted quilt block is not just about diligently following sequential steps; it’s also about understanding and applying the nuanced techniques that make quilting such a rewarding craft. Here are some invaluable additional tips to help you master the Floating 4-Patch and inspire your next creative quilting project:
- Precision is Paramount: From the initial fabric cutting to every stitch you make, maintaining absolute accuracy, especially with your ¼-inch seam allowance, is the undeniable golden rule in quilting. A consistent seam allowance ensures that all your blocks will be the same size and will fit together seamlessly and perfectly when you assemble your quilt top.
- Pressing, Not Ironing: Always remember to press your seams. The technique of lifting and carefully placing the iron firmly down on the fabric helps to effectively set the stitches and flatten the fabric without distorting the meticulously sewn shape of your block. Different quilters have preferences for pressing seams open or to one side; experiment with both methods to see what works best for your specific project, fabric choices, and desired bulk reduction.
- Strategic Fabric Selection for the “Float” Effect: The true magic and visual impact of the Floating 4-Patch comes from the deliberate contrast between the central 4-patch unit and its surrounding framing triangles. Choose fabrics for the 4-patch that distinctly stand out from the triangle fabrics. For instance, a bright, intricately patterned 4-patch against solid or subtly textured triangles will create a strong, dramatic floating effect. Conversely, a solid-colored 4-patch beautifully framed by busy, multi-colored prints can also be incredibly effective and visually striking.
- Embrace Chain Piecing for Efficiency: If you are planning to make multiple Floating 4-Patch blocks for a larger quilt project, consider incorporating chain piecing into your workflow. This smart technique involves feeding multiple fabric units through your sewing machine one after another without cutting the thread in between. It’s a fantastic time-saver, significantly increases your sewing efficiency, and uses less thread.
- Squaring Up at Each Stage: While a final squaring up of the entire block is absolutely essential, sometimes checking the squareness and dimensions of your initial 4-patch unit before you even begin adding the triangles can help you catch and correct any minor errors early on, preventing them from compounding later in the project.
- Utilize and Embrace Your Scraps: This quilt block is an absolutely fantastic way to utilize those smaller fabric scraps and remnants that quilters often accumulate. Don’t underestimate the inherent beauty and charm of a “scrappy” quilt! It tells a unique story, reduces waste, and offers a one-of-a-kind, eclectic aesthetic that is often cherished.
- Beyond a Single Block – Quilt Assembly Ideas: Once you’ve successfully mastered a single Floating 4-Patch block, begin to envision how you can combine multiple blocks into a larger, cohesive quilt. You can arrange them in a straightforward grid pattern, rotate alternate blocks for a dynamic and engaging visual rhythm, or incorporate sashing (strips of fabric) and cornerstones between blocks for added visual interest, structure, and a polished look.
Mastering the Floating 4-Patch Quilt Block: A Rewarding Quilting Journey
The Floating 4-Patch Quilt Block is far more than just a simple pattern; it represents a wonderful gateway to developing fundamental quilting skills and fostering a deep, enduring love for the craft. Its elegant yet deceptively simple design, combined with a straightforward and achievable construction process, makes it an ideal project for both budding quilters taking their first stitches and experienced crafters seeking a quick, immensely satisfying creation. By meticulously following Carol Thelen’s brilliant tutorial and the detailed, step-by-step instructions outlined above, you’ve not only crafted a beautiful and visually engaging quilt block but also built a solid foundation of precision, patience, and creative confidence.
Remember, every single stitch you make is a meaningful step forward in your personal quilting journey. Don’t hesitate to experiment boldly with different fabric combinations, challenge yourself by incorporating new techniques as you progress, and most importantly, truly enjoy and savor every moment of the creative process. The profound satisfaction of transforming humble fabric scraps into a tangible, beautiful, and functional piece of art is an experience that is truly unparalleled. We encourage you to share your completed Floating 4-Patch blocks with your friends, family, or vibrant online quilting communities – inspire others with your handmade beauty and the joy of creation!
A huge and heartfelt thank you goes out to Carol Thelen via YouTube for graciously sharing her incredible knowledge, clear instructions, and inspiring countless quilters worldwide with her easy-to-follow video tutorials. If you thoroughly enjoyed creating this project and found her guidance invaluable, be sure to visit her YouTube channel for more fantastic video tutorials and consider subscribing to stay updated with her latest quilting adventures, tips, and patterns! Happy quilting, and may your creative spirit continue to flourish!