
Master the Classic Shoofly Quilt Block: Your Easy Beginner’s Guide
Are you eager to dive into the captivating world of quilting but feeling overwhelmed by complex patterns? Look no further! The Shoofly Quilt Block is a timeless classic, renowned for its simple construction and stunning visual impact, making it the perfect starting point for any aspiring quilter. This beloved block, a staple in quilting traditions, offers a fantastic opportunity to learn fundamental techniques, especially the art of creating perfect half-square triangles (HSTs).
In this comprehensive guide, we’ll walk you through every step of crafting your very own Shoofly quilt block. Whether you’re making your first quilt project, a charming personalized gift, or simply seeking a quick and satisfying sewing endeavor, this pattern is incredibly versatile and rewarding. We’ll break down the materials you’ll need, provide precise cutting instructions, and guide you through the assembly process with clear, easy-to-follow directions. Get ready to transform fabric into a beautiful piece of art!
This fantastic tutorial is inspired by the clear instructions from Cut and Create on YouTube. We highly recommend watching their video tutorial for a visual guide to complement these written steps. Their channel offers a wealth of valuable resources for quilters of all levels.
Why the Shoofly Quilt Block is Perfect for Beginners
The Shoofly quilt block holds a special place in the quilting community, particularly for those just starting out. Here’s why it’s an excellent choice:
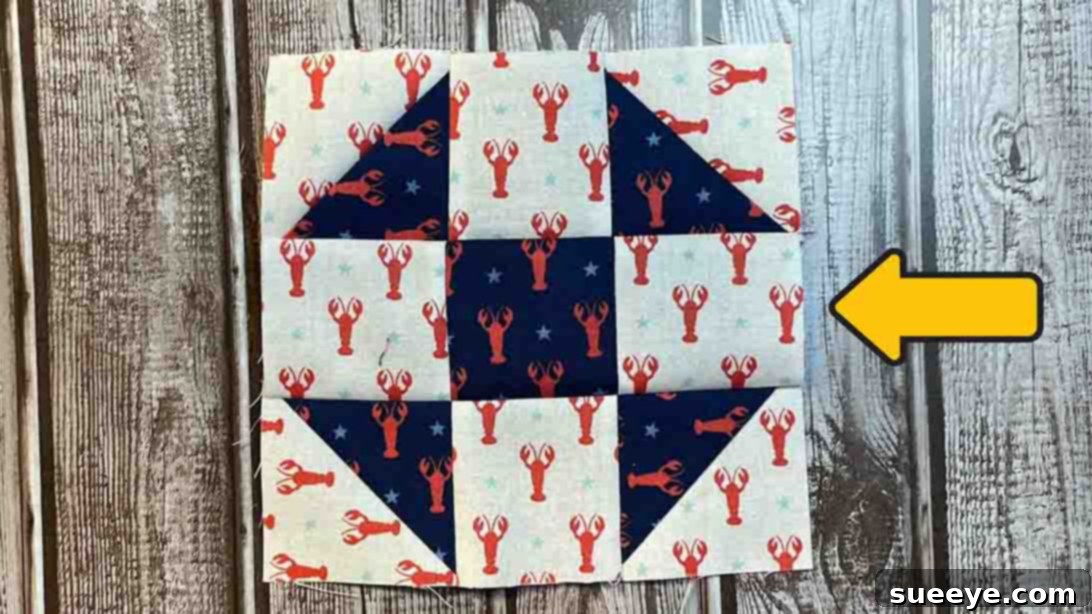
- Simplicity in Design: Composed of nine units arranged in a 3×3 grid, the Shoofly block combines solid squares with half-square triangles, creating a recognizable and charming pattern without excessive complexity.
- Mastering Key Techniques: It introduces you to essential quilting skills like precise cutting, sewing a consistent 1/4-inch seam allowance, and accurately pressing seams. Most importantly, it’s a superb way to practice making half-square triangles, a foundational element in countless quilt patterns.
- Quick and Satisfying: Because of its straightforward nature, you can complete a single Shoofly block relatively quickly. This provides a wonderful sense of accomplishment and builds confidence for larger projects.
- Versatile and Adaptable: Once you’ve mastered the basic block, you can experiment with different fabric combinations, colors, and block sizes to create a myriad of effects. From vibrant modern quilts to traditional heirlooms, the Shoofly block adapts beautifully. It can form the basis of a baby quilt, a table runner, placemats, or integrate into a larger sampler quilt.
- Classic Appeal: The Shoofly is a timeless block that has been cherished for generations. Learning to make it connects you to a rich history of quilting and textile artistry.
Essential Materials for Your Shoofly Quilt Block
Gathering the right tools before you begin ensures a smoother and more enjoyable quilting experience. Here’s what you’ll need to create your Shoofly block:
- High-Quality Cotton Fabric: You’ll need two contrasting fabrics – one dark and one light. Choose 100% cotton quilting fabric for best results, as it’s easy to work with and holds up well over time.
- Fabric A (Dark): Approximately 1/8 yard or scraps large enough for two 3-inch squares and one 2.5-inch square.
- Fabric B (Light): Approximately 1/8 yard or scraps large enough for two 3-inch squares and four 2.5-inch squares.
- Rotary Cutter: A sharp rotary cutter is indispensable for making clean, precise cuts quickly and efficiently.
- Self-Healing Cutting Mat: Protect your work surface and prolong the life of your rotary blade with a good quality self-healing mat.
- Quilting Ruler: A clear acrylic quilting ruler with precise markings (e.g., 6.5″ x 6.5″ or similar square ruler, and a longer ruler for initial strip cuts) is crucial for accurate measuring and cutting.
- Sewing Machine: A reliable sewing machine with a 1/4-inch presser foot (or the ability to consistently sew a 1/4-inch seam allowance) is highly recommended.
- Matching Thread: High-quality polyester or cotton thread that blends with your fabrics.
- Fabric Marker or Pencil: For drawing lines on your fabric (e.g., a Frixion pen, chalk pencil, or similar erasable marker).
- Iron and Ironing Board: Essential for pressing seams flat and ensuring your block lies perfectly.
- Fabric Pins: To hold fabric pieces together securely before sewing.
- Seam Ripper (Optional but Recommended): For those inevitable “oops” moments.
Step-by-Step Directions: Creating Your Shoofly Quilt Block
Follow these detailed instructions to construct a perfect Shoofly quilt block. Remember, precision at each stage contributes to a beautiful finished product.
Step 1: Precise Fabric Cutting and Half-Square Triangle (HST) Creation
Accuracy in this initial step is paramount for a successful quilt block. Even a slight discrepancy in cutting can lead to misaligned seams later on.
- For Fabric A (Dark): Cut two 3-inch squares and one 2.5-inch square.
- For Fabric B (Light): Cut two 3-inch squares and four 2.5-inch squares.
Set aside all the 2.5-inch squares for now. We will first focus on creating the half-square triangles (HSTs) from the 3-inch squares.
- Prepare for HSTs: Take the two 3-inch light fabric squares (Fabric B). Lay one of them right side down. Using your fabric marker and a ruler, draw a diagonal line from one corner to the opposite corner. Then, draw a second line exactly 1/4 inch away from the first diagonal line, towards one side. Repeat this on the other side of the original diagonal line, so you have three parallel lines: one center diagonal and two lines 1/4 inch away from it.
- Layer Fabrics: Place one 3-inch dark fabric square (Fabric A) and one 3-inch light fabric square (Fabric B) right sides together. Ensure all edges are perfectly aligned. Pin them securely to prevent shifting during sewing.
- Sew the HSTs: Using your sewing machine, sew precisely along the two outer lines you drew in step 1 (the lines that are 1/4 inch away from the center diagonal). Do not sew on the center line yet.
- Cut Apart: Once both seams are sewn, use your rotary cutter and ruler to carefully cut the fabric square along the central diagonal line you originally drew. You will now have two separate units.
- Press Open: Take each of these newly cut units. Carefully press the seam allowance open (or towards the darker fabric, if preferred, though open seams often lie flatter). Use a hot iron to ensure the fabric is completely flat. You should now have two unfinished half-square triangles.
- Trim for Accuracy: This is a critical step for perfect blocks. Place your quilting ruler over each HST, aligning the 45-degree line of your ruler with the diagonal seam of the HST. Trim each HST to exactly 2.5 inches square. This creates perfectly sized components for your Shoofly block, ensuring all pieces fit together precisely. Repeat this process with the remaining 3-inch dark and light squares to create a total of four 2.5-inch trimmed HSTs.
Step 2: Assembling Your Shoofly Quilt Block
Now that all your components are perfectly cut and trimmed, it’s time to bring your Shoofly block to life. Think of it like assembling a 3×3 puzzle.
- Lay Out the Block: On a flat surface (your cutting mat or design wall), arrange your nine 2.5-inch units into a 3×3 grid.
- Place the single dark 2.5-inch square (Fabric A) in the absolute center of your grid.
- Place the four light 2.5-inch squares (Fabric B) on each side of the center square (middle of the top, bottom, left, and right rows).
- Finally, place your four trimmed 2.5-inch half-square triangles (HSTs) in each of the four corner positions. Crucially, ensure the dark fabric portion of each HST is facing inwards towards the center of the block. This specific orientation creates the iconic “windmills” or “fly” effect of the Shoofly pattern.
- Sew the Rows: Working row by row (top, middle, then bottom), carefully pick up the three units for the first row. Place the right sides of the first and second units together, pin, and sew with a consistent 1/4-inch seam allowance. Then, attach the third unit to the second in the same manner. Repeat this process for the remaining two rows.
- Press the Rows: After sewing each row, press the seams. For the top and bottom rows, press the seam allowances towards the outside of the row. For the middle row, press the seam allowances towards the center of the row. This method, known as “nesting seams,” will help your seams lock together perfectly when joining the rows, reducing bulk and ensuring flat intersections.
- Join the Rows: Now, you have three completed rows. Place the top row and the middle row right sides together, carefully aligning the seams. The nested seams should naturally fit together. Pin generously at each seam intersection and along the edges. Sew with a 1/4-inch seam allowance. Repeat this to attach the bottom row to the combined top and middle rows.
- Final Press: Once all rows are sewn together, give your entire Shoofly quilt block a final, thorough press. You can press the seams open or press them all to one side (often towards the darker fabric) to minimize bulk. A well-pressed block will lie flat and square, making it easier to join with other blocks.
Quilting Tips for a Perfect Shoofly Block
Achieving crisp, accurate quilt blocks takes practice, but these tips will help you along the way:
- Consistency is Key: Strive for a consistent 1/4-inch seam allowance throughout your project. A quarter-inch foot on your sewing machine can be incredibly helpful.
- Press, Don’t Iron: When pressing, gently lift and place your iron rather than sliding it across the fabric, which can distort your pieces. Pressing helps set the seams and keeps your blocks square.
- Trim Smart: Don’t skip trimming your HSTs! This step ensures all your units are the exact same size, preventing wonky blocks.
- Use Good Lighting: Good lighting prevents eye strain and helps you see your stitches and alignments clearly.
- Take Your Time: Quilting is a journey, not a race. Enjoy the process, and don’t be afraid to use your seam ripper if something isn’t quite right. Patience leads to better results.
- Starch Your Fabric: Applying a light starch before cutting can add crispness to your fabric, making it easier to cut precisely and preventing stretching while sewing.
- Chain Piecing: If you’re making multiple blocks, consider chain piecing. This involves sewing several units together without breaking the thread between them, saving time and thread.
Beyond the Block: What to Make with Your Shoofly Blocks
Once you’ve mastered the Shoofly block, the possibilities for creating beautiful projects are endless! Here are a few ideas to get your creative juices flowing:
- Charming Baby Quilts: Combine several Shoofly blocks to create a sweet and simple baby quilt. Its geometric pattern is perfect for little ones.
- Elegant Table Runners and Placemats: A row of Shoofly blocks makes a lovely table runner, or individual blocks can be finished into stylish placemats.
- Decorative Wall Hangings: Frame a single, beautifully pieced Shoofly block, or combine a few for an eye-catching piece of wall art.
- Pillows and Cushions: A Shoofly block can be easily integrated into a throw pillow cover, adding a handmade touch to your home decor.
- Full-Sized Quilts: For a larger project, simply repeat the process to make as many Shoofly blocks as needed. You can arrange them in a grid, add sashing (strips of fabric between blocks), or incorporate borders to achieve a larger quilt top.
- Sampler Quilts: Combine Shoofly blocks with other traditional quilt blocks to create a sampler quilt that showcases a variety of patterns.
The beauty of quilting lies in its adaptability. Experiment with different fabric colors and prints. A two-color Shoofly block creates a crisp, graphic look, while a scrappy version using many different fabrics can be vibrant and playful. Let your imagination guide you!
Conclusion: Your Quilting Journey Starts Here!
Congratulations! You’ve successfully learned how to create the classic Shoofly Quilt Block, a foundational design that will serve you well in your quilting adventures. This block is not just a pattern; it’s a stepping stone to mastering essential techniques like precise cutting, consistent seam allowances, and the ever-important half-square triangles.
We hope this detailed tutorial, inspired by the excellent work of Cut and Create on YouTube, has empowered you to tackle your first major quilting project with confidence. Remember, every quilter starts somewhere, and patience and practice are your best friends. Don’t hesitate to revisit the video tutorial for visual clarity or re-read these steps as you work.
Now that you’ve got this versatile block under your belt, the world of quilting is truly at your fingertips. Go forth, create, and share your beautiful Shoofly projects with pride! Happy quilting!