
Charming DIY Owl Pincushion: An Easy Sewing Project for Craft Enthusiasts
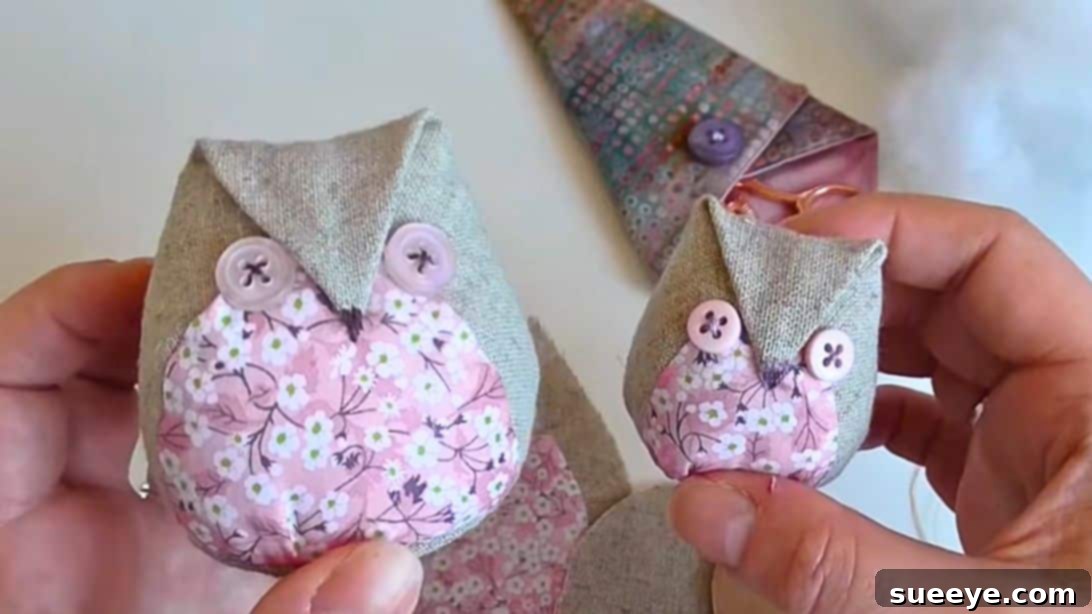
Every sewing enthusiast knows the value of a reliable pincushion. It’s not just a practical tool for keeping your needles and pins organized; it can also be a delightful accent to your crafting space. We’re thrilled to share an absolutely adorable owl pincushion tutorial by Craft House Magic that we discovered on YouTube, and we know you’ll fall in love with these charming little creations! These aren’t just any pincushions; their versatility allows them to serve multiple purposes. Imagine them as whimsical decorations, playful toys for children, or even unique accessories that add a touch of handmade charm to your home. For an added functional twist, consider filling them with heavy materials like uncooked rice or even sand instead of traditional polyester stuffing. This makes them excellent fabric weights, perfect for holding down patterns or fabric pieces while you cut, preventing frustrating shifts and ensuring precise results.
RELATED: Looking for more owl-inspired sewing fun? Don’t miss our Easy DIY Owl Pillow Sewing Tutorial for another fantastic project!
What makes this particular owl pincushion project even more appealing is the availability of the pattern in two distinct sizes. This fantastic feature gives you the freedom to choose: craft a larger owl that makes a statement, a smaller one for more delicate tasks, or even create a charming pair or family of owls in both sizes! These handmade owls make truly perfect gifts for anyone who loves to sew, appreciates unique handmade items, or simply adores owls. Imagine the joy of gifting a set of these to a friend or family member who spends their time creating beautiful textiles. It’s a quick and remarkably easy sewing project that you can confidently tackle right from the comfort of your home. If your craft room is anything like ours, you probably have a collection of fabric scraps from past projects just waiting for a purpose. This small DIY project is the ideal opportunity to put those beautiful remnants to good use, reducing waste and creating something wonderful in the process.
Explore more creative pincushion ideas: Learn How To Sew A Chicken Pincushion Using Fabric Scraps.
Essential Materials for Your Easy Owl Pincushion
Gathering your materials is the first exciting step in any crafting adventure. For this delightful owl pincushion, you’ll need a few common sewing supplies, many of which you might already have on hand. Here’s a detailed list to ensure you’re well-prepared:
- Owl Pattern: The foundation of your project! You can easily download the pattern here. Remember, it comes in two sizes, so you can choose your favorite or make both!
- Solid Fabric for the Body and Base: This will be the main color of your owl. Consider durable cottons, flannel, or even felt. Choose a color that complements your sewing space or the recipient’s preferences.
- Colored Fabric for the Tummy: This is where you can add a pop of color or a fun pattern! A contrasting print, a vibrant solid, or a subtle textured fabric will make your owl unique. Quilting cottons work wonderfully here.
- Two Buttons for the Eyes: These bring your owl to life! Opt for buttons that are roughly 1/2 inch to 1 inch in diameter, depending on the size of your owl. Black or dark brown buttons offer a classic look, but feel free to experiment with colored or decorative buttons for more personality.
- Thread and Needle: Essential for all your stitching. Choose a thread color that matches or subtly contrasts with your fabrics for a professional finish. A good quality all-purpose sewing thread will suffice.
- Piece of Cardboard: This is crucial for creating a sturdy, flat base for your pincushion, ensuring it sits evenly and can withstand the weight of your pins. Recycled cardboard from a cereal box or a greeting card works perfectly.
- Sharp Scissors: A good pair of fabric shears is indispensable for clean, precise cuts, which are key to a professional-looking finish.
- Polyester Stuffing: This provides the soft, plump shape for your owl. Ensure you have enough to stuff your owl firmly without making it lumpy. Alternatively, you can use uncooked rice, crushed walnut shells, or sand for added weight and pin-sharpening properties.
Step-by-Step Guide: Crafting Your Adorable Owl Pincushion
Now that you have all your materials ready, let’s dive into the fun part: bringing your owl pincushion to life! Follow these detailed steps for a smooth and enjoyable crafting experience.
Step 1: Prepare Your Pattern Pieces
Begin by printing out the owl pattern you downloaded. Carefully cut out all the pattern pieces. Take your chosen fabrics – the solid fabric for the body and base, and the colored fabric for the tummy. Place your pattern pieces on the fabric, ensuring you align them with the fabric grain if specified, or simply for optimal fabric usage. Pin the pattern pieces securely to your fabric and, using your sharp fabric scissors, meticulously cut out all the fabric components. Precision in this step will ensure your owl comes together beautifully and symmetrically.
Step 2: Assemble the Owl’s Body and Tummy
Take one of the main body pieces. Identify the longest straight edge; this will form the bottom of your owl. Now, take your tummy fabric piece. With right sides facing together (meaning the patterned or “pretty” sides of the fabric are touching), carefully align one of the curved edges of the tummy piece with the corresponding curved edge on the main body piece, making sure the bottom corners line up perfectly. Secure this alignment with pins. Using your needle and thread (or a sewing machine if you prefer), sew along this curved edge with a consistent 1/4-inch seam allowance. This small, precise seam allowance is vital for the correct shaping of your owl. Repeat this process for the other side of the tummy piece, attaching it to the other main body piece. Once both sides are sewn, you will have the two body pieces connected by the tummy fabric. For reference, please consult the image below to ensure correct placement and stitching.
Next, you’ll close the top gap of the owl. With right sides still together, align the remaining top edges of the body pieces. Sew from the edge to the corner, closing the small gap that remains at the very top of what will be your owl’s head. To reduce bulk and ensure a smooth curve when turned right side out, carefully trim a little bit of the seam allowance along all the curved edges. Be careful not to cut too close to your stitching.
Step 3: Create the Beak and Shape the Face
Carefully turn your owl’s body right side out. Use a blunt tool (like a chopstick or the eraser end of a pencil) to gently push out all the seams, ensuring they are smooth and well-defined. Once turned, use your fingers to “finger press” the seams flat. This means gently pressing the seams open or to one side with your fingers to give the fabric a crisp, neat finish without needing an iron immediately. Now, focus on the top edge of the owl where the two body pieces meet. Fold this top edge slightly inward towards the tummy fabric. This subtle fold will naturally begin to form a sweet little beak for your owl. Once you’re happy with the shape, use a dark-colored thread (black or dark brown works well) and a simple hand stitch to secure this fold, effectively “sewing in” the beak. This stitch not only holds the beak in place but also adds a defining facial feature to your owl.
Step 4: Attach the Eyes
With the beak now defined, it’s time to give your owl its watchful eyes! Take your two chosen buttons. Position them carefully on either side of the newly formed beak. Experiment with placement to give your owl different expressions – closer together for a more curious look, or slightly wider apart for a gentle demeanor. Once you’re satisfied with their positioning, securely sew each button in place using your needle and matching thread. Ensure the buttons are firmly attached, as they will define your owl’s character. The image below provides a visual guide for ideal button placement.
Step 5: Stuff the Owl
Now for the satisfying part – stuffing your owl! Take your polyester filling (or your chosen alternative like rice or walnut shells) and begin to gently fill the owl’s body. Start by pushing small, even amounts into the corners and curves to ensure a smooth shape without lumps. Continue adding stuffing, gradually building up the owl’s form until it is firm and plump. If you’re using it as a pincushion, a denser stuffing will help pins stand upright better. If using heavy fillers like rice, ensure there are no small gaps for the filler to escape. This step transforms your flat fabric pieces into a three-dimensional, huggable owl.
Step 6: Prepare the Base
Refer back to your pattern to find the circular base piece. Using this pattern piece as a template, cut out a corresponding circle from your piece of cardboard. This cardboard circle will give your pincushion a flat, stable bottom. Next, take your fabric base circle. Using your needle and thread, perform a running stitch all around the outer edge of the fabric circle, approximately 1/4 inch from the raw edge. A running stitch is a simple, straight stitch that you can gather later. Once you have stitched all the way around, insert the cardboard circle into the center of the fabric circle. Gently pull on the ends of your running stitch thread. This action will gather the fabric around the cardboard, creating a neat, taut fabric-covered base. Pull the thread tightly and secure it with a firm knot to keep the gathering in place.
Step 7: Close the Owl’s Opening
With the owl firmly stuffed, you’ll now prepare its bottom opening for attachment to the base. Around the raw edge of the opening at the bottom of the owl’s body, perform a tacking stitch. A tacking stitch, in this context, is similar to a running stitch, but you’ll be using it to slightly gather and cinch the opening. Stitch all the way around the perimeter, about 1/4 inch from the raw edge. Once you’ve completed the circle, gently pull the thread to tighten the opening, closing it a little bit and creating a more defined edge. This partial closure helps to shape the owl’s bottom and makes the final attachment to the base much neater. Secure your thread with a knot to hold this gather.
Step 8: Secure the Base to the Body
Finally, it’s time to bring the two main components together. Take your prepared fabric-covered cardboard base and align it with the cinched opening at the bottom of the owl’s body. Use pins to hold the base securely in place. Now, using your needle and a sturdy thread (matching the body fabric), begin to stitch the base onto the body. A whip stitch or ladder stitch (also known as an invisible stitch) works beautifully here, providing a strong, clean, and nearly invisible join. Work your way all around the circumference, ensuring the base is firmly attached and the stuffing is securely contained. This final step gives your owl pincushion its stability and completes its structure.
Your Adorable Owl Pincushion: A Gateway to Creativity
Congratulations! You’ve successfully crafted your very own charming owl pincushion. This project is more than just a sewing tutorial; it’s an invitation to explore your creativity and enjoy the rewarding process of handmade crafting. Each stitch brings you closer to a unique, functional, and utterly adorable item that brightens your sewing space or makes a heartfelt gift.
The beauty of this project lies not only in its simplicity but also in its potential for customization. Don’t hesitate to personalize your owl! You could experiment with different fabric textures – perhaps a soft fleece for the tummy or a textured linen for the body. Consider adding small felt wings, embroidered details like eyebrows or eyelashes, or even tiny beads for added sparkle. Mix and match button styles for the eyes, or use fabric paint to create intricate patterns on the tummy. For those using their owl as a fabric weight, incorporating fragrant dried lavender or cedar chips with your rice filler can add a pleasant scent to your sewing room.
Whether you’re a seasoned seamstress or just starting your sewing journey, this easy owl pincushion offers a fulfilling experience. It’s a fantastic way to utilize those beloved fabric scraps, embrace sustainable crafting, and create something truly special. So, gather your materials, follow these steps, and prepare to welcome a wise and wonderful owl into your crafting collection. We encourage you to share your finished owl pincushions with us – we can’t wait to see your unique creations!