
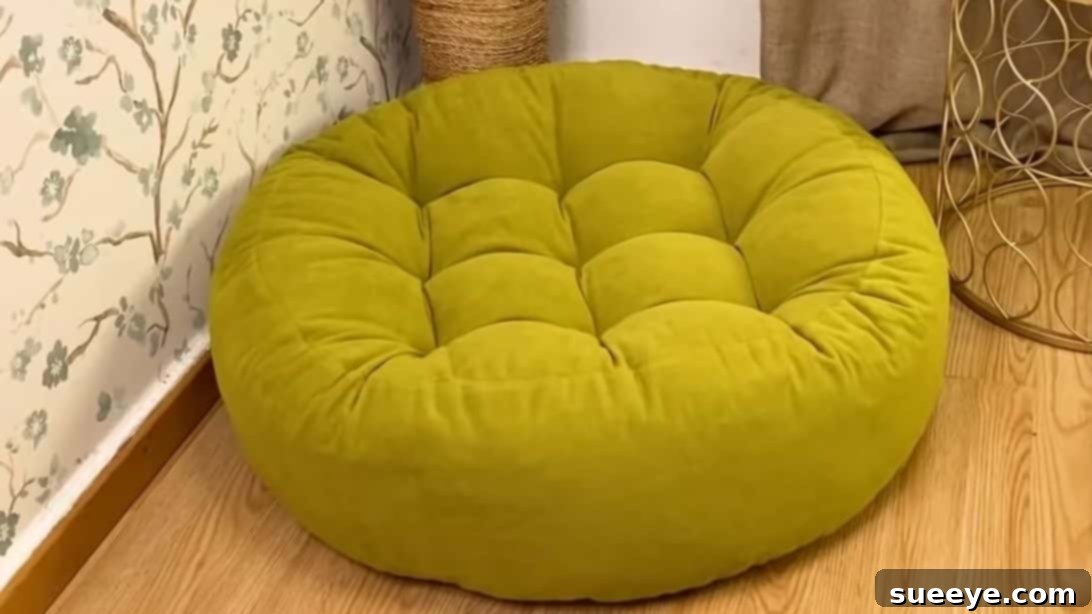
Tired of searching for the perfect bean bag or pouf cushion that fits both your style and budget? Why not create one yourself! Crafting your own floor pouf is not only a significantly more affordable option but also allows for complete customization, ensuring it perfectly complements your living space and provides unparalleled comfort tailored to your preferences. This comprehensive guide will walk you through every step of making a super easy and simple pouf, transforming basic materials into a chic and functional piece of home decor. Gather your sewing essentials, and let’s embark on this rewarding DIY journey inspired by the creative insights from Estadistica Datos del Mundo on YouTube.
Why DIY Your Own Floor Pouf Cushion?
Making your own floor pouf offers a multitude of benefits beyond just saving money. Firstly, it provides an incredible opportunity for personalization. You get to choose the exact fabric, pattern, and size, ensuring your pouf seamlessly integrates with your existing interior design, rather than settling for generic store-bought options. Whether you envision a vibrant accent piece or a subtle, cozy addition, the power of choice is entirely yours. This level of customization is rarely found in mass-produced items, allowing your unique personality to shine through your home decor.
Secondly, there’s immense satisfaction in creating something with your own hands. A handmade pouf is more than just a piece of furniture; it’s a testament to your creativity and skill. It adds a unique, handcrafted touch to your home that often sparks conversation and admiration. Moreover, by selecting durable upholstery fabric and sturdy stitching, you can ensure your DIY pouf is built to last, providing years of comfortable use as extra seating, a convenient footrest, or even a decorative side table. This longevity often surpasses that of cheaper commercial alternatives.
Finally, this project is surprisingly accessible for sewists of all skill levels. With clear, step-by-step instructions and a few basic sewing techniques, you’ll be amazed at how quickly you can bring this stylish and practical item to life. It’s an excellent project for honing your sewing skills while simultaneously enhancing your home’s comfort and aesthetic appeal. Embrace the joy of crafting and design a piece that truly feels like home.
Materials You’ll Need for Your Custom Pouf:
Before diving into the sewing process, ensure you have all your materials ready. Choosing the right supplies is crucial for a durable, aesthetically pleasing, and comfortable floor pouf. Quality materials will significantly impact the final look and longevity of your creation.
- Upholstery Fabric (180 x 140 cm / 70.8 x 55 inches): This is the most crucial component. Opt for a sturdy, heavy-duty upholstery fabric that can withstand regular use, potential spills, and general wear and tear. Excellent choices include canvas, denim, velvet, corduroy, twill, or a robust cotton blend. Consider fabrics that are easy to clean and maintain. The specified measurement provides ample fabric for cutting all the necessary pieces with a little room for error. Don’t forget to select a pattern and color that truly complements your existing home decor.
- Fabric Scissors: Investing in sharp, dedicated fabric scissors is essential for achieving clean, precise cuts. Using them solely for fabric prevents them from becoming dull from other materials, ensuring your edges are neat and fray-free, which is vital for a professional-looking finish.
- Sewing Needle: Depending on whether you’ll be using a sewing machine or hand-sewing (primarily for closing the gap and tufting), ensure you have a sturdy needle. For machine sewing upholstery fabric, a denim or heavy-duty needle (size 90/14 or 100/16) is highly recommended. For hand-sewing, a strong, long upholstery needle will be invaluable for the tufting process.
- Matching Colored Thread (Sturdy): Choose a high-quality, strong polyester or nylon thread that closely matches the color of your fabric. Upholstery thread is ideal as it’s specifically designed for durability and resisting wear, ensuring your seams hold up under pressure from the filling and daily use. Avoid thinner, weaker threads that might snap.
- Ruler: A standard, sturdy ruler will be helpful for measuring smaller sections, checking seam allowances, and ensuring straight lines during the marking process.
- Tape Measure: Crucial for taking accurate measurements of larger fabric pieces, marking the curved sections for the pouf’s top and bottom, and ensuring consistent dimensions throughout your project.
- Marking Pen or Fabric Chalk: Essential for transferring your pattern lines, cutting guides, and tufting points onto the fabric. Make sure it’s erasable, washable, or disappears after a short time, to avoid permanent marks on your finished pouf.
- Polyester Fiberfill (or alternative filler): This material provides the primary bulk, softness, and resilience for your pouf. You’ll need a substantial amount to make the pouf firm yet comfortable. Purchase more than you think you’ll need, as poufs require a lot of stuffing.
- Small Cut Sponge (or foam scraps): Mixing small pieces of sponge or foam scraps with polyester fiberfill adds excellent density, structure, and weight to the pouf. This combination helps prevent the pouf from flattening too quickly over time and gives it a more substantial, high-quality feel.
- Plenty of Sewing Pins: Essential for holding fabric pieces together securely before and during sewing. Use numerous pins, especially when dealing with slippery fabrics, curves, or thick upholstery materials, to prevent shifting and ensure precise alignment.
Easy Step-by-Step Directions to Sew Your Floor Pouf Cushion:
Follow these detailed instructions carefully to construct a beautiful and durable floor pouf. Precision in each step will lead to a professional-looking finished product.
Step 1: Preparing and Cutting Your Fabric Pieces
This initial step involves carefully cutting your fabric into the necessary shapes for the top, bottom, and cylindrical side panels of your pouf. Accuracy here is key for a well-proportioned final product.
- Fold and Mark the Pouf Circles: Begin by taking your large piece of upholstery fabric. Lay it flat and fold it in half lengthwise, ensuring the raw edges meet perfectly. Then, fold both sides inwards towards the center crease, creating a multi-layered, rectangular block. This folding technique allows you to cut a perfect circle by marking only a quarter of it. From the center point of the fabric fold, extend your tape measure outwards. Mark a point at 40 cm (approximately 15.7 inches). Slowly pivot your measuring tape from the fold, making small dots or a continuous line as you go, creating a smooth quarter-circle arc. Continue marking until your line extends straight upward along the open edge of the folded fabric. Connect these marks to draw a smooth, curved line. Repeat this precise marking process on the opposite side of the folded fabric to mirror the first arc.
- Pin and Cut the Circles: To ensure all layers of fabric are cut uniformly, secure them together with plenty of sewing pins. Place the pins just inside the curved lines you’ve drawn, preventing any shifting. Carefully cut along these curved lines using your sharp fabric scissors. When you unfold the fabric, you will beautifully reveal two perfect circular pieces, each with an approximate diameter of 80 cm (31.4 inches). These will form the top and bottom panels of your pouf. Set these two essential circles aside for later assembly.
- Cut the Side Panels: Now, take the leftover fabric from your initial piece and spread it open flat. Using your tape measure and marking pen, carefully measure and cut two rectangular pieces. Each piece should measure 128.5 cm (50.5 inches) in length and 30 cm (11.8 inches) in width. These two rectangular panels will form the cylindrical side walls of your pouf, connecting the top and bottom circles.
- Prepare the Side Panel Seams: To create the continuous side wall, stack these two rectangular side panel pieces with their “right sides” (the side of the fabric that will be visible on the exterior of the pouf) facing each other. Align the 30 cm (11.8 inches) edges precisely, then pin them together securely along both of these shorter sides.
- Sew the Side Panels: Using your sewing machine, sew down each of the pinned 30 cm (11.8 inches) sides with a consistent 1 cm (0.4 inches) seam allowance. However, it’s crucial to leave an 18 cm (7 inches) gap unsewn at the very center of one of these side seams. This strategically placed opening will be absolutely essential later for turning the pouf right side out and for the crucial step of filling it. For added durability, especially important for a frequently used item like a floor pouf, you can double-seam (sew over the seam a second time) these edges to reinforce them.
Step 2: Assembling, Filling, and Finishing Your Pouf
Now that your main fabric components are expertly prepared, it’s time to bring your pouf to life by assembling the pieces, generously filling it, and adding the distinctive and charming tufting details that give poufs their characteristic look.
- Mark the Center of the Circles: Take one of your two circular fabric pieces. To find its exact center, fold it in half, then fold it in half again (into quarters). Make a small, clear mark with your fabric pen or chalk at the very center point where all the folds intersect. Repeat this precise marking process for the second circular piece as well. These center marks will serve as crucial alignment points.
- Attach the First Circle to the Side Panel: Locate the seam on your rectangular side panel (the one you just sewed, but specifically the seam that does not have the unsewn gap). Take one of your marked circular pieces and align its center mark with this seam, ensuring the “right sides” (the exterior, patterned sides) of both fabrics are facing each other. Carefully pin the circular piece all around the edge of the rectangular panel. This step requires patience, as you are attaching a straight edge to a curved one; gently ease the fabric as needed to ensure a smooth, even attachment without puckering.
- Sew the First Circle: Using your sewing machine, carefully sew the pinned circular piece to the rectangular side panel with a consistent 1 cm (0.4 inches) seam allowance. Go slowly, guiding the fabric meticulously to maintain your curve and prevent any uneven stitches. Backstitch at the beginning and end for added security.
- Attach and Sew the Second Circle: Repeat steps 2 and 3 for the second circular piece, attaching it to the other open edge of your now cylindrical rectangular side panel. At this point, your pouf will resemble a completely closed fabric cylinder, with the sole opening being the unsewn 18 cm (7 inches) gap along one of the side seams.
- Turn and Fill the Pouf: Through the unsewn 18 cm (7 inches) gap in the side seam, carefully reach inside and turn your entire pouf cover right side out. Take your time with this step, gently pushing out all the seams to achieve a neat shape. Now comes the exciting and tactile part: filling! Begin to generously stuff your pouf with the prepared mixture of small cut sponge pieces and polyester fiberfill. Distribute the filling as evenly as possible, pushing it firmly into all corners and edges to ensure a uniform shape and prevent any lumpy areas. Continue adding filler until the pouf reaches your desired level of firmness and plushness. It’s often better to overstuff slightly, as fillers tend to settle over time.
- Close the Gap: Once your pouf is fully stuffed to perfection, it’s time to seal the opening. Carefully hand stitch the 18 cm (7 inches) gap closed using a neat, invisible blind stitch. This technique is designed to hide the stitches within the fabric folds, giving your finished pouf a professional, seamless, and polished appearance.
- Prepare for Tufting Marks: To create the classic tufted look, you’ll need to accurately mark points on both the top and bottom of your pouf. Starting from the central point you previously marked on the top of your pouf, use a ruler and fabric pen to map out a grid. A common and appealing tufting pattern often involves a central point surrounded by eight additional points, creating a 3×3 grid (like a tic-tac-toe board). You can achieve this by measuring from the center and marking points at regular intervals along two perpendicular lines (creating a cross), and then marking additional points to form the full square grid. The original guidance suggests dividing the surface into three parts horizontally and vertically. Flip the cushion over and meticulously repeat the exact marking process on the bottom side, ensuring that each mark on the bottom aligns directly opposite its corresponding mark on the top. Accuracy here ensures symmetrical tufting.
- Prepare Tufting Buttons (or small fabric pieces): From your leftover upholstery fabric, carefully cut 18 small pieces, each measuring approximately 1 x 1 cm (0.4 x 0.4 inches). These small squares will serve as sturdy anchors for your tufting, preventing the thread from pulling through the fabric.
- Perform the Tufting: Thread your strong, long upholstery needle with a very long piece of sturdy, matching thread. For extra strength and durability, it’s highly recommended to double the thread. Take one of the small fabric squares and center it directly over one of your marked points on the top surface of the pouf. Carefully push the threaded needle straight through the small fabric square, then through all the layers of the pouf, emerging precisely at the corresponding marked point on the bottom side.
- Secure the Tuft: Once the needle emerges on the bottom, thread it through another one of your small fabric squares. Then, push the needle back through the pouf, aiming to re-emerge at the initial top mark. Pull the thread very tightly to create the desired indentation (tuft), compressing the filling and giving the pouf its characteristic dimpled look. While holding the tension, make 3-4 strong, secure knots directly at the top, firmly securing the small fabric square against the pouf’s surface. Trim any excess thread close to the knots. Repeat this detailed tufting process for all marked points on both the top and bottom of your pouf. The consistent tension of the thread across all tufts creates the signature sculpted and inviting appearance.
Tips for Success with Your DIY Pouf:
To ensure your pouf-making experience is smooth and enjoyable, and that your final product is of the highest quality, consider these helpful tips:
- Choose the Right Fabric Wisely: As mentioned, upholstery fabric is highly recommended for its durability and ability to withstand heavy use. Consider fabrics with a tight weave to prevent filler from escaping over time. If you’re using a patterned fabric, pay extra attention to pattern matching during cutting, especially for the side panels, for a more professional and continuous finish.
- Pre-wash Your Fabric (If Applicable): If your chosen fabric is washable, it’s a good practice to pre-wash and dry it before cutting and sewing. This prevents potential shrinkage and color bleeding after your pouf is completed and needs cleaning, ensuring it maintains its original shape and vibrancy.
- Use Strong, Quality Thread: Do not compromise on thread quality. Heavy-duty polyester or upholstery thread is crucial. It will ensure your seams are robust and hold up to the internal pressure of the dense filling and the stresses of everyday use. Weak thread is a common cause of DIY project failure.
- Measure Twice, Cut Once: This age-old adage is especially true in sewing. Accuracy in measuring is paramount for a well-proportioned pouf. Double-check all your measurements, particularly for the circular and rectangular panels, before making any cuts to avoid costly mistakes.
- Pin Generously and Frequently: When sewing curves or attaching long pieces of fabric, use an abundance of pins to keep the fabric layers from shifting. This is especially important for thicker upholstery fabrics, which can be prone to moving, and for ensuring smooth, even curves.
- Sew Slowly and Steadily: When operating your sewing machine, especially around curves or when joining different shapes, take your time. A slower, controlled pace allows for greater precision, more even stitches, and a much cleaner, more professional finish.
- Consider a Zipper for Easy Care: While this tutorial uses a hand-stitched gap for closure, for easier cleaning or future refilling, you could consider installing a long, heavy-duty zipper in one of the side seams instead. This provides convenient access to the filler.
- Explore Alternative Fillers: Besides polyester fiberfill and sponge, other suitable options for pouf filling include foam beads (for a traditional bean bag feel), shredded foam scraps, or even clean, cut-up old clothing scraps. You can also combine different types of filler to achieve a specific firmness or texture. Experiment to find what works best for your comfort preferences.
Customization Ideas for Your Unique Pouf:
Once you’ve mastered the basic pouf construction, the possibilities for customization are truly endless. Let your creativity soar and make your pouf a unique reflection of your personal style!
- Fabric Play and Texture: Experiment with different fabric textures and patterns. Imagine a velvet pouf for a luxurious feel, or a chunky knit fabric for a cozy, rustic vibe. You could combine a solid color on the sides with a vibrant, patterned top, or use contrasting colors for a bold, graphic statement. Faux leather or even durable outdoor fabrics can create distinct looks suitable for various settings.
- Adjust Size and Shape: Don’t feel limited by the provided dimensions. Adjust the measurements to create a larger, more substantial ottoman for your living room, a smaller, compact footrest for a reading nook, or even a cube-shaped pouf by altering the side panel and top/bottom dimensions to square.
- Add Decorative Elements: Elevate your pouf’s design with embellishments. Incorporate elegant piping along the seams for a more tailored and sophisticated look. Add playful tassels or whimsical pom-poms around the base for a bohemian or fun touch. You could also sew on applique designs, intricate embroidery, or even incorporate fabric painting to personalize it further.
- Tufting Variations: Beyond the small fabric squares, consider using decorative buttons for the tufting points. You can choose buttons that perfectly match or starkly contrast with your fabric for an added design detail. Experiment with different tufting patterns – a single central tuft, a more intricate grid, or even an asymmetric design for an artistic flair.
- Multi-functional Design Enhancements: Think about the pouf’s role in your home. For easy maintenance, consider making the pouf with a removable, washable outer cover. If you intend for it to hold heavier items or serve as a more stable surface, you could even add a sturdy, weighted base inside.
Creating your own DIY floor pouf cushion is a wonderfully rewarding project that perfectly combines practicality with personal style. With this detailed sewing tutorial, you now have all the comprehensive information and expert guidance you need to craft a durable, comfortable, and beautifully customized piece that will undoubtedly become a cherished and frequently used addition to your home. Enjoy the creative process of bringing your vision to life, and revel in the unparalleled comfort and satisfaction of your handmade creation!
Easy DIY Floor Pouf Cushion Sewing Tutorial
*All images in this tutorial are credited to Estadistica Datos del Mundo via YouTube. We highly encourage you to visit their channel and subscribe for more inspiring DIY content and creative projects!