
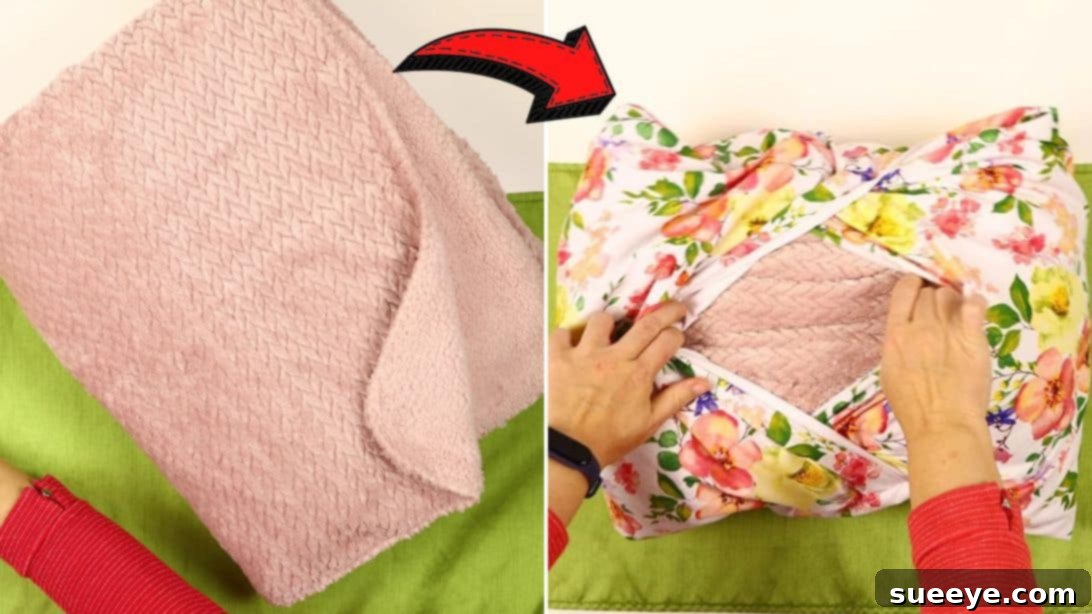
DIY Quillow: Craft Your Own Cozy Blanket in a Pillow
Discover the joy and convenience of creating your own DIY quillow, a truly ingenious blanket that folds neatly into its own integrated pillow. This transformative project, inspired by the brilliant tutorial from Hello Sewing on YouTube, is an absolute must-try for anyone who loves practical sewing, thoughtful gifting, or simply adding a touch of personalized comfort to their life. Quillows are incredibly versatile, making them ideal companions for road trips, camping adventures, long flights, or even just snuggling on the couch at home. Beyond personal use, a handmade quillow makes for a unique and cherished gift for loved ones, or an excellent item to sell at craft fairs. Dive into our comprehensive guide, follow these easy-to-understand instructions, and get ready to experience the convenience and charm of your very own quillow!
Why Sew Your Own Quillow?
While quillows can be purchased, crafting one yourself offers numerous benefits that an off-the-shelf item simply can’t match. Firstly, you gain complete control over the design. Imagine selecting your favorite fabric patterns and textures, ensuring your quillow perfectly complements your personal style or the decor of your home. You can choose a super-soft fleece for ultimate warmth, a lightweight cotton for summer travel, or even a water-resistant material for outdoor excursions. Secondly, it’s a wonderfully rewarding project that builds your sewing skills and allows for creative expression. Lastly, a handmade gift carries a special sentiment, showing the recipient the time and care you invested. It’s a practical, heartfelt present that truly keeps on giving.
Understanding the Quillow Concept
At its core, a quillow is a clever combination of a quilt (or blanket) and a pillow. It features an integrated pocket sewn onto one corner of a blanket. When the blanket is folded correctly, it tucks entirely into this pocket, transforming into a compact, cushion-like package. This design makes it incredibly easy to store, carry, and keep tidy, offering comfort on demand wherever you go.
Materials You’ll Need for Your DIY Quillow
Gathering all your materials before you begin will ensure a smooth and enjoyable sewing experience. Most items are standard sewing supplies, making this a great project for beginners and experienced crafters alike.
- A Blanket or Large Fleece: This will be the main body of your quillow. Choose a size appropriate for your needs (e.g., a throw blanket, twin, or full-size). Fleece, minky, or a soft cotton quilt are excellent choices for comfort.
- Main Fabric for Quillow Pocket: Opt for a durable cotton or blend that complements your blanket. You’ll need enough for two pieces.
- Lining Fabric for Quillow Pocket: A coordinating or contrasting cotton fabric for the inside of the pocket. This can be the same as your main fabric if you prefer.
- Coordinating Thread: High-quality polyester thread that matches or subtly contrasts with your fabrics.
- Sharp Scissors or Rotary Cutter and Cutting Mat: Essential tools for precise fabric cutting. A rotary cutter is highly recommended for straight lines.
- Clear Ruler or Measuring Tape: For accurate measurements of your blanket and fabrics.
- Iron and Ironing Board: Crucial for pressing seams, which gives your finished project a professional look and feel.
- Fabric Pins or Clips: To hold fabric pieces together securely before sewing.
- Sewing Machine: A standard sewing machine with basic straight stitch capabilities is all you need.
Step-by-Step Quillow Sewing Tutorial
Follow these detailed instructions to craft your very own convertible blanket-in-a-pillow. Take your time with each step, and don’t hesitate to pause and re-read if anything is unclear.
Preparation: Gathering Your Supplies
Before you even make the first cut, ensure your fabrics are pre-washed and ironed. This step prevents future shrinkage and makes them much easier to work with. Lay out your blanket on a clean, flat surface, ready for measurement. Having your tools organized will streamline the entire process.
Step 1: Crafting the Quillow Pocket
The quillow pocket is the heart of this project, allowing your blanket to transform. Precision in this step is key for a functional and aesthetically pleasing result.
- Measure Your Blanket: Begin by folding your blanket neatly and evenly. Measure its width accurately. Then, measure its length.
- Calculate Fabric Dimensions: For your quillow pocket, you’ll need two pieces of cotton fabric (one main, one lining).
- Width: Take your blanket’s measured width and add 1 inch. This extra inch accounts for seam allowances.
- Length: Take your blanket’s measured length and add 9 inches. This additional length provides enough room for the blanket to tuck in comfortably and allows for the pocket’s depth.
- Cut Your Pocket Pieces: Using these calculated dimensions, carefully cut two identical rectangles from your chosen cotton fabrics – one for the main exterior of the pocket and one for the lining.
- Sew the Pocket Pieces: Place the two cut fabric rectangles together, ensuring their right sides (the pretty sides) are facing each other. Align all edges perfectly. Pin them securely all around the perimeter.
- Stitch Around the Edges: Using your sewing machine, stitch around all four sides of the pinned fabrics, leaving a consistent seam allowance (e.g., 1/2 inch or 5/8 inch). Crucially, remember to leave a gap of approximately 3 to 4 inches unsewn on one of the longer sides. This opening will be used for turning the pocket right side out. Backstitch at the beginning and end of your stitching to reinforce the seams.
- Trim and Turn: Carefully trim off the corners of your sewn rectangle, cutting diagonally close to the stitching but without snipping the thread. This reduces bulk and helps create crisp corners when turned. Reach through the unsewn gap and gently pull the fabric right side out. Use a blunt tool, like a chopstick or a corner turner, to carefully poke out all four corners until they are nice and sharp.
- Press and Finish: Press the entire pocket flat with your iron, paying special attention to the seams. Fold in the raw edges of the unsewn gap to match the pressed seam line, and press them flat as well. This creates a clean finish for the next step.
Step 2: Attaching the Pocket to Your Blanket
Now that your quillow pocket is ready, it’s time to integrate it with your chosen blanket. This step ensures the pocket is strategically placed for easy folding.
- Prepare the Blanket: Lay your blanket out flat and smooth. Fold the blanket in half lengthwise, then in half again widthwise, or simply find the midpoint of one side. The goal is to identify a corner where you want the quillow pocket to reside. Traditionally, it’s attached to one of the blanket’s short ends, near a corner.
- Mark for Placement: With the blanket unfolded, identify the corner where the quillow pocket will be attached. Measure 4 inches in from each of the two adjacent short sides that form this corner. Mark these points.
- Create the Pocket Overlap: Take your quillow pocket (which should still have its raw edges of the opening pressed in from Step 1). Fold the pocket in half to find its midpoint. Then, fold the fabric to meet the center marks you made, ensuring the edges overlap slightly, as demonstrated in the video tutorial. This creates the “flap” that secures the blanket. Pin these folds in place temporarily.
- Position the Pocket: Place the quillow pocket onto the chosen corner of your blanket. The side of the pocket with the unsewn gap (now pressed neatly) should be positioned towards the edge of the blanket. Align the pocket so that its edges are flush with the raw edges of the blanket’s corner, without any folds in the blanket itself. Pin the quillow pocket securely to the blanket along its three outer sides, making sure it lays flat and smooth.
Step 3: Securing and Finishing the Quillow
The final step involves stitching the pocket permanently to the blanket and learning the satisfying art of folding your new quillow.
- Stitch the Pocket to the Blanket: Carefully open up the blanket to lay it flat, ensuring the quillow pocket remains precisely positioned. Stitch all around the three outer sides of the quillow cover, attaching it firmly to the blanket. Start and end with backstitching for strength. This stitching should also close the previously unsewn gap on the quillow pocket, providing a clean, finished edge. Use a stitch that is appropriate for your blanket material; a straight stitch is usually sufficient.
- Adjust and Fold: Once stitched, your quillow is technically complete! Now comes the fun part: learning to fold it.
- Lay the blanket out flat with the quillow pocket facing up.
- Begin folding the blanket in thirds or quarters, depending on its size, so that it forms a long, narrow rectangle. Ensure the quillow fabric remains on the outside throughout this process.
- Once folded into a narrow strip, start rolling or folding the blanket from the end opposite the quillow pocket.
- As you approach the quillow pocket, reach the edge of the blanket, and pull it inside the quillow cover neatly. The folded flaps of the quillow pocket should remain on the outside, creating the pillow shape.
- Adjust and smooth the blanket within the pocket until it forms a neat, compact pillow.
Tips for a Perfect DIY Quillow
To ensure your quillow turns out beautifully and lasts for years, consider these additional tips.
Choosing the Right Fabric
The blanket itself is crucial. For warmth, fleece, minky, or flannel are excellent. For a lighter, more breathable option, consider cotton voile or a thin quilt. For the pocket, a medium-weight cotton offers good structure and durability. Always think about the intended use – a travel quillow might prioritize lightness and packability, while a home quillow might focus on plush comfort.
Sewing Machine Settings
Adjust your sewing machine’s tension and stitch length according to your fabric’s thickness. Thicker blankets might require a longer stitch length to prevent puckering. Use a strong needle suitable for the combined layers of fabric you’ll be sewing, especially when attaching the pocket to the blanket.
Customization Ideas
Personalize your quillow further! You could add a small patch pocket to the outside of the quillow cover for holding a book or a phone. Consider adding a loop of elastic or a button-and-loop closure to help keep the quillow neatly folded. Embroider initials or a fun design onto the pocket for an extra special touch, especially if it’s a gift.
Folding Your Quillow: A Quick Guide
Mastering the fold is key to enjoying your quillow. Start by laying your blanket flat, pocket side up. Fold the blanket inwards from the sides, creating a narrower rectangle that is roughly the width of your pocket. Then, starting from the end opposite the pocket, roll or fold the blanket towards the pocket. Once you reach the pocket, gently tuck the entire rolled blanket inside, smoothing it out to form a perfect cushion. It might take a couple of tries to get the hang of it!
Care and Maintenance of Your Handmade Quillow
To keep your quillow fresh and comfortable, follow the care instructions for your chosen fabrics. Most fleece and cotton materials can be machine washed on a gentle cycle with cold water and tumble dried on low. Avoid high heat to prevent shrinking or damaging the fibers. Regular washing will ensure your quillow remains a clean and inviting source of comfort.
Beyond the Basics: Quillow Variations
Once you’ve mastered the basic quillow, consider experimenting with variations. You could create different sizes – a small child-sized quillow, a car-seat friendly version, or an extra-large one for family movie nights. Play with different fabric combinations, perhaps a whimsical print for the pocket and a solid color for the blanket, or a luxurious faux fur for ultimate coziness.
This fantastic sewing tutorial by Hello Sewing on YouTube provides excellent visual guidance for this project. Her clear instructions make the process even more accessible.
Congratulations! You’ve successfully sewn your very own DIY quillow, a testament to your crafting skills and a new staple for comfort and convenience. Whether it’s for travel, a thoughtful gift, or simply to enhance your home’s coziness, this versatile blanket-in-a-pillow will surely become a cherished item. Enjoy the practicality and personalized touch of your handmade creation. Happy sewing!
*All amazing images are credited to Hello Sewing via YouTube. Check her other content and follow for more inspiring DIY projects!