
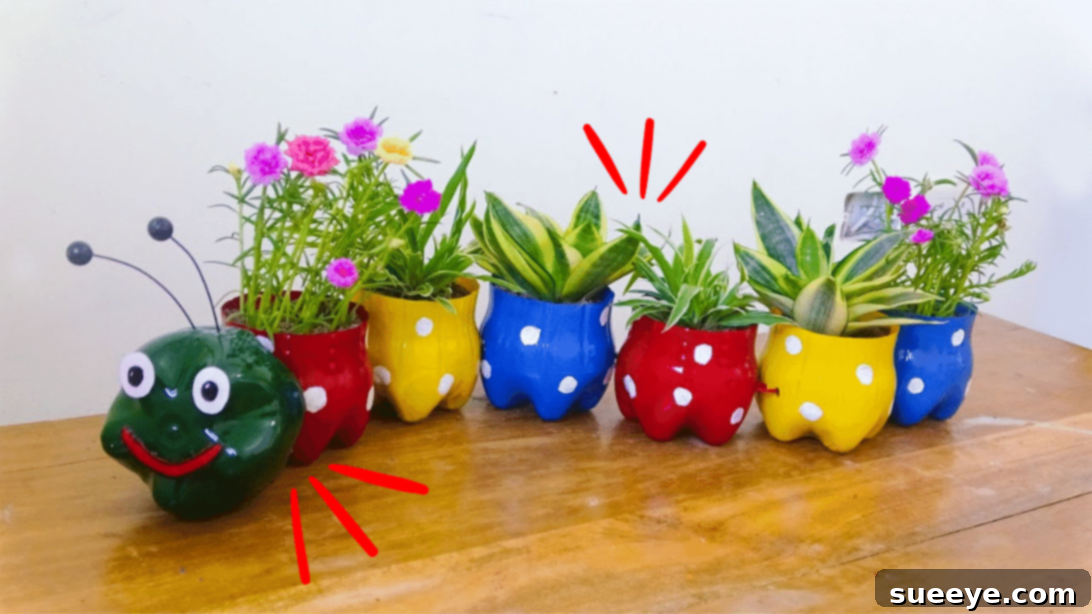
Are you a passionate gardener with a penchant for sustainable living? Do you find joy in transforming discarded items into beautiful, functional pieces for your home and garden? If so, then get ready to embark on an exciting and eco-friendly craft project that combines your love for greenery with the art of recycling! This engaging DIY guide will show you how to create adorable, worm-shaped flower pots using nothing more than ordinary plastic bottles found around your house. Imagine the delight of seeing your favorite plants thriving in these unique, whimsical planters, all while contributing to a healthier planet. It’s a fantastic way to give plastic waste a second life, turning potential pollutants into charming garden decor that will undoubtedly become a focal point in your outdoor space. This project is not only incredibly rewarding but also surprisingly simple, making it perfect for crafters of all skill levels. So, gather your supplies, ignite your creativity, and let’s dive into crafting these delightful upcycled planters. Discover the full tutorial below, originally inspired by Garden Design, and start making your own eye-catching, worm-shaped flower pots today!
Essential Materials for Your DIY Worm Planters
Before you begin this exciting journey of transforming plastic bottles into charming garden companions, ensure you have all the necessary tools and materials readily available. Having everything organized beforehand will make the crafting process smoother and more enjoyable. Most of these items are likely already in your home or easily acquired, emphasizing the accessibility and cost-effectiveness of this project.
- 8 Plastic Bottles: These are the stars of our project! Opt for sturdy, similar-sized plastic beverage bottles (e.g., 2-liter soda bottles or large water bottles). Clean them thoroughly and remove any residue.
- Cutter: A utility knife or craft knife will be essential for making initial incisions into the plastic. Always use with extreme caution.
- Pair of Big Scissors: Sturdy scissors are needed to cut the plastic bottles more precisely after the initial cuts with the cutter.
- Soldering Iron (or alternative): This tool is perfect for creating clean, round holes in plastic for drainage and assembly. If you don’t have one, a heated screwdriver tip (heated with a candle) is an effective and safe alternative. Always exercise caution when working with heat.
- Zip Ties: These will be used to securely connect the different segments of your worm, forming its body. Choose a size that can comfortably pass through the holes you create.
- Glue Gun and Glue Sticks: An indispensable tool for attaching decorative elements like eyes, mouths, and antennae securely.
- Spray Paint with 4 Different Colors: Choose vibrant, weather-resistant spray paints suitable for plastic. Select colors that will make your worm planters pop in the garden, perhaps a mix of greens, reds, yellows, and blues for a truly whimsical look.
- White Paint: Essential for painting the base of the eyes and adding decorative details like spots or patterns to the worm’s body. Acrylic or craft paint will work well.
- Paint Brush: A medium-sized brush for applying white paint and other details.
- Gloves: Protect your hands from paint, especially when using spray paint. Latex or nitrile gloves are recommended.
- 2 Big Black Beads: These will serve as the pupils for your worm’s eyes, adding character and charm.
- 2 Small Wires: Flexible wires are needed to create the worm’s antennae. Floral wire or thin craft wire would be suitable.
- Marker: A permanent marker is useful for outlining cut lines, marking hole positions, and adding fine details to the eyes.
Having all these items ready will ensure a seamless crafting experience, allowing you to focus on the creative aspects of bringing your worm planters to life!
Step-by-Step Guide to Crafting Your Worm-Shaped Flower Pots
Follow these detailed instructions to transform simple plastic bottles into an enchanting worm planter. Take your time with each step, paying attention to safety and precision, to ensure a beautiful and durable end product.
Step 1: Preparing Your Plastic Bottle Segments
Begin by thoroughly cleaning all eight plastic bottles and meticulously removing all labels and adhesive residue. A little warm soapy water can help. Once clean and dry, it’s time to shape them. Carefully use your cutter to make an initial incision around the bottom portion of six of the bottles. Then, switch to big scissors to precisely cut off the bottom part of these six bottles. The goal is to have six segments of roughly equal size, which will form the main body of your worm. For the remaining two bottles, which will be used for the worm’s head, cut one slightly smaller than the other. The larger one will form the main head, and the smaller one will be attached to it, creating a more three-dimensional and interesting head shape. Ensure all cut edges are as smooth as possible to avoid sharp points.
Step 2: Creating Connection and Drainage Holes
Now, it’s time to prepare your six body segments for assembly and drainage. Take each of the six equally sized bottle bottoms. Using your soldering iron (or a heated screwdriver tip for an alternative), carefully create two holes on the front side and two corresponding holes on the back side of the bottom rim of each segment. These holes will be used to thread the zip ties that connect the segments. If using a screwdriver, heat the tip over a lighted candle until it’s hot enough to melt through the plastic cleanly. Always work in a well-ventilated area and on a heat-resistant surface when using a soldering iron or heated screwdriver. After creating the connection holes, make several smaller holes at the very bottom “feet” of each bottle segment. These are crucial for proper drainage, preventing your plants from becoming waterlogged. Aim for 3-5 small drainage holes per segment.
Step 3: Assembling the Worm’s Head and Core Structure
With your holes ready, you can start building the worm’s structure. For the six body segments, insert one zip tie through the two front holes and another through the two back holes of each bottle. Do not tighten them yet; they are just in place for now. Next, turn your attention to the worm’s head. Take the smaller of the two head bottles and create two holes near its center using your soldering iron or heated screwdriver. Thread a zip tie through these holes. This zip tie will later connect the smaller head piece to the main body. Following this, create two tiny holes on the upper sides of the smaller head bottle – these will be for the worm’s antennae. Once the holes are made, apply a generous amount of hot glue to the inner rim of the smaller head bottle and carefully attach it to the larger head bottle. Press firmly to ensure a strong bond, forming a more robust and visually interesting head for your worm.
Step 4: Adding a Splash of Color with Spray Paint
This is where your worm truly begins to come to life! Don your gloves and move to a well-ventilated outdoor area or a space protected by drop cloths. Shake your spray paint cans vigorously. Select one color for the head segment and then choose three other distinct colors for the body segments, ensuring two segments share the same color. For example, you might have a red head, then two green, two yellow, and two blue body segments. Apply thin, even coats of spray paint to each bottle segment. It’s better to apply multiple thin coats than one thick coat to prevent drips and ensure even coverage. Make sure to paint both the exterior and slightly inside the rim for a professional finish. Allow each coat to dry completely before applying the next, and let all painted segments cure thoroughly according to the paint manufacturer’s instructions, which may take several hours.
Step 5: Crafting the Worm’s Expressive Face
While the painted bottles are drying, you can work on the worm’s facial features. Using the top, curved parts of the plastic bottles that were cut off in Step 1, carefully cut out two oval shapes for the eyes and one curve-shaped piece for the mouth. These should be proportionate to your worm’s head. Paint the mouth piece with red paint to give your worm a friendly smile. For the eyes, paint the entire oval shapes with white paint as a base. Let them dry completely. Now, take your two black beads and attach one to the end of each of the two small wires using a tiny dab of glue; these will form the pupils of the antennae. Once the white paint on the oval eye pieces is dry, use a permanent marker to draw a distinct black circle in the center of each white oval, creating the final look for the worm’s eyes. You can also add small details like eyelashes or eyebrows if you wish!
Step 6: Bringing the Worm’s Face to Life
Once all the paint has dried on your head segment and facial features, it’s time to assemble the face. Retrieve the head of the worm (the two glued-together bottle parts). Using your glue gun, carefully attach the prepared eyes and mouth onto the front portion of the head, ensuring they are positioned symmetrically and securely. Make sure you attach them to the part of the head that *doesn’t* have the zip ties for the main body connection. Next, take the two wires with the black beads attached (your antennae) and insert the un-beaded ends into the two small holes you made on the sides of the smaller head bottle in Step 3. Secure them in place with a drop of hot glue from the inside of the head. Adjust the antennae so they stand upright or curve playfully. Set the entire head aside and allow the glue to dry and set completely for maximum durability.
Step 7: Adding Decorative Details to the Body
Now, let’s add some charming details to the worm’s body segments. With your white paint and a fine paintbrush, paint various-sized circles, dots, or even stripes onto the six painted body segments. These decorative patterns will give your worm more character and make it visually appealing. You can choose to make uniform patterns or vary them for a more playful look. Ensure the paint is applied smoothly and evenly. Allow these painted details to dry thoroughly before moving on to the final assembly stage.
Step 8: Final Assembly of Your Whimsical Worm
Once all paint on every segment is completely dry and cured, it’s time for the grand assembly! Take your head segment and the six body segments. Begin by attaching the head to the first body segment using the zip tie you threaded through the head in Step 3, connecting it to the front zip ties of the first body segment. Then, systematically connect one body segment to the next, using the pre-inserted zip ties. Thread the zip ties from the back of one segment through the front of the next. Pull each zip tie tight to create a secure connection between the segments, ensuring your worm holds its shape. Once all segments are joined and securely tightened, use your scissors to carefully trim any excess length from the zip ties, making the connections neat and tidy. Your worm planter should now be fully assembled and ready for its green inhabitants!
Step 9: Planting and Enjoying Your Eco-Friendly Creation
The moment of truth has arrived! Carry your newly assembled worm planter to its desired location in your garden, patio, or even indoors. Carefully add a layer of potting soil to each of the individual bottle segments, ensuring good quality soil that provides adequate nutrients for your plants. Once the soil is in place, gently set your chosen plants into each segment. Small annuals, herbs, succulents, or trailing plants like ivy would look spectacular cascading from these worm pots. After planting, give your new green friends a good watering. The drainage holes you created in Step 2 will prevent water from pooling. Now, step back and admire your handiwork! You’ve not only created a beautiful piece of garden art but also given discarded plastic a purposeful and delightful new life. Enjoy the compliments from friends and family on your innovative and eco-conscious gardening efforts!
Beyond the Craft: The Multifaceted Benefits of DIY Worm Planters
Creating these adorable worm-shaped flower pots from plastic bottles offers a rich tapestry of benefits that extend far beyond simply having a new home for your plants. It’s a project that aligns perfectly with a growing global consciousness towards sustainability, personal creativity, and economical living. Understanding these advantages can inspire even more people to try their hand at this delightful craft.
Environmental Stewardship: A Green Solution to Plastic Waste
Perhaps the most significant benefit of this DIY project is its positive environmental impact. Plastic bottles are a pervasive form of waste, often ending up in landfills or polluting oceans, taking hundreds of years to decompose. By repurposing eight plastic bottles into a functional and decorative planter, you are actively participating in the ‘reduce, reuse, recycle’ mantra. This act of upcycling directly prevents these items from contributing to environmental harm. It’s a tangible way to practice sustainable living, educate others about the importance of waste reduction, and contribute to a circular economy where materials are valued and reused rather than discarded after a single use. Imagine if every household transformed a fraction of its plastic waste into something beautiful and useful – the collective impact would be immense.
Economic Savings: Affordable Garden Decor
Gardening can be an expensive hobby, especially when it comes to purchasing decorative planters. High-quality ceramic or terracotta pots can quickly add up, making it a considerable investment for those with many plants. This DIY project offers a remarkably cost-effective alternative. You’re using materials that would otherwise be thrown away, drastically cutting down on the expense of new planters. The cost is primarily limited to paint, glue, and a few small craft items, which are generally inexpensive and can be used for multiple projects. This makes gardening more accessible and affordable for everyone, allowing you to allocate your budget towards plants, soil, or other gardening essentials instead of costly containers.
Unleash Creativity and Personal Expression
This project is a fantastic outlet for creativity. While the basic structure is defined, the design possibilities are endless. You can experiment with an array of colors, from bright and vibrant to pastel and subtle. You can add different patterns, such as polka dots, stripes, or even freehand designs, to each segment. The worm’s face itself offers a chance for personalization – different eye shapes, mouth expressions, or even adding accessories like glasses or hats. This allows each worm planter to be a unique reflection of your personality and artistic vision, making your garden truly one-of-a-kind. It’s not just a planter; it’s a piece of art created by you.
Educational Value: A Fun Family Activity
Crafting these worm planters is an excellent activity for families, especially those with children. It serves as an engaging way to teach kids about recycling, the lifecycle of materials, and the importance of environmental responsibility. Children can actively participate in painting, decorating, and even the simpler assembly steps (under adult supervision). It also introduces them to basic craft skills, fosters creativity, and provides a sense of accomplishment. Plus, caring for the plants in their handmade worm friend can instill a love for gardening and nature from an early age, making learning both hands-on and fun.
Unique Aesthetic and Conversation Starter
Let’s face it, a worm-shaped planter made from recycled plastic bottles is not something you see every day! Its whimsical and unconventional design will undoubtedly capture attention and spark conversations. Whether placed on a porch, windowsill, or nestled among other plants in a garden bed, these planters add a touch of playful charm and personality that mass-produced pots simply cannot replicate. They are a testament to ingenuity and sustainable living, inviting questions and admiration from guests and passersby alike.
Therapeutic and Rewarding Experience
Engaging in craft projects can be incredibly therapeutic. The process of meticulously cutting, painting, and assembling provides a mindful escape from daily stresses. There’s a deep satisfaction in watching discarded items transform under your hands into something beautiful and functional. The sense of accomplishment upon completing the project, combined with the joy of seeing your plants flourish in your handmade creation, is immensely rewarding. It boosts self-esteem and provides a tangible reminder of your creative capabilities.
Tips for Success and Customization
To ensure your worm planters are not only beautiful but also durable and functional, consider these additional tips and ideas for customization:
- Bottle Selection: For a more uniform look, try to use bottles from the same brand or type. This ensures the diameters are consistent, making assembly smoother. Clear plastic bottles are usually easier to paint as the color adheres better without previous pigments.
- Smooth Edges: After cutting, you can gently sand the edges of the plastic with fine-grit sandpaper or carefully heat them with a lighter (briefly and cautiously!) to slightly melt and smooth any sharp points. This improves safety and aesthetics.
- Paint Adhesion: For best results with spray paint on plastic, consider using a plastic-specific primer first. This will help the paint adhere better and last longer, especially in outdoor conditions. Always use outdoor-grade, weather-resistant paints.
- Drainage Matters: Don’t skimp on drainage holes! Proper drainage is vital for plant health. If you’re concerned about soil falling out, you can place a small piece of mesh or a coffee filter over the drainage holes before adding soil.
- Plant Choices: Select plants that are suitable for smaller containers and have similar watering needs. Succulents, small herbs (like thyme or oregano), impatiens, or creeping jenny are excellent choices that will thrive and enhance the worm’s appearance.
- Weatherproofing: If your worm planter will live outdoors, consider applying a clear, UV-resistant sealant spray over the painted surfaces after they have fully cured. This will protect the paint from fading due to sun exposure and help it withstand rain.
- Varying Sizes: Create a family of worms! Use different sized bottles (e.g., 2-liter and 1-liter) to make worms of various lengths and girths. This can create an even more dynamic display in your garden.
- Different Animals: Don’t stop at worms! This technique can be adapted to create other animal planters like caterpillars, snakes, or even dragons by changing the head design and body segmentation. Let your imagination run wild!
- Hanging Planters: Instead of making the worm lie flat, you could add extra holes and strong string or wire to hang your worm planter vertically, creating a unique hanging garden feature.
Worm-Shaped Flower Pots From Plastic Bottles: A Final Encouragement
In conclusion, the journey of transforming humble plastic bottles into vibrant, worm-shaped flower pots is a testament to the power of imagination and sustainability. This engaging DIY project offers a multitude of benefits, from significantly reducing plastic waste and saving money on garden decor to fostering creativity and providing a rewarding, therapeutic experience. Each step, from cutting and painting to the final assembly, is an opportunity to infuse your unique personality into a functional piece of art for your garden. Not only will these whimsical planters bring a smile to your face and charm to your outdoor spaces, but they also serve as a gentle, yet powerful, reminder of the impact our choices have on the environment. By choosing to upcycle, you’re not just creating a beautiful home for your plants; you’re cultivating a greener planet, one adorable worm planter at a time. So, embrace the joy of crafting, nurture your green thumb, and let these eco-friendly worm planters be a colorful symbol of your commitment to a more sustainable and creative lifestyle. Get started today and watch your garden flourish with character and purpose!