
Transform Your Home Decor: The Ultimate Guide to DIY Throw Pillows from Fabric Scraps
Are you searching for an easy, budget-friendly, and incredibly rewarding way to refresh your living space? Look no further than the humble throw pillow! These versatile decor elements are one of the most effective tools for instantly transforming a room, injecting personality, and setting the perfect mood. And what could be better than creating your own? Handmade throw pillows offer unparalleled creative freedom, allowing you to craft unique pieces that perfectly complement your home. Best of all, you don’t need to be a seasoned seamstress to embark on this delightful DIY adventure, especially when you leverage the charm of fabric scraps.
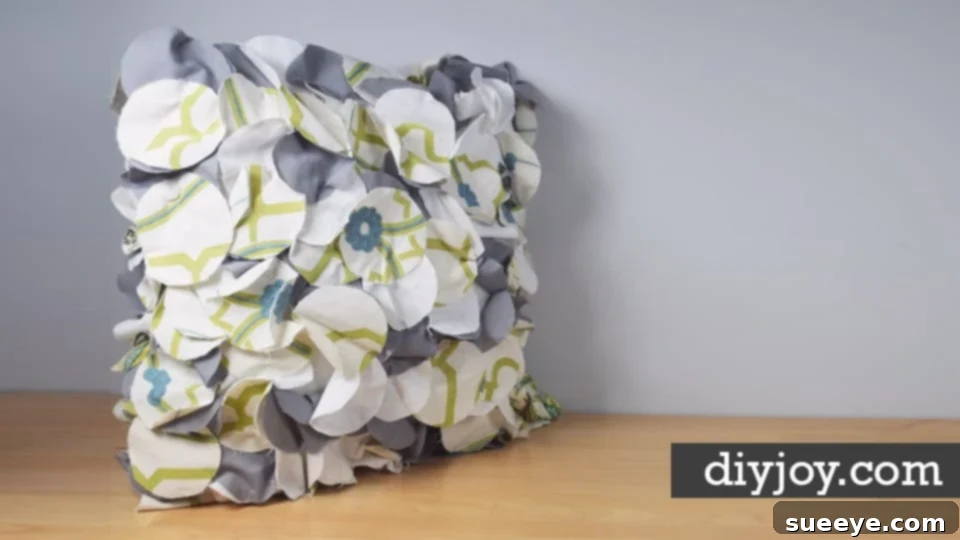
I recently stumbled upon a brilliant idea: making beautiful, decorative pillows entirely from fabric remnants. Like many craft enthusiasts, I have a cherished basket overflowing with awesome fabric scraps – remnants from past projects, forgotten treasures, and pieces too lovely to discard. This project was the perfect excuse to put those saved scraps to good use, and the results were nothing short of incredible. If you’re keen to infuse your home with unique, stylish decor without breaking the bank, this DIY throw pillow project is an absolute must-try. It’s a beginner-friendly sewing endeavor that yields professional-looking results. Get ready to dive into our comprehensive step-by-step tutorial and learn how to create your own stunning, personalized throw pillows today!
Why DIY Throw Pillows Are a Game-Changer for Your Home Decor
Throw pillows are more than just cushions; they are essential design elements that can dramatically influence a room’s aesthetic. They add layers, texture, color, and comfort, acting as focal points or subtle accents. Choosing to DIY your throw pillows, especially from fabric scraps, amplifies these benefits in several key ways:
1. Unmatched Personalization and Unique Style
Store-bought pillows, while convenient, often lack that special touch. When you create your own, you have complete control over every design aspect. Imagine selecting specific fabric patterns, mixing vibrant colors, or combining various textures to craft a pillow that perfectly mirrors your style and existing decor. From rustic farmhouse to modern minimalist, bohemian chic to classic elegance, your DIY pillows can be tailored to any theme. Using fabric scraps means each pillow can become a unique piece of art, a conversation starter that truly reflects your creativity and individuality.
2. Significant Cost Savings: Decor on a Budget
High-quality decorative pillows can be surprisingly expensive, especially if you need several to complete a look. The beauty of using fabric scraps is that you’re repurposing materials you already own or can acquire very cheaply. Instead of buying new fabric, which can quickly add up, you’re giving a second life to remnants that might otherwise go to waste. This approach makes achieving a high-end, custom look incredibly affordable, proving that stunning home decor doesn’t require a hefty budget.
3. Sustainable and Eco-Friendly Crafting
In an era where sustainability is paramount, upcycling fabric scraps is a wonderfully eco-conscious choice. Every piece of fabric you repurpose means less textile waste contributing to landfills. This project aligns perfectly with a sustainable lifestyle, allowing you to create something beautiful and functional while reducing your environmental footprint. It’s a guilt-free way to indulge in your passion for home decor and crafting.
4. A Rewarding Creative Outlet
There’s immense satisfaction in creating something with your own hands. The process of transforming discarded fabric pieces into a cohesive, beautiful pillow is deeply rewarding. It offers a chance to unwind, engage your creativity, and see tangible results of your efforts. Even for beginners, the sense of accomplishment from completing a handmade pillow is incredibly motivating.
5. Perfect for Beginners: No Expert Sewing Skills Required
One of the most appealing aspects of this DIY project is its accessibility. You don’t need advanced sewing techniques or years of experience. Basic straight stitching is often all that’s required. If you can sew a straight line, you can make these pillows. This makes it an ideal project for those just starting their sewing journey, building confidence with each stitch.
The Impact of Throw Pillows: More Than Just Comfort
Beyond their decorative appeal, throw pillows play a crucial role in enhancing the functionality and feel of a room:
- Instant Room Refresh: They are the quickest way to update a room’s look without major renovations. A change of pillows can completely alter the mood, color scheme, and style.
- Seasonal Decor Updates: Easily swap out pillows to match the season – cozy velvets and rich tones for winter, light linens and bright patterns for summer, or autumnal hues for fall.
- Adding Color and Texture: Pillows are excellent for introducing pops of color or subtle texture variations, adding depth and visual interest to neutral furniture.
- Enhanced Comfort and Coziness: Practically, they make sofas, chairs, and beds more inviting and comfortable, perfect for lounging and relaxation.
- Defining Space: In open-plan living areas, carefully placed pillows can help define different zones or add a cohesive thread throughout the space.
Getting Started: Essential Materials for Your Fabric Scrap Pillows
Before you begin your creative journey, gather your materials. The beauty of this project lies in using what you already have, making it wonderfully resourceful.
- Fabric Scraps: This is your primary material! Dig through your stash. Look for pieces that are at least 6×6 inches, though smaller pieces can be pieced together. Cotton, linen, denim, corduroy, velvet, and even upholstery remnants work beautifully. Consider coordinating colors, patterns, and textures, or go wild with an eclectic mix.
- Pillow Inserts: You’ll need these to fill your pillow covers. Standard sizes range from 16×16 inches to 20×20 inches, but you can make any custom size. Poly-fill inserts are common and affordable, while down or feather inserts offer a luxurious feel. Alternatively, you can repurpose old, worn-out pillows by using their stuffing.
- Sewing Machine (or Hand Sewing Kit): A basic sewing machine will make the process quicker and more precise, but hand sewing is absolutely doable. For hand sewing, you’ll need a sharp needle and strong thread.
- Matching Thread: Choose a color that blends with your dominant fabric or provides a subtle contrast.
- Scissors: Sharp fabric scissors are essential for clean cuts.
- Pins: To hold fabric pieces together securely before sewing.
- Measuring Tape or Ruler: For accurate measurements.
- Iron and Ironing Board: Crucial for pressing seams flat and ensuring a professional finish.
- Optional: Zipper, Buttons, or Velcro: If you want a removable pillow cover, these closures are helpful. For a simpler project, you can simply sew the pillow closed after inserting the filler.
Step-by-Step Tutorial: Crafting Your Own Fabric Scrap Throw Pillows
While the exact design will vary based on your chosen scraps and desired look, here’s a generalized step-by-step guide to help you construct your beautiful throw pillows.
-
Plan Your Design and Prepare Fabric
Decide on the size of your pillow. A common size is 18×18 inches. This means your finished fabric panels should be slightly larger to account for seam allowances (e.g., 18.5×18.5 inches or 19×19 inches, depending on your seam allowance preference, typically 1/2 inch).
Lay out your fabric scraps. Experiment with different arrangements, colors, and patterns to create your desired aesthetic. For a patchwork look, cut your scraps into squares, rectangles, or even triangles. Iron all your fabric pieces flat to ensure accurate cutting and sewing. -
Assemble the Pillow Front
If you’re doing a patchwork design, start sewing your smaller fabric pieces together. Place two pieces right sides together, pin, and stitch along one edge. Press the seam open or to one side. Continue adding pieces until you have a panel large enough for the front of your pillow. If using a single large scrap, simply cut it to size.
-
Cut Your Pillow Panels
Once your pillow front is assembled (or cut from a single piece), trim it to your desired size, adding a seam allowance on all four sides. For example, if you want an 18×18 inch finished pillow, cut your front panel to 19×19 inches (for a 1/2 inch seam allowance).
For the back of the pillow, you have a few options:- Simple Back: Cut one piece of fabric the same size as your front panel.
- Envelope Back: This allows for easy removal of the insert. Cut two pieces for the back. Each piece should be the same width as your front panel, but about 2/3 the height. For an 18×18 inch pillow, you might cut two pieces measuring 19 inches wide x 13 inches high. Hem one long edge of each of these back pieces.
- Zipper Back:
Cut two pieces for the back, each roughly half the height of your front panel plus seam allowance. Attach a zipper between them.
For a beginner project, the simple back (sewn shut) or the envelope back is recommended.
-
Sew the Pillow Together
For a simple, non-removable cover:
Place your front panel and back panel right sides together. Pin all around the edges. Stitch around all four sides, leaving a 4-6 inch opening along one side (preferably the bottom) for turning and stuffing. Make sure to backstitch at the beginning and end of your stitching.
For an envelope back:
Lay your finished front panel right side up. Place one back panel (hemmed edge towards the center) right side down on top of the front panel, aligning the raw edges. Place the second back panel (hemmed edge towards the center, overlapping the first back panel) right side down on top, aligning its raw edges. Pin all layers together around the perimeter. Stitch around all four sides. -
Finish and Stuff Your Pillow
Trim the corners of your sewn pillow to reduce bulk, being careful not to cut through your stitching. Turn the pillow cover right side out through the opening (for a simple back) or through the envelope opening. Use a blunt object (like a chopstick or turning tool) to push out the corners neatly.
Insert your pillow form or stuffing. If using loose stuffing, fill it firmly but evenly to avoid lumps.
For a simple back, hand-stitch the opening closed using an invisible stitch (ladder stitch) for a neat finish. For an envelope back, no closing is needed, as the overlap keeps the insert secure.
Design Inspirations for Your Fabric Scrap Pillows
The beauty of working with scraps is the endless potential for unique designs. Let your creativity soar!
- Patchwork Perfection: Go traditional with uniform squares or rectangles, or try a “crazy quilt” style with irregular shapes for a whimsical, eclectic look. Experiment with different patchwork patterns like log cabin, foundation paper piecing for intricate designs, or simple strip piecing.
- Appliqué Adventures: Cut shapes (stars, hearts, leaves, abstract forms) from contrasting scraps and appliqué them onto a larger scrap base. This adds dimension and a personalized touch.
- Stripes and Geometrics: Sew long, thin strips of different fabrics together to create a striped pillow, or cut geometric shapes and arrange them in a repeating pattern.
- Mix and Match Textures: Combine a smooth cotton with a tactile velvet, a rustic linen with a soft flannel. The textural contrast adds depth and a luxurious feel.
- Embellishments: Add a touch of flair with pom-poms, tassels, fringes, or decorative buttons sewn along the edges or onto the pillow front. These small additions can elevate a simple design.
Tips for Success and Professional-Looking Results
Even as a beginner, you can achieve beautiful, high-quality results with these helpful tips:
- Pre-Wash Your Fabrics: Especially if mixing different fabric types, pre-washing helps prevent shrinkage after your pillow is made and ensures colors won’t bleed.
- Press, Press, Press: Ironing your fabric pieces before cutting and pressing your seams after each stitch is crucial for crisp, accurate sewing and a polished finish.
- Use a Walking Foot: If your sewing machine has one, a walking foot can be very helpful when sewing multiple layers or different fabric textures, ensuring they feed evenly.
- Measure Twice, Cut Once: Accuracy in cutting is key for pieces to fit together perfectly.
- Backstitch at Seam Starts and Ends: This reinforces your stitches, preventing them from unraveling over time.
- Don’t Be Afraid to Experiment: The beauty of working with scraps is that there’s less pressure to be perfect. Embrace imperfections as part of the charm!
- Consider an Oversized Insert: For a plump, full-looking pillow, choose an insert that is 1-2 inches larger than your finished pillow cover.
Beyond Throw Pillows: More Ways to Use Fabric Scraps
Once you’ve experienced the joy of repurposing fabric scraps for pillows, you might find yourself looking for more ways to utilize every last piece. Smaller scraps can be used for:
- Coasters and placemats
- Small pouches or wallets
- Quilt blocks (even tiny ones!)
- Appliqué details on clothing or bags
- Handmade greeting cards or scrapbooking
- Stuffing for pincushions or small decorative items
Conclusion: Embrace the Joy of Handmade Home Decor
Creating DIY throw pillows from fabric scraps is more than just a craft project; it’s an opportunity to inject personality, save money, and contribute to a more sustainable lifestyle. It demystifies sewing for beginners and offers seasoned crafters a fresh challenge to utilize their existing resources. The satisfaction of seeing your once-discarded fabric scraps transform into beautiful, functional pieces of home decor is truly unparalleled.
So, gather your treasures, fire up your sewing machine (or grab your needle and thread!), and embark on this wonderful journey. Your sofa, your armchair, and your bed are waiting for their unique, handmade companions. Start creating your awesome, budget-friendly home decor today, and let your creativity shine through every stitch!