
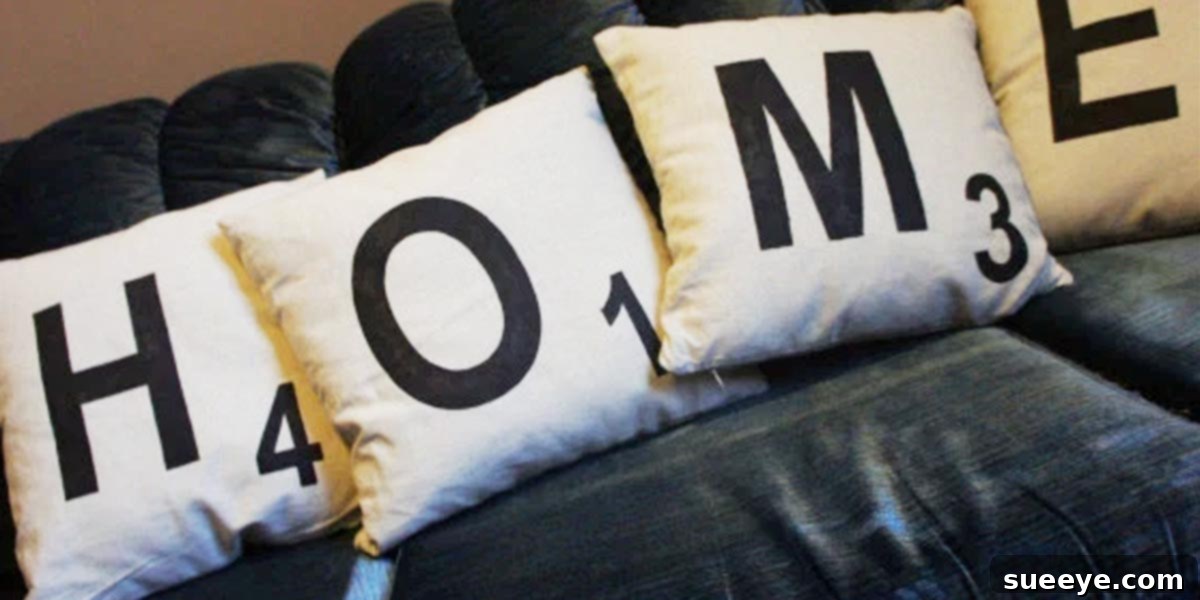
Unlock Your Creativity: Crafting Personalized Scrabble Tile Pillows for Your Home
Are you a wordsmith at heart, someone who finds joy in the strategic play of Scrabble, or simply someone who appreciates unique and personalized home decor? If so, get ready to fall head over heels for an incredibly charming and satisfying DIY project: creating your own Scrabble tile pillows! Imagine your favorite words, significant initials, or an inspiring message beautifully displayed on plush throw pillows, adding a touch of bespoke elegance and warmth to any room. This project isn’t just about crafting; it’s about infusing your living space with personality and a story that’s uniquely yours.
The beauty of this concept lies in its endless customization possibilities. You can choose any word or combination of letters that resonates with you. Many people opt for their initials, the initials of loved ones, or simple, impactful words like “LOVE,” “HOME,” or “FAMILY.” I once saw a clever display on Pinterest where someone spelled “NAP” across three pillows on their bed – an utterly adorable and brilliant idea that perfectly captures the relaxed vibe of a bedroom!
While browsing online marketplaces like Etsy, you might encounter similar Scrabble-themed pillows, often commanding prices upwards of $100 for a set of four. This tutorial empowers you to achieve that same high-end, personalized look without breaking the bank. Let’s be honest, quality decorative pillows can be surprisingly expensive. Even those labeled “inexpensive” often come with a price tag that adds up quickly, especially when you’re seeking something with a bit more character, unique design, or superior craftsmanship. By taking the DIY route, you save money and gain the immense satisfaction of creating something beautiful with your own hands.
Why DIY Scrabble Pillows Are a Must-Try Project
Beyond the obvious cost savings, there are numerous compelling reasons to embark on this creative journey:
- Unleash Personalization: This is arguably the biggest draw. Unlike mass-produced decor, your Scrabble pillows will be a direct reflection of your personality, memories, or aspirations. Spell out your family name, a cherished pet’s name, a favorite quote, or even an inside joke.
- Budget-Friendly Decor: As mentioned, ready-made custom pillows can be pricey. Crafting them yourself allows you to achieve a luxurious, custom look using relatively inexpensive materials, significantly reducing the overall cost.
- Unique Home Accent: These pillows are undeniable conversation starters. Guests will be curious about their origin and admire their clever design. They instantly elevate the aesthetic of your sofa, armchair, or bed, adding a bespoke element that stands out.
- Therapeutic Creative Outlet: Engaging in DIY projects can be incredibly relaxing and rewarding. The process of selecting words, painting, and assembling provides a wonderful opportunity to unwind, focus your energy, and see a tangible result of your efforts.
- Meaningful Gift Idea: Handmade gifts always carry a special charm. Scrabble tile pillows make thoughtful and personalized presents for weddings, housewarmings, birthdays, or holidays. Imagine gifting a newlywed couple pillows spelling “MR & MRS” or their combined initials!
- Versatile Design: Scrabble themes blend well with various decor styles, from rustic farmhouse to modern minimalist, and even eclectic bohemian. The classic design of Scrabble tiles has a timeless appeal that adapts beautifully.
More Than Just Pillows: The Versatility of Scrabble Tile Crafts
The ingenious use of Scrabble tiles extends far beyond pillows. It’s truly amazing how many creative projects can spring from this simple, iconic game piece. The list of possibilities seems endless, showcasing the incredible versatility and charm of these little wooden or plastic squares. Here are just a few inspiring ideas that demonstrate the broad appeal of Scrabble-themed DIY:
- Refrigerator Magnets: Spell out words, family names, or fun messages on your fridge. This is a simple project that adds a touch of playful personality to your kitchen.
- Necklace Pendants: Create unique, personalized jewelry by gluing individual letters onto pendant bases, perfect for gifts or a quirky personal accessory.
- Christmas Ornaments: Fashion festive ornaments spelling out “JOY,” “NOEL,” or family names to hang on your tree, adding a touch of handmade charm to holiday decorations.
- Coasters: Arrange tiles to form words or patterns and secure them to a coaster base for a distinctive and functional addition to your coffee table.
- Wall Art: Mount an arrangement of tiles on a canvas or wooden board to spell out an inspirational quote, a family motto, or a collection of meaningful words, creating truly custom wall decor.
- Key Chains: Personalize key chains with names or significant initials, making them easy to identify and a sweet gift.
- Garden Markers: Some ingenious gardeners even attach Scrabble tiles to stakes to label their herbs, vegetables, or flowers, adding a whimsical and charming touch to their garden beds.
These diverse applications highlight the enduring appeal of Scrabble iconography and its ability to transform everyday items into cherished, personalized treasures. Our focus today, however, remains firmly on those delightful pillows that bring words to life in your living space.
Materials You’ll Need for Your Scrabble Pillows
Before diving into the creative process, gathering your materials is key. Opting for quality supplies will ensure your finished pillows are not only beautiful but also durable and long-lasting.
- Plain Pillow Covers: Choose covers made from sturdy fabrics like canvas, duck cloth, or a thick cotton blend. These fabrics provide an excellent surface for painting and hold their shape well. Consider neutral colors like off-white, beige, light gray, or even a soft linen shade to mimic the classic Scrabble board aesthetic. Ensure they have a zipper or envelope closure for easy insertion of the pillow form.
- Pillow Inserts: Select high-quality pillow inserts that fit your chosen covers. For a plump, luxurious feel, sometimes going up one size in the insert (e.g., an 18×18 inch insert for a 16×16 inch cover) can create a fuller look.
- Fabric Paint: You’ll need at least two colors. A light brown or beige for the “tile” background and a dark color (black or dark brown) for the letters and numbers. Ensure the paint is specifically designed for fabric to prevent cracking and ensure washability.
- Stencils: High-quality letter and number stencils are crucial for crisp, professional-looking results. Look for stencils in a classic, clear font that resembles the Scrabble game’s lettering. You’ll need stencils for both the main letters and tiny numbers (1-10) for the point values.
- Fabric Brushes or Sponges: Small, flat-tipped brushes or dense sponge applicators are ideal for stenciling. They help prevent paint from bleeding under the stencil.
- Ruler and Pencil/Fabric Marker: Essential for precise measurements and marking the layout of your tiles on the pillow cover.
- Painter’s Tape (Optional but Recommended): For securing stencils and creating sharp, clean edges around your “tiles.”
- Cardboard or Plastic Insert: To place inside the pillow cover while painting, preventing paint from seeping through to the other side.
- Iron: Most fabric paints require heat-setting to become permanent and washable.
- Paper Towels/Old Cloths: For wiping brushes and cleaning up any spills.
Step-by-Step Guide to Crafting Your Scrabble Tile Pillows
Now that you have all your supplies, let’s get crafting! Take your time with each step, and you’ll be amazed at the professional finish you can achieve.
Step 1: Prepare Your Pillow Covers and Plan Your Design
First, pre-wash and dry your pillow covers according to their fabric care instructions. This helps prevent shrinkage and ensures better paint adhesion. Once dry, iron them smooth. Insert a piece of cardboard or plastic into each pillow cover to create a firm, flat painting surface and protect the back of the pillow from paint bleed. Decide on the words you want to spell and the layout. Will they be horizontal, vertical, or a combination? Use a ruler and a light pencil or fabric marker to lightly mark the square outlines for each “Scrabble tile” on your pillow cover. Ensure consistent spacing between tiles for a neat appearance.
Step 2: Paint the Scrabble Tile Backgrounds
Carefully apply painter’s tape around the outer edges of each marked square if you want super crisp lines, leaving the square exposed. Using your light brown or beige fabric paint and a flat brush or sponge, fill in each square. Apply thin, even coats to avoid a thick, crackled finish. You might need two coats for opaque coverage, allowing each coat to dry completely before applying the next. Once all tile backgrounds are painted and dry, gently remove the painter’s tape.
Step 3: Add the Letters and Point Values
Once the tile backgrounds are completely dry (this is crucial to prevent smudging), position your letter stencil carefully over the center of each painted square. Secure it with a small piece of painter’s tape if needed. Dip your small fabric brush or sponge into the darker fabric paint (black or dark brown) and gently dab the paint over the stencil. Use minimal paint to prevent bleeding under the stencil. Lift the stencil straight up. Repeat this process for all your letters.
Next, use your tiny number stencils to add the point values to the bottom right corner of each tile, mimicking the authentic Scrabble design. Again, use a small amount of paint and a gentle dabbing motion. Allow all the painted letters and numbers to dry thoroughly, ideally overnight, to ensure they are completely set.
Step 4: Heat-Set Your Fabric Paint
This step is essential for making your painted design permanent and washable. Once all paint is completely dry, remove the cardboard insert from the pillow cover. Place a thin cloth or parchment paper over your painted design to protect your iron. Following the fabric paint manufacturer’s instructions, iron over the design for the recommended amount of time and temperature. This heat-setting process cures the paint, making it durable and resistant to washing.
Step 5: Assemble Your Personalized Scrabble Pillows
Once your pillow covers are cool and the paint is fully set, it’s time for the final satisfying step. Carefully insert your pillow forms into the freshly decorated covers. Fluff them up, arrange them on your sofa, bed, or armchair, and admire your brand-new, custom-made Scrabble tile pillows!
Design Variations and Creative Inspirations
The beauty of this DIY project lies in its adaptability. Here are some ideas to spark your creativity and personalize your Scrabble pillows even further:
- Word Choices: Go beyond “HOME” and “LOVE.” Consider “FAMILY,” “DREAM,” “CREATE,” “INSPIRE,” “COFFEE,” “READ,” or even specific family names, pet names, or inside jokes. The possibilities are truly endless, allowing for deep personalization.
- Font Styles: While a classic Scrabble-like font is popular, you could experiment with other clear, blocky stencils for a slightly different aesthetic. Just ensure readability.
- Tile Colors: Instead of classic beige, try painting your tiles in a soft gray, a pastel shade, or even a bold primary color to match your existing decor. The letters can be black, white, or another contrasting color.
- Pillow Cover Materials: While canvas is great, consider other textures like soft linen for a natural look, or even velvet for a touch of luxury (though painting on velvet requires extra care).
- Arrangement: Instead of a single word, create a crossword puzzle effect with intersecting words. Or stagger the tiles slightly for a more playful, less rigid look.
- Different Pillow Sizes: Mix and match different sized pillows. Perhaps a larger pillow spells a family name, surrounded by smaller ones with individual initials.
- Themed Sets: Create sets for specific rooms. “COOK” for the kitchen, “BATHTIME” for a bathroom, or “PLAY” for a child’s room.
Tips for Success and Longevity
- Practice First: If you’re new to fabric painting or stenciling, practice on a scrap piece of fabric before working on your actual pillow covers.
- Less is More with Paint: Apply thin layers of paint. Too much paint can bleed under the stencil or create a stiff, cracked finish.
- Clean Stencils: Clean your stencils thoroughly between uses and especially between different colors to prevent paint transfer and keep lines crisp.
- Patience is Key: Allow ample drying time between coats of paint and before handling the finished product. Rushing can lead to smudges and ruined designs.
- Work in a Well-Ventilated Area: Fabric paints can have fumes, so ensure good air circulation.
Care and Maintenance
To ensure your beautiful Scrabble pillows last for years, follow these general care instructions for fabric-painted items:
- Spot Clean: For minor spills, spot clean with a damp cloth and mild soap.
- Gentle Washing: If a full wash is necessary, turn the pillow cover inside out. Wash on a gentle cycle with cold water and a mild detergent. Avoid harsh chemicals or bleach.
- Air Dry: Air drying is always best for fabric-painted items. Lay flat or hang to dry. Avoid high heat from a dryer, which can potentially damage or crack the paint over time.
- Ironing: If ironing is needed, do so on the reverse side of the fabric or with a protective cloth over the painted area.
I crafted four of these pillows for my sofa, spelling out the word “HOME,” just like the featured photo often seen for this project, and I absolutely adore them! Every time friends or family visit, they invariably ask where I found such unique and charming pillows. It’s always a pleasure to share this easy and rewarding tutorial, encouraging them to create their own personalized pieces. It’s truly amazing how a simple DIY project can become such a focal point and a topic of joyful conversation.
So, gather your supplies, pick your favorite words, and embark on this delightful journey of creating custom Scrabble tile pillows. You’ll not only save money but also add a deeply personal and stylish touch to your home decor that everyone will love!
Photo Credit: Dolled Up Design