
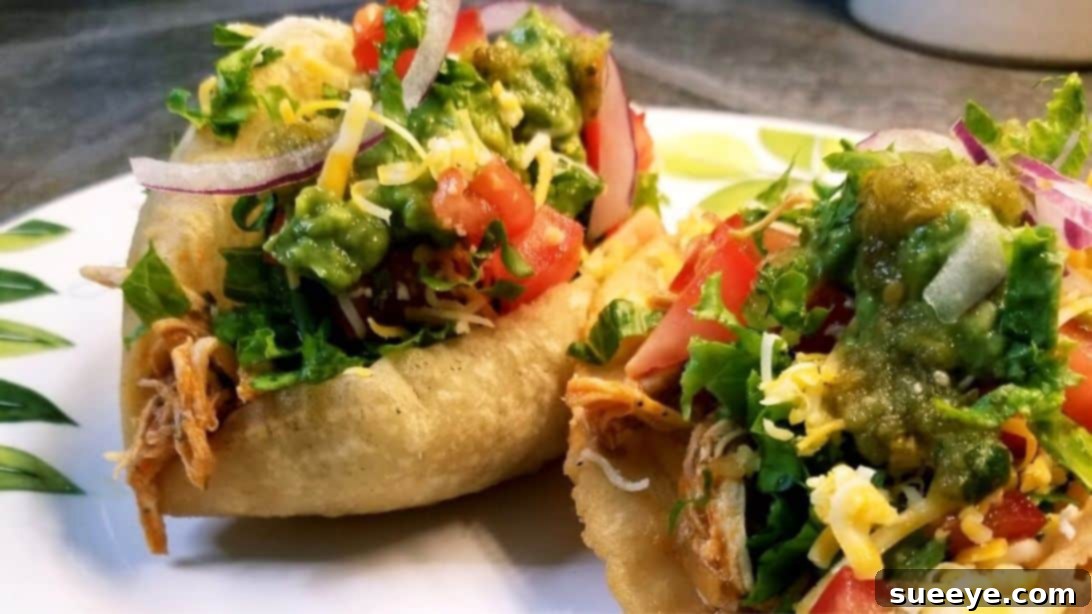
Authentic Puffy Tacos San Antonio Style: A Culinary Journey
Embark on a culinary adventure straight to the heart of Texas with this incredible recipe for Puffy Tacos San Antonio Style. If you’ve ever craved the unique texture of a taco shell that is both crispy and wonderfully airy, you’ve found your ultimate guide. Inspired by the brilliant techniques shared by Rachel Cooks With Love, this recipe proves that crafting delicious, authentic Tex-Mex dishes from scratch is not only achievable but also immensely rewarding. Forget pre-made shells; the homemade difference in these puffy tacos is simply unparalleled. Get ready to delight your family and friends with a dish that captures the vibrant flavors and distinctive style of San Antonio’s iconic cuisine.
Puffy tacos are a cornerstone of San Antonio’s culinary identity, renowned for their distinctive, cloud-like texture. Unlike traditional crispy tacos, puffy tacos are made by flash-frying fresh masa dough, which causes the tortilla to puff up and create a delicate, airy pocket that’s perfect for holding savory fillings. This unique cooking method results in a taco shell that’s soft and tender on the inside, with a satisfyingly crisp exterior. Our recipe features a succulent shredded chicken filling, rich with aromatic spices and fresh vegetables, offering a depth of flavor that perfectly complements the signature shell. Prepare to elevate your taco night to an entirely new level!
Ingredients for San Antonio Puffy Tacos
Creating these sensational puffy tacos requires a selection of fresh, high-quality ingredients. Pay attention to each component, as they all play a vital role in achieving that authentic San Antonio flavor and signature puffy texture.
For the Flavorful Shredded Chicken:
- 1 large chicken breast (bone-in recommended for deeper flavor)
- 3 boneless chicken thighs (for added moisture and tenderness)
For Boiling the Chicken and Building the Broth Base:
These aromatics will infuse your chicken and broth with essential savory notes, creating a rich foundation for your taco filling.
- 3-4 garlic cloves, peeled
- 1 small yellow onion, quartered
- 1 teaspoon black peppercorns (or 1/2 teaspoon ground pepper)
For the Rich and Savory Taco Filling:
This blend of spices and fresh vegetables creates a vibrant, well-balanced filling that is both hearty and incredibly delicious.
- 1 teaspoon dried oregano (Mexican oregano preferred for authenticity)
- 1 teaspoon sweet paprika (for color and mild sweetness)
- 1 1/2 tablespoons tomato paste (for depth and umami)
- 1/4 cup yellow bell pepper, finely diced (for sweetness and color)
- 1/4 cup green bell pepper, finely diced (for a fresh, slightly bitter note)
- Small bunch of fresh cilantro, chopped (about 1/4 cup)
- 2 Roma tomatoes, diced (for natural acidity and body)
- 3/4 chopped medium onion (about 1 cup), finely diced (the aromatic base)
For the Traditional Molcajete Spice Blend (or equivalent):
The molcajete blend provides the quintessential Tex-Mex spice kick. Freshly ground spices offer the most potent aroma and flavor.
- 1/2 teaspoon dried cumin seeds (or 1/4 teaspoon ground cumin)
- 1/2 teaspoon black peppercorns (for fresh cracked pepper flavor)
- 2 large garlic cloves, peeled
- 1/2 to 1 cup of water (for grinding, adjust as needed for consistency)
Note: While a traditional molcajete (mortar and pestle) yields the best results, you can use pre-ground powdered spices if necessary. However, grinding them fresh truly elevates the flavor profile.
For the Signature Puffy Shells (Masa Dough):
The secret to the “puffy” texture lies in this simple yet crucial dough mixture.
- 1 1/2 cups Maseca (nixtamalized corn flour for tortillas)
- 1/2 teaspoon fine sea salt
- 1 cup warm water (ensure it’s warm, not hot or cold, for optimal dough consistency)
For the Essential Toppings:
Customize your puffy tacos with a vibrant array of fresh toppings to add crunch, creaminess, and tang.
- Fresh guacamole (homemade is always best!)
- Zesty tomatillo salsa (salsa verde)
- Grated cheddar cheese (or a Tex-Mex blend)
- Crisp shredded lettuce (iceberg or romaine)
- Freshly diced tomatoes
- Thin slices of red onion (for a subtle bite and beautiful color)
Step-by-Step Guide to Crafting San Antonio Puffy Tacos
Follow these detailed steps carefully to achieve perfectly puffy shells and a mouthwatering chicken filling that will transport your taste buds straight to San Antonio.
Step 1: Prepare and Boil the Chicken for Maximum Flavor
Begin by placing a large, heavy-bottomed pot or Dutch oven over medium-high heat. Add the bone-in chicken breast and boneless chicken thighs. Introduce the whole garlic cloves, small onion quarters, and black peppercorns into the pot. Pour in enough cold water to fully submerge the chicken, ensuring it’s generously covered. Bring the water to a rolling boil, then immediately reduce the heat to a low simmer. Cover the pot with a lid and let it gently simmer for approximately 45 minutes, or until the chicken is tender and cooked through. Once done, turn off the heat. Carefully remove the cooked chicken pieces from the pot and set them aside to cool. Crucially, reserve a ladleful (about 1/2 cup) of the flavorful chicken broth for your taco filling and set aside the remaining broth for future culinary uses – it’s liquid gold for soups or other recipes!
Step 2: Shred the Cooled Chicken
Once the cooked chicken has cooled enough to handle comfortably, begin to shred it into small, manageable pieces. You can use two forks to pull the meat apart, or for a quicker method, a stand mixer with the paddle attachment can shred chicken in seconds. Aim for uniform pieces that will integrate well into your taco filling. Once shredded, cover the chicken with cling wrap or place it in an airtight container to prevent it from drying out, and set it aside for later assembly.
Step 3: Begin Building the Taco Filling Base
In a large, heavy pot or deep skillet, add about 2 1/2 tablespoons of your preferred cooking oil (vegetable or canola oil works well) and heat it over medium heat. Add the finely diced onion and sauté, stirring occasionally, until it becomes translucent and tender, usually about 5-7 minutes. Next, add the diced yellow and green bell peppers. Sauté for another few seconds, just until they begin to soften slightly but still retain a bit of crunch. Finally, add the diced Roma tomatoes. Continue to cook, stirring frequently, until the tomatoes break down, become soft, and release their natural liquids, concentrating their flavor. This step is essential for a rich sauce.
Step 4: Incorporate the Molcajete Blend and Spices for Depth
Now, it’s time to build the robust flavor profile of your filling. If using a molcajete, combine the dried cumin seeds, black peppercorns, and two large garlic cloves. Grind them into a coarse paste, adding 1/2 to 1 cup of water gradually to aid in the grinding process and create a wet, aromatic paste. If using powdered spices, simply combine them in a small bowl with the specified water to form a slurry. Add this molcajete blend (or spice slurry) to the pot with the sautéed vegetables. Next, stir in the sweet paprika, dried oregano, chopped cilantro, and the tomato paste. Mix everything thoroughly to combine. Cook for a few minutes, allowing the spices to bloom and their aromas to intensify. Season generously with salt to taste. Bring the mixture to a gentle boil, then reduce the heat to low, cover the pot, and let it simmer for approximately 10 to 15 minutes. This simmering period allows the flavors to meld beautifully.
Step 5: Prepare the Masa Dough for Puffy Shells
In a medium-sized mixing bowl, combine the Maseca corn flour and fine sea salt. Whisk them together to ensure even distribution. Gradually pour in the warm water, adding a small amount at a time and mixing with your hands or a spoon after each addition. Continue this process until a cohesive dough forms. Once the dough comes together, turn it out onto a clean surface and knead it gently about 8-10 times. The dough should be soft, pliable, and not sticky. Form the dough into a smooth ball. Cover it tightly with cling wrap or a damp towel and let it rest for at least 15-20 minutes at room temperature. This resting period is crucial as it allows the masa to fully hydrate, resulting in a more pliable dough that puffs up beautifully when fried.
Step 6: Combine Chicken and Sauce, Then Simmer to Infuse Flavors
Add the previously shredded chicken to the simmering sauce in the heavy pot. Stir everything together thoroughly, ensuring all the chicken pieces are well-coated with the rich, aromatic sauce. Cover the pot with its lid and let the chicken and sauce simmer on low heat for an additional 15 to 20 minutes. This final simmer allows the chicken to fully absorb all the incredible flavors of the sauce, making it incredibly tender and juicy.
Step 7: Prepare the Frying Oil
Choose a deep, medium-sized pot or a Dutch oven for frying your taco shells. Pour in a neutral-flavored oil (such as vegetable, canola, or corn oil) until it is about halfway full. Place the pot over medium-high heat and allow the oil to heat up to approximately 350-375°F (175-190°C). If you don’t have a thermometer, you can test the oil by dropping a tiny piece of masa dough into it; if it sizzles vigorously and floats to the surface within a few seconds, the oil is ready.
Step 8: Portion and Flatten the Masa Dough
Uncover your rested masa dough. Divide the dough into 8 equal pieces. Roll each piece into a smooth ball between your palms. Place one dough ball between two pieces of plastic wrap (or a cut-open Ziploc bag) on a tortilla press, or use a rolling pin to flatten it into a thin, round tortilla, approximately 5-6 inches in diameter. The edges should be slightly thinner than the center. Repeat this process with the remaining dough balls, creating all your tortillas before you begin frying.
Step 9: Fry the Puffy Taco Shells to Perfection
Carefully drop one flattened masa tortilla into the hot oil. It should immediately begin to bubble and rise. As it fries, the tortilla will miraculously puff up like a balloon – this is the magic of the puffy taco! Once it has puffed, use a spatula (preferably one with a slot) to gently hold down the center of the taco while it cooks, creating that characteristic “pocket” shape. Fry for about 30-45 seconds on the first side until golden and crispy. Then, carefully flip it over and cook the other side for another 30-45 seconds, ensuring both sides are beautifully golden brown and crisp. Remove the cooked puffy shell from the oil and transfer it to a wire rack placed over a baking sheet lined with paper towels to drain excess oil. Repeat this process with the remaining tortillas, being careful not to overcrowd the pot and maintaining the oil temperature.
Step 10: Assemble and Serve Your Authentic Puffy Tacos
Once all your puffy taco shells are fried and drained, it’s time for the best part: assembly! Fill each warm, crispy shell generously with the flavorful shredded chicken mixture. Then, pile on your favorite fresh toppings. A classic combination includes a dollop of creamy guacamole, a spoonful of tangy tomatillo salsa, a sprinkle of grated cheddar cheese, crisp shredded lettuce, diced fresh tomatoes, and a few thin slices of red onion for a refreshing bite. Serve immediately and savor every bite of these truly authentic San Antonio-style puffy tacos. Enjoy the delightful contrast of the airy, crispy shell with the tender, seasoned chicken and fresh toppings!
Tips for the Best San Antonio Puffy Tacos
- Quality Maseca: Use good quality Maseca corn flour. It’s specifically treated for tortilla making and is crucial for the puffy texture.
- Warm Water for Masa: Ensure your water for the masa is warm, not hot or cold. This helps the masa hydrate properly and develop pliability.
- Rest the Dough: Don’t skip the resting step for the masa dough. It allows the gluten to relax and the flour to fully hydrate, making the tortillas easier to handle and more likely to puff.
- Oil Temperature: Maintain a consistent oil temperature between 350-375°F (175-190°C). Too cold, and the shells will be greasy; too hot, and they’ll burn before puffing.
- Don’t Overcrowd the Pot: Fry one or two tortillas at a time to maintain oil temperature and allow enough space for them to puff properly.
- Spatula Technique: Gently pressing the center of the tortilla with a spatula while frying helps to create that distinctive puffy pocket.
- Freshly Ground Spices: If possible, grind your cumin and peppercorns fresh in a molcajete. The aroma and flavor difference are significant.
- Chicken Broth: Don’t discard the chicken broth! It’s a key ingredient for enriching the taco filling sauce.
Variations to Explore
While chicken is a classic choice, feel free to experiment with other fillings for your puffy tacos:
- Beef Fajita: Thinly sliced and seasoned beef fajita meat.
- Carnitas: Slow-cooked, tender pork carnitas for a richer flavor.
- Ground Beef: A classic seasoned ground beef mixture.
- Vegetarian Options: Seasoned black beans, sautéed mushrooms, or grilled vegetables like zucchini and corn.
Frequently Asked Questions About Puffy Tacos
What makes a taco “puffy”?
A puffy taco gets its unique texture from the way its shell is made. Instead of using pre-made, dry tortillas, a fresh masa dough is rolled thin and then deep-fried. The rapid heat from the oil causes the moisture inside the masa to quickly turn into steam, creating air pockets that make the tortilla expand and puff up, resulting in a light, airy, and crispy shell.
Can I use regular corn tortillas for puffy tacos?
Unfortunately, no. Regular store-bought corn tortillas are typically made with already cooked and processed corn flour, and they lack the specific properties of fresh masa dough needed to create the “puff” when fried. For authentic puffy tacos, you must use masa dough made from Maseca or fresh masa.
What is Maseca?
Maseca is a brand name for a type of instant masa flour, which is a key ingredient for making tortillas and other Mexican dishes. It’s made from dried corn that has undergone nixtamalization (a process of soaking and cooking corn in an alkaline solution, usually limewater), then ground into a fine flour. When mixed with water, it forms fresh masa dough.
Can I make the taco filling ahead of time?
Absolutely! The chicken filling is perfect for meal prep. You can make it 1-2 days in advance and store it in an airtight container in the refrigerator. Gently reheat it on the stovetop over low heat, adding a splash of chicken broth if it seems too dry.
What’s the best oil for frying puffy tacos?
Neutral-flavored oils with a high smoke point are best. Vegetable oil, canola oil, corn oil, or even peanut oil are excellent choices. They won’t impart unwanted flavors to your delicate taco shells.
Can I bake puffy taco shells instead of frying them?
No, baking will not produce the characteristic “puffy” texture. The high, direct heat of deep frying is essential for the masa to rapidly steam and expand, creating the signature airy pockets. Baking would result in a hard, cracker-like shell rather than a puffy one.
How do I store leftover puffy taco shells and filling?
Store leftover chicken filling in an airtight container in the refrigerator for up to 3-4 days. Leftover puffy shells should be stored at room temperature in a paper bag or loosely covered to maintain crispness; they can become soft if sealed in plastic. For best results, it’s recommended to fry the shells fresh just before serving. You can reheat shells briefly in a hot oven for a few minutes to crisp them up, but they won’t be as light as freshly fried ones.