
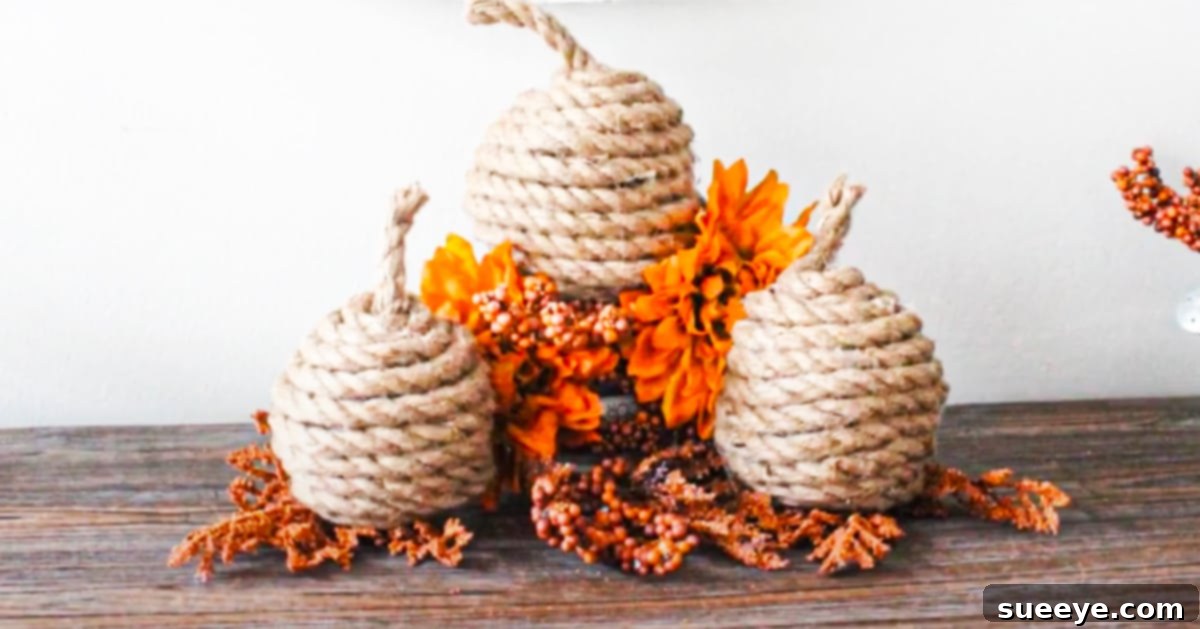
Craft Charming Rustic Rope Pumpkins: Your Ultimate DIY Fall Decor Guide
As the leaves begin to change and a crispness fills the air, the desire to infuse our homes with the warmth and charm of autumn becomes irresistible. While store-bought fall decorations can be beautiful, there’s a unique satisfaction and character that comes from creating your own. This season, embrace the spirit of DIY with a project that’s not only incredibly simple and budget-friendly but also yields truly stunning results: the DIY rope pumpkin.
Inspired by the ingenious craft shared by Repurpose And Upcycle on YouTube, this project transforms humble materials into rustic works of art. Forget complicated techniques or expensive supplies; all you need are a few basic items you might already have on hand, such as rope, a hot glue gun, paper, and rubber bands. It’s an ideal craft for anyone looking to add a touch of handmade elegance to their fall decor without breaking the bank or requiring specialized crafting skills. In fact, you can likely gather all the necessary supplies from a dollar store, making this an exceptionally affordable endeavor.
The beauty of sisal rope, with its natural texture and earthy tone, lends itself perfectly to creating an authentic, organic aesthetic that complements any autumn setting. Imagine decorating these charming pumpkins with faux fall leaves, sprigs of berries, or even grouping several together to form an eye-catching centerpiece for your dining table or mantelpiece. This delightful holiday project is so straightforward that even absolute beginners can achieve professional-looking results. You’ll be amazed at how quickly you can create an entire patch of these adorable rope pumpkins in just one crafting session.
Why DIY Rope Pumpkins Are a Must-Make for Fall
The allure of DIY projects, especially for seasonal decor, extends far beyond mere cost savings. Crafting your own rope pumpkins offers a multitude of benefits that enhance both your home and your crafting experience:
- Unbeatable Affordability: Compared to purchasing pre-made decorative pumpkins, crafting your own from basic materials like paper and rope dramatically cuts down on expenses. This allows you to decorate extensively without straining your budget.
- Personalized Aesthetic: When you craft, you have complete control over the design. Choose your preferred rope texture, experiment with different sizes, and personalize the embellishments to perfectly match your home’s unique style, whether it’s rustic farmhouse, modern minimalist, or cozy traditional.
- Sustainable Crafting: This project is a fantastic example of upcycling. By using old paper or packing material for the pumpkin’s core, you’re giving waste a new purpose, contributing to a more sustainable approach to home decor.
- Therapeutic & Relaxing: Engaging in a simple, repetitive craft like wrapping rope can be incredibly meditative and stress-reducing. It’s a wonderful way to unwind and channel your creativity.
- Gift-Worthy Creations: Hand-made gifts carry a special sentiment. These rope pumpkins make thoughtful presents for friends, family, or hostess gifts during fall gatherings.
- Versatile Decor: From a simple standalone accent to part of an elaborate tablescape, these pumpkins are incredibly versatile. They can adorn shelves, windowsills, porches, or become the focal point of a larger fall display.
Embracing this DIY project allows you to infuse your home with genuine warmth and character, making your fall decor truly one-of-a-kind.
Essential Supplies for Your Rope Pumpkins
One of the most appealing aspects of this craft is the minimal and accessible supply list. Before you begin, gather these items to ensure a smooth crafting process:
- Hot Glue Gun and Glue Sticks: A reliable hot glue gun is your best friend for this project. Ensure you have plenty of all-purpose hot glue sticks. A high-temperature gun generally provides a stronger bond, but exercise caution to prevent burns.
- Sharp Scissors: You’ll need a good pair of sharp scissors to cleanly cut the sisal rope. Dull scissors can fray the rope and make the process more difficult.
- Various Sizes of Rubber Bands: These are crucial for shaping the paper core and creating the segmented look of a pumpkin. Having an assortment of sizes allows for flexibility in shaping and securing.
- Heavy Brown Packing Paper: This is the ideal material for the pumpkin’s core due to its rigidity and ability to hold shape. Alternatives include newspaper, paper grocery bags, or even scrap paper. The heavier the paper, the firmer your pumpkin core will be.
- Sisal Rope: The star of the show! Sisal rope offers that quintessential rustic, natural texture. It’s widely available at craft stores, hardware stores, or even dollar stores. Consider different thicknesses for varying effects – a thicker rope will create a more substantial, rugged look, while a thinner rope allows for finer detail.
Pro Tip for Supplies:
Before you start, estimate how much rope you’ll need. For a medium-sized pumpkin (roughly 4-6 inches in diameter), you might need anywhere from 20-50 feet of rope, depending on its thickness. It’s always better to have a little extra than to run out mid-project.
Step-by-Step Guide: Crafting Your Rustic Rope Pumpkins
Follow these detailed directions to transform simple materials into charming fall decor. Remember, perfection isn’t the goal; the beauty lies in the handmade quality of each unique pumpkin.
Step 1: Creating the Robust Paper Core
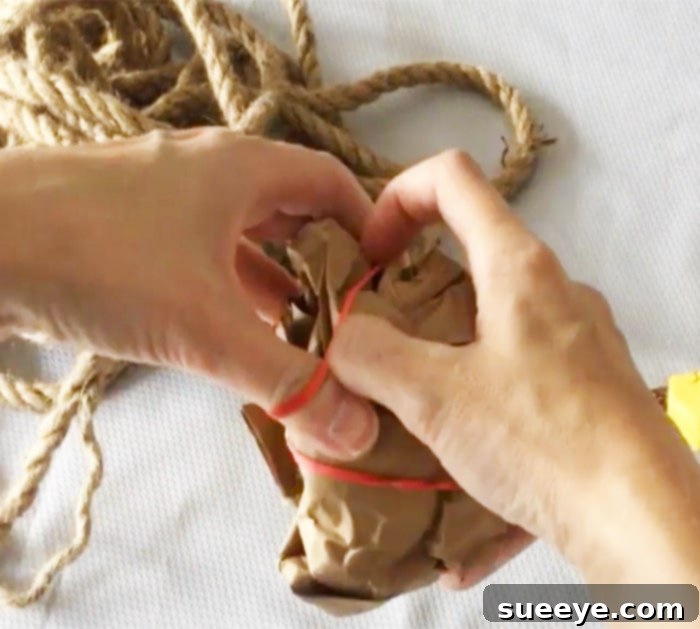
Your pumpkin’s journey begins with its core. The better you form this base, the more aesthetically pleasing your final pumpkin will be. Begin by crumpling your heavy brown packing paper into a tight, compact ball. Don’t be shy; really compress the paper to remove as much air as possible, creating a dense and sturdy form. The size of this paper ball will dictate the final size of your pumpkin, so make a few different sizes if you plan to create a varied display.
Once you have a firm ball, begin to secure it with rubber bands. Wrap the rubber bands around the paper ball, crisscrossing them in various directions. This serves two purposes: first, it helps to further compress and hold the paper together, ensuring it maintains its shape. Second, and perhaps more importantly, the rubber bands create the natural indentations or “segments” characteristic of a pumpkin. Aim for several wraps to form distinct grooves, which will guide your rope application in the next step. Ensure the core feels solid and won’t easily deform under light pressure.
Step 2: The Art of Wrapping with Rope and Hot Glue
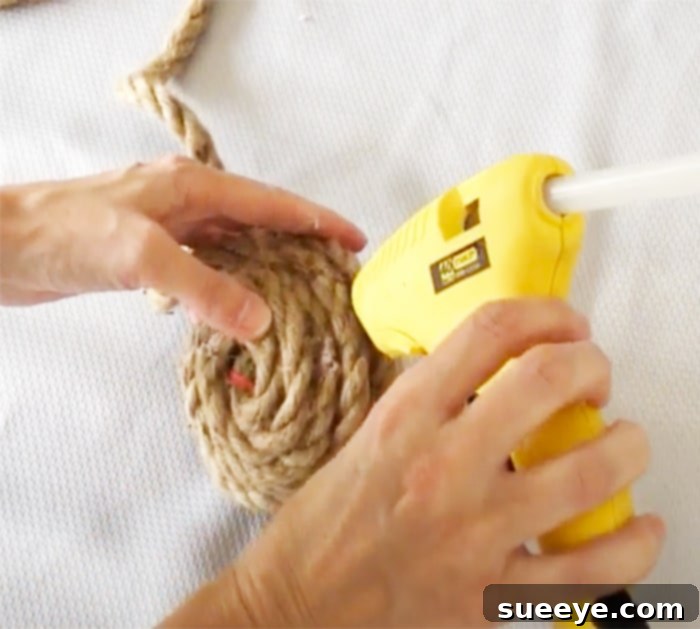
With your paper core ready, it’s time to introduce the rope. Take one end of your sisal rope and carefully tuck it under one of the rubber bands on your paper ball. This initial tuck will help secure the rope’s starting point without needing excessive glue immediately. Once it’s snug, apply a small dab of hot glue to firmly attach the very end of the rope to the paper core, ensuring it won’t unravel.
Now, begin to wrap the rope around the paper core. The technique is simple: apply a thin line of hot glue to a small section of the paper ball, then quickly press the rope into the glue, following the contours and rubber band indentations. Work in small sections, maybe 1-2 inches at a time, to prevent the glue from drying before you can attach the rope. Continue to wrap the rope tightly and evenly, ensuring each coil sits flush against the previous one. The goal is to cover the entire paper core completely, leaving no paper exposed.
As you work your way around the pumpkin, allow the rubber band grooves to guide your wrapping, reinforcing the segmented look. Maintain consistent tension on the rope for a neat finish. If you notice any gaps or unevenness, gently press the rope into place before the glue fully sets. This step requires patience, but the repetitive motion can be quite calming.
Step 3: Crafting the Stem and Final Shaping
As you approach the top of your pumpkin, continue wrapping until the entire paper core is covered. Once you’re satisfied with the coverage, it’s time to create the stem. Instead of cutting the rope flush, leave a small length (perhaps 2-4 inches, depending on your desired stem size) extending from the top center of the pumpkin. Carefully cut the rope at this point. You can then tightly coil this remaining piece of rope and secure it with hot glue to form a rustic, natural-looking stem directly on top of your pumpkin. Alternatively, you can use a small twig, a cinnamon stick, or a piece of jute twine wrapped into a spiral for a different stem effect, attaching it with hot glue.
After the stem is formed, take a moment to gently mold and press your pumpkin to achieve its final desired shape. Apply a little pressure in certain areas to enhance the pumpkin’s natural curves and indentations. Ensure all glue has thoroughly dried before handling your finished creation extensively.
Beyond the Basics: Customization and Decoration Ideas
While a plain sisal rope pumpkin is beautiful in its simplicity, the real fun begins when you start to customize! These versatile pieces are perfect canvases for expressing your personal style and enhancing your fall decor. Here are some ideas to take your rope pumpkins to the next level:
Natural Embellishments
- Fall Foliage: Hot glue small faux fall leaves, real dried leaves, or even miniature pinecones around the stem or base of your pumpkin for an authentic autumn touch.
- Berries and Twigs: Add small clusters of faux berries or tiny, delicate twigs to give your pumpkin a woodland charm. A small cinnamon stick can also serve as a fragrant and rustic stem alternative.
- Acorns & Nuts: Glue on small acorns or decorative nuts for added texture and natural appeal.
Textile Accents
- Ribbons and Bows: Tie small bows made from burlap ribbon, plaid fabric strips, or even elegant satin ribbons around the stem. Different textures and patterns can completely change the pumpkin’s vibe.
- Jute Twine: Wrap a bit of jute twine around the base of the stem or tie a small, rustic bow for subtle detail that complements the sisal.
- Lace or Fabric Scraps: For a shabby chic or vintage look, incorporate small pieces of lace or patterned fabric scraps.
Creative Finishes
- Painting: While the natural sisal is gorgeous, don’t hesitate to paint your finished pumpkins! Acrylic paints in white, cream, soft grey, or muted fall colors like burnt orange or olive green can completely transform their appearance. Consider a distressed look by dry-brushing a lighter color over a darker base.
- Glitter & Sparkle: For a touch of whimsy or glamour, apply a thin layer of decoupage glue and sprinkle fine glitter over parts of the pumpkin, or opt for a glitter spray paint.
- Distressing: Lightly sand parts of the rope after painting to give it a worn, aged look, adding to its rustic appeal.
Grouping for Impact
One pumpkin is lovely, but a collection is stunning. Create pumpkins of various sizes and group them together on a decorative tray, a tiered stand, or scattered across your mantelpiece. Integrate other fall elements like scented candles, additional faux foliage, small gourds, or even fairy lights to create a captivating autumn vignette.
Tips for Success and Hot Glue Gun Safety
This project is generally very safe and straightforward, but a few considerations will ensure the best results:
- Work Surface Protection: Always work on a protected surface. Hot glue can be messy and difficult to remove from unprotected tables or floors. A silicone mat, old newspaper, or a cardboard sheet works well.
- Hot Glue Gun Safety: Be mindful of the hot glue gun’s tip and the molten glue. Hot glue can cause burns. Keep fingers away from the nozzle and avoid touching freshly applied glue. Children should be supervised if participating.
- Patience is Key: While the project is quick, taking your time with each wrap and ensuring the glue sets properly will result in a much tidier and more durable pumpkin.
- Experiment with Rope: While sisal is recommended for its natural look, feel free to experiment with other types of rope like jute, cotton cording, or even thin clothesline for different textures and appearances.
Conclusion: Embrace the Beauty of Handmade Fall Decor
Overall, this DIY rope pumpkin project is an exceptionally easy and rewarding craft to undertake during the fall season. It’s truly incredible how adding a simple layer of rope over a piece of crumpled paper can create such a beautiful and impactful piece of home decor. Whether you’re on a tight budget or simply enjoy the process of creating something with your own hands, these charming pumpkins are a fantastic seasonal project.
Cut them, paint them, adorn them with leaves, or display them just as they are – however you choose to personalize and present your rope pumpkins, they are guaranteed to add a cozy, rustic touch to any room. They are not only super adorable but also make heartfelt, unique gifts for loved ones. So, gather your supplies, fire up your hot glue gun, and start crafting your own patch of gorgeous, handmade fall pumpkins today. Your home will thank you for the extra touch of autumn charm!