
Craft Your Own Rustic Charm: The Ultimate DIY Barn Door Picture Holder Guide
There’s an undeniable warmth and authenticity that defines farmhouse decor, making it a beloved style for countless homes. What makes it even more appealing is its inherent connection to DIY culture. The farmhouse movement, with its emphasis on repurposing and handmade items, has transformed everything from vintage furniture given new life with chalk paint to the thrill of discovering hidden gems at flea markets, antique fairs, and the ever-popular Facebook Marketplace. Each find, each project, adds a unique layer to a home’s story.
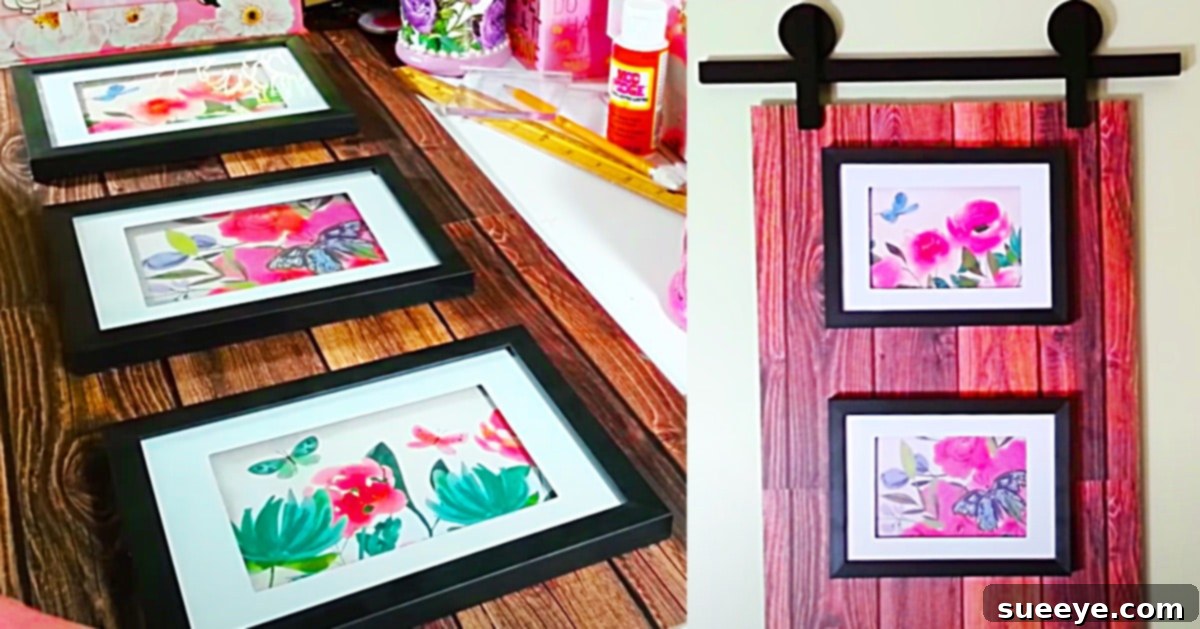
For enthusiasts eager to infuse their spaces with this charming aesthetic, the possibilities are endless. Recently, I stumbled upon an inspiring barn door picture holder video tutorial by Jody’s Craft Room on YouTube. This project immediately captured my imagination, presenting itself as another fantastic addition to any farmhouse collection. It’s a delightful way to blend rustic appeal with personal touches, creating a unique focal point in any room.
Embracing the Heart of Farmhouse Style
Farmhouse decor is more than just a trend; it’s a lifestyle choice that celebrates simplicity, comfort, and the beauty of natural materials. Its roots lie in the practical, unpretentious homes of rural life, evolving into a sophisticated yet cozy aesthetic that resonates deeply in modern interiors. Key elements often include distressed wood, galvanized metal, neutral color palettes accented with pops of muted hues, and an abundance of textures from woven fabrics to rustic finishes.
One of the core tenets of farmhouse style is its welcoming, lived-in feel, often achieved through vintage finds and handmade creations. This is where DIY projects truly shine. Crafting your own decor not only saves money but also injects genuine character and a personal narrative into your home. Each brushstroke, each piece of wood glued into place, contributes to a space that feels uniquely yours, echoing the spirit of handcrafted elegance that defines the farmhouse ethos.
Why a DIY Barn Door Picture Holder?
The barn door picture holder is a perfect embodiment of farmhouse charm. It takes a classic architectural element—the rustic barn door—and scales it down to create an intimate, yet striking, display for your cherished photographs. This project offers several compelling benefits:
- Adds a Unique Focal Point: Its distinct design immediately draws the eye, making it an excellent centerpiece on a wall.
- Personalizes Your Space: Displaying family photos or artwork in a custom holder makes your home feel more intimate and reflective of your personality.
- Budget-Friendly Decor: Utilizing readily available craft supplies, this project is significantly more affordable than purchasing pre-made rustic wall art.
- Versatile Design: The neutral palette and natural textures of this piece mean it can effortlessly complement various rooms and existing decor styles.
- Sense of Accomplishment: There’s immense satisfaction in creating something beautiful and functional with your own hands.
The “barn door” element itself lends a sense of history and country living, transforming ordinary pictures into a gallery with a story.
Gathering Your Crafting Essentials: A Detailed Materials Guide
Before you embark on this rewarding DIY journey, it’s essential to gather all your materials. One of the joys of farmhouse crafting is often the accessibility and affordability of supplies. Here’s a comprehensive look at what you’ll need, along with some helpful tips:
Materials For Barn Door Picture Holder:
- 2 Tall Wooden Signs (e.g., from Hobby Lobby): These serve as the foundational backer for your barn door. Look for unfinished wood signs that are relatively flat and sturdy. If you can’t find specific signs, plain plywood or MDF cut to size will also work beautifully. The “tall” aspect is crucial for achieving the desired barn door proportion.
- Tumbling Tower Game (Wood Blocks): These small, uniform wooden blocks are perfect for creating the raised “planks” and cross-bracing that give a barn door its characteristic texture and look. A standard game set provides plenty of blocks for this project.
- Popsicle Sticks: Standard craft popsicle sticks are versatile for adding finer details, trimming edges, or even creating smaller accent pieces on your faux barn door.
- Wood Glue: A strong wood glue is vital for bonding the wooden signs, blocks, and popsicle sticks securely. It provides a durable hold that hot glue alone might not offer for structural components.
- Wood Pattern Card Stock: This is your secret weapon for creating a realistic faux wood finish without the hassle of staining or painting real wood. Choose a pattern that mimics rustic, distressed, or weathered wood for an authentic farmhouse feel.
- Mod Podge (Matte Finish Recommended): This all-in-one glue, sealer, and finish is perfect for adhering the cardstock smoothly and then sealing the entire project. A matte finish will give it a more natural, less glossy look, enhancing the rustic appeal.
- 3 Small Picture Frames: Select frames that complement the overall size of your barn door panel. Wood frames or simple metal frames in black or bronze tend to work well with the farmhouse aesthetic. Consider varying their orientation (two vertical, one horizontal) for visual interest.
- Hot Glue Gun and Glue Sticks: While wood glue is for structural bonds, a hot glue gun is indispensable for quick, temporary holds, or for attaching lighter elements like the picture frames rapidly. Keep plenty of glue sticks on hand!
Most of these items can be found at major craft stores like Hobby Lobby, Michaels, or Joann Fabrics, as well as discount retailers or even dollar stores for the wood blocks and popsicle sticks. Sourcing your materials is the first exciting step in bringing your vision to life.
Step-by-Step Directions: Crafting Your Rustic Barn Door Picture Holder
Now that you have all your supplies, let’s dive into the creative process. This project is designed to be enjoyable and straightforward, even for beginner crafters. Follow these steps to construct your beautiful farmhouse barn door picture holder:
Preparation is Key
- Prepare Your Base: Begin by taking your two tall wooden signs. If they are already connected or designed to be placed side-by-side, great! If not, you may want to lightly sand the edges where they will meet and join them together using wood glue to create a wider, seamless surface. Clamp them together while the glue dries completely, ensuring a strong bond. This combined surface will form the main “door” panel.
- Size Your Cardboard (Optional): If your wooden signs are not perfectly smooth or you wish to reinforce the cardstock application, you can cut a piece of sturdy cardboard (from an old box, for example) to the exact dimensions of your joined wooden signs. This will provide an additional layer for your faux wood finish.
Creating the Faux Wood Barn Door Surface
- Apply Wood Pattern Card Stock: Lay your chosen wood pattern card stock over your prepared wooden sign base (or cardboard, if using). Carefully measure and cut the cardstock to fit perfectly. Using a generous amount of Mod Podge, apply a thin, even layer to the wooden surface.
- Smooth and Seal: Carefully position the cardstock onto the Mod Podge-coated surface, starting from one edge and smoothing it out to prevent air bubbles. A credit card or a brayer can be useful for this. Once flat, apply another thin layer of Mod Podge over the top of the cardstock. This acts as both a sealant and a protective finish. Allow it to dry completely, which may take a few hours. A matte finish Mod Podge is recommended for a truly rustic look.
Adding Dimensional Barn Door Details
- Design Your Barn Door Pattern: This is where the Tumbling Tower blocks come in! Lay out your wooden blocks on the dried faux wood surface to visualize your desired barn door design. Common patterns include a simple “Z” shape, an “X” shape, or straight vertical/horizontal planks. You may need to cut some blocks to size using a craft knife or small saw for the diagonal pieces.
- Secure the Blocks: Once you’re happy with the arrangement, use wood glue to firmly attach each block to the cardstock surface. Apply glue to the back of each block, press it into place, and hold for a few seconds. If you used cardboard, ensure the glue penetrates to the wooden sign base for maximum stability. Allow the wood glue to cure fully.
- Add Popsicle Stick Accents (Optional): For added detail, you can use popsicle sticks to create trim around the edges of your barn door panel or to simulate smaller, finer bracing elements. Cut them to size and attach with wood glue or a small amount of hot glue.
Attaching Your Picture Frames and Finishing Touches
- Position the Picture Frames: Arrange your three small picture frames on the faux barn door surface. Experiment with different placements until you find a balanced and aesthetically pleasing configuration. Consider the orientation of your photos – typically, one in the center and two on either side works well.
- Hot Glue the Frames: Once satisfied with the frame placement, use your trusty hot glue gun to firmly attach each frame to the barn door surface. Hot glue provides an instant bond, making this step quick and easy. Apply glue liberally to the back edges of the frames for a secure hold.
- Final Sealing and Distressing (Optional): For extra durability and a truly authentic rustic look, you can apply another thin coat of Mod Podge over the entire project, including the wooden blocks and frames (if they are paintable). Once dry, you can lightly sand the edges of the blocks or the entire piece with fine-grit sandpaper to give it a weathered, distressed appearance.
- Add Hanging Hardware: Flip your finished barn door picture holder over and securely attach appropriate hanging hardware. Sawtooth hangers are simple and effective for wall mounting. Ensure they are evenly spaced and firmly screwed or hammered into the back of your wooden signs.
Customization and Creative Variations
One of the best aspects of DIY projects is the freedom to personalize them. While the tutorial provides a fantastic foundation, don’t hesitate to put your own spin on this barn door picture holder:
- Paint and Stain Alternatives: Instead of wood pattern cardstock, you could paint your wooden signs a solid color (e.g., white, gray, sage green) and then dry brush with a contrasting color for a distressed look. Alternatively, use wood stain directly on the wooden signs for a more authentic wood grain.
- Frame Styles: Experiment with different frame materials like galvanized metal, distressed white frames, or even frames painted with chalkboard paint for a unique touch. Varying the sizes and shapes of the frames can also add visual interest.
- Additional Embellishments: Consider adding small metal hardware like faux hinges or corner brackets for a more realistic barn door feel. A small twine bow, a miniature wreath, or even a stenciled quote above the frames can enhance its charm.
- Functional Adaptations: Attach small hooks to the bottom of the piece to create an entryway organizer for keys or lightweight bags. You could also incorporate a small wire basket for mail or notes.
- Themed Displays: Create seasonal barn door holders by swapping out photos for seasonal artwork, small decorative elements like miniature pumpkins for fall, or snowflakes for winter.
Displaying Your Masterpiece: Where It Shines
Once completed, your handmade barn door picture holder will be a charming addition to almost any room in your home. Its versatility allows it to seamlessly integrate into various settings:
- Kitchen: Display cherished family recipes, a rotating collection of photos, or even small notes and reminders. It adds a cozy, country-kitchen feel.
- Living Room: Place it over a mantelpiece, above a sofa, or on a gallery wall to create a beautiful focal point. It can beautifully complement other rustic or farmhouse elements in the room.
- Entryway/Mudroom: Greet guests with a personalized display of family memories, setting a warm and inviting tone for your home.
- Bedroom: Create a serene display of peaceful landscapes or personal milestones, contributing to a calm and personal retreat.
- Nursery or Kids’ Room: Showcase adorable baby photos or your children’s artwork, adding a touch of rustic whimsy.
This farmhouse barn door idea is such a fun project, offering a creative outlet and a stunning piece of decor that looks great in any kitchen, living room, or even a cozy bedroom.
The Joy of DIY: More Than Just Decor
Embarking on a DIY project like this barn door picture holder offers benefits far beyond simply acquiring a new piece of decor. It’s an opportunity to engage your creativity, develop new skills, and experience the immense satisfaction that comes from transforming simple materials into something beautiful and meaningful. In a world of mass-produced goods, a handmade item brings a unique soul to your living space, making your house feel more like a home.
So, gather your supplies, follow these steps, and enjoy the process of crafting. You’ll not only save money but also create a conversation starter, a cherished family heirloom, and a testament to your own creative spirit. Happy crafting!