
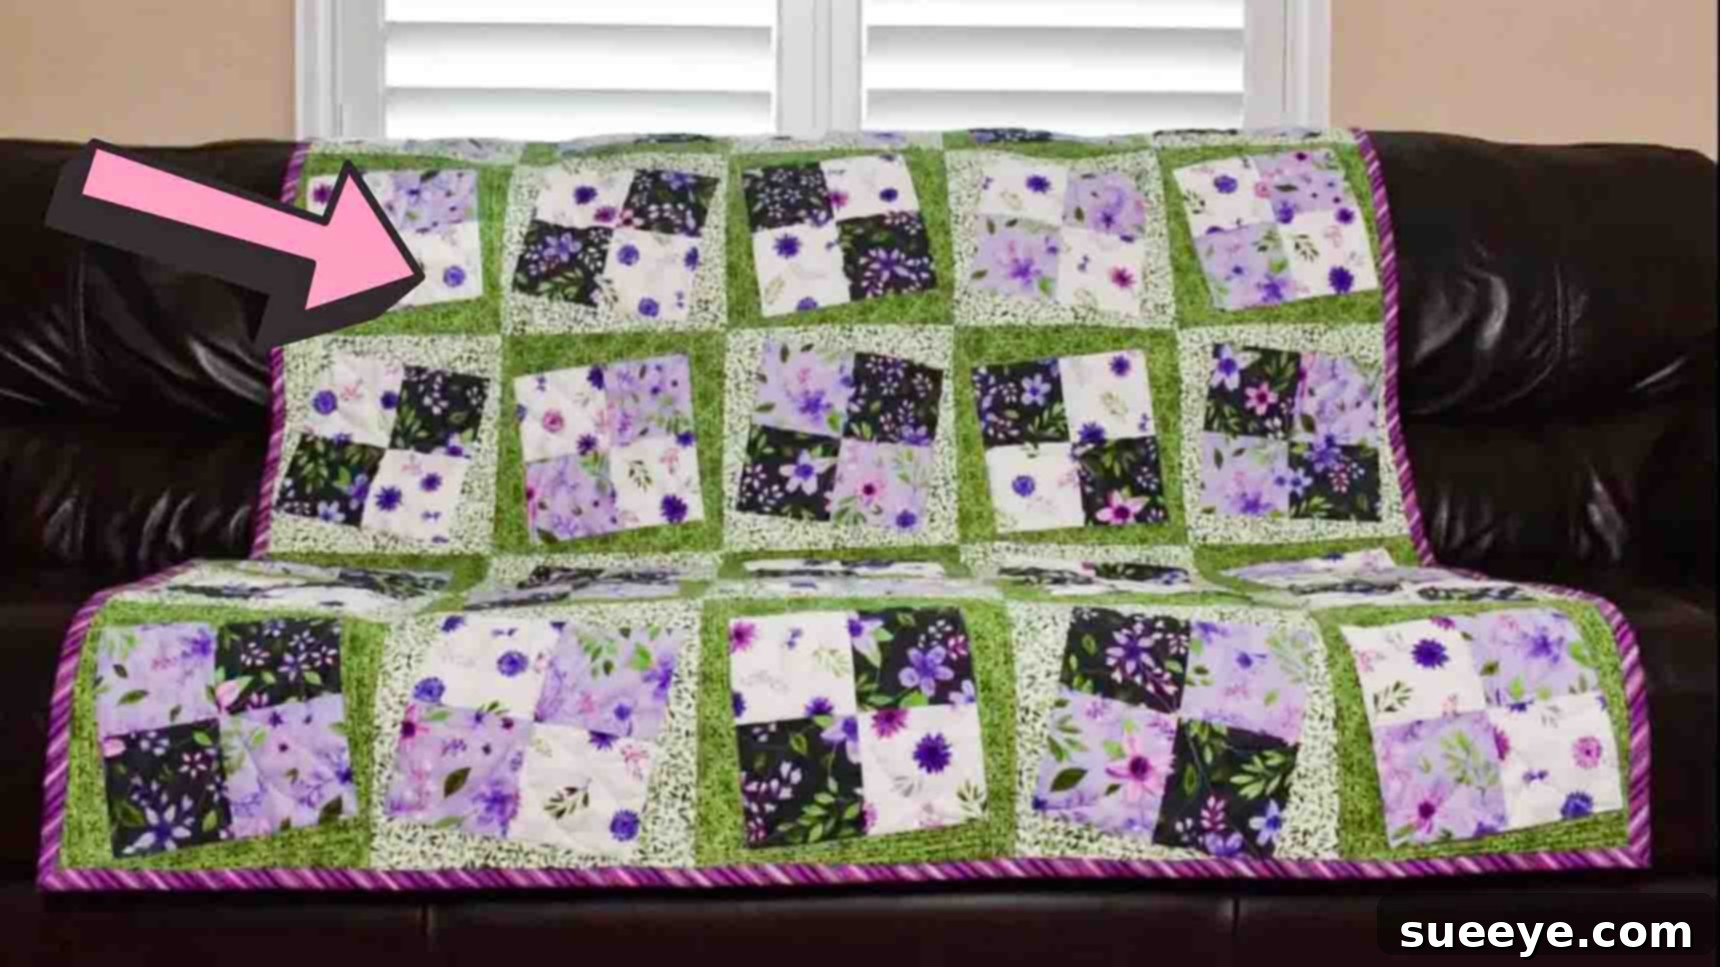
Embarking on your quilting journey can be an incredibly rewarding experience, transforming simple fabric into beautiful, intricate designs. For newcomers to the world of quilting, finding a project that is both engaging and manageable is key to building confidence and honing essential skills. Look no further than the captivating Rocking Block Quilt pattern, a fantastic introduction to quilting techniques that promises a stunning finished product. This delightful project, popularized by Fallon Caldwell on YouTube, is specifically designed for ease and enjoyment, making it perfectly achievable over a relaxed weekend. It’s an excellent opportunity to practice precise cutting, accurate piecing, and effective pressing – fundamental techniques that will serve as the foundation for all your future quilting endeavors. Get ready to dive in and create your very own Rocking Block Quilt with this comprehensive, step-by-step tutorial.
The Rocking Block quilt gets its name from the dynamic, shifting appearance of its blocks, which often incorporate half-square triangles (HSTs) or similar angled units to create a sense of movement and depth. This visual play of light and dark, or contrasting colors, gives the quilt a unique charm that belies its straightforward construction. Whether you’re aiming to make a cozy throw for your couch, a decorative wall hanging, or a thoughtful gift, this pattern offers versatility and a sense of accomplishment. Let’s gather our supplies and prepare to bring this beautiful design to life!
Essential Materials for Your Rocking Block Quilt
Before you begin any quilting project, ensuring you have all the necessary materials and tools at hand is crucial for a smooth and enjoyable process. For this Rocking Block Quilt, we’ll focus on a vibrant purple and green color scheme, but feel free to let your creativity shine by choosing any fabric combination that inspires you! Remember, quality materials make a significant difference in the final look and feel of your quilt.
(For a visual guide and specific product recommendations, you might refer to the original pattern and supplies link associated with Fallon Caldwell’s tutorial.)
- 1/2 yard dark purple design fabric: This will serve as one of your contrasting elements, adding depth to the blocks. Look for a fabric with a small, repeating pattern or a subtle texture.
- 1/2 yard medium purple design fabric: A slightly lighter shade than your dark purple, this fabric will provide a transitional hue, contributing to the “rocking” effect.
- 1/2 yard light purple design fabric: The lightest of your purple palette, this will offer a bright contrast and highlight the angles within your quilt blocks.
- 1 yard dark green design fabric: Introducing a different color family, the dark green will create strong contrast and help define the structure of your blocks.
- 1 yard medium green design fabric: A complementary shade to the dark green, this fabric will add another layer of visual interest and balance.
- Backing fabric to size: The size of your backing fabric will depend on the finished dimensions of your quilt top. A general rule of thumb is to have your backing fabric be at least 4-6 inches larger than your quilt top on all sides to allow for secure layering and quilting. Consider a soft, coordinating print or solid.
- Batting to size: Batting is the crucial middle layer that provides warmth, dimension, and structure to your quilt. Like your backing, it should be slightly larger than your quilt top. Choose a batting type (e.g., cotton, polyester, blend, wool) based on your desired loft, warmth, and washability.
- High-quality thread: Select a thread color that blends well with your chosen fabrics, typically a neutral gray or beige, or a color that matches the dominant fabric in your blocks. Opt for a strong, mercerized cotton thread for piecing to ensure durable seams.
- 9 & 1/2″ square acrylic ruler: This specialized ruler is incredibly helpful for precise measuring and trimming, especially for squaring up your blocks. Its size makes it ideal for many common quilt block dimensions.
- Basic sewing tools and supplies:
- Rotary cutter: Essential for accurate, straight cuts. Make sure you have a fresh blade.
- Self-healing cutting mat: Protects your work surface and extends the life of your rotary blade.
- Fabric scissors: For snipping threads and other general cutting tasks.
- Quilting pins or wonder clips: To hold fabric layers together securely before sewing.
- Seam ripper: A must-have for correcting any mistakes (every quilter uses one!).
- Iron and ironing board: Crucial for pressing seams, which ensures flat, accurate blocks.
- Sewing machine: Equipped with a 1/4-inch piecing foot for consistent seam allowances.
- Fabric marking tool: A fine-line fabric marker, chalk pencil, or Frixion pen for drawing lines on your fabric.
Step-by-Step Guide to Crafting Your Rocking Block Quilt
Precision is paramount in quilting, especially for a pattern like the Rocking Block that relies on geometric accuracy to achieve its dynamic effect. Take your time with each step, paying close attention to your measurements and seam allowances. Let’s get started!
Step 1: Fabric Preparation and Crafting the Dynamic Units
The foundation of any great quilt lies in meticulous fabric preparation. To begin, carefully unfold and press all your fabrics to remove any creases or wrinkles. This step is often overlooked but ensures that your cuts are as accurate as possible. Next, square up both sides of each fabric yardage. This involves trimming a small amount from the raw edges to ensure they are perfectly straight and perpendicular to the selvage. Using your rotary cutter and mat, align your fabric along a grid line, trim one edge, then rotate the fabric 180 degrees and trim the opposite edge to create a perfectly square starting point. This initial squaring is vital for all subsequent cuts.
Once your fabrics are squared, proceed to cut 8-inch wide strips from all your chosen design fabrics (dark purple, medium purple, light purple, dark green, and medium green). Use your acrylic ruler to ensure these strips are consistently 8 inches from edge to edge. After you have cut all the necessary 8-inch strips, turn the strips horizontally on your cutting mat. Now, sub-cut these strips into 8-inch squares. This will yield a collection of 8-inch by 8-inch squares from each of your design fabrics. Repeat this process for all the strips and all the fabrics you intend to use in your main blocks.
Next, prepare your border fabrics. For the border pieces, you will follow a similar process: square up the fabric, cut strips of the appropriate width (which will likely be specified in the full pattern, but a common border width might be 2.5 or 3 inches), and then sub-cut these strips down to the specific lengths needed for the borders around your individual blocks. This might mean cutting them into specific rectangular units rather than squares, ready to be attached to the block’s perimeter.
Now, let’s create the unique “rocking” elements of your quilt blocks. Take your prepared 8-inch squares. You’ll be pairing contrasting squares together, placing them right sides together (RST). For instance, you might pair a light purple with a dark green, or a medium purple with a dark purple. The key is to select combinations that offer good visual contrast to enhance the dynamic effect. On the back (wrong side) of one square from each pair (e.g., on the lighter fabric), use your fabric marking tool to draw two diagonal lines, connecting opposite corners. These lines will intersect precisely in the center of the square, forming an ‘X’.
With the squares still paired right sides together, you will now sew along these marked lines. Instead of sewing directly on the lines, you will sew parallel to each drawn diagonal line, a quarter-inch (1/4″) away on both sides. This means for each diagonal line, you will stitch two new lines: one 1/4″ to its left and one 1/4″ to its right. Since you have two diagonal lines, you will end up sewing a total of eight parallel lines on your square. Ensure your 1/4″ seam allowance is consistent for accuracy. After all eight lines are sewn, carefully cut directly along each of the two original drawn diagonal lines. Then, cut the square vertically and horizontally through its center point, effectively quartering the original large square. This precise cutting technique will yield eight individual half-square triangle (HST) units from each pair of 8-inch squares. These HSTs, with their distinct contrasting triangles, are the building blocks of your “four-patch” components that will create the rocking illusion. Open up these newly formed HSTs and gently press your seams open or to one side, depending on your preference for reducing bulk. The goal is to get flat, crisp units ready for assembly.
Step 2: Assembling Your Blocks and Finishing Touches
With your individual HST units prepared, it’s time to assemble them into the distinctive rocking blocks. Carefully arrange your HST units to form the specific “four-patch” configuration described in the pattern, paying close attention to the direction of the angled seams to achieve the rocking effect. Once you have a small four-patch unit (which will likely be composed of four of your smaller HSTs sewn together), you will begin to add the borders.
Start by sewing the first border strip along one side of your newly formed four-patch unit. When you attach this initial border, it’s important to leave a small allowance or “tail” of the border strip extending past the end of the four-patch unit. This extra length will be critical for achieving clean, mitered or overlapping corners later on, depending on the pattern’s specific border finishing technique. Use a consistent 1/4-inch seam allowance for all your piecing. After sewing, press the seam open or towards the darker fabric (whichever is less bulky and creates a flatter finish). Pressing after each seam is a non-negotiable step in quilting; it ensures your blocks lie flat and square, contributing to the overall precision of your quilt.
Next, sew another border strip to the opposite side of your four-patch unit, again leaving a similar allowance at the end. Press this seam. Then, add the third border strip to an adjacent side. This time, you might sew it all the way across, or again leave an allowance, depending on how your final border will be constructed. Press this seam open as well. Finally, sew the fourth and final border strip. This strip will typically extend to the edge of your initial four-patch unit and may overlap part of the allowance you left on the first border strip, completing the frame around your block. Press this last border seam. Then, go back to the first border strip and carefully sew any remaining unattached portions into place, completing the full border around your block. Repeat this entire border-adding process for all your four-patch units, ensuring each rocking block has its distinctive frame.
The trimming stage is where you truly refine your blocks. You’ll notice that due to the angled nature of the rocking block, some blocks might appear to “tilt” in one direction, and others in another. This is intentional and part of the design! Divide your completed blocks into two different piles based on their tilt direction. This categorization will help you maintain consistency and symmetry when you start assembling the full quilt top. Now, take your 9 1/2-inch square acrylic ruler and carefully place it on top of each block. Align your template square so that it precisely trims each block to its final, desired size, usually by aligning a specific point or seam with a ruler marking. This squaring-up process is crucial for ensuring all your blocks are identical in size, which makes joining them much easier and prevents wavy seams. Trim around the edges with your rotary cutter.
Once all your blocks are trimmed and squared, it’s time to piece them together into rows. Lay out your blocks on a design wall or on the floor according to your chosen quilt design. Experiment with different arrangements until you are happy with the visual flow and the “rocking” movement created by the blocks. Once you have your layout finalized, sew all the blocks within each row together, maintaining that consistent 1/4-inch seam allowance. Press the seams for each row, alternating the direction of the seam allowance from one row to the next to help nest the seams when you join the rows. After all individual rows are sewn, carefully join the rows together, matching up your seams and points as accurately as possible. Pin generously at intersections to ensure precision. Press the final row seams open or to one side to complete your quilt top.
Finally, with your quilt top complete, you’re ready for the last stages: quilting and binding. Layer your quilt top with the batting and backing fabric, creating a “quilt sandwich.” Baste these layers together using pins, basting spray, or thread basting to prevent shifting. Then, quilt as desired – whether by hand or machine. You can choose a simple stitch-in-the-ditch, an all-over free-motion design, or a more intricate custom quilting pattern. Once quilted, trim the excess batting and backing, and bind your quilt using your preferred binding method. Binding creates a clean, durable edge and is the finishing touch that transforms your layered fabrics into a functional, beautiful quilt.
Mastering the Rocking Block Quilt: A Perfect Project for Aspiring Quilters
The Rocking Block Quilt truly stands out as an exceptional project for beginners, offering a perfect balance of challenge and reward. Throughout this journey, you’ve not only created a beautiful, functional piece of textile art but have also significantly advanced your quilting repertoire. You’ve honed your cutting accuracy, mastered the precise 1/4-inch seam, learned the importance of pressing, and gained experience in assembling complex units into cohesive blocks. These are invaluable skills that will serve as the cornerstone for all your future quilting adventures.
Don’t be afraid to experiment with different fabric combinations and color palettes in future projects. The versatility of the Rocking Block design allows for endless creative interpretations. Imagine this pattern in seasonal colors, holiday themes, or even a sophisticated monochromatic scheme. Each variation will yield a uniquely stunning quilt, reflecting your personal style and growing expertise.
We hope this detailed guide has empowered you to confidently tackle the Rocking Block Quilt. Remember, every stitch is a step forward in your crafting journey, and every finished quilt is a testament to your patience and creativity. Share your beautiful Rocking Block Quilt creations with the quilting community, inspire others, and continue to explore the wonderful world of fabric and thread. Happy quilting!