
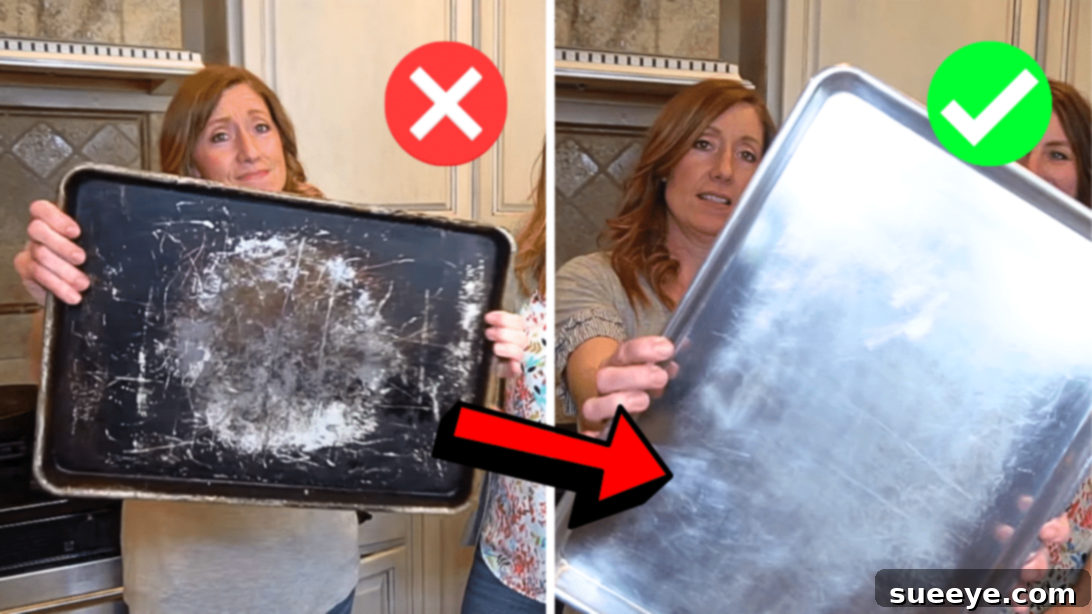
Is your once-gleaming baking sheet now a battleground of stubborn, burnt-on residue? If you’re an avid home baker, you know the frustration: those beautiful golden-brown creations often leave behind a dark, crusty reminder that seems impossible to remove. Before you consider tossing those well-loved but heavily stained baking sheets, get ready to discover a surprisingly simple and incredibly effective cleaning hack. This method promises to restore your baking sheets to their sparkling, almost brand-new condition, banishing even the most entrenched baked-on grease and char without endless, grueling scrubbing. Say goodbye to wasted time and effort, and hello to remarkably clean bakeware, ready for your next culinary adventure.
EXPLORE MORE: If you’re interested in alternative methods, you might also find this Easy No-Scrub Burnt Pan Cleaning Hack useful for other burnt pans.
You don’t have to spend countless hours and excessive energy scrubbing repeatedly to no avail. Once you implement this brilliant method, originally demonstrated by Clean Freak & Germaphobe on YouTube, you’ll find that removing even the most stubborn burnt parts becomes surprisingly easy. The secret to this powerful cleaning hack lies in a single, readily available product that you can often purchase from your nearest dollar store or supermarket. Prepare to be amazed by the results, as your baking sheets will look so pristine, it will be as if they were never burnt at all.
The Secret Weapon: Understanding Ammonia’s Power
Unlike conventional cleaning methods that rely on brute force and abrasive scrubbing, this ingenious hack harnesses the concentrated power of household ammonia. Ammonia, a potent alkaline solution, works its magic by effectively breaking down the tough, carbonized fats and oils that create those unsightly burnt layers on your baking sheets. It initiates a chemical reaction that effectively dissolves baked-on grime, transforming what was once a rock-solid, seemingly impossible mess into a softened, easily removable residue.
This chemical approach is far more efficient than physical scrubbing alone. Instead of laboriously scraping away at hardened carbon, the ammonia vapors penetrate and weaken the bonds holding the burnt material to the metal surface. This makes the subsequent cleaning process astonishingly simple and significantly less labor-intensive. When used correctly and with proper precautions, ammonia offers a truly transformative solution for even the most neglected bakeware, restoring its original luster and hygiene.
Crucial Safety Precautions Before You Begin
While incredibly effective, ammonia is a strong chemical and must be handled with extreme care to ensure your personal safety and the safety of your environment. Always prioritize these essential precautions before you start the cleaning process:
- Ensure Ample Ventilation: This is the most critical step. Always work in a very well-ventilated area, ideally outdoors, in a garage with open doors, or in a kitchen with all windows open and exhaust fans running at full power. Never use ammonia in an enclosed or poorly ventilated space, as the fumes can be overwhelming and dangerous.
- Wear Protective Gear: It is paramount to always don sturdy cleaning gloves to protect your skin from direct contact with ammonia. Consider wearing eye protection, such as safety goggles, to prevent accidental splashes that could irritate your eyes.
- Do NOT Mix Ammonia: This warning cannot be overstated. Never, under any circumstances, mix ammonia with bleach or any other cleaning products. Combining ammonia with bleach creates highly toxic chloramine gases, which can be extremely dangerous, even fatal, if inhaled. Always use ammonia alone.
- Keep Away from Children and Pets: Ammonia should be stored securely and out of reach of children and pets. Ensure that children and pets are not present in the area where you are performing the cleaning task.
- Avoid Inhaling Fumes: Even in a well-ventilated area, try to minimize direct inhalation of the fumes. Work quickly and keep your face away from the opening of the plastic bag. If you experience dizziness, nausea, coughing, or any respiratory irritation, move to fresh air immediately.
- Proper Disposal: After use, dilute the ammonia solution heavily with water before carefully pouring it down a drain. Never pour concentrated ammonia directly down a drain.
By strictly adhering to these comprehensive safety guidelines, you can safely and effectively restore your burnt baking sheets without any risks.
Gather Your Essential Materials
To embark on this journey to sparkling clean baking sheets, you’ll need just a few readily available items. The star of our show, household ammonia, can often be found affordably at dollar stores, hardware stores, or your local supermarket. Gather these specific supplies before you begin the cleaning process:
- Household Ammonia: The primary cleaning agent. Ensure it’s plain, unscented ammonia, and not a cleaning solution mixed with other chemicals or detergents.
- Heavy-Duty Plastic Bags: Large, sturdy, and sealable plastic bags are essential. Good options include contractor garbage bags, extra-thick kitchen trash bags, or even large Ziploc-style storage bags if your sheets fit. They must be robust enough to hold the baking sheet and contain the ammonia fumes effectively.
- Sturdy Cleaning Gloves: Absolutely necessary for hand protection against the corrosive properties of ammonia.
- Brillo Pads or Steel Wool: For scrubbing away the softened residue. Choose a grade that is abrasive enough to remove grime but won’t excessively scratch the surface of your baking sheet.
- Drill with Scrub Brush Attachment (Optional): For those who prefer a less manual, more powerful scrubbing action. This tool can significantly reduce physical effort and speed up the cleaning process for very stubborn grime.
- A Well-Ventilated Area: This is a crucial “material” for safety during the entire procedure.
Step-by-Step Guide to Restoring Your Burnt Baking Sheets
Follow these detailed instructions carefully to achieve remarkable results and bring your baking sheets back to life, looking as good as new:
Step 1: Preparing for the Ammonia Soak
Begin by ensuring you have all your necessary supplies ready and organized in your designated, well-ventilated cleaning area. Before handling any chemicals, always put on your protective cleaning gloves to safeguard your hands from direct contact with the ammonia. Carefully place your extremely burnt baking sheet inside a large, heavy-duty plastic bag. The bag must be robust enough to hold the sheet without tearing and, crucially, it needs to be sealable to contain the ammonia fumes effectively. The objective here is to create an enclosed environment where the ammonia vapors can concentrate and work efficiently on the baked-on grime.
Once the baking sheet is securely inside, pour a small amount of household ammonia into the bag. You don’t need to completely submerge the sheet in liquid; approximately ½ to 1 cup should suffice, as it’s primarily the fumes that do the heavy lifting in breaking down the burnt residue. After adding the ammonia, quickly and securely seal the plastic bag, ensuring it is as airtight as possible. This step is critical to prevent the ammonia fumes from escaping and to maximize their cleaning power within the confined space. Allow the baking sheet to soak undisturbed overnight, or for a minimum of 8-12 hours. During this prolonged period, the concentrated ammonia vapors will penetrate and begin to dissolve even the most stubborn, carbonized layers of grease and food residue.
Step 2: Rinsing and Initial Scrubbing
The following morning, with your gloves still on, carefully retrieve your soaked baking sheet. Remember to perform this entire step in a well-ventilated area, as ammonia fumes will still be present when you open the bag. Carefully remove the baking sheet from the plastic bag. You will likely notice a significant transformation in the burnt residue – it should appear softer, darker, and more pliable, indicating that the ammonia has effectively begun to break it down. Carefully rinse the baking sheet under running water, removing as much of the loose, softened product and residue as possible. This initial rinse helps to wash away the majority of the chemical and the dissolved grime, preparing the surface for the physical scrubbing stage.
Once rinsed, it’s time to begin the scrubbing process. Take your Brillo pad or steel wool and start gently yet firmly scrubbing the burnt areas. You should find that the residue now comes off significantly more easily than it would have before the ammonia soak. The previously hardened carbon should now feel like a soft, gummy substance that yields readily to friction. Work in small, manageable sections, applying steady, even pressure. As you scrub, continue to rinse the baking sheet occasionally to wash away the dislodged grime, allowing you to get a clearer view of your progress and identify any remaining stubborn spots.
Step 3: Detailing Corners and Edges
As you continue scrubbing the main, flat surfaces of your baking sheet, it’s crucial to pay special attention to the corners, crevices, and raised edges. These areas are notorious for accumulating the most stubborn, hard-to-reach grime that often resists flat scrubbing pads. For precision cleaning in these tight spots, grab a knife, a pointed spatula, or any other sturdy, blunt-tipped tool. Carefully wrap a small piece of your scrub pad or steel wool around the tip of this tool. This creates a makeshift, precise cleaning instrument that allows you to apply targeted pressure directly into the crevices and along the raised edges of the baking sheet, effectively dislodging any remaining burnt bits that a larger, flat pad might miss. Continue scrubbing and rinsing these detailed areas diligently until they are as clean and pristine as the rest of the sheet. Exercising patience and thoroughness in this step will result in a comprehensively restored baking sheet, free of any lingering grime.
Step 4: The Power Scrub (Optional) and Final Rinse
If you find manual scrubbing too arduous, or if you’re dealing with exceptionally large baking sheets or extremely stubborn, deeply ingrained grime, a drill with a scrub brush attachment can be an invaluable ally. This powerful tool takes the vast majority of the hard work out of scrubbing, allowing the machine to do the heavy lifting for you. Attach a suitable scrub brush to your drill (ensure it’s designed for cleaning tasks and safe for use on cookware), and carefully guide it over the remaining burnt areas. The rotating brush will efficiently remove any lingering grime with minimal physical effort on your part. Always maintain a firm grip on the drill and ensure stable footing. This method is particularly useful for achieving a thorough clean quickly and efficiently.
Once all the burnt residue has been completely removed and your baking sheet is gleaming, it’s time for the final and most crucial step: a thorough rinse. Rinse the baking sheet meticulously under running water, multiple times, to ensure absolutely no traces of ammonia are left behind. To be extra sure, you might want to wash it again with warm water and a good dish soap, scrubbing gently, and then rinsing thoroughly. After the final rinse, dry the baking sheet completely immediately using a clean towel to prevent water spots and the formation of rust, especially for non-stainless steel options. Your baking sheet should now be fully restored to its former glory, looking as if it was never burnt and ready for many more culinary adventures.
Beyond the Clean: Tips for Maintaining Your Baking Sheets
Achieving a sparkling clean baking sheet through this deep cleaning method is incredibly satisfying, but proactive maintenance can prevent future heavy build-up and significantly extend the life and appearance of your bakeware. Here are some essential tips to keep your baking sheets in pristine condition:
- Use Parchment Paper or Silicone Mats: This is arguably the simplest and most effective preventative measure. Lining your baking sheets with parchment paper or a reusable silicone baking mat creates a physical barrier between your food and the sheet. This catches drips, prevents direct contact that leads to baked-on residue, and makes cleanup incredibly easy.
- Clean After Every Use: While deep cleaning with ammonia is reserved for extreme cases, a quick wash with warm, soapy water after each use will prevent minor spills and grease from setting and turning into stubborn stains. Don’t let residue sit and harden.
- Avoid Over-Greasing: Excessive oil, butter, or cooking spray can pool and bake onto the sheet, leading to unnecessary residue. Use just enough to prevent sticking, and wipe away any obvious excess before baking.
- Don’t Let Food Sit: If food spills or bakes onto the sheet, try to clean it as soon as the sheet has cooled down enough to handle. The longer residue sits and dries, the harder it becomes to remove, increasing the likelihood of deep-seated stains.
- Store Properly: Ensure your baking sheets are completely dry before storing them. Storing damp sheets can lead to water spots, rust (especially for non-stainless steel or aluminum options), and even mildew. Store them in a dry, well-ventilated cabinet.
Frequently Asked Questions About Burnt Baking Sheet Cleaning
- Is using ammonia safe for my baking sheets?
- Yes, when used correctly and in a very well-ventilated area, ammonia is generally safe for most metal baking sheets, including those made from aluminum and stainless steel. It works by breaking down organic matter (fats, oils, carbonized food), not by corroding the metal itself. However, it is generally not recommended for non-stick coated pans as it could potentially damage or strip the non-stick surface over time. It should also not be used on cast iron, as it can strip the seasoning.
- Can I use this method on other types of burnt pans or cookware?
- This ammonia vapor method is most effective and safest for plain metal baking sheets and oven racks. While some individuals report success with non-stick cookware, it comes with a risk of degrading the non-stick coating, so proceed with caution or avoid it. It should definitely not be used on cast iron (it will remove the protective seasoning), copper (can cause discoloration), or anodized aluminum (can strip the finish), as these materials can react poorly to ammonia.
- What if my baking sheet is still burnt after the first attempt?
- For exceptionally stubborn or heavily caked-on residue, you might need to repeat the process. Ensure your plastic bag is completely sealed to maximize vapor concentration, and consider extending the soaking time up to 24 hours. While typically not necessary, for extremely severe cases, you can try a slightly higher concentration of ammonia, though the fumes alone are usually sufficient with proper enclosure and time.
- How often should I clean my baking sheets this way?
- This deep cleaning method with ammonia is intended for heavily burnt and neglected baking sheets, not for routine cleaning. It’s a powerful solution for those “beyond saving” moments. Aim to use it only when standard washing with soap and water fails to remove significant baked-on grime. Implementing regular maintenance, as described in our tips section, should largely prevent the need for frequent ammonia treatments.
- What kind of plastic bag should I use for the soak?
- It is crucial to use a heavy-duty, large plastic bag that is both thick and can be securely sealed. Excellent choices include contractor-grade garbage bags or sturdy kitchen trash bags. The bag must be robust enough not to tear under the weight of the baking sheet and, most importantly, capable of being sealed airtight to effectively contain the concentrated ammonia fumes. Avoid thin, flimsy bags that could easily rip or allow fumes to escape.
Reclaim Your Bakeware: A Simple Solution for Stubborn Grime
Dealing with burnt baking sheets can be one of the most disheartening chores in the kitchen, often leading to frustration and the premature disposal of otherwise perfectly good bakeware. But as you’ve discovered, with a simple, inexpensive ingredient like ammonia and a little patience, you can effortlessly reverse years of baked-on grime. This ammonia cleaning hack is a true game-changer, offering a powerful, no-scrub solution that brings your baking sheets back to their sparkling best, making them look as if they were just purchased.
No longer do you need to endure endless, back-breaking scrubbing or resign yourself to cooking on stained, unhygienic surfaces. Embrace this incredibly effective method, always remember to follow the crucial safety steps, and enjoy the immense satisfaction of seeing your baking sheets restored to their original glory. With clean and gleaming bakeware, your next culinary creations are sure to shine even brighter. Happy baking, with truly clean sheets!
*All images featured in this guide are credited to Clean Freak & Germaphobe via YouTube. We highly recommend visiting their channel and subscribing for more brilliant cleaning tips and innovative hacks that can make your household chores much easier!