
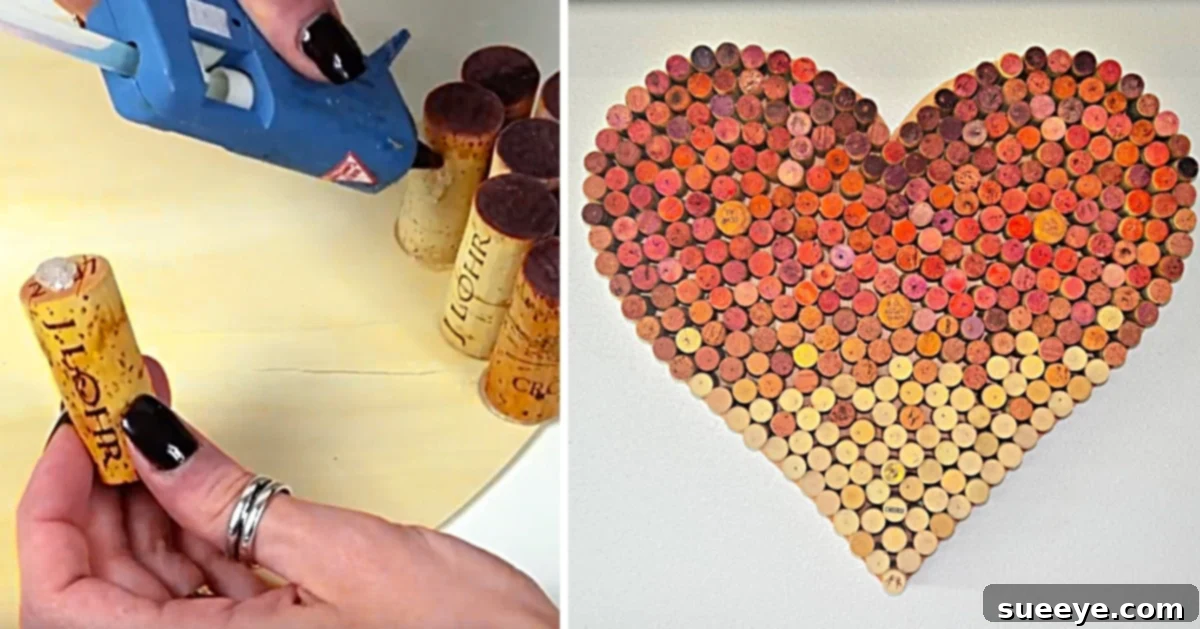
Craft a Charming DIY Wine Cork Heart: The Perfect Valentine’s Day Project
Valentine’s Day, with its iconic symbols of love and affection, is the perfect occasion to unleash your creativity and craft something truly special. While hearts are ubiquitous this time of year, there’s a unique charm in handmade decorations and gifts that store-bought items simply can’t replicate. If you’re searching for a fun, easy, and incredibly budget-friendly DIY project that also champions sustainability, look no further than the delightful wine cork heart. This craft not only transforms discarded materials into a beautiful piece of decor but also offers a wonderful opportunity for family bonding.
My own journey into crafting a wine cork heart began with a serendipitous discovery. I stumbled upon an inspiring image on Instagram by @onecharmingtreasure, showcasing a gorgeous little cork heart. The idea immediately sparked joy, especially since I had a collection of wine corks patiently waiting for the perfect project. Shortly after, a simple YouTube tutorial sealed the deal, confirming that this was indeed a craft I could tackle with ease. The thought of bringing my kids around the family craft table to create this cute heart filled me with anticipation, promising an afternoon of shared laughter and creativity. It’s a craft that truly embodies the spirit of giving and decorating with love.
Why Choose a DIY Wine Cork Heart? Beyond Just Decoration
Creating a wine cork heart offers a multitude of benefits, making it an ideal project for crafters of all skill levels. It’s more than just a decorative item; it’s a statement of eco-consciousness, personal effort, and heartfelt intention. Here’s why this craft stands out:
- Sustainable and Eco-Friendly: In an age where environmental awareness is paramount, repurposing wine corks gives new life to materials that might otherwise end up in landfills. It’s a wonderful way to demonstrate sustainability to your family and friends. Every cork saved is a small step towards a greener planet.
- Incredibly Budget-Friendly: Chances are, you already have a stash of wine corks at home. The other materials needed are minimal and inexpensive, often found at craft stores or even within your household. This makes it an accessible project for anyone, regardless of their crafting budget.
- Remarkably Easy to Make: You don’t need advanced crafting skills to create a stunning wine cork heart. The process primarily involves gluing corks to a base, making it perfect for beginners, children, and even seasoned crafters looking for a relaxing project.
- Versatile Home Decor: Once completed, your wine cork heart isn’t just for Valentine’s Day. It can serve as charming rustic decor year-round, adding warmth and personality to your kitchen, living room, entryway, or even a child’s bedroom. Its natural texture and warm tones blend beautifully with various interior design styles.
- Meaningful Handmade Gift: A handmade gift carries a unique emotional value. Gifting a wine cork heart shows thought, effort, and affection, making it a cherished present for teachers, neighbors, friends, or family members. It’s a tangible expression of love crafted with your own hands.
- Fantastic Family Activity: This craft is wonderfully engaging for all ages. Kids love arranging the corks and using the hot glue gun (with adult supervision, of course!). It fosters creativity, develops fine motor skills, and creates lasting family memories.
Gathering Your Crafting Treasures: Essential Materials
Before you dive into the joyful process of assembling your wine cork heart, it’s crucial to gather all your materials. One of the beauties of this DIY project is its simplicity and reliance on readily available items. Having everything organized at your crafting station will ensure a smooth and enjoyable experience.
Essential Supplies:
- Recycled Wine Corks: The star of our show! You’ll need a good number of these. Depending on the size of your heart base, you might need anywhere from 30 to over 100 corks. If you don’t drink wine frequently, start saving them well in advance, ask friends and family to contribute, or look for bags of corks at craft stores like Michael’s, Hobby Lobby, or online retailers. Both natural and synthetic corks work, though natural corks offer a more rustic aesthetic. Ensure they are clean and dry before use.
- 1 Cardboard or Wooden Heart-Shaped Base: This will be the foundation for your cork creation.
- Wooden Heart: These are often found in various sizes at craft stores (e.g., Michael’s Craft Store, Joann Fabrics) in their unfinished wood sections. They provide a sturdy, long-lasting base.
- Sturdy Cardboard Heart: If you prefer a DIY base, cut one from thick cardboard (like from a shipping box). Ensure the cardboard is rigid enough to hold the weight of the corks without bending. Use a template or freehand draw a heart shape, then carefully cut it out. This option is even more budget-friendly.
Consider the size of your base based on where you plan to display your finished heart.
- Trusty Hot Glue Gun and Glue Sticks: This is your primary adhesive for this project. Hot glue sets quickly, providing a strong bond between the corks and the base.
- Safety First: If crafting with children, always ensure adult supervision when using a hot glue gun, as the tip and glue can be very hot. Explain proper handling and emphasize not touching the hot parts.
- Glue Sticks: Keep a good supply of all-purpose hot glue sticks on hand.
Optional Enhancements for Personalization:
- Ribbon or Twine: For creating a hanger if you plan to display your heart on a wall or door.
- Acrylic Paint: To paint the heart base before gluing corks, or to add accents to some corks.
- Glitter or Embellishments: For a touch of sparkle or added decoration.
- Magnets: To turn smaller cork hearts into fridge magnets.
- Clear Sealant Spray: To protect the corks and give them a subtle sheen (optional).
Step-by-Step Guide: Crafting Your Beautiful Cork Heart
With your materials ready and your creative spirit buzzing, it’s time to bring your wine cork heart to life! This process is intuitive and enjoyable, making it a perfect project to unwind with or share with loved ones.
Step 1: Prepare Your Workspace and Materials
Start by laying down newspaper or a craft mat to protect your table from any stray glue. Plug in your hot glue gun and allow it to heat up completely. Take a moment to sort through your wine corks, ensuring they are clean and free of any debris. If you’re using a cardboard base, ensure its edges are smooth and the desired shape is perfectly cut.
Step 2: Secure Your Heart Base
Place your chosen heart base (either wooden or cardboard) flat on your protected workspace. This is the canvas upon which your cork masterpiece will be built. You might want to mentally visualize your design or even lightly sketch out a starting point if you’re aiming for a specific pattern. The image below shows a simple yet effective approach to starting your cork arrangement.
Step 3: Begin Arranging and Gluing Corks
Now, the fun truly begins! Start by applying a small dot of hot glue to the end of a wine cork and firmly press it onto your heart base. A popular method is to begin by outlining the heart’s edge and then working your way inward. You can arrange the corks in a variety of ways:
- Concentric Circles: Start from the outer edge and work inwards in a spiral.
- Random Pattern: Place corks haphazardly for a more organic, rustic look.
- Uniform Rows: Arrange them neatly in rows, either horizontally or vertically.
The image below illustrates the process of gluing the corks down. Be generous enough with the glue to ensure a strong bond, but not so much that it oozes out excessively.
Step 4: Fill in Gaps and Refine
As you continue to glue corks, you’ll likely notice small gaps or empty spaces, especially towards the center or at the curves of the heart. For these areas, you can strategically place whole corks or, for a more seamless look, carefully cut corks in half lengthwise or crosswise using a craft knife (adult supervision crucial for this step) to fit perfectly. This step allows you to achieve a fuller, more polished appearance for your wine cork heart, ensuring every inch of the base is covered with the beautiful texture of the corks. Take your time to fill in all the empty spaces for a truly stunning finish.
Step 5: Add Finishing Touches (Optional)
Once all your corks are securely glued and the base is completely covered, allow the glue to cool and set fully. At this point, you can personalize your heart further. If you plan to hang it, attach a loop of ribbon, twine, or jute string to the back of the heart using a strong dab of hot glue. You might also consider painting some of the cork ends for a pop of color, or adding a light coat of clear sealant to protect the corks and give them a subtle sheen. Feel free to tie a small bow around one of the corks for an extra decorative flourish. Your unique wine cork heart is now complete!
A Joyful Family Activity: Crafting Together
One of the most rewarding aspects of this DIY wine cork heart project is its potential as a family activity. My own experience saw my kids, fresh home from school, eagerly taking over the crafting table. I had just started my second heart when their excitement filled the room. They didn’t just participate; they completely immersed themselves, making five more hearts with boundless enthusiasm!
Engaging children in crafts like this offers numerous benefits. It stimulates creativity, develops fine motor skills as they handle the corks and glue (with careful adult supervision for the hot glue gun), and provides a tangible sense of accomplishment. Beyond the practical skills, it creates precious memories and strengthens family bonds. We ended up with a beautiful grouping of hearts for our kitchen, but even better, the kids had enough extra creations to share. They proudly gifted one to each of their Home Room Teachers as adorable and thoughtful Valentine’s Day presents, proving that handmade gifts truly come from the heart.
Creative Variations and Display Ideas
The beauty of the DIY wine cork heart lies in its adaptability. While a classic heart shape is charming, don’t hesitate to experiment with different forms and embellishments to make your creation truly unique. Here are some ideas to inspire you:
- Paint it Pretty: Before gluing, paint some or all of your corks with acrylic paints. You could use shades of red, pink, and white for Valentine’s Day, or metallic colors for a sophisticated look. Alternatively, paint the heart base a contrasting color that peeks through the gaps between the corks.
- Glitter and Sparkle: For a touch of glamour, apply glitter glue or spray adhesive and sprinkle glitter onto some of the cork ends or along the edges of the heart.
- Ribbon and Bows: Weave thin ribbons between the corks or tie small bows and glue them onto the finished heart. Lace or burlap ribbon can add different textures.
- Personalized Touches: Use a permanent marker to write special dates, initials, or short loving messages on the flat ends of some corks before gluing them down.
- Different Shapes: While hearts are perfect for Valentine’s Day, this technique can be applied to other shapes! Consider making a cork initial for a personalized gift, a star for Christmas, or a simple square as a unique coaster.
- Display Ideas:
- Wall Art: Attach a sturdy hanger and display your heart on a prominent wall in your kitchen, living room, or entryway.
- Table Centerpiece: Place a larger cork heart flat on a dining table or coffee table as a rustic centerpiece, perhaps surrounded by candles.
- Shelf Decor: Smaller hearts look lovely nestled on bookshelves or mantels.
- Door Decor: A medium-sized heart makes a charming statement on your front door or an interior door.
- Gift Tags/Ornaments: Craft miniature cork hearts to use as unique gift tags or charming ornaments for a Valentine’s Day tree.
Conclusion: Cherish Your Handmade Creation
The DIY wine cork heart is a testament to the joy and satisfaction that comes from creating something beautiful with your own hands. It’s an incredibly easy, affordable, and eco-friendly project that delivers stunning results. Whether you’re crafting it for a special someone, as a decorative piece for your home, or as a fun activity with family, the process is as rewarding as the finished product. Embrace the charm of handmade decor and let your creativity flow. We hope this guide inspires you to start saving those corks and embark on your own heartwarming crafting adventure!