
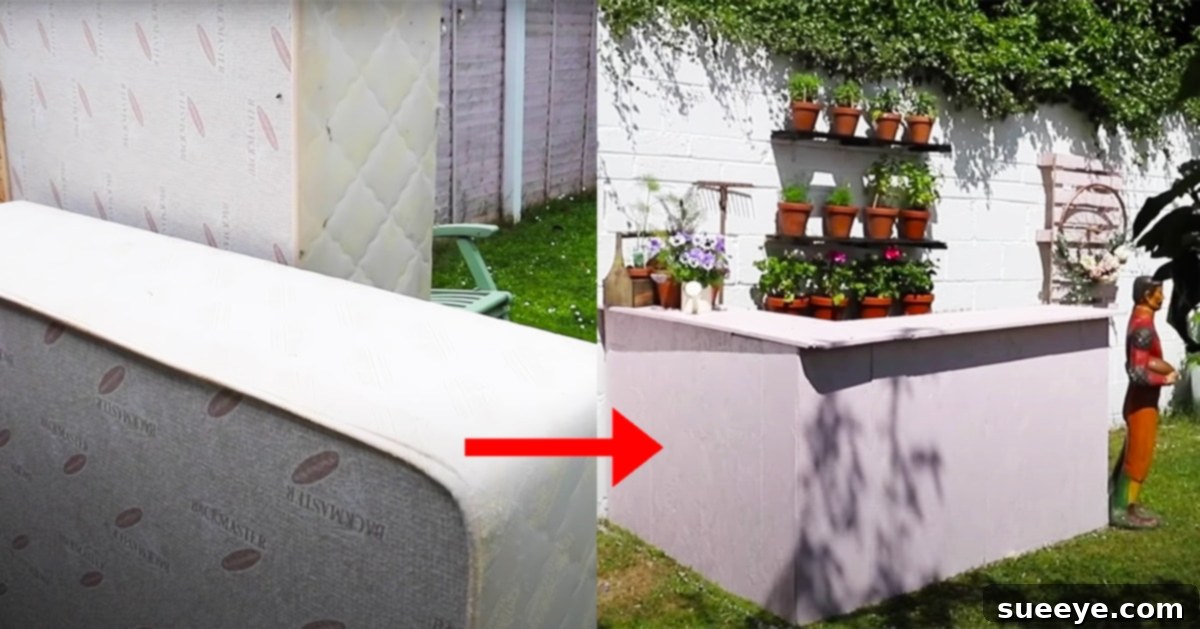
Transform Your Old Bed Frame into a Stylish DIY Garden Bar: The Ultimate Upcycling Project
As the seasons shift, so does my inspiration for creative DIY projects. With summer in full swing, my mind invariably turns to outdoor living and unique ways to enhance our garden spaces. Recently, I stumbled upon an incredibly innovative idea from Dainty Diaries on YouTube, showcasing a concept I’d never encountered before: transforming an old bed frame into a charming garden bar. This ingenious approach to upcycling is precisely the kind of project that sparks my imagination and adds a personal touch to any outdoor area.
In an era where creativity and sustainability are highly valued, more and more people are embracing the art of repurposing. I’m consistently amazed by the clever solutions and beautiful creations emerging from the DIY community. My personal project list seems to grow longer by the day, but this particular idea has quickly risen to the top. I have an old, unused bed frame gathering dust at my parent’s house, just waiting for a new purpose. Instead of sending it to a landfill, giving it a second life as a stylish garden bar feels like the perfect solution – a fantastic way to recycle and create something truly unique.
Imagine hosting backyard gatherings, summer BBQs, or simply enjoying a relaxing evening drink, all served from your custom-built outdoor bar. Not only is this project incredibly rewarding, but it also provides a practical and attractive focal point for your garden. This comprehensive guide will walk you through the process, inspired by Dainty Diaries’ brilliant concept, helping you turn that forgotten bed frame into a functional piece of outdoor furniture that will impress your friends and family.
Why Build a DIY Garden Bar? The Benefits of Upcycling
Creating a garden bar from an old bed frame offers a multitude of advantages beyond just having a cool new feature in your backyard. It’s a testament to the power of upcycling and sustainable living:
- Environmental Impact: By repurposing an old bed frame, you prevent it from becoming waste, reducing landfill burden and conserving resources that would otherwise be used to create new furniture.
- Cost-Effective: Building a DIY bar is significantly cheaper than buying a pre-made outdoor bar, especially when the main structure (the bed frame) is something you already own or can acquire for free or very little cost.
- Unique Design: Your DIY garden bar will be a one-of-a-kind piece, reflecting your personal style and craftsmanship. It’s far more interesting and conversation-starting than mass-produced furniture.
- Customization: You have complete control over the design, size, finish, and features. You can tailor it to fit your specific needs, whether you want shelves for glasses, a built-in cooler space, or a particular color scheme.
- Rewarding Experience: The satisfaction of building something with your own hands, especially from reclaimed materials, is immense. It’s a project that builds skills and confidence.
- Enhanced Outdoor Living: A dedicated bar area elevates your outdoor entertaining experience, making your garden a more inviting and functional space for relaxation and social gatherings.
This project isn’t just about constructing a bar; it’s about embracing creativity, sustainability, and making the most of what you have. Let’s dive into the materials you’ll need to begin this exciting transformation.
Materials for Your Upcycled Garden Bar
Before you start, gather all your supplies. Sourcing reclaimed wood not only enhances the sustainable aspect of this project but can also add character and charm to your finished bar.
- Old Bed Frame: The core of your project. A sturdy wooden bed frame is ideal. Ensure it’s in good condition, free from rot or significant damage.
- Reclaimed Wood Planks or Pallet Wood: This will form the outer shell, shelves, and countertop of your bar. Look for wood that is durable and can withstand outdoor conditions, or be prepared to treat it thoroughly. Old fence panels, floorboards, or even responsibly sourced pallet wood can work wonders.
- Fabric Scissors or Utility Knife: Essential for carefully removing any upholstery or fabric from the bed frame.
- Wood Sandpaper (Various Grits) or Electric Sander: To smooth down rough surfaces, prepare the wood for painting, and prevent splinters.
- Cuprinol Garden Paint (or other exterior-grade wood paint/stain): Choose a color that complements your garden aesthetic. Exterior paint will protect the wood from weather elements, ensuring longevity.
- Nails and Wood Screws: A variety of sizes for securing different components. Screws generally offer a stronger hold than nails, especially for structural elements.
- Wood Adhesive (Optional, but recommended for extra strength): Can be used in conjunction with screws or nails for more robust joints.
- Drill/Driver: For making pilot holes and driving screws efficiently.
- Saw (Hand Saw, Jigsaw, or Circular Saw): For cutting reclaimed wood to size.
- Measuring Tape and Pencil: For accurate measurements and markings.
- Safety Gear: Gloves, safety glasses, and a dust mask are crucial for protecting yourself during the building process.
- Bamboo Screen or Slats (Optional): For decorative paneling, adding a touch of rustic charm or privacy.
- Wood Filler (Optional): To fill any gaps or imperfections in the reclaimed wood.
Having all your materials organized before you begin will streamline the process and allow for a more enjoyable building experience. Remember, safety should always be your top priority!
Step-by-Step Guide: Building Your DIY Garden Bar
This project is an exciting journey of transformation. While the original inspiration from Dainty Diaries’ tutorial provides an excellent visual guide, we’ll delve deeper into each step to ensure a smooth and successful build.
Phase 1: Preparing Your Bed Frame
-
Disassemble and Strip the Bed Frame:
Your first task is to prepare the bed frame. If it’s an upholstered frame, you’ll need to use your fabric scissors or a utility knife to carefully cut away and remove all fabric, padding, and any decorative elements. Work meticulously to expose the bare wooden or metal frame underneath. Pay close attention to removing any staples, tacks, or nails that held the fabric in place. A pair of pliers can be very useful here. The goal is to have a clean, stripped frame to work with.
-
Inspect and Clean the Frame:
Once the frame is bare, inspect it thoroughly for any signs of damage, rot, or loose joints. If it’s a wooden frame and there are rough patches, splintered areas, or old paint/varnish, it’s time to sand it down. An electric sander will make this task much quicker, but good old-fashioned sandpaper (starting with a coarse grit like 80, then moving to a finer grit like 120 or 180) will also do the job. Sand until all surfaces are smooth and free from potential splinters. This step is crucial for both safety and for creating a good base for paint or stain. After sanding, wipe down the frame with a damp cloth to remove all dust and allow it to dry completely.
-
Reinforce the Frame (Optional but Recommended):
Depending on the age and condition of your bed frame, you might want to reinforce its structure. Check all joints and connections. If anything feels wobbly, add screws or corner brackets for extra stability. Remember, this bar will be holding weight, so a solid foundation is key.
Phase 2: Constructing the Bar’s Outer Shell and Countertop
-
Plan Your Bar’s Layout:
Before you start attaching wood, visualize the final structure. Decide on the height of your countertop, where shelves will be placed (if any), and how much of the original bed frame you want to expose or cover. This planning stage is critical for an organized build.
-
Building the Outer Shell/Panels:
Now, following the general method shown in the Dainty Diaries tutorial, you will begin cladding the bed frame with your reclaimed wood. Measure and cut your reclaimed wood planks to create the outer panels of the bar. These panels will define the aesthetics and provide structural integrity. Use wood screws (pre-drilling pilot holes is recommended to prevent splitting, especially with reclaimed wood) to securely attach the planks to the existing bed frame. You might choose to cover all sides, or leave one side open for access, depending on your design. Ensure the planks are flush and level for a professional finish. You can opt for a vertical, horizontal, or even diagonal arrangement of the planks to create different visual effects.
-
Install the Countertop:
Once your outer shell is taking shape, it’s time to add the countertop. Measure the top dimensions of your bar structure and cut a piece (or multiple pieces joined together) of reclaimed wood for the surface. This piece should ideally be thicker and more robust, as it will endure the most use. Attach the countertop securely to the top of the bar frame using screws from underneath where possible, or countersunk screws from the top for a cleaner look. Ensure it is perfectly level and firmly attached.
-
Add Internal Shelving:
One of the brilliant features of this garden bar concept is the ability to incorporate internal shelving. This is where you can store bottles, glasses, and other bar essentials. Measure and cut additional pieces of reclaimed wood to serve as shelves. Determine your desired shelf heights and install support battens (small strips of wood) on the inside of the bar frame. Then, simply rest or screw your shelves onto these supports. Consider varying the height of shelves to accommodate different bottle sizes.
Phase 3: Finishing Touches and Personalization
-
Sanding and Filling:
With the main structure complete, perform a final round of sanding over all new wood surfaces and edges. Pay attention to any rough spots, sharp corners, or areas where reclaimed wood might have splinters. If there are any noticeable gaps or imperfections, use wood filler, let it dry, and then sand it smooth. This meticulous preparation ensures a beautiful and safe finish.
-
Painting and Sealing:
Now for the fun part – adding color and protection! Apply a generous coat of your chosen exterior-grade wood paint or stain, such as Cuprinol Garden Paint. If you’re using a lighter color or want a more opaque finish, you may need two or three coats. Ensure each coat dries completely according to the manufacturer’s instructions before applying the next. Painting not only makes your bar look fantastic but also provides crucial protection against moisture, UV rays, and general wear and tear, significantly extending its life outdoors.
-
Adding Decorative Elements (Optional):
To truly elevate your garden bar, consider adding decorative elements. As seen in the inspiration, a bamboo screen or bamboo slats can be attached to the exterior panels, offering a natural, tropical aesthetic. This is a great way to cover imperfections in the reclaimed wood or simply add an extra layer of visual interest. You could also add bottle openers, hooks for towels, or small decorative lights.
Personalizing Your Upcycled Garden Bar
This DIY project is a canvas for your creativity. Here are some ideas to make your garden bar truly yours:
- Color Schemes: Experiment with vibrant colors for a modern look, or stick to natural wood tones for a rustic feel. A distressed paint finish can add vintage charm.
- Functionality: Consider adding a small mini-fridge or cooler compartment, perhaps even a fold-down extension on the countertop for extra serving space.
- Lighting: Incorporate solar-powered fairy lights, LED strip lights under the counter, or a stylish lantern to create ambiance during evening use.
- Planters: Attach small planters to the sides of the bar for herbs or flowers, adding a touch of greenery.
- Bar Stools: Complete the look with matching DIY bar stools made from repurposed materials or comfortable weather-resistant stools.
- Signage: Add a personalized sign with your family name or a fun bar slogan.
The Lasting Impact of Upcycling
Upon completing this project, you’ll not only have a fantastic, functional garden bar but also a deep sense of accomplishment. This is such an innovative idea because most people wouldn’t think twice about recycling an old bed frame in this way. It’s truly inspiring to see how a seemingly unusable item can be transformed into something so practical and beautiful. This project serves as a wonderful inspiration for any summer outdoor DIY endeavor, proving that creativity and resourcefulness can lead to incredible results.
I’m already planning to share this brilliant DIY with my best friend, who just moved into a new house with a spacious backyard. I can’t wait to help her create her own unique garden bar, knowing the joy and utility it will bring. So, if you have an old bed frame taking up space, don’t throw it away – unleash your inner DIY enthusiast and create a focal point for your garden that will be cherished for years to come!