
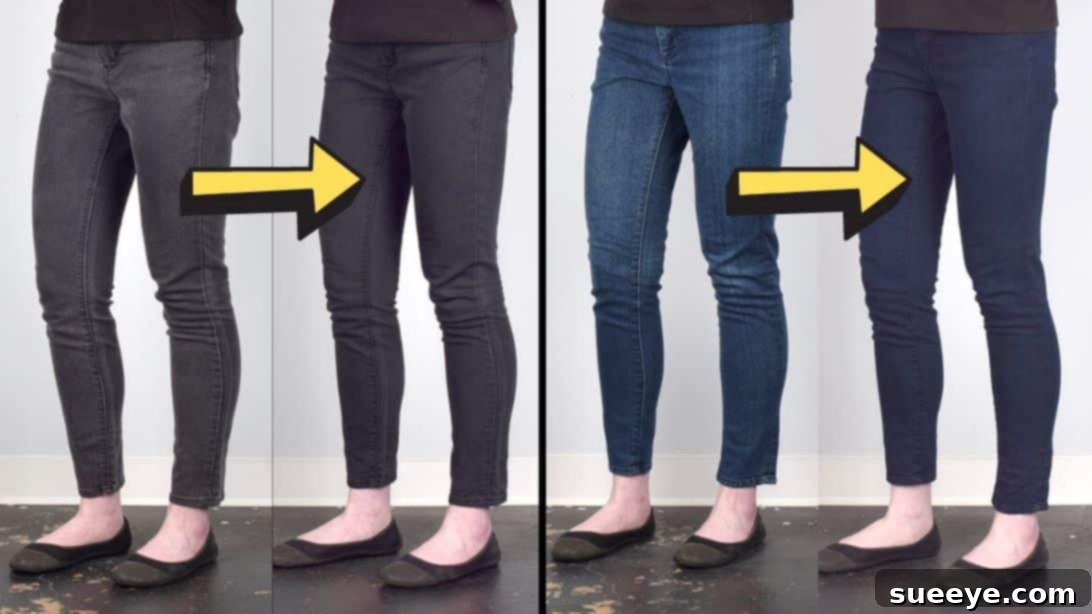
Revive Your Favorite Faded Jeans: A Comprehensive DIY Dyeing Guide
Do you own a pair of jeans that fits like a second skin, a style you absolutely adore, making them your go-to choice for almost any occasion? The unfortunate reality is that even the most cherished denim can succumb to the relentless march of time, leading to wear, tear, and inevitable fading. Faced with a pair of beloved, yet worn-out jeans, you might contemplate buying a new one, only to discover that finding a replacement with the same perfect fit and feel is a near-impossible quest. What if there was a way to bypass this dilemma, to breathe new life into your faded denim, making it look as good as new without ever having to part ways with your favorite pair?
This comprehensive, easy-to-follow guide will walk you through the magical process of restoring your old and faded jeans using fabric dye. Drawing inspiration from a highly detailed video tutorial by OnlineFabricStore on YouTube, we’ll unveil the secrets to transforming dull denim into vibrant attire. Not only is this a fantastic way to save money and embrace sustainable fashion by extending the lifespan of your garments, but it also allows you to customize your jeans, perhaps even giving them a completely new look. Get ready to embark on a creative journey that will ensure your favorite jeans remain a staple in your wardrobe for years to come!
Why Dye Your Faded Jeans Instead of Replacing Them?
Before diving into the dyeing process, let’s explore the compelling reasons why restoring your jeans is a brilliant idea. Beyond the obvious benefit of keeping a pair you love, dyeing offers several advantages:
- Sustainability and Eco-Friendliness: In an era of fast fashion, extending the life of your clothing is a significant step towards reducing waste. By reviving your jeans, you lessen your environmental footprint, contributing to a more sustainable planet.
- Cost-Effectiveness: High-quality jeans can be expensive. Dyeing an existing pair is a fraction of the cost of purchasing new denim, allowing you to save money while maintaining your style.
- Personalization and Customization: Dyeing isn’t just about restoring original color; it’s an opportunity for transformation. You can choose to refresh the original shade or even completely change the color of your jeans, giving them a unique, personalized look that reflects your individual style.
- Preserving Comfort and Fit: There’s nothing quite like the broken-in comfort of a perfectly fitted pair of jeans. Replacing them often means enduring the discomfort of a new, stiff pair until they’re adequately worn in. Dyeing allows you to retain that cherished comfort and fit.
Understanding Fabric Dyeing Basics for Denim
Denim is predominantly made from cotton, a natural cellulose fiber, which is highly receptive to fabric dyes. This makes jeans an excellent candidate for home dyeing projects. For optimal results, it’s crucial to understand a few fundamental principles:
- Fabric Composition Matters: While cotton takes dye beautifully, synthetic fibers (like polyester or spandex often found in stretch jeans) do not. If your jeans are a blend, the cotton fibers will absorb the dye, but the synthetic fibers will not, resulting in a slightly lighter or heathered appearance. Always check the fabric content label.
- Pre-Washing is Key: Any dirt, oils, or fabric finishes on your jeans can act as a barrier, preventing the dye from absorbing evenly. A thorough pre-wash is non-negotiable for achieving uniform color.
- Water Temperature: Dyes work best with hot water, as it helps open up the fibers, allowing for deeper and more consistent color penetration.
- Even Distribution: Constant agitation or stirring during the dyeing process is vital to prevent splotches and ensure the dye reaches every part of the fabric evenly.
Essential Materials for Dyeing Jeans at Home
Before you begin your denim transformation project, gather all your supplies. Having everything at hand will make the process smoother and more enjoyable. Here’s what you’ll need:
- Your Faded Jeans: Ensure they are clean and damp before starting.
- Fabric Dye (Rit Dye or Dylon Dye): Both are excellent choices. Rit offers liquid and powder options, while Dylon is commonly found in powder form. Choose a color close to the original or a new shade you desire. For dark colors like black or deep blue, you might need two boxes/bottles of dye for a single pair of jeans, especially if they are heavy-weight denim.
- Dishwashing Soap or Liquid Detergent: A small amount acts as a wetting agent, helping the dye penetrate the fabric more evenly and reducing surface tension.
- Rit ColorStay Fixative (Optional but Highly Recommended): This crucial step helps lock in the color, significantly reducing bleeding and fading in subsequent washes. It’s essential for achieving long-lasting, vibrant results.
- Salt (Non-Iodized): Acts as a dye activator for natural fibers like cotton, promoting better dye absorption and color intensity.
- Measuring Cups and Spoons: Accuracy in dye and additive quantities ensures consistent and predictable results.
- Large Container for Dyeing: This could be a large plastic tub, a stainless steel sink (though be careful with staining), or a bucket. It must be large enough for your jeans to move freely when submerged. Avoid containers that you use for food preparation.
- Rubber Gloves: Absolutely essential for protecting your hands from dye stains and chemicals.
- Plastic Sheeting or Old Towels: To protect your work surface from spills and stains.
- Stirring Utensil: A dedicated metal or wooden stirring stick that you don’t mind getting stained.
- Access to a Washing Machine: For pre-washing, post-dye rinsing, and final washing.
Pre-Dyeing Preparation: The Critical Foundation for Success
The success of your dyeing project hinges significantly on thorough preparation. Don’t skip these vital steps!
- Clean Your Jeans: Machine wash your jeans with detergent and warm water. This removes any dirt, oils, or factory finishes that could interfere with dye absorption. Do not use fabric softener. For best results, the jeans should be damp, not dripping wet, when you introduce them to the dye bath.
- Protect Your Workspace: Lay down plastic sheeting, old newspapers, or old towels on your work surface. Dye can permanently stain surfaces, so take ample precautions. Work in a well-ventilated area.
- Gather All Materials: Ensure all your listed materials are within easy reach before you start mixing any dyes.
- Wear Protective Gear: Put on your rubber gloves immediately. Consider wearing old clothes or an apron to protect yourself from splashes.
- Read Dye Instructions: While this guide provides general directions, always consult the specific instructions on your chosen dye package. Different brands or types of dye might have slightly varying recommendations.
Dyeing Your Jeans: Two Effective Methods for Stunning Results
Here, we’ll detail two popular methods, one using Dylon powder dye for a classic black finish and another using Rit liquid dye for denim blue. Both methods share core principles but have slight variations based on the dye type.
Method 1: Achieving Rich Black with Dylon Powder Dye
- Prepare the Dye Solution: In a separate small container, carefully dissolve the Dylon powder dye in approximately 4 cups of very warm (almost hot) water. Stir continuously until the powder is completely dissolved, ensuring there are no clumps, which can lead to uneven dyeing.
- Set Up the Dye Bath: Fill your large dyeing container with enough warm water for your jeans to move freely – typically several gallons. The more water, the less concentrated the dye will be, so adjust based on desired intensity. Add 4 tablespoons of salt to this bath and stir thoroughly until dissolved. This salt helps the dye bond effectively with the cotton fibers.
- Submerge and Agitate Jeans: Place your pre-washed, damp jeans into the dye bath, ensuring they are fully submerged. Begin stirring them constantly for the first 15 minutes. This continuous agitation is crucial for preventing streaks and achieving an even color throughout the fabric.
- Soak for Deeper Color: After the initial agitation, allow the jeans to soak in the dye mixture for an additional 45 minutes, stirring occasionally (every 5-10 minutes). The longer the jeans soak, the darker and more intense the black will become.
- Rinse Until Clear: Once the desired shade is achieved, carefully remove the jeans from the dye bath using your gloved hands. Rinse them under cold running water in a utility sink or bathtub until the water runs completely clear. This step is vital to remove excess dye and prevent future bleeding.
- Machine Wash Post-Dye: Transfer the rinsed jeans to a washing machine. Wash them on a warm water cycle with a small amount of mild detergent. Do not add other garments during this wash.
- Air Dry: Hang your freshly dyed black jeans to air dry. To prevent potential fading or uneven drying, avoid direct heat or sunlight during this stage.
- Repeat Washing: For the first couple of washes, continue to wash the jeans separately to ensure all residual dye is removed and to prevent any color transfer to other clothes.
Method 2: Restoring Classic Denim Blue with Rit Liquid Dye
- Prepare the Dye Bath: Fill a large container with approximately 3 gallons of hot water (around 140°F/60°C is ideal for Rit dyes; use the hottest tap water setting). Add 1 cup of salt and about 1 teaspoon of liquid dishwashing soap or mild detergent. Stir until the salt dissolves.
- Add Rit Liquid Dye: Shake the bottle of Rit liquid dye vigorously before opening. Pour about half a cup of dye into the hot water mixture. If you desire a darker, more intense denim blue, you can use the entire bottle. Stir the dye thoroughly into the water.
- Submerge Damp Jeans: Carefully submerge your pre-washed, damp jeans into the prepared dye bath. Ensure they are fully immersed.
- Initial Constant Stirring: For the first 10 minutes, stir the jeans constantly in the dye bath. This initial agitation is vital to ensure the dye penetrates all areas of the fabric evenly, preventing lighter spots or streaks.
- Soak for Desired Shade: Continue to stir regularly for at least 30 minutes, or longer if you’re aiming for a deeper, darker blue. The longer the jeans remain in the dye bath with consistent stirring, the more saturated the color will become.
- Apply Rit ColorStay Fixative: This step is critical for colorfastness. In a separate clean container, fill it with approximately 3 gallons of hot water. Add half a cup of Rit ColorStay Fixative for every pound of dry fabric (a typical pair of jeans weighs about 1.5 to 2 pounds, so adjust accordingly). Transfer your freshly dyed jeans into this fixative solution.
- Fixative Treatment: Stir the jeans in the fixative solution for about 20 minutes. This process helps to lock the dye into the fibers, significantly reducing color bleeding in future washes.
- Rinse and Wash: After the fixative treatment, rinse the jeans in cool water until the water runs clear. Then, machine wash them on a warm water cycle with a mild detergent.
- Dry and Maintain: You can tumble dry your jeans on a low setting or air dry them. For the first few washes, always wash your newly dyed jeans separately from other garments or only with similar dark colors to prevent any potential dye transfer.
*All these images are credited to OnlineFabricStore via YouTube. Give their channel a visit and subscribe for more inspiring DIY projects and fabric tips!
Post-Dyeing Care and Maintenance for Long-Lasting Color
To ensure your newly revived jeans maintain their vibrant color and prevent premature fading, proper aftercare is paramount:
- Initial Separate Washes: For the first 2-3 washes, always wash your dyed jeans separately. This precaution helps to capture any residual dye that might still be released and prevents it from staining other clothes.
- Wash with Similar Colors: After the initial separate washes, continue to wash your jeans with other dark or similar-colored items to minimize the risk of color transfer.
- Cold Water Wash: Always wash your jeans in cold water. Cold water helps to preserve dye molecules and prevents them from leaching out, thus extending the life of your color.
- Turn Inside Out: Before washing, turn your jeans inside out. This reduces friction on the outer surface, protecting the dyed fibers and preventing surface abrasion that can lead to fading.
- Use Mild Detergent: Opt for a gentle, color-safe detergent. Avoid detergents with harsh chemicals, bleach, or optical brighteners, as these can strip color from dyed fabrics.
- Air Dry When Possible: While tumble drying is an option, air drying your jeans can further extend their color life by avoiding the high heat of a dryer, which can cause colors to fade more quickly. If you must tumble dry, use a low heat setting.
Troubleshooting Common Dyeing Issues
Even with careful preparation, issues can sometimes arise. Here are solutions to common dyeing problems:
- Uneven Color or Streaks:
- Cause: Insufficient stirring, not enough water in the dye bath (jeans weren’t moving freely), or jeans not thoroughly pre-washed.
- Solution: Ensure consistent and vigorous stirring throughout the dyeing process. Use a larger container with ample water for full immersion and movement. Always pre-wash jeans thoroughly.
- Color Not Dark Enough:
- Cause: Not enough dye used, not enough soaking time, or water temperature was too low.
- Solution: For deeper shades, use more dye (e.g., a full bottle instead of half). Extend the soaking time, stirring frequently. Ensure the water is hot enough as per dye instructions.
- Color Bleeding After Washing:
- Cause: Not using a dye fixative, or insufficient rinsing/washing after the dyeing process.
- Solution: Always use a dye fixative like Rit ColorStay Fixative. Rinse jeans thoroughly until the water runs completely clear, and then machine wash them separately several times post-dyeing.
- Dye Stains on Skin or Surfaces:
- Cause: Lack of protective gear or inadequate workspace protection.
- Solution: Always wear rubber gloves. Protect all surfaces with plastic sheeting or old towels. If skin gets stained, try scrubbing with soap and water immediately. For surfaces, a bleach solution might help, but prevention is best.
Conclusion: Embrace the Transformation
Reviving your faded jeans through home dyeing is a wonderfully rewarding project. Not only does it allow you to extend the life of a beloved garment, but it also offers a creative outlet and a sustainable alternative to continually buying new clothes. With the detailed steps and helpful tips provided in this guide, you now have all the knowledge and confidence needed to transform your tired, faded denim into a fresh, vibrant, and cherished staple once more. So, gather your materials, follow the directions carefully, and get ready to fall in love with your “new” old jeans all over again!