
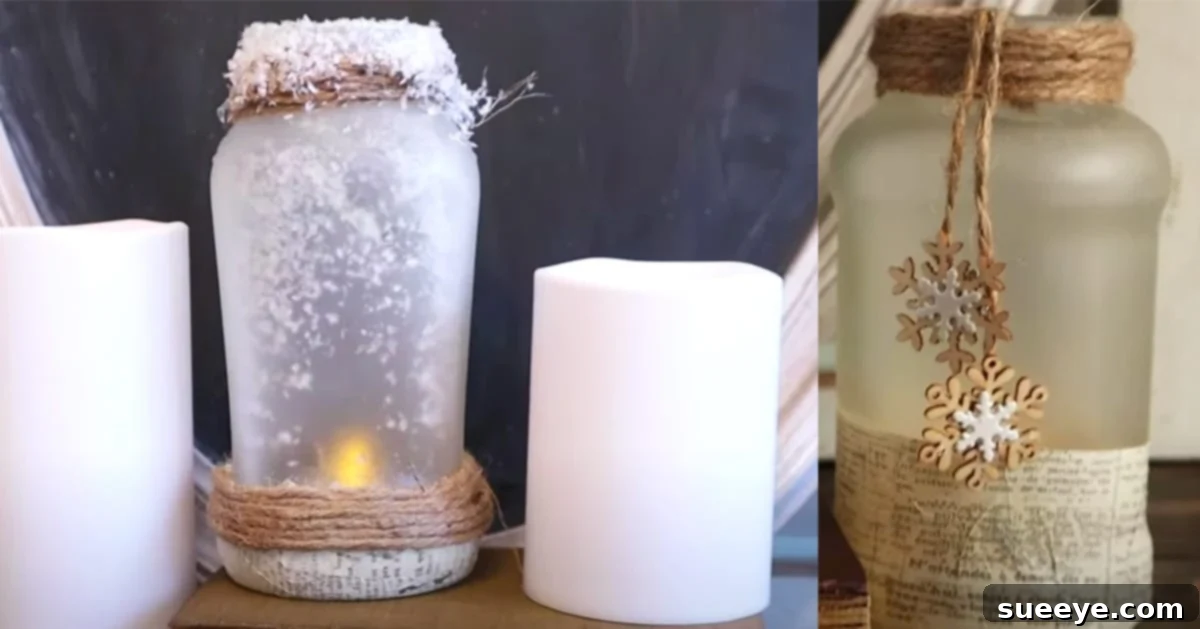
In an age where sustainability and conscious consumption are more vital than ever, the simple act of upcycling everyday items has become a cherished practice for many. Among the myriad possibilities, transforming old glass jars stands out as a wonderfully accessible and rewarding craft. Far from being mere waste, these forgotten containers hold incredible potential to become unique pieces of home decor, practical storage solutions, or heartfelt handmade gifts. The beauty of upcycling jars lies in its simplicity, its cost-effectiveness, and the boundless creative freedom it offers. It’s an opportunity to reduce your environmental footprint while simultaneously adding a touch of personalized charm to your living space.
I frequently find myself drawn to the charm of giving new life to old jars, repurposing them into delightful crafts or functional storage containers. It’s a creative endeavor that not only satisfies my artistic inclinations but also aligns with a more eco-friendly lifestyle. Recently, I stumbled upon Ashleigh Lauren’s insightful video, a true gem for anyone looking to delve into the world of jar recycling and crafting. Ashleigh masterfully demonstrates how to transform ordinary spaghetti jars into something extraordinary with quick, easy, and impactful steps. Her approach is not just a how-to guide; it’s an experience. Ashleigh’s vibrant energy, bubbly personality, and infectious “go happy” attitude make watching her tutorial an absolute joy. It’s a refreshing departure from typical, dry instructional videos, injecting a much-needed dose of enthusiasm into the crafting process. She truly inspires you to unleash your inner artist and start saving those jars for a creative revolution.
Why Upcycle Your Jars? The Benefits of Sustainable Crafting
Beyond the immediate gratification of creating something beautiful, upcycling glass jars offers a plethora of advantages that extend from your home to the planet:
- Environmental Impact: Every jar you reuse is one less item sent to a landfill and one less new product that needs to be manufactured, significantly reducing waste and conserving resources. This small act contributes to a larger movement of sustainable living.
- Cost-Effective Decor: Why spend a fortune on new decor when you can transform items you already have? Upcycling jars is an incredibly budget-friendly way to refresh your home’s aesthetic or create unique gifts without breaking the bank. Most of the materials you’ll need are either repurposed or inexpensive craft supplies.
- Unleash Creativity: Jar crafting is a fantastic outlet for personal expression. From rustic to minimalist, whimsical to elegant, the possibilities for customization are truly limitless. You can match your creations to your existing decor or experiment with entirely new styles.
- Versatility in Use: The potential uses for upcycled jars are vast. Imagine them as stylish pencil holders for your desk, charming vases for fresh flowers, practical organizers for your kitchen pantry, decorative candle lanterns, mini terrariums, or even personalized gift packaging. The only limit is your imagination.
- Personalized Touch: Store-bought decor often lacks character. Handcrafted jars, however, tell a story. They add a personal, unique touch to any space, reflecting your style and creativity in a way mass-produced items cannot.
Materials You’ll Need to Begin Your Jar Transformation
One of the beauties of jar crafting is that it often requires only a few basic supplies, many of which you might already have on hand. For Ashleigh Lauren’s specific winter-themed project, and for general jar decor, here’s a comprehensive list, along with some tips and alternatives:
- Jars: Any clean glass jars will do! Spaghetti sauce jars, jam jars, pickle jars, or even classic Mason jars are perfect candidates. Ensure they are thoroughly cleaned and free of labels and adhesive residue.
- Frosted Glass Spray Paint: This is a magical product that transforms clear glass into a beautiful, soft, opaque finish, giving it an elegant, diffused look. Make sure to work in a well-ventilated area and use light, even coats for the best results. As an alternative, you could use chalk paint for a matte, rustic finish, or even regular acrylic paints if you prefer a solid color or desire to hand-paint designs.
- Twine: Natural jute twine adds a rustic, charming touch to your jars. It’s excellent for wrapping around the neck or body of the jar. Other options include decorative ribbons, lace, raffia, or colorful yarn to match different themes.
- Wooden Snowflakes (optional): These small wooden embellishments are perfect for a winter or holiday theme, adding texture and visual interest. For other seasons, consider small wooden cutouts of flowers, leaves, stars, or even mini fruit shapes.
- Metal Snowflakes (optional): Similar to wooden snowflakes, metal embellishments provide a different texture and a slightly more polished look. You could also use small charms, buttons, or found objects like shells or small pebbles for different seasonal vibes.
- Faux Snow: Essential for creating a cozy, winter wonderland effect inside or around your jar. Alternatives for other themes include decorative sand, small gravel, glitter, or even dried flower petals.
- Glue Gun: An indispensable tool for quick and secure adhesion of embellishments like twine, snowflakes, and other decorative elements. Ensure you have plenty of glue sticks on hand. Always exercise caution when using a hot glue gun to prevent burns.
- LED Candles: These battery-operated candles are a safe and effective way to create a warm, inviting glow within your decorated jars, especially if they are designed as lanterns. They mimic the flicker of real candles without the fire hazard. Small battery-operated string lights (fairy lights) are another fantastic option for adding ambient light.
- Mod Podge: This versatile crafting glue acts as an adhesive, sealer, and finish, often used in decoupage. It’s perfect for attaching tissue paper or other delicate materials to glass.
- Tissue Paper: When combined with Mod Podge, tissue paper allows you to create beautiful, translucent, stained-glass effects or add colorful patterns to your jars. Experiment with different colors and patterns to match your theme. You can also use fabric scraps, newspaper clippings, or printed images.
- Scissors: A basic but essential tool for cutting twine, tissue paper, and other decorative elements.
- Any Craft Designs: This broad category encourages personalization! Think stencils, paint pens for freehand designs, glitter, beads, small plastic ornaments, or anything else that sparks your creativity and fits your chosen theme.
Step-by-Step Guide to Crafting Your Upcycled Jars
Step One: Prepare Your Jars for Transformation
The foundation of any successful jar upcycling project is a thoroughly clean and prepared surface. This step is critical for ensuring that your paint adheres properly and your decorations stick securely. Start by gathering any glass jars you wish to repurpose.
- Empty and Rinse: First, ensure the jars are completely empty of their original contents. Rinse them thoroughly with warm, soapy water to remove any food residue or lingering odors.
- Remove Labels: This can sometimes be the trickiest part! Submerge the jars in hot, soapy water for at least 15-30 minutes. This helps to loosen the adhesive. After soaking, try peeling off the labels. For stubborn residue, a plastic scraper or an old credit card can be helpful.
- Tackle Sticky Residue: Even after peeling, sticky glue residue often remains. For this, household products like Goo Gone, rubbing alcohol, nail polish remover (acetone), or even a paste of baking soda and cooking oil can work wonders. Apply the chosen cleaner, let it sit for a few minutes, then scrub vigorously with a sponge or steel wool (if the glass isn’t delicate). Repeat until all stickiness is gone.
- Final Wash and Dry: Once all labels and residue are removed, wash the jars one final time with soap and water. Rinse them completely to remove any cleaner residue, and then dry them thoroughly. Air drying upside down on a rack is often best to ensure no moisture remains, particularly before painting, as moisture can cause paint to peel or bubble.
Step Two: Transform and Decorate Your Jars
With your jars sparkling clean and dry, it’s time for the fun part: giving them their brand-new look! Ashleigh Lauren’s tutorial showcases a beautiful wintertime aesthetic, but the techniques are incredibly versatile, allowing you to adapt them to any season or theme you desire.
- Apply Frosted Glass Spray Paint (or chosen paint):
- Preparation: Work in a well-ventilated area, preferably outdoors, and lay down newspaper or a drop cloth to protect your work surface. Wear gloves and a mask if recommended by the paint manufacturer.
- Application: Shake the spray paint can vigorously for at least a minute. Hold the can 8-12 inches away from the jar and apply light, even coats in a sweeping motion. It’s better to apply several thin coats than one thick coat, as thick coats can drip and look uneven.
- Drying: Allow each coat to dry completely according to the manufacturer’s instructions (usually 15-30 minutes) before applying the next. This typically takes 2-3 coats to achieve a uniform frosted or matte finish. Once all coats are applied, let the jars cure for at least 24 hours before handling them extensively or adding decorations. If you’re using brush-on paints like chalk paint or acrylics, apply with even strokes and allow ample drying time between coats.
- Theme Selection and Design:
This is where your creativity truly shines! While Ashleigh opts for a charming winter theme, consider these ideas for year-round appeal:
- Winter Wonderland: As shown in the tutorial, a frosted jar base provides the perfect snowy backdrop. Add faux snow inside or around the base, then attach wooden or metal snowflakes, small pinecones, or sprigs of evergreen with a glue gun. A twine wrap around the neck completes the rustic winter look.
- Spring Garden: Paint your jars in soft pastels (mint green, baby blue, pale pink). Use Mod Podge to decoupage floral tissue paper or small pressed flowers onto the jar. Wrap with delicate lace or pastel ribbon, and perhaps add a small butterfly or bee embellishment. Perfect for holding fresh spring blooms!
- Summer Beach House: Opt for sandy beige or seafoam green paints. Fill the jar with decorative sand, small seashells, and sea glass. Wrap the neck with natural jute twine or a nautical-themed ribbon. A small starfish or anchor charm would be a perfect accent.
- Autumn Harvest: Choose warm tones like burnt orange, deep red, or earthy brown for your paint. Decoupage leaves or rustic patterns using Mod Podge. Wrap with burlap ribbon and attach small artificial berries, acorns, or mini pumpkins for a cozy fall display.
- Everyday Elegance: For a more versatile look, paint jars in neutral tones (white, grey, black) or metallic shades. Decorate with simple geometric patterns using stencils and a contrasting paint color, or wrap with elegant satin ribbon. These can serve as chic storage or minimalist vases.
- Decorating Techniques:
- Twine/Ribbon Wrapping: Secure one end of the twine or ribbon with a dab of hot glue near the top or bottom of the jar. Begin wrapping tightly and evenly, applying small dots of glue intermittently to keep it in place, especially at the start and end of the wrap.
- Decoupage: If using tissue paper and Mod Podge, cut your paper into desired shapes or strips. Apply a thin layer of Mod Podge to the jar, carefully place the tissue paper over it, and then apply another thin layer of Mod Podge over the paper to seal it, smoothing out any bubbles with a brush.
- Embellishments: Use your hot glue gun to securely attach wooden or metal cutouts, beads, buttons, or other small decorative items directly onto the painted and dried jar surface or onto the wrapped twine/ribbon.
- Adding Fillers: Once the exterior decorations are complete and dry, carefully add faux snow, sand, or other fillers to the bottom of the jar.
- Lighting: Finally, place your LED candles or fairy lights inside the jar to create a magical glow. These are especially effective with frosted glass, as the light diffuses beautifully.
Beyond the Tutorial: Expanding Your Creative Horizons with Jars
While Ashleigh Lauren’s tutorial provides a fantastic starting point, the world of jar crafting is vast and full of exciting possibilities. Don’t be afraid to experiment and adapt techniques to create truly unique pieces.
- Tiered Storage: Glue jars of varying sizes together (base-to-base) to create tiered organizers for jewelry, craft supplies, or office stationery.
- Garden Lanterns: Create charming outdoor lighting by decorating jars and adding solar-powered fairy lights, then hanging them from trees or hooks.
- Personalized Gifts: Fill decorated jars with homemade treats, bath salts, or small curated gifts for a thoughtful, personal touch.
- Terrariums: Transform larger jars into miniature ecosystems by adding layers of pebbles, charcoal, potting soil, and small plants like succulents or moss.
- Food Storage: While not a craft in itself, well-decorated jars can elevate your pantry organization, perfect for storing grains, pasta, or homemade preserves. Ensure they are airtight if storing food for long periods.
Remember to always prioritize safety, especially when using tools like glue guns or spray paints. Ensure proper ventilation and follow product instructions. With a little imagination and a few simple supplies, you can turn humble glass jars into extraordinary creations that beautify your home and express your unique style.
Overall, the art of recycling and crafting old jars is not just a hobby; it’s a wonderfully rewarding way to embrace creativity, reduce waste, and add a personal touch to your surroundings. This beautiful form of upcycling is an excellent example of how everyday objects can be given a second life, transforming them into items of greater beauty and utility. So, the next time you finish a jar of spaghetti sauce or pickles, think twice before tossing it. Instead, see it as a blank canvas awaiting your artistic touch. Happy crafting!