
Transform Your Kitchen Scraps into a Thriving Garden: The Ultimate Guide to Regrowing Vegetables
Imagine having an endless supply of fresh produce right from your kitchen! What if you could significantly cut down on your grocery bill and reduce food waste, all while enjoying the satisfaction of growing your own food? Thanks to insightful resources like Mary’s Nest’s viral YouTube video, this dream is easily attainable. Regrowing vegetables from kitchen scraps is not only incredibly simple but also a highly rewarding endeavor that can turn your home into a miniature, sustainable farm within just a couple of weeks. This comprehensive guide will walk you through the process, providing detailed instructions, essential tips, and all the inspiration you need to embark on your very own kitchen scraps gardening journey.
Why Embrace Kitchen Scraps Gardening?
Regrowing vegetables from the parts you’d normally discard offers a multitude of benefits, extending beyond mere cost savings:
- Economic Savings: By giving your vegetable scraps a second life, you effectively reduce your need to purchase new produce, leading to substantial savings on your grocery budget over time.
- Environmental Sustainability: This practice is a cornerstone of a zero-waste lifestyle. It minimizes food waste, reduces your carbon footprint by lessening the demand for commercially grown vegetables (which often travel long distances), and fosters a greater connection to where your food comes from.
- Freshness and Nutrition: Home-grown vegetables are often fresher and more nutrient-dense than their store-bought counterparts, as they don’t lose nutrients during transit or extended storage.
- Educational and Rewarding: It’s a fantastic educational activity for all ages, teaching patience, observation, and the fascinating cycles of nature. Witnessing a discarded piece of celery sprout new life is incredibly gratifying.
- Accessible to Everyone: You don’t need a large backyard or specialized gardening tools. Many vegetables can be regrown right on a sunny windowsill, making it perfect for urban dwellers, apartment residents, or anyone new to gardening.
Essential Materials for Your Regrowing Project
Before you dive in, gather these basic tools. Most are likely already in your kitchen, making this an incredibly accessible hobby:
- Scissors: Ideal for trimming roots or leaves with precision.
- Clean Water: Tap water is usually fine, but filtered water can sometimes yield better results. Regular water changes are crucial.
- Sharp Knife: Essential for making clean cuts on your vegetable scraps.
- Glass Containers (Jars, Bowls, or Glasses): Perfect for submerging vegetable bases in water, allowing you to observe root and sprout development. Clear containers are recommended.
- Toothpicks: Useful for suspending larger vegetable pieces, like onion or lettuce bases, just above the water line, preventing them from becoming fully submerged and rotting.
- Potting Soil & Pots/Garden Space (Optional, for later planting): Once your scraps develop roots and significant growth, you’ll need a place to transplant them to continue their full growth cycle.
Step-by-Step Guide: Regrowing Popular Vegetables from Scraps
Let’s explore how to bring your favorite vegetables back to life, one scrap at a time.
Potatoes: Sprouting New Life from Eyes
Potatoes are incredibly forgiving and fun to regrow. The key lies in finding potatoes with visible “eyes”—small indentations where sprouts emerge. If you find a potato already budding, you’re one step ahead!
- Select Your Potato: Choose a potato, any variety will work, that has several pronounced eyes. Potatoes that have been sitting in your pantry for a while and are starting to look a bit wrinkly or green are often perfect candidates.
- Prepare the Cuttings: Using a clean, sharp knife, cut the potato into sections. Ensure that each section contains at least two to three eyes. Angled cuts can sometimes help with water drainage once planted. Aim for pieces roughly 1.5 to 2 inches in size.
- Curing (Drying) Process: This is a crucial step to prevent rot and disease. Place your potato slices on a paper towel, a wire rack, or a clean surface in a cool, dry place away from direct sunlight. Allow them to dry out for 1-2 days. This “curing” process forms a protective layer, similar to a scab, over the cut surfaces.
- Planting: Once cured, your potato pieces are ready for planting. You can plant them directly into nutrient-rich potting soil or well-draining garden soil, about 4-6 inches deep, with the eyes facing upwards. Space them about 10-12 inches apart.
- Care and Growth: Keep the soil consistently moist but not waterlogged. Potatoes thrive in full sun. In about 2-3 weeks, you should start seeing green shoots emerge from the soil. As the plants grow, you can “hill” them by mounding more soil around the base to encourage more potato development. Harvest your new potatoes when the plant foliage begins to yellow and die back.
Celery: The Ever-Renewing Stalk
Regrowing celery is perhaps one of the easiest and most satisfying projects. You’ll be amazed at how quickly new stalks appear!
- Prepare the Base: When you’ve used most of your celery stalks, leave about 2 inches of the base intact. This is the section you’ll use.
- Water Submersion: Place the celery base in a shallow dish, plate with a lip, or small bowl. Add about half an inch to an inch of water, ensuring only the very bottom of the base is submerged. The top cut surface should remain dry to prevent rot.
- Light and Water Changes: Position your container on a sunny windowsill. Change the water daily or every other day to keep it fresh and prevent mold or bacterial growth.
- Observe Growth: Within a few days, you’ll notice small leaves beginning to emerge from the center of the base, and tiny roots will start to develop from the bottom.
- Transplanting (Optional but Recommended): Once new leaves are established (about 1-2 inches tall) and a decent root system has formed, you can transfer the celery base to a pot filled with good quality potting soil or directly into your garden. Plant it shallowly, ensuring the top of the base is just above the soil line.
- Continued Care: Celery loves consistent moisture and plenty of sunlight. Keep the soil well-watered. You can harvest outer stalks as needed, allowing the inner stalks to continue growing.
Onions: A Continuous Supply of Flavor
Both yellow and green onions are incredibly simple to regrow, offering a continuous supply of fresh flavor for your culinary adventures.
Yellow Onions
Regrowing a yellow onion provides you with fresh green shoots and, eventually, new onion bulbs.
- Root End Preparation: Take a yellow onion and carefully slice off the root end, ensuring about half an inch to an inch of the onion base is included. Make sure there are some visible roots still attached.
- Partial Submersion: Place the onion slice root-side down into a small glass or jar. Add just enough water so that the roots are submerged, but the top portion of the onion slice remains out of the water. This prevents the onion from rotting.
- Light and Water: Place the jar on a sunny windowsill. Change the water every 1-2 days to keep it clean.
- Observe Growth: Within a few days, you’ll see new roots emerging, and green shoots will start to grow from the top of the onion slice.
- Transplanting: Once the green shoots are a few inches tall and a strong root system has developed, plant the onion base into a pot with potting soil or directly into your garden. Cover the onion base entirely with soil.
- Harvesting: You can harvest the green onion tops as they grow, or allow the plant to mature and form a new onion bulb. This process usually takes several weeks to months.
Image by. Mary’s Nest via YouTube video.
Green Onions (Scallions) and Leeks
Green onions are perhaps the fastest and most rewarding vegetables to regrow, offering multiple harvests from a single base.
- Base Preparation: After using the green parts of your green onions, leave about an inch or two of the white root end intact.
- Water Submersion: Place the green onion bases root-side down into a small glass or jar with about an inch of water.
- Rapid Growth: Position the container on a sunny windowsill. You will be astonished at how quickly new green shoots emerge, often within 24-48 hours!
- Continuous Harvest: You can trim the green tops with scissors as needed, and they will continue to regrow. Change the water every 1-2 days.
- Transplanting for Longevity: While you can keep them in water for a few rounds of harvesting, transplanting them into soil will give you a more robust and long-lasting plant. Plant the bases in a pot or garden bed, covering the white part with soil. They will continue to produce new green shoots.
This same simple method also works wonderfully for leeks, providing you with fresh greens from their discarded bases.
Image by. Mary’s Nest via YouTube video.
Garlic: A Sprout of Flavor
While growing full garlic bulbs from a single clove takes time, you can easily grow delicious garlic greens that add a mild garlic flavor to salads, stir-fries, and garnishes.
- Select a Clove: Choose a healthy, unpeeled garlic clove. It’s even better if you find one that’s already starting to show a tiny green sprout.
- Water Preparation: Place the garlic clove (root end down) into a small jar or shot glass with just enough water to cover the very bottom of the clove. You can also suspend it with toothpicks if needed.
- Light and Water Changes: Place the container on a sunny windowsill. Change the water every day to prevent mold and ensure oxygenation.
- Observe Growth: Within a few days to a week, you’ll see roots emerging from the bottom and a green shoot growing from the top.
- Harvesting Greens: Once the green shoot is several inches tall, you can snip off the top with scissors. It will continue to regrow. For growing a full bulb, transplant the sprouted clove into soil once it has a good root system, burying it about 1-2 inches deep.
- Bulb Growth (Long-term): Growing a full garlic bulb from a single clove typically takes several months. It requires well-draining soil, full sun, and consistent moisture.
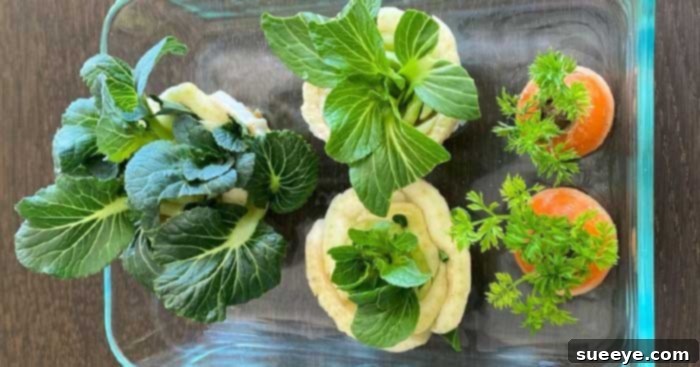
Lettuce and Bok Choy: Crisp Greens from the Core
Enjoying multiple harvests of fresh lettuce and bok choy is incredibly simple using their core bases.
- Prepare the Base: After using the outer leaves, cut off about two to three inches from the bottom core of a head of lettuce (romaine works exceptionally well) or bok choy. Ensure the core is intact.
- Water Submersion: Place the base cut-side up into a shallow bowl or dish with about an inch of water. The cut surface should be exposed to the air, with only the bottom submerged.
- Light and Water Changes: Position the bowl on a sunny windowsill. Change the water daily to prevent stagnation and mold.
- Observe Growth: In just a few days, you’ll notice small roots developing from the bottom and tiny new leaves emerging from the center of the core.
- Transplanting (Optional but Recommended): Once the roots are a couple of inches long and new leaves are visible, you can plant the core into a pot with potting mix or directly into your garden. Bury the base so the top of the core is just above the soil line.
- Harvesting: Allow the leaves to grow to a desirable size, then harvest the outer leaves as needed, allowing the inner leaves to continue developing for subsequent harvests. Lettuce and bok choy prefer partial to full sun and consistently moist soil.
General Tips for Successful Kitchen Scraps Gardening
To maximize your success and enjoy bountiful harvests, keep these general tips in mind:
- Fresh Water is Key: Always use fresh water and change it daily or every other day. Stagnant water can lead to mold, rot, and bacterial growth, which will kill your sprouts.
- Sunlight is Essential: Most vegetables require ample sunlight to thrive. A sunny windowsill receiving at least 4-6 hours of direct light per day is ideal. If natural light is limited, consider a grow light.
- Patience and Observation: Gardening is a lesson in patience. Some scraps will sprout faster than others. Observe your plants daily for signs of growth, or potential issues like mold or wilting.
- When to Transplant: While many vegetables can start in water, most will benefit greatly from being transplanted into soil once they develop a significant root system and some green growth. Soil provides essential nutrients that water alone cannot.
- Choose Organic Scraps: Whenever possible, use organic vegetable scraps. These are less likely to have been treated with pesticides or chemicals that could inhibit growth.
- Monitor for Pests: Even indoor plants can attract pests. Regularly inspect your regrowing plants for any signs of unwanted visitors and address them promptly using natural remedies if possible.
- Don’t Be Afraid to Experiment: This guide covers popular choices, but many other vegetables can be regrown, including ginger, sweet potatoes, and pineapples. Don’t hesitate to try new things!
Start Your Sustainable Garden Journey Today!
Regrowing vegetables from kitchen scraps is more than just a frugal hack; it’s a step towards a more sustainable, self-sufficient, and joyful lifestyle. It reconnects us with the food we eat, reduces waste, and adds a touch of green vibrancy to our homes. The process is simple, incredibly rewarding, and accessible to everyone, regardless of their gardening experience. As Mary’s Nest beautifully demonstrated in her helpful YouTube video, turning your kitchen scraps into a thriving mini-garden is easier than you think. So, grab your scissors, find a sunny spot, and begin your journey into the wonderful world of kitchen scraps gardening. Happy growing!
For more visual guidance and inspiration on how to regrow your kitchen scraps, be sure to check out Mary’s Nest YouTube video, as mentioned earlier.