
Authentic Texas Nachos: Your Ultimate Guide to Tex-Mex Perfection
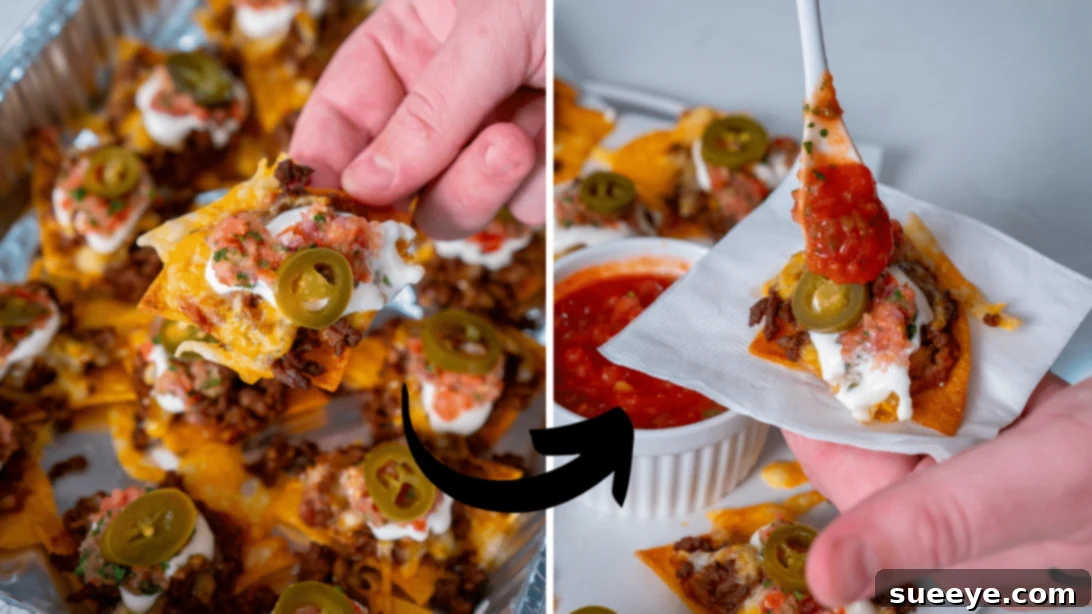
Nachos are universally loved, a quintessential comfort food that brings smiles to every face. But have you ever truly experienced the culinary magic of authentic Texas Nachos? More than just a simple snack, these loaded tortilla chips are a flavor-packed experience, perfect for any gathering, game day, or even a satisfying main meal. Imagine crispy, sturdy tortilla chips generously topped with perfectly seasoned ground beef, creamy refried beans, and a blanket of golden, melted Colby Jack cheese, all crowned with vibrant, fresh pico de gallo and a dollop of cool sour cream. If you’re ready to elevate your nacho game from good to legendary, you’ve come to the right place.
RELATED: Authentic Texas Style Chili Recipe – Another Tex-Mex classic worth exploring to complement your nacho feast or enjoy on its own!
Many people think they know nachos, but true authentic Texas Nachos are a class apart. They embody a rich history rooted in Tex-Mex tradition and feature a specific layering technique that guarantees every single bite is loaded with maximum flavor and satisfying texture. This comprehensive guide, inspired by the culinary experts at 12 Tomatoes on YouTube, will walk you through every step to create a masterpiece that will impress even the most seasoned nacho connoisseur. Get ready to embark on a delicious journey that will transform your appreciation for this iconic dish.
Gather Your Ingredients: What You’ll Need for Authentic Texas Nachos
The secret to crafting incredible Texas Nachos begins with selecting fresh, high-quality ingredients. Each component plays a vital role in building the intricate layers of flavor and texture that make this dish truly special. From the robust, perfectly seasoned ground beef to the zesty, vibrant fresh toppings, every item on this list is essential for achieving that authentic Tex-Mex taste you crave. Prepare to gather these items to ensure a truly memorable nacho experience:
- 24 thick, restaurant-style tortilla chips (choose sturdy chips that can withstand the weight of generous toppings without becoming soggy)
- 2 cups of Colby Jack cheese, freshly grated (Colby Jack is an excellent choice for its superior melt and mild, creamy flavor that perfectly complements the other ingredients)
- ¾ cup of refried pinto beans, warmed (warming the beans makes them easier to spread and contributes to a creamier texture)
- 1 pound of lean ground beef (provides a robust, savory base for your nachos)
- 1 oz packet of taco seasoning (opt for a high-quality blend to infuse your beef with authentic Tex-Mex flavor)
- 2/3 cup of sour cream (for a cool, tangy contrast that balances the richness of the other ingredients)
- 3 ripe Roma tomatoes, finely chopped (adds fresh acidity, sweetness, and vibrant color to your topping)
- ¼ cup of red onion, sliced thinly and finely diced (provides a sharp, pungent kick and crisp texture)
- ¼ cup of fresh cilantro, finely chopped (for a bright, herbaceous note that is quintessential in Tex-Mex cuisine)
- 3 tbsp of pickled jalapeño slices, plus a splash of brine (to provide a perfect amount of heat and a tangy punch, the brine is a secret flavor booster!)
- Salsa, store-bought or homemade, for serving (optional, but highly recommended for an extra layer of flavor and dipping pleasure)
- Salt and freshly ground black pepper, to taste (to enhance and balance all the flavors)
- A splash of water (approximately 2-3 tablespoons, used when seasoning the ground beef to help distribute the taco seasoning)
Step-by-Step Guide: Crafting Your Perfect Authentic Texas Nachos
Follow these detailed steps to ensure your Texas Nachos are nothing short of spectacular. Precision in preparation and a bit of patience will yield truly authentic, restaurant-quality results that will delight your palate.
Step 1: Prepare the Seasoned Ground Beef and Preheat Your Oven
Begin your nacho journey by preheating your oven to a steady 350°F (175°C). While the oven warms up, prepare your baking surface: line two large baking sheets with parchment paper. This simple yet crucial step prevents the nachos from sticking to the pan, ensures even cooking, and makes cleanup an absolute breeze. Next, place a large skillet or pan over medium-high heat on your stovetop. Add the pound of ground beef to the hot pan and, using a sturdy wooden spoon or spatula, break it apart into small, uniform crumbles. Cook the beef, stirring occasionally, until it’s beautifully browned all over, indicating it’s fully cooked. Once browned, carefully drain off any excess grease. This step is vital to prevent your nachos from becoming overly oily and ensures a cleaner, richer flavor profile. Now, add the entire 1 oz packet of taco seasoning to the cooked beef, along with a splash of water (about 2-3 tablespoons). Stir vigorously to ensure the seasoning evenly coats all the beef crumbles, allowing the aromatic spices to fully meld with the meat. Continue to cook for another 2-3 minutes, allowing the flavors to develop and any remaining liquid to evaporate, resulting in perfectly seasoned, savory ground beef. Remove from heat and set aside.
Step 2: Craft the Fresh Pico de Gallo-Style Topping
For that essential burst of freshness and vibrant flavor, we’ll create a finely chopped, pico de gallo-style topping. In a food processor, combine your finely chopped Roma tomatoes, thinly sliced and finely diced red onion, fresh cilantro, and the pickled jalapeño slices. Here’s a secret ingredient to elevate the tang: add about 1-2 tablespoons of the pickled jalapeño brine. This liquid gold provides an extra layer of tangy, zesty flavor that brightens the entire dish and ties all the fresh components together. Season generously with salt and freshly ground black pepper to taste. Process these ingredients until they are finely chopped but still retain some texture; be careful to avoid over-processing them into a watery pulp. This mixture will serve as a fresh, zesty, and slightly spicy counterpoint to the rich, savory nachos. Transfer this flavorful topping to a small bowl, cover, and set aside.
Step 3: Assemble and Bake Your Nacho Masterpiece
Now for the most exciting part – assembling your authentic Texas Nachos! Arrange the thick tortilla chips in a single layer across your prepared baking sheets. This individual chip layering technique is crucial for Texan authenticity and ensures optimal flavor and texture in every bite. Ensure there’s minimal overlapping so each chip receives ample toppings and melts evenly. On each individual chip, spread a small, even amount of the warmed refried pinto beans. The beans act as a delicious adhesive, preventing toppings from falling off, and add a creamy, earthy depth that complements the other ingredients beautifully. Next, spoon a generous amount of the seasoned ground beef over the beans on each chip. Finally, generously sprinkle the freshly grated Colby Jack cheese over the beef, ensuring each chip is well-covered. The key here is individual chip layering, not a massive, unorganized mound, for optimal cooking and eating. Carefully place the baking sheets into your preheated oven. Bake for approximately 5-8 minutes, or until the cheese is beautifully melted, bubbly, and just beginning to turn golden at the edges. Keep a close eye on them to prevent any burning, as ovens can vary.
Step 4: Garnish, Serve, and Savor
Once the cheese is perfectly melted and gooey, carefully remove the baking sheets from the oven. Using a spatula, gently transfer the baked nachos onto a large serving platter. Don’t worry if some stick together or form clusters; that’s part of the rustic, homemade charm! Now, it’s time to add the final, fresh touches. Dollop generous spoonfuls of cool sour cream over the warm nachos, creating creamy swirls. Then, spoon your freshly prepared pico de gallo-style topping liberally over everything, adding a burst of color and zesty flavor. If desired, serve extra store-bought or homemade salsa on the side for additional dipping. For an extra flourish and a final pop of freshness, you can sprinkle a little more fresh cilantro over the top. Serve immediately while the cheese is still wonderfully gooey, the chips are warm and crisp, and the flavors are at their peak. Gather your friends and family, and prepare to enjoy the best authentic Texas Nachos you’ve ever tasted!
The Fascinating History of Nachos: A Culinary Legend
The origin story of nachos is as compelling and flavorful as the dish itself, a true testament to culinary improvisation. Legend has it that in 1943, in Piedras Negras, Mexico, a small border town directly across from the U.S. military base Fort Duncan, a group of American military wives arrived at the Victory Club restaurant after closing hours. Caught without a full kitchen staff, the restaurant’s maître d’, Ignacio “Nacho” Anaya, quickly improvised a dish using the few ingredients he had on hand: fried tortilla pieces, melted cheese (reportedly Colby), and sliced jalapeños. He presented his impromptu creation, modest yet delicious, and named it “Nacho’s Especiales.” From these humble beginnings, an international culinary icon was born. Nachos quickly crossed the border, first gaining popularity in Texas and then spreading throughout the United States, becoming a staple in Tex-Mex restaurants and eventually a beloved global sensation. Texas played a crucial role in popularizing and refining the dish, adding hearty layers of meat, beans, and a wider array of fresh toppings, thus transforming Anaya’s simple snack into the robust and flavorful “Texas Nachos” we adore today.
Why Authentic Texas Nachos Are a Cut Above the Rest
What precisely makes “Texas Nachos” special, and why do they deserve their own distinct spotlight in the vast world of Mexican and Tex-Mex cuisine? It all comes down to an unwavering attention to detail and a strategic layering technique that differentiates them from generic nacho platters. Unlike a chaotic mound of chips often found in other variations, where toppings are haphazardly piled and some chips are left bare, authentic Texas nachos prioritize even distribution. Each thick tortilla chip is carefully selected and individually topped with warm refried beans, perfectly seasoned ground beef, and a generous sprinkle of melting cheese. This meticulous approach ensures that every single chip, in every single bite, is perfectly balanced with flavor, texture, and a satisfying gooiness. This isn’t a messy pile; it’s a carefully crafted culinary experience. The deliberate choice of Colby Jack cheese for its superior melt, the use of savory, well-seasoned ground beef over bland options, and the inclusion of vibrant, fresh toppings like our pico de gallo-style mixture, all contribute to a depth of flavor and a delightful textural contrast that truly sets them apart. They’re designed to be eaten individually, preventing soggy chips and maximizing flavor delivery with every single piece.
Expert Tips for Crafting the Ultimate Texas Nachos
Achieving nacho perfection is surprisingly simple when you know a few insider tricks. By following these expert tips, you can ensure your Texas Nachos are consistently delicious, visually appealing, and utterly irresistible, every single time you make them:
- Choose Quality Tortilla Chips: This is fundamental. Always opt for thick, sturdy, restaurant-style tortilla chips. Thin, flimsy chips will quickly become soggy and break under the weight of the delicious toppings, leading to a less satisfying experience.
- Even Layering is Key: Resist the urge to simply pile chips high. Arrange them in a single, slightly overlapping layer on parchment-lined baking sheets. This method is crucial as it ensures every single chip gets evenly toasted, receives ample toppings, and, most importantly, allows the cheese to melt perfectly.
- Don’t Skimp on Seasoning: The ground beef is a flavor powerhouse in this dish. Ensure it’s thoroughly seasoned with a high-quality taco blend. Don’t be afraid to taste and adjust the seasoning before assembly for maximum impact.
- Warm the Beans: Take a moment to warm the refried beans slightly before spreading them. This makes them much easier to work with, ensures a smoother application, and guarantees they heat through properly in the oven, integrating seamlessly with the other warm ingredients.
- Freshly Grate Your Cheese: While convenient, pre-shredded cheeses often contain anti-caking agents that can hinder a smooth, creamy melt. Grating your own Colby Jack cheese will yield superior, gooey, and velvety results.
- The Brine Secret: Do not underestimate the power of that splash of pickled jalapeño brine in your fresh topping mix. It’s a secret ingredient that adds an unexpected zing and a layer of tangy complexity that brilliantly elevates and brightens the overall flavors of the nachos.
- Serve Immediately: Nachos are a dish best enjoyed hot and fresh, straight out of the oven. This is when the cheese is wonderfully gooey, the chips are still crisp, and all the flavors are at their peak. Prepare everything else in advance so you can serve them right away.
Customizing Your Texas Nachos: Endless Possibilities
While this recipe provides the definitive blueprint for authentic Texas Nachos, the beauty of this dish truly lies in its incredible versatility. Feel absolutely free to personalize them to your specific taste preferences and dietary needs. The possibilities for customization are nearly endless, allowing you to create your ultimate nacho experience:
- Protein Alternatives: While ground beef is traditional, don’t hesitate to experiment! Consider using shredded chicken, slow-cooked pulled pork (carnitas), or thinly sliced, marinated steak for a different protein punch. For a delicious vegetarian twist, seasoned black beans, crumbled plant-based meat substitutes, or even roasted vegetables like sweet potatoes or bell peppers can be excellent, satisfying substitutes for meat.
- Cheese Variations: If Colby Jack isn’t available, or if you simply want to try something new, experiment with other fantastic melting cheeses. Monterey Jack, sharp cheddar, or a flavorful blend of Mexican cheeses can all work wonderfully, each adding its own unique character to the dish.
- Spice Level Adjustments: If you love heat, increase the spice! Add more fresh or pickled jalapeños, a dash of cayenne pepper directly to the ground beef, or a sprinkle of your favorite chili flakes. For those who prefer milder flavors, simply reduce the amount of jalapeños.
- Additional Toppings: Elevate your nacho experience even further with a wider array of toppings. Creamy homemade guacamole, sliced black olives, vibrant corn kernels, diced avocado, or even a drizzle of authentic Texas chili (like the one linked in our related recipe!) can take your nachos to the next level.
- Sauce Enhancements: Beyond sour cream and salsa, consider adding a warm, spicy queso dip, a vibrant crema (Mexican sour cream), or a smoky chipotle aioli for extra layers of flavor and a gourmet touch.
Serving Suggestions for the Perfect Nacho Experience
Texas Nachos are incredibly versatile and can fit almost any occasion, from casual weeknight meals to festive gatherings. Their inherent shareability and customizable nature make them a perennial favorite. Here are some ideas to make your nacho feast even better and ensure everyone enjoys every bite:
- Game Day Essential: There’s hardly a better snack for cheering on your favorite team. Serve a massive platter of these nachos for the big game. Be sure to have plenty of napkins on hand – it’s going to get deliciously messy!
- Party Appetizer: Arrange them artfully on a large tray or several smaller platters for an impressive and universally crowd-pleasing appetizer that is guaranteed to disappear fast. They make a fantastic centerpiece for any social gathering.
- Casual Family Dinner: When paired with a simple, crisp side salad (perhaps with a light vinaigrette to cut through the richness), Texas Nachos make for a fun, interactive, and incredibly satisfying weeknight meal that the whole family will love.
- Beverage Pairings: Complement the rich, savory flavors of the nachos with refreshing cold beer (especially a lager or Mexican pilsner), classic margaritas, or even a crisp sparkling water with a squeeze of fresh lime for a non-alcoholic option.
- Presentation: While best served immediately, consider having all your fresh, cold toppings (like extra sour cream, your homemade pico de gallo, and additional salsa or guacamole) prepped and ready in small, attractive bowls on the side. This allows guests to customize their own portions and add extra freshness as they enjoy.
Why Homemade Texas Nachos Are Always the Best Choice
While store-bought nacho kits or even restaurant versions can offer convenience, making authentic Texas Nachos from scratch at home provides unparalleled advantages that truly elevate the experience. Firstly, you gain complete control over the quality of your ingredients, ensuring freshness, avoiding unwanted preservatives, and tailoring the flavors precisely to your liking. Customization is limitless; you can adjust the spice level, vary the richness, and choose exactly which toppings you want, creating a dish perfectly suited to your palate. Moreover, the satisfaction of creating such a delicious and impressive dish yourself is immense – there’s a unique joy in serving something you’ve crafted with your own hands. Homemade nachos are often more cost-effective than their takeout counterparts and, most importantly, they guarantee that perfect gooey cheese and crispy chip texture that only comes with fresh preparation right out of your oven. Experience the undeniable difference – once you try authentic homemade Texas Nachos, you’ll find it incredibly difficult to go back to any other way!
*All images featured in this article are credited to 12 Tomatoes via YouTube. We highly recommend visiting their channel and subscribing for more amazing recipes and culinary inspiration that celebrates delicious home cooking!