
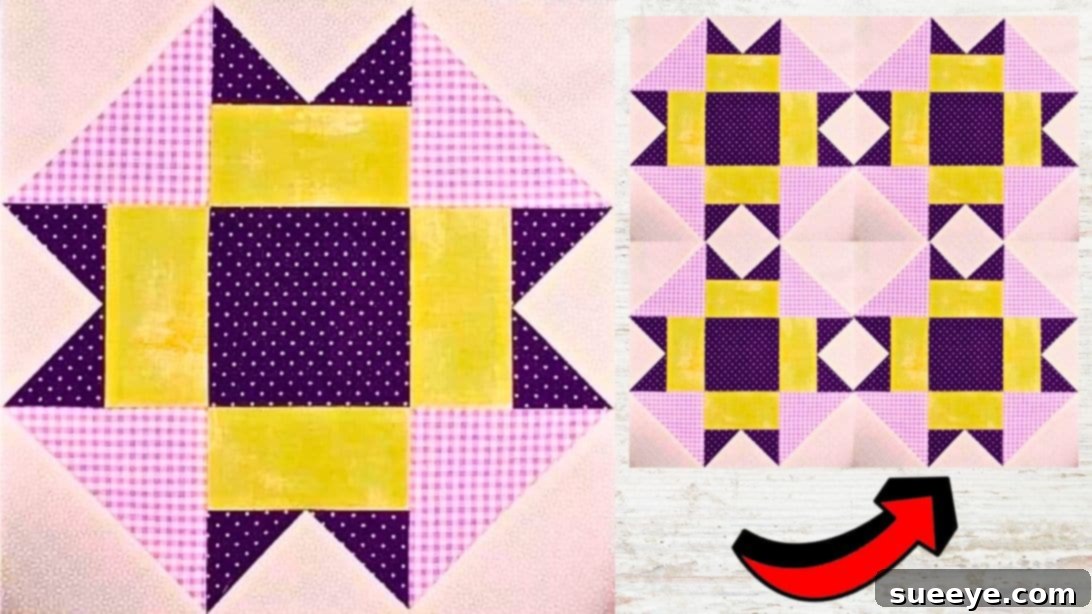
Embark on a delightful quilting journey with the captivating “Folded Corners Quilt Block.” When I first discovered this ingenious quilt block demonstrated by the talented Carol Thelen on YouTube, I was immediately drawn to its unique aesthetic and apparent simplicity. While the intricate look might initially suggest a challenging endeavor, I assure you that once you understand the core steps, you’ll uncover a remarkably straightforward and rewarding project. This tutorial is meticulously crafted to guide you through each phase, making it perfect for beginners and seasoned quilters alike. The instructions are clear, concise, and incredibly easy to follow, virtually guaranteeing a successful outcome for your first (or hundredth!) folded corners block. Get ready to transform carefully chosen fabrics into a stunning quilt block that boasts depth and visual interest, all while mastering a versatile quilting technique that you’ll undoubtedly use in future projects.
The beauty of the Folded Corners technique lies in its ability to create complex-looking patterns from simple cuts and precise stitching. This method is incredibly popular for crafting elements like Flying Geese units and corner-triangle-squares without dealing with tiny, fiddly triangles. Instead, you stitch a square onto a larger piece, then cut and press, revealing perfectly formed corners. This not only saves time but also significantly improves accuracy, leading to crisp points and perfectly aligned seams – the hallmarks of a professionally finished quilt. Whether you’re aiming to create a charming baby quilt, a stylish wall hanging, or a cozy throw, this foundational block offers endless possibilities for customization and creative expression. Let’s gather our materials and dive into crafting your very own Folded Corners Quilt Block.
Essential Materials for Your Folded Corners Quilt Block:
- Low-Volume Background Fabric: Choose a light-colored or subtly patterned fabric that will allow your main prints to stand out. This forms the canvas of your quilt block, providing visual breathing room.
- Dark Print Fabric: Select a fabric with a deeper hue or a bold pattern. This will create contrast and help define the “folded” effect within your block, adding depth and dimension.
- Light Print Fabric: Opt for a fabric that is lighter than your dark print but still offers good contrast against the low-volume background. This fabric will contribute to the dynamic interplay of colors and patterns.
- Contrasting Fabric: A strip of fabric, often a solid or a distinct print, used to border or connect units. This choice can either blend harmoniously or provide a striking pop of color, depending on your desired effect.
- Quilting Ruler (Acrylic): A transparent ruler with clear markings, indispensable for accurate cutting. A 6×12 or 6×24 inch ruler is highly recommended for versatility.
- Marking Pen, Pencil, or Chalk: Essential for drawing diagonal lines on your fabric squares. Ensure it’s fabric-friendly and easily erasable or disappears with heat/water.
- Scissors or Rotary Cutter and a Cutting Mat: A sharp rotary cutter paired with a self-healing cutting mat ensures precise, clean cuts, which are crucial for accurate piecing. Scissors are useful for trimming threads.
- Fabric Pins or Clips: To hold fabric layers securely in place before stitching, preventing shifting and ensuring accurate seam allowances.
- Needle and Thread: High-quality thread suitable for quilting, preferably 100% cotton, to match your fabric choices or a neutral color.
- Iron, for pressing: A good quality iron is vital for pressing seams open or to one side. Consistent pressing flattens your block and helps achieve crisp, sharp points.
- Sewing Machine: A reliable sewing machine with a ¼-inch presser foot attachment will make stitching accurate and enjoyable.
- Downloadable Pattern: Don’t forget to access the essential pattern! Click here to download the pattern directly from Google Drive. This pattern will provide precise cutting dimensions for all your fabric pieces, ensuring your block comes together perfectly.
Step-by-Step Directions to Create Your Folded Corners Quilt Block:
Step 1: Crafting Your Half-Square Triangle (HST) Units
Begin your quilting adventure by preparing your fabric pieces. First, download and print the provided pattern, ensuring it prints at 100% scale for accurate dimensions. Carefully cut all your low-volume background squares and light print squares according to the sizes specified in the pattern. Precision at this stage is paramount for a successful block, so take your time and use your rotary cutter and ruler with care. Once your squares are cut, take two large background squares and, using your marking tool, draw a diagonal line from corner to corner on the wrong side of each square. This line will serve as your stitching guide.
Next, align one of these marked background squares on top of a light print square. Ensure their right sides are facing each other, and all edges are perfectly matched. Pin them securely to prevent any shifting during stitching. With your sewing machine, stitch a line on each side of the drawn diagonal line, maintaining a precise ¼-inch seam allowance from the marked line. Once stitched, use your rotary cutter to cut the unit directly along the drawn diagonal line, separating it into two pieces. Carefully press each piece open. It’s generally recommended to press seams towards the darker fabric to minimize shadow, but for HSTs, pressing them open often creates a flatter unit, which can be beneficial for reducing bulk later on. Congratulations, you’ve just created two perfect Half-Square Triangle (HST) units! Repeat this process with your remaining background and light print squares until you have all the necessary HSTs as indicated by the pattern.
Step 2: Constructing the Flying Geese Units with Dark Print Accents
Now that you have your foundational HSTs, it’s time to introduce the dynamic dark print fabric to form the charming “Flying Geese” units. Take your small dark print squares and, similar to Step 1, draw a diagonal line from corner to corner on the wrong side of each square. These smaller squares will be used to create the folded corner effect on your larger light/background fabric units (these units might be the HSTs you just created, or other larger squares as per the pattern diagram). Refer to your pattern diagram for exact placement. Typically, you will lay one marked dark print square on the bottom right corner of a larger base unit (with right sides together and edges aligned), and another marked dark print square on the upper left corner of another base unit. The key is to ensure the diagonal lines on the dark print squares run in the correct direction to form the points of the ‘geese’.
Stitch on each side of the drawn diagonal line on both small dark print squares, again using a ¼-inch seam allowance. After stitching, carefully cut along the original diagonal line. Press the seams open for a flat finish. You will notice that as you press, the dark print fabric ‘folds’ back, creating a crisp, sharp point. The magic of the folded corner technique is truly evident here. You’re essentially creating smaller HSTs that attach to the corners of a larger piece, but the diagonal line method makes it very efficient. This process will yield the characteristic V-shape of the Flying Geese block component. Ensure all your points are sharp and that your units lie flat before moving on. Accuracy in cutting and stitching these small units will directly impact the precision of your final quilt block.
Step 3: Completing Flying Geese Units and Final Block Assembly
To finish forming your Flying Geese units, you’ll typically need to add a third corner to the background fabric. Place a square (often another low-volume background square, as per your pattern) on the remaining raw corner of the background fabric unit (the one you attached the first two dark print squares to). Again, draw a diagonal line, stitch ¼ inch on each side, then cut along the line and press them open. This completes the full Flying Geese unit, creating a distinct arrow-like shape. At this stage, you might find tiny fabric ‘nubs’ or dog ears extending beyond the seams. These should be carefully trimmed off to ensure clean edges and prevent bulk in your seams, making your block lie flatter. Achieving sharp points on your Flying Geese units is a key indicator of precision, so take care with your pressing and trimming.
With all your individual units (HSTs, Flying Geese, and any other squares or rectangles specified in the pattern) now complete, it’s time for the exciting assembly phase. Refer closely to your pattern diagram – this visual guide is essential for arranging all the pieces correctly. Lay out all your units on a design wall or a flat surface according to the diagram. This allows you to visualize the final block and correct any misplacements before you begin stitching. Once satisfied with the arrangement, start stitching the units together, focusing on creating individual rows first. Stitch each unit within a row, using a consistent ¼-inch seam allowance. After completing a row, give it a good press to flatten the seams. Pressing seams open can help reduce bulk, especially where many seams converge, leading to a flatter, more professional-looking block.
Once all your rows are sewn and pressed, carefully stitch the rows to each other. Pin extensively at each seam intersection to ensure your points align perfectly, creating a seamless flow across your block. Take your time, matching up those crucial points precisely. As you join the rows, continue to press the seams open as you go. This systematic approach to pressing ensures that your finished quilt block is flat, square, and beautifully constructed. The “Folded Corners Quilt Block” is a testament to the fact that intricate-looking designs can be achieved with simple, repeatable techniques. Once you’ve completed this block, you’ll have a stunning piece that showcases your quilting prowess and a versatile technique ready for countless other projects. Don’t be afraid to experiment with different fabric combinations to unlock new visual possibilities!
Mastering the Folded Corners Quilt Block not only enhances your quilting skills but also opens up a world of creative possibilities. This technique is incredibly versatile, allowing you to create various designs beyond just this specific block. You can adapt it to make different sized Flying Geese units, add corner triangles to squares or rectangles, or even create intricate borders for your quilts. The precision gained through this method will reflect in all your future quilting projects, ensuring sharper points and flatter seams. Remember, practice makes perfect, and each block you create builds confidence and expertise.
For aspiring quilters, remember these essential tips: always use a fresh needle in your sewing machine, clean your machine regularly, and keep your rotary cutter blade sharp. These small habits significantly impact the quality of your stitches and cuts. Don’t rush the process; enjoy each step from fabric selection to the final press. Experiment with different color palettes – try a monochromatic scheme for subtle elegance, or a vibrant mix for a playful effect. The interplay of low-volume, dark, light, and contrasting fabrics is what gives the Folded Corners block its distinctive charm. This tutorial, inspired by Carol Thelen’s excellent demonstration, is designed to empower you to create beautiful, handcrafted items. So, take a deep breath, trust the process, and let your creativity flourish with every stitch.
All these inspiring images are credited to Carol Thelen via YouTube. We highly recommend visiting her channel and subscribing for more fantastic quilting tutorials and creative inspiration!