
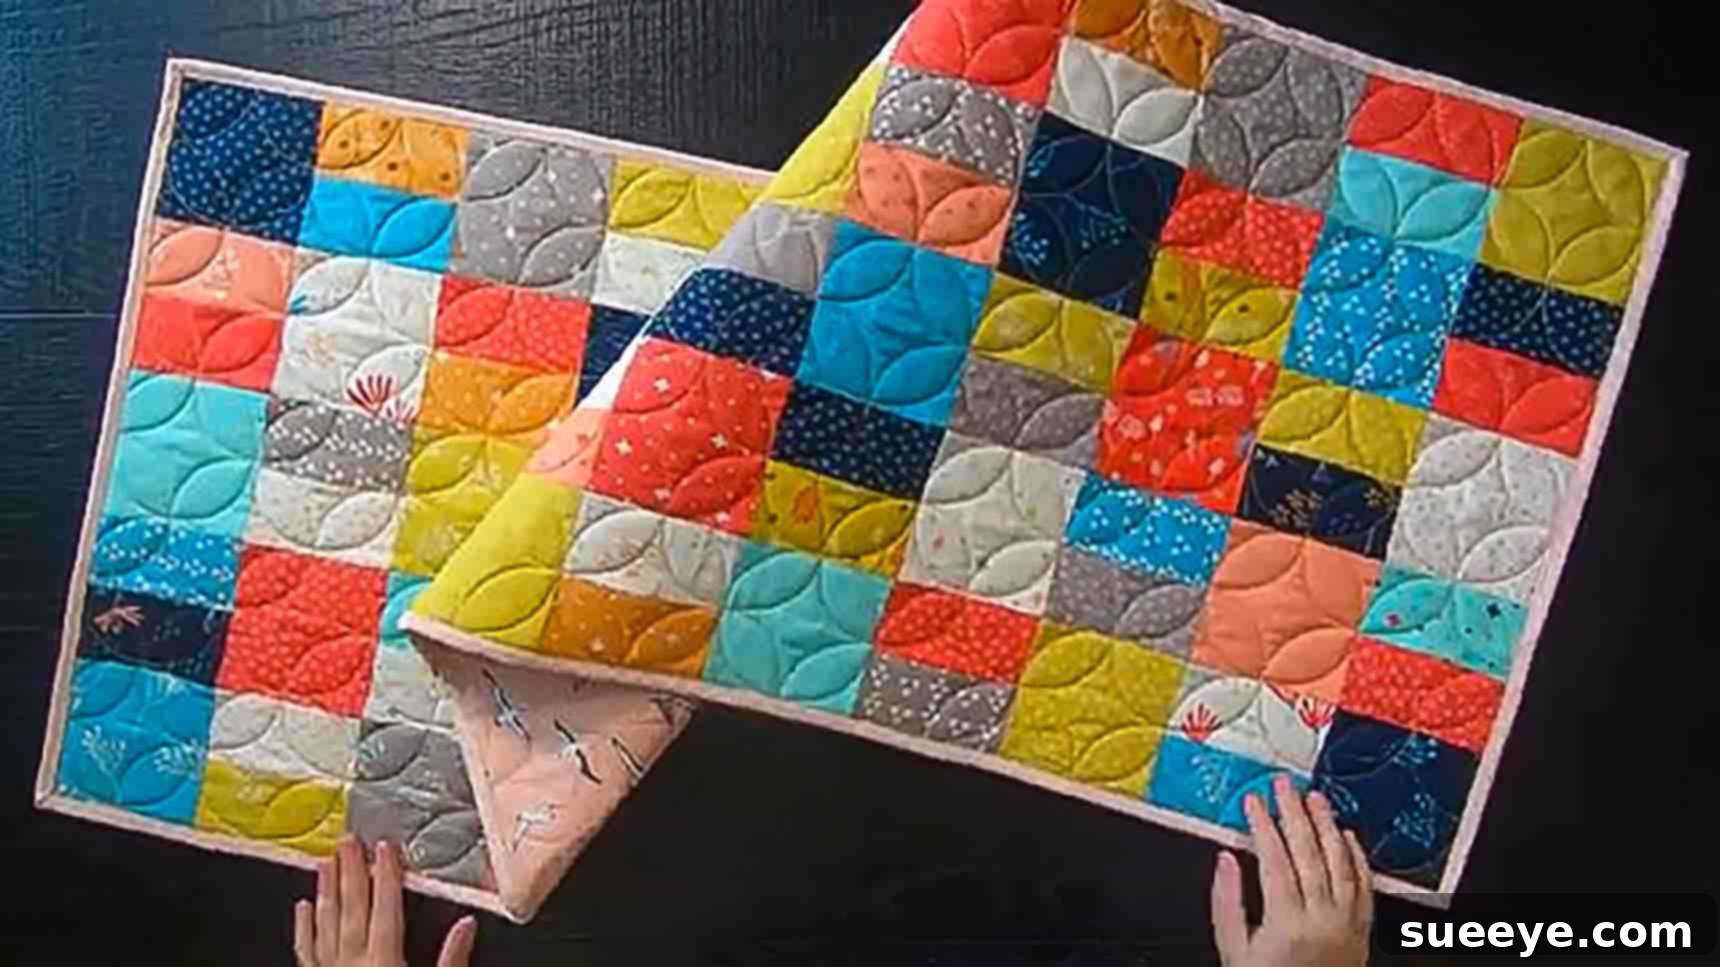
Welcome to the wonderful world of quilting, where creativity meets coziness! Whether you’re an experienced quilter looking for a quick and satisfying project or a complete beginner eager to try your hand at sewing, this charming quilted table runner tutorial is perfect for you. Created by the talented team at Moonkin Stitchery on YouTube, this project offers an incredibly accessible way to craft a beautiful piece of home decor. What makes it even better? You can utilize a whole stash of those delightful charm packs you’ve been saving, or finally put those precious leftover fabric scraps to good use. It’s super easy to make, remarkably beginner-friendly, and the best part is, you can customize it to be whatever size you like! Get ready to transform your dining space or create a heartfelt gift with this straightforward and rewarding sewing adventure.
Why Create a Quilted Table Runner?
Quilted table runners are much more than just decorative accents; they are functional pieces of textile art that can dramatically enhance the ambiance of any room. Placed on a dining table, coffee table, or even a console, a handmade runner instantly adds warmth, texture, and a personal touch to your home. They protect surfaces from spills and scratches, while also serving as a canvas to showcase your unique style and fabric preferences. For many, quilting is not just a hobby, but a form of mindful meditation, a chance to slow down, create something beautiful with your hands, and enjoy the satisfaction of a finished product. This particular “Mini Single Slice” design is especially appealing for its clean lines and modern aesthetic, making it a versatile addition to any home decor scheme.
This project is a fantastic opportunity to dive into basic quilting techniques without feeling overwhelmed. It introduces essential skills such as accurate cutting, precise piecing, and the art of layering and binding, all within a manageable timeframe. Plus, by utilizing fabric scraps, you’re embracing an eco-friendly approach to crafting, giving new life to textiles that might otherwise go unused.
Materials for Your Quilted Table Runner
Gathering your materials is the first exciting step in any creative project. For this quilted table runner, you’ll need a few essential items. The beauty of this pattern lies in its flexibility, making it ideal for both curated fabric collections and a delightful mix of your favorite scraps.
- 65 – 5″ Squares (or Charm Packs): These squares will form the core design of your table runner. Charm packs, which are pre-cut bundles of 5-inch squares from a specific fabric line, are a convenient option as they ensure a cohesive color palette and pattern variety. Alternatively, delve into your scrap bin and select 5-inch squares from your stash. This is a wonderful way to create a truly unique and personalized runner that tells a story through its fabric choices.
- Backing Fabric – 26″ x 60″ Rectangle: This piece of fabric will be the underside of your table runner, providing a finished look and protecting the batting. Choose a fabric that complements your pieced top, perhaps a solid that picks up a color from your squares, or a subtle print.
- Binding Fabric – 1/4 Yard: Binding is the narrow strip of fabric that neatly finishes the raw edges of your quilted piece, giving it a professional and durable border. A quarter yard of fabric will typically yield enough strips for binding this size of table runner.
- Batting – 26″ x 60″ Rectangle: Batting is the soft, fluffy layer sandwiched between your quilt top and backing. It provides warmth, dimension, and the characteristic “quilted” texture. There are various types of batting (cotton, polyester, blend, wool), each offering different qualities in terms of drape, warmth, and washability. A cotton or cotton-blend batting is a popular choice for table runners due to its breathability and ease of use.
Precise Cutting: The Foundation of Your Quilt
Accuracy in cutting is paramount in quilting, as it directly impacts how well your pieces fit together and the overall neatness of your finished project. Take your time with this step, using sharp tools for the best results.
- Subcut 32 – 5″ Squares into 64 – 2 & 1/2″ x 5″ Rectangles: From 32 of your initial 5-inch squares, you will create two rectangles from each. Carefully cut each 5-inch square in half, creating two identical 2.5 x 5-inch rectangles. This will give you a total of 64 smaller rectangles, which will be pieced together to form a key element of the design.
- Select 33 – 5″ Squares and Trim Them to a 4 & 1/2″ Square: The remaining 33 of your original 5-inch squares will be trimmed down slightly. Using a rotary cutter and a quilting ruler, carefully trim each of these squares to a precise 4.5 x 4.5-inch dimension. This step is crucial for ensuring all your finished blocks are uniform, allowing for perfect alignment when assembling the table runner.
Tip for Cutting: Always use a sharp rotary cutter, a self-healing cutting mat, and a clear acrylic quilting ruler for the most accurate cuts. When trimming, ensure your fabric is flat and straight to avoid distortions.
Step-by-Step Directions to Quilt Your Table Runner
Step 1: Piece Your Rectangles and Square Up Blocks
The first exciting phase involves transforming your individual fabric pieces into the foundational blocks of your table runner. This step focuses on creating the alternating design elements and ensuring all your components are perfectly sized for seamless assembly.
After you’ve meticulously cut out all your rectangles, it’s time to start sewing. Take two different prints from your 2.5″ x 5″ rectangles. Place them right sides together, aligning the 5-inch edges. Sew them together with a consistent 1/4″ seam allowance. The 1/4-inch seam allowance is a standard in quilting and maintaining it consistently will lead to straighter seams and a more accurate finished product. You will need to make a total of 32 such pieced units.
Once all your 32 rectangle units are sewn, it’s essential to trim them down. Carefully press your seams – you can press them open or to one side, whichever you prefer. Then, using your quilting ruler and rotary cutter, trim each of these pieced units down to a precise 4 & 1/2″ square. This process of “squaring up” is vital for achieving accurate block sizes and ensuring your rows will align perfectly.
Concurrently, you also need to trim down those 33 – 5″ squares you previously selected. Ensure these are also trimmed to a crisp 4 & 1/2″ square. By the end of this step, you should have 32 pieced 4.5-inch squares and 33 solid 4.5-inch squares, all perfectly uniform. Once everything is all trimmed down and squared up, the fun begins: start laying out your table runner!
Step 2: Lay Out Your Design and Assemble Rows
This stage is where your table runner truly starts to take shape and your design vision comes to life. It’s highly recommended to lay out all your trimmed 4.5-inch squares on a flat surface, such as a design wall, the floor, or a large table, before you begin sewing. This allows you to visualize the pattern, check for color balance, and make any adjustments to the placement of your squares.
For the Mini Single Slice Table Runner, you’ll create an alternating pattern. Start with one of your solid 4 & 1/2″ squares, followed by one of your pieced 4 & 1/2″ squares. Continue this alternating sequence throughout each row. The pattern calls for a total of five rows, with 13 blocks in each row.
Once you are completely satisfied with your layout, carefully begin to sew all your blocks together to form each individual row. Work row by row, ensuring you maintain that precise 1/4-inch seam allowance for every seam. Press your seams after sewing each row, alternating the direction of the seam allowance for adjacent rows (e.g., press seams to the right for row 1, to the left for row 2). This technique, known as “nesting seams,” helps reduce bulk and makes it easier to match your seams perfectly when joining the rows.
Step 3: Join Your Rows to Complete the Table Runner Top
With all five of your rows individually constructed, the next step is to bring them together to form the complete table runner top. This is a moment of anticipation, as your design truly emerges!
Carefully place your first row and second row right sides together, aligning all the seams and raw edges. Use pins generously, especially at each seam intersection, to ensure everything stays perfectly matched. Sew these two rows together using your consistent 1/4-inch seam allowance. Repeat this process, attaching the third row to the second, then the fourth to the third, and finally the fifth row. Take your time, making sure your seams align as perfectly as possible. Press your long seams carefully after joining each row, typically pressing them open or to one side to reduce bulk.
Once all rows are sewn together, give your finished table runner top a final, thorough press. This will flatten all the seams and make it smooth and ready for the next exciting stage: quilting!
Step 4: Create the Quilt Sandwich and Quilt It!
Now that your beautiful pieced top is complete, it’s time to turn it into a true “quilted” table runner. This involves layering your quilt top with batting and backing fabric, then stitching through all three layers to create the distinctive texture and durability of a quilt.
- Prepare Your Layers: Lay your backing fabric flat on a clean surface, right side down, smoothing out any wrinkles. Tape it down if needed to keep it taut. Next, center your batting on top of the backing. Finally, place your pieced table runner top on top of the batting, right side up, ensuring it’s centered and smooth.
- Baste the Layers: Basting is the process of temporarily securing all three layers together so they don’t shift while you’re quilting. You can use safety pins (starting from the center and working outwards, placing pins every 4-6 inches), basting spray, or even large hand stitches.
- Quilt Your Runner: Now for the fun part – the actual quilting! You can choose from various methods:
- Stitch-in-the-Ditch: This involves stitching precisely along the seam lines of your pieced blocks. It’s a subtle way to highlight your piecing and is very beginner-friendly.
- Straight-Line Quilting: Use a walking foot on your sewing machine to stitch parallel lines across your runner, either horizontally, vertically, or diagonally. You can use masking tape or a quilting guide to keep your lines straight and evenly spaced.
- Free-Motion Quilting: For a more advanced approach, lower your feed dogs and use a darning foot to create free-form designs, swirls, or stippling.
Choose a quilting design that complements your fabric choices and skill level. Ensure your stitches go through all three layers.
Step 5: Add the Binding for a Polished Finish
The binding is the final touch that gives your quilted table runner a clean, professional, and durable edge. It’s like framing a beautiful piece of art.
- Prepare Binding Strips: From your 1/4 yard of binding fabric, cut several strips, typically 2.25 inches or 2.5 inches wide, across the width of the fabric. Join these strips end-to-end using a diagonal seam (to reduce bulk) until you have one long continuous strip sufficient to go around the entire perimeter of your table runner plus an overlap. Press all seams open.
- Fold and Press: Fold your long binding strip in half lengthwise, wrong sides together, and press well.
- Attach to Front: Starting along one long edge of your quilted table runner, align the raw edges of your folded binding with the raw edges of the table runner. Begin about 6-8 inches from a corner, leaving a tail of binding. Attach the binding using a 1/4-inch seam allowance. When you reach a corner, stop 1/4 inch from the edge, backstitch, remove from machine, and miter the corner. Continue around all four sides.
- Finish the Binding: When you’ve sewn all the way around, join the two tails of binding using a diagonal seam so they form a continuous loop. Trim excess seam allowance. Then, fold the binding over to the back of the table runner. You can either hand-stitch the binding in place for an invisible finish or machine-stitch it for speed and durability, stitching from the front just inside the binding edge.
Give your finished table runner one last press, and admire your beautiful, handmade creation!
Tips for Quilting Success
To ensure your quilting journey is as smooth and enjoyable as possible, keep these general tips in mind:
- Accurate Seam Allowances: Consistently sewing with a perfect 1/4-inch seam allowance is the cornerstone of successful quilting. Consider using a 1/4-inch foot on your sewing machine.
- Pressing Matters: Proper pressing (not ironing!) can make a huge difference in the flatness and accuracy of your blocks. Press seams carefully after each step.
- Sharp Tools: Always use a sharp rotary blade and fresh sewing machine needle. Dull tools can lead to inaccurate cuts and skipped stitches.
- Test Your Stitch: Before starting on your project fabric, always test your stitch length and tension on a scrap piece of fabric to ensure optimal settings.
- Take Your Time: Quilting is a journey, not a race. Enjoy each step of the process, and don’t be afraid to unpick stitches if something isn’t quite right.
Customization and Personalization: Make It Your Own!
The true beauty of DIY projects like this quilted table runner is the ability to infuse your personal style and adapt the design to your needs. While the tutorial provides a fantastic starting point, don’t hesitate to experiment:
- Size Variations: Easily adjust the length or width of your table runner by adding or removing blocks from your rows, or by increasing or decreasing the number of rows. You could even make a set of matching placemats using a similar block construction.
- Color Palettes: Play with different fabric collections! Create a festive runner for holidays like Christmas or Thanksgiving, a vibrant one for summer, or a sophisticated neutral design for everyday elegance. Consider a monochromatic scheme for a subtle look, or go bold with high-contrast fabrics.
- Quilting Designs: Explore beyond straight lines. Experiment with simple meandering stippling, geometric patterns, or even outline quilting around your pieced blocks to add texture and visual interest.
- Fabric Choice: While charm packs are convenient, using a diverse collection of fabric scraps can give your runner a unique, eclectic, and heartwarming “memory quilt” feel.
Your Beautiful Handmade Quilted Table Runner
Congratulations! You’ve just completed a gorgeous, handmade quilted table runner. This Mini Single Slice Table Runner project is a testament to the fact that stunning quilting doesn’t have to be complicated or intimidating. With simple steps and a clear guide, even beginners can achieve a professional-looking result.
Whether this beautiful piece now graces your own dining table, protects your coffee table, or is presented as a heartfelt, handcrafted gift to a loved one, it will undoubtedly be admired. Each stitch carries a piece of your effort and creativity, making it truly special. We highly encourage you to watch the original video tutorial by Moonkin Stitchery on YouTube for visual guidance and additional tips. Seeing the steps in action can often clarify any uncertainties and boost your confidence.
Share your finished projects with the quilting community and inspire others! Happy quilting!