
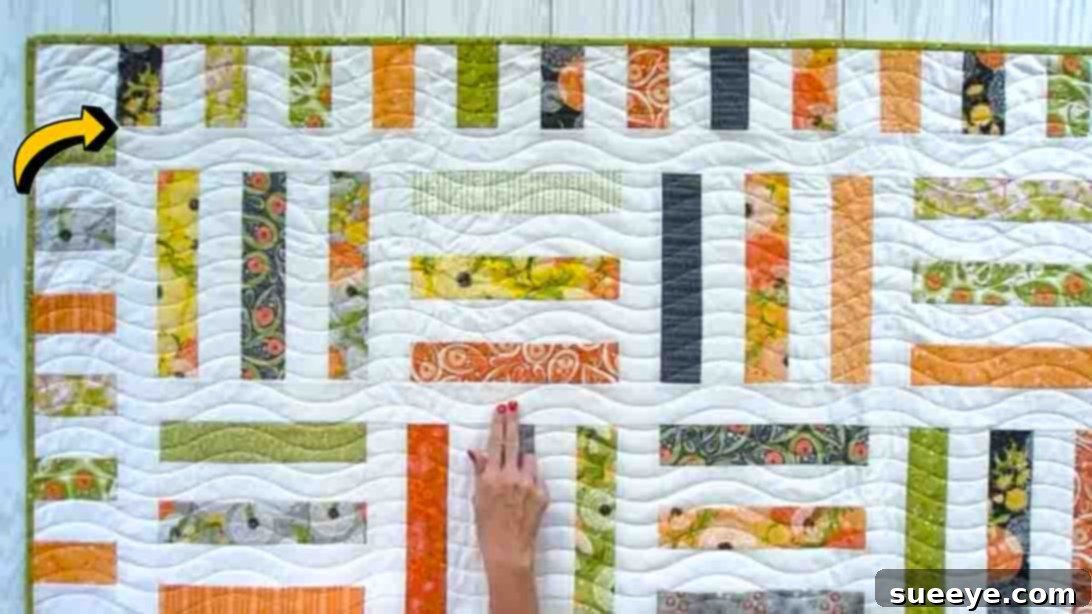
Are you searching for a delightful and straightforward quilting project that yields impressive results? Look no further! The **Jelly Roll Relish Shortcut Quilt**, as brilliantly designed by Fat Quarter Shop on YouTube, is an absolute gem, especially for those new to the world of quilting or seasoned crafters seeking a quick and satisfying make. This captivating quilt boasts a charming piano key-bordered design, transforming simple fabric strips into a visually rich and cozy masterpiece. If your fabric stash includes a beloved jelly roll (or several!), this project offers the perfect opportunity to bring those vibrant fabrics to life.
We promise you’ll adore the outcome of this engaging quilt. Its versatility makes it ideal for a variety of uses – think personalized gifts for loved ones, a snuggly lap quilt for chilly evenings, or an enchanting addition to a baby’s nursery. This comprehensive guide will walk you through every step, ensuring a smooth and enjoyable quilting journey from start to finish. Let’s dive in and create something beautiful today!
Why the Jelly Roll Relish Shortcut Quilt is Your Next Must-Make Project
The Jelly Roll Relish Shortcut Quilt stands out in the quilting community for several compelling reasons, making it a favorite for many. Its “shortcut” designation isn’t just a catchy phrase; it truly embodies the efficiency and ease built into the pattern. Here’s why this beginner-friendly quilt deserves a spot on your crafting table:
- Beginner-Friendly Design: Even if you’ve never pieced a quilt before, this pattern is incredibly approachable. The clear, concise steps and reliance on pre-cut fabric strips (jelly rolls) minimize complex cutting and tricky alignments, allowing you to focus on the joy of sewing.
- Speed and Efficiency: As a “shortcut” quilt, it’s designed to come together relatively quickly. This means less time spent meticulously cutting and more time enjoying the assembly process, making it perfect for a weekend project or when you need a gift in a pinch.
- Stash-Busting Power: Got a collection of jelly rolls you’ve been saving for the perfect project? This is it! The Jelly Roll Relish Quilt is an excellent way to utilize those beautiful 2½-inch fabric strips, giving them a new purpose and clearing space for more fabric (we all do it!).
- Versatile Aesthetics: The piano key border design is classic and adaptable. Depending on your fabric choices – from whimsical prints to elegant solids – the quilt can take on entirely different personalities. It’s perfect for customizing to suit any recipient or decor style.
- A Sense of Accomplishment: Completing a quilt, regardless of its complexity, is a huge achievement. This project offers a fantastic introduction to quilting techniques, building your confidence and skills with each stitch, paving the way for more intricate projects in the future.
Whether you’re looking to create a cherished heirloom, a cozy throw, or a thoughtful present, the Jelly Roll Relish Shortcut Quilt delivers on all fronts. Get ready to embark on a rewarding creative adventure!
Essential Materials for Your Quilt Project
Before you begin sewing, gathering all your materials is crucial for a smooth and uninterrupted quilting experience. The beauty of this quilt lies in its use of jelly rolls, which are pre-cut fabric strips that save you significant time and effort in the initial cutting phase. Here’s a detailed list of what you’ll need, along with some considerations for fabric selection:
- 1 – Print Jelly Roll: This consists of 40 individual 2½-inch by Width of Fabric (WOF) strips, typically coordinated prints. If you don’t have a jelly roll, you’ll need approximately 32 individual 2½-inch WOF strips of various print fabrics. These will form the colorful core of your quilt.
- 1 – Solid Jelly Roll: Similar to the print jelly roll, this provides the contrasting solid strips that give the quilt its distinctive piano key effect and sashing. Alternatively, you’ll need about 39 individual 2½-inch WOF strips of solid fabric. Choose a color that complements your print fabrics beautifully.
- ¾ Yard Binding Fabric: This fabric will be used to create the binding strips that finish the edges of your quilt, providing a neat and durable frame. Select a fabric that either harmonizes with your quilt top or offers a striking contrast.
- 3 ⅞ Yards Backing Fabric: The backing fabric is what gives your quilt its underside. It’s an opportunity to use a fun coordinating print or a soft, comforting solid. Ensure you have enough to cover the entire back of your quilt plus a few extra inches for ease of quilting.
- Click here for the free downloadable PDF pattern from Fat Quarter Shop, which includes detailed diagrams and measurements.
Pro Tip on Fabric Selection: When choosing your jelly rolls, consider the overall mood you want your quilt to convey. Bright and bold prints create a playful look, while softer pastels lend themselves to a more serene nursery theme. For your solid jelly roll and binding, a neutral color like white, cream, or a deep charcoal can make your prints pop, while a coordinating color can create a more cohesive, blended appearance.
Precise Cutting Instructions for Flawless Blocks
Accurate cutting is the cornerstone of successful quilting. Taking your time during this phase will ensure your blocks fit together perfectly and your quilt lays flat. Even though you’re starting with pre-cut jelly rolls, some additional cutting is required to shape the specific components of the Jelly Roll Relish Shortcut Quilt. Label your fabric pieces as you cut them to avoid confusion.
- Fabric A (Print Strips): From your print jelly roll (or 32 WOF strips), select 30 strips. These will remain as full 2½-inch WOF strips initially, forming the basis of your strip sets.
Cut 2 additional print 2½-inch WOF strips into:
- Fabric B (Print Rectangles): Cut each of these 2 strips into two 2½-inch x 4½-inch rectangles. This will give you a total of 4 Fabric B rectangles. These small print accents will add a touch of color to specific areas.
- Fabric C (Solid Strips): From your solid jelly roll (or 39 WOF strips), select 20 strips. These will also remain as full 2½-inch WOF strips, serving as key sashing elements within your main blocks.
Cut 5 additional solid 2½-inch WOF strips into:
- Fabric D (Solid Rectangles): Cut each of these 5 strips into three 2½-inch x 10½-inch rectangles. This results in a total of 15 Fabric D rectangles. These longer solid pieces will be vital for the sashing between your strip sets and main quilt blocks.
- Fabric E (Solid Rectangles): From the remaining portions of these same 5 strips, cut one 2½-inch x 4½-inch rectangle from each. This gives you a total of 5 Fabric E rectangles. These smaller solid pieces will be used for additional accents or sashing details.
Cut 3 more solid 2½-inch WOF strips into:
- Fabric E (Additional Solid Rectangles): From these 3 strips, cut seven 2½-inch x 4½-inch rectangles from each. This provides an additional 21 Fabric E rectangles, bringing your total for Fabric E to 26 pieces. These are crucial for creating the “piano key” style borders or sashing effects.
- Fabric F (Solid Strips): The remaining 11 solid 2½-inch WOF strips from your jelly roll will be designated as Fabric F. These will likely be used for other sashing or border elements later in the quilt assembly.
Cut binding fabric into:
- Fabric G (Binding Strips): From your ¾ yard of binding fabric, cut 8 full 2½-inch x WOF strips. These will be pieced together to create one continuous strip for binding the entire quilt.
Remember to use a sharp rotary cutter, a good cutting mat, and an accurate quilting ruler for the best results. Precision now will save you headaches later!
Step-by-Step Quilting Directions for the Jelly Roll Relish Quilt
With all your fabrics neatly cut and organized, you’re ready to bring your quilt to life! Follow these detailed instructions carefully, taking your time with each seam to ensure accuracy.
Step 1: Crafting Your Signature Strip Sets
The first step involves creating the core building blocks of your quilt. These “strip sets” are visually dynamic and quick to assemble, laying the foundation for the entire design.
To begin, select three different print strips (Fabric A) from your designated pile. Aim for a pleasing contrast or blend of colors and patterns. Lay these three print strips out side-by-side. Now, take two solid strips (Fabric C) and insert one between each of your print strips. The arrangement should look like: Print Strip A1, Solid Strip C1, Print Strip A2, Solid Strip C2, Print Strip A3. This creates a five-strip unit. Using a ¼-inch seam allowance, carefully sew these five strips together lengthwise. It’s often helpful to chain piece these if you’re making multiple units to save time. Once sewn, press the seams towards the darker fabric. This technique helps to “hide” the seam allowances and gives your quilt a flatter, more professional finish. Repeat this process until you have a total of ten identical five-strip sets.
Once your ten strip sets are complete, it’s time to cut them into usable units for your quilt center. From each of the ten strip sets, you will precisely cut two 10½-inch squares and two 4½-inch x 10½-inch rectangles. To do this accurately, first square up one end of your strip set. Then, using your rotary cutter and ruler, measure and cut your 10½-inch squares. After cutting two squares, cut two 4½-inch x 10½-inch rectangles from the remaining length. When you have finished cutting all ten strip sets, you should have a total of 20 10½-inch squares and 20 4½-inch x 10½-inch rectangles. These units form the main visual interest of your quilt.
Step 2: Assembling the Dynamic Quilt Center
With your strip-set units ready, it’s time to assemble the captivating center of your quilt. This step involves carefully arranging your squares and rectangles to create a visually appealing grid, incorporating the sashing elements that define the “relish” pattern.
Begin by laying out your blocks to form the first main “block row.” Take three of your 10½-inch strip-set squares. For a dynamic visual, orient the first square vertically, the second horizontally, and the third vertically. In between each of these squares, you will insert one of your 2½-inch x 10½-inch Fabric D rectangles (the longer solid sashing pieces). So, your first block row will be arranged as: Strip Set Square (Vertical), Fabric D rectangle, Strip Set Square (Horizontal), Fabric D rectangle, Strip Set Square (Vertical). Pin these components together securely and sew them using a ¼-inch seam allowance. Press the seams towards the sashing (Fabric D) to help create a crisp, flat row. Create three identical “block rows” in this manner. These will form the foundation for rows 1, 3, and 5 of your quilt center. To add further visual interest, for rows 3 and 5, you might consider reversing the orientation of your strip-set squares compared to row 1, or rotating the squares by 90 degrees if you prefer a subtle shift in pattern, creating an “XOX” or checkerboard effect with the internal strips.
Next, you’ll create the “sashing rows” that separate your main block rows. These rows will typically be composed of your Fabric D and Fabric E pieces. Referring to the free pattern PDF is highly recommended here for exact placement. Generally, these sashing rows will consist of repeating units of Fabric D rectangles and Fabric E rectangles, sewn together to match the width of your block rows. For example, a sashing row might be constructed using a sequence like: Fabric D (10½-inch), Fabric E (4½-inch), Fabric D (10½-inch), Fabric E (4½-inch), and so on, to fill the length. You will create two of these sashing rows, which will become rows 2 and 4 of your quilt center. Ensure that the smaller Fabric E pieces align with the sashing between the main blocks in the adjacent block rows.
Once you have all five rows (three block rows and two sashing rows) completed, it’s time to assemble the full quilt center. Carefully align Row 1 (Block Row) with Row 2 (Sashing Row), ensuring all seams and edges match up. Pin them generously, then sew them together with a ¼-inch seam allowance. Press this seam open or to one side, whichever creates the flattest finish for your specific fabrics. Repeat this process, attaching Row 3 (Block Row) to Row 2, then Row 4 (Sashing Row) to Row 3, and finally Row 5 (Block Row) to Row 4. Take your time, pinning thoroughly, and checking your alignment as you go. Once all rows are sewn together, your beautiful quilt center will be complete!
Tips for a Perfect Quilt Finish
Creating a beautiful quilt involves more than just sewing pieces together; it’s about precision, patience, and attention to detail. Here are some essential tips to help you achieve a professional-looking finish for your Jelly Roll Relish Shortcut Quilt:
- Accurate ¼-Inch Seam Allowance: This is perhaps the most critical quilting tip. A consistent ¼-inch seam allowance throughout your project ensures that all your pieces fit together as designed and your finished blocks are the correct size. Invest in a ¼-inch presser foot for your sewing machine if you don’t already have one.
- Pressing Matters: How you press your seams significantly impacts the flatness and overall appearance of your quilt. Generally, pressing seams towards the darker fabric is preferred as it prevents lighter fabrics from showing through. However, sometimes pressing seams open creates less bulk, especially where many seams meet. Experiment to see what works best for your specific project. Always press, don’t iron back and forth, to avoid stretching your fabric.
- Squaring Up Blocks: After assembling your strip sets and cutting your squares and rectangles, take a moment to “square up” each unit if necessary. This involves trimming them to their exact specified dimensions, ensuring perfectly straight edges and corners. This step is vital for avoiding wavy borders and ensuring your rows lie flat.
- Chain Piecing for Efficiency: When you have many identical units to sew (like your strip sets), use chain piecing. This involves sewing one unit, and instead of clipping your thread, immediately feeding the next unit under the needle. This saves thread and time, making your process much more efficient.
- Pin Generously: Don’t be shy with pins! Especially when joining longer strips or rows, pins help keep your fabric layers aligned, preventing shifting and puckering. Pay extra attention to pinning where seams intersect, ensuring they match up perfectly for a clean finish.
- Audition Your Fabrics: Before you make your final cuts or sew, lay out your chosen fabrics and components on a design wall or floor. This allows you to visualize the finished quilt and make any adjustments to color placement or orientation, ensuring you love the look before committing.
- Use Good Quality Thread: A strong, high-quality 100% cotton thread will hold your quilt together beautifully. Match the thread color to your fabrics as closely as possible for a seamless look.
Bringing Your Quilt to Life: The Finishing Touches
Once your quilt top is assembled, the journey isn’t over! The final steps of basting, quilting, and binding transform your pieced top into a functional, beautiful, and durable quilt. These stages allow you to add your unique touch and ensure your quilt lasts for years to come.
Basting Your Quilt Layers
Basting is the process of temporarily securing the three layers of your quilt – the quilt top, batting, and backing fabric – together before quilting. Proper basting prevents shifting and puckering during quilting. Lay your backing fabric flat, face down, and tape it securely to a clean floor or large table. Next, carefully smooth your batting layer over the backing. Finally, place your completed quilt top, face up, on top of the batting. You can baste using safety pins (pin basting, typically every 4-6 inches), basting spray, or traditional hand basting stitches. Choose the method you’re most comfortable with.
Quilting Your Layers
Quilting is the decorative stitching that holds all three layers together. This is where your quilt truly comes to life! For a beginner-friendly approach, consider simple straight-line quilting. You can stitch lines parallel to your seams, or create a grid pattern across the quilt. Alternatively, if you’re feeling adventurous, you can try free-motion quilting, which allows for more intricate designs. Use a walking foot for straight-line quilting to ensure all layers feed evenly through your machine. When starting, try to quilt from the center outwards to push any excess fabric towards the edges, minimizing wrinkles.
Binding Your Quilt
Binding provides a neat and durable edge to your quilt, encasing all the raw edges of the three layers. This is where your Fabric G (binding strips) comes into play. First, join your 8 binding strips end-to-end using diagonal seams to create one long continuous strip. Press these seams open. Fold this long strip in half lengthwise, wrong sides together, and press well. Now, attach the binding to the front of your quilt, aligning the raw edges of the binding with the raw edges of the quilt top. Use a ¼-inch seam allowance. When you reach a corner, miter it neatly. Once sewn all around, flip the folded edge of the binding to the back of the quilt and hand-stitch or machine-stitch it in place. This final step gives your quilt a professional, finished look.
Frequently Asked Questions About the Jelly Roll Relish Quilt
New to quilting or just have some lingering questions? Here are answers to common queries about this fantastic beginner-friendly project:
- What exactly is a jelly roll?
A jelly roll is a collection of 40 (sometimes 42) pre-cut fabric strips, each measuring 2½ inches wide and the full width of the fabric (typically 42-44 inches long). They are usually from a single fabric line, meaning all the prints and colors are coordinated, making fabric selection incredibly easy for quilters. - Can I use fat quarters or yardage instead of jelly rolls?
Absolutely! While the pattern is designed for jelly rolls for convenience, you can certainly cut your own 2½-inch WOF strips from fat quarters or yardage. Just make sure you have enough variety and quantity to meet the specified material requirements. Cutting from yardage might give you more control over your fabric selection. - What kind of batting should I use for this quilt?
The best batting depends on your preference! Common choices include 100% cotton for a traditional feel and warmth, 80/20 cotton/polyester blend for a nice drape and durability, or 100% polyester for lightweight warmth and puffiness. For a lap quilt or nursery quilt, a mid-loft cotton or blend is usually a great choice. - How do I care for my finished Jelly Roll Relish Quilt?
Most quilts can be machine washed on a gentle cycle with cold water and a mild detergent. Tumble dry on low or air dry flat to prevent shrinkage and preserve the quilting stitches. Avoid harsh chemicals or excessive heat, especially with new quilts, as they can set dyes or damage fabrics. - Is this quilt truly suitable for absolute beginners?
Yes, definitely! The Jelly Roll Relish Shortcut Quilt is an excellent “first quilt” project. It introduces fundamental quilting techniques like strip piecing, accurate cutting, and basic assembly without overwhelming complexity. The satisfaction of completing this quilt will build confidence for future projects. - How can I customize this quilt?
Customization is easy! Experiment with different color palettes in your jelly rolls – bright and playful for kids, sophisticated tones for adults. You can also vary the solid fabric used for sashing and binding to create different contrasts. Don’t be afraid to add a personalized label to the back for gifts!
Jelly Roll Relish Shortcut Quilt Tutorial
We’ve covered all the essential steps, from gathering your materials and making precise cuts to assembling your quilt top with care. The Jelly Roll Relish Shortcut Quilt is more than just a project; it’s an opportunity to create something beautiful, practice valuable quilting skills, and perhaps even bust through some of your fabric stash!
This beginner-friendly pattern, with its quick assembly and charming piano key border effect, promises a rewarding experience and a stunning finished product. Whether you’re crafting it for a cherished gift, a cozy addition to your home, or a nursery, you’ll love the unique character it brings.
Now that you have all the instructions, what are you waiting for? Grab your jelly rolls, fire up your sewing machine, and start creating! Don’t forget to refer to the Fat Quarter Shop video tutorial for a visual guide alongside these written instructions. Happy quilting, and enjoy the beautiful quilt you’re about to make!