
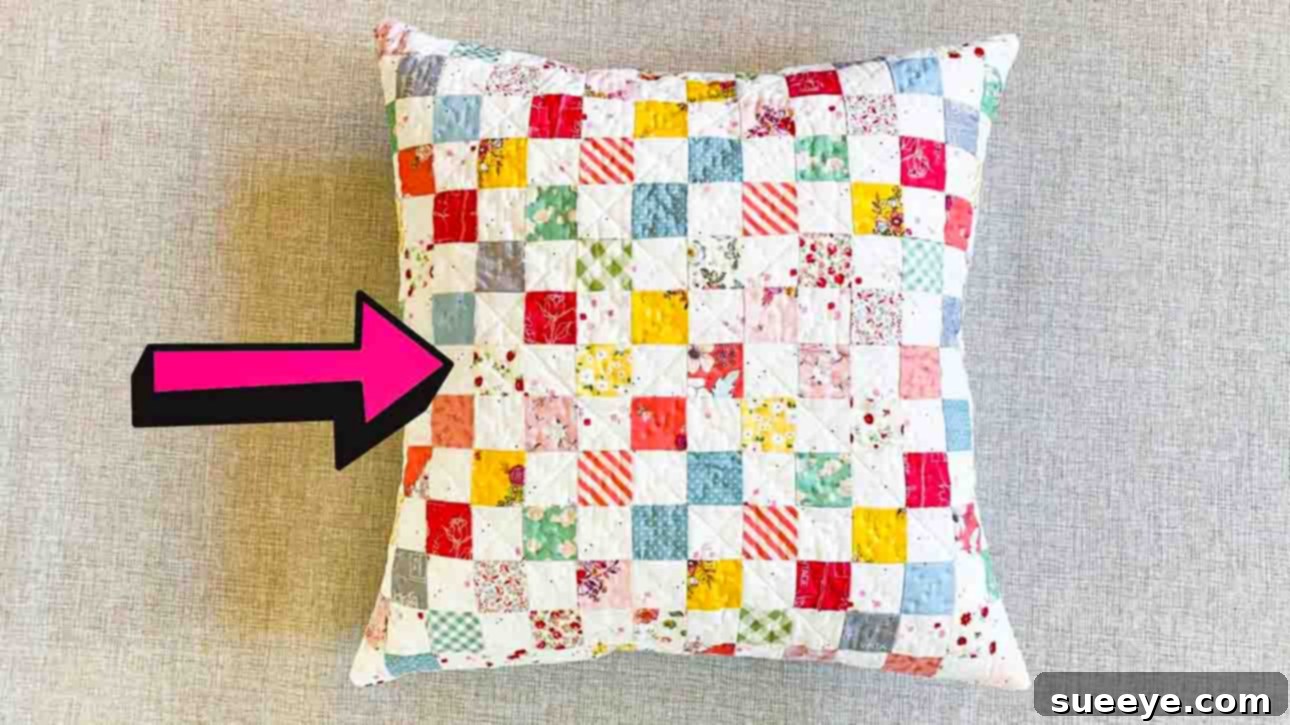
Quilting, an art form rich in history and tradition, offers a wonderful way to express creativity and add a touch of handcrafted charm to your home. However, the meticulous process of traditional patchwork, often involving countless small fabric squares sewn individually, can sometimes feel daunting and time-consuming, even for seasoned quilters. What if there was a method to achieve that beautiful patchwork look with significantly less effort and in a fraction of the time?
Enter the brilliant technique popularized by Minki Kim on YouTube. Her innovative approach transforms the often-tedious task of patchwork into a remarkably fast and enjoyable experience. Instead of painstakingly joining individual tiny squares, this tutorial introduces a streamlined method that allows you to create stunning patchwork patterns up to three times faster! Imagine crafting a gorgeous, quilted pillow cover in just an afternoon, or even applying this speedy technique to larger quilt projects.
This comprehensive guide will walk you through every step of creating a beautiful and durable quilted patchwork pillow cover. We’ll delve into fabric selection, precise cutting, efficient strip assembly, and expert finishing touches, ensuring your final product is not only beautiful but also built to last. Whether you’re a beginner eager to dive into quilting or an experienced quilter looking for a quicker way to achieve stunning results, this Minki Kim-inspired method is a game-changer. Get ready to transform your fabric stash into a cozy, decorative masterpiece that brightens any room!
Gather Your Essential Materials for This Quilted Pillow Project
Before you embark on your quilting journey, ensuring you have all the necessary materials on hand is crucial. High-quality fabrics and precise cutting tools will significantly contribute to a professional-looking finish. Here’s a detailed list of everything you’ll need:
- Assorted Print Fabrics: For the vibrant patchwork design, you will need a total of fourteen (14) strips measuring 2 inches (5cm) by 8 inches (20cm) and fourteen (14) strips measuring 2 inches (5cm) by 6 inches (15.2cm). Choosing a variety of prints from a cohesive collection, like Minki Kim’s IDYLLIC collection, or coordinating scraps will give your pillow cover a unique and visually appealing character. Ensure your prints complement each other, offering both contrast and harmony.
- White Solid Fabric: To create a balanced and clean aesthetic, you will also need fourteen (14) strips of white fabric, each 2 inches (5cm) by 8 inches (20cm), and fourteen (14) strips of white fabric, each 2 inches (5cm) by 6 inches (15.2cm). The white fabric will serve as a neutral background, allowing your print fabrics to truly pop and defining the patchwork pattern.
- Backing Fabric: For the underside of your quilted pillow, you’ll need three pieces of backing fabric. One (1) piece measuring 23 inches by 23 inches (58.5cm x 58.5cm) will serve as the primary backing for the quilted top. Additionally, you’ll need one (1) piece measuring 21 1/2 inches (54.6cm) by 21 inches (53.3cm) and one (1) piece measuring 21 1/2 inches (54.6cm) by 29 1/2 inches (75cm) to construct the convenient envelope-style closure for your pillow cover. Choose a durable, comfortable fabric for the backing, as it will be in contact with your pillow insert.
- Cotton Batting: To give your pillow cover that soft, quilted loft and texture, you will need one (1) piece of cotton batting measuring 22 1/2 inches by 22 1/2 inches (57cm x 57cm). Batting is essential for insulation and provides the characteristic puffiness of a quilted item. Cotton batting is often preferred for its breathability and ease of quilting.
- Basic Sewing Supplies: Don’t forget your essential sewing kit! This includes a sewing machine, coordinating thread (a neutral color like white or light grey often works well), sharp fabric scissors or a rotary cutter with a cutting mat, a quilting ruler, pins or fabric clips, an iron and ironing board, and a fabric marking tool (such as a Frixion pen or chalk). A walking foot for your sewing machine is highly recommended for quilting, as it helps feed multiple layers of fabric evenly.
Step-by-Step Instructions: Crafting Your Quilted Patchwork Pillow Cover
Now that you have all your materials ready, let’s dive into the exciting process of assembling your fast and easy quilted patchwork pillow cover. Precision and consistent seam allowances are key to achieving a beautiful, professional-looking finish. Take your time with each step, and don’t hesitate to press frequently.
Step 1: Constructing the Dynamic Patchwork Panel
This is where the magic of Minki Kim’s method truly shines, allowing for rapid patchwork assembly. We will create distinct rows of alternating print and white fabric strips, then sub-cut and reassemble them to form a cohesive patchwork square.
- Assemble the First Patchwork Row (2″ x 8″ strips): Begin by taking seven (7) of your 2-inch by 8-inch print strips and seven (7) of your 2-inch by 8-inch white strips. Arrange them in an alternating pattern, starting with a print strip. Carefully stitch these 14 strips together along their 8-inch edges, using a consistent 1/4-inch seam allowance. Precision here is paramount for neat results. Once sewn, press all seam allowances towards the darker fabric (or to one side) on the wrong side of the fabric. This completed strip set should measure approximately 21 1/2 inches (54.6cm) by 8 inches (20cm).
- Assemble the Second Patchwork Row (2″ x 8″ strips): For the second row, repeat the process with the remaining seven (7) 2-inch by 8-inch print strips and seven (7) 2-inch by 8-inch white strips. This time, start with a white strip and alternate with print strips. Stitch them together with a 1/4-inch seam allowance. Press the seam allowances in the opposite direction from your first row (if you pressed to the right on the first row, press to the left on the second). This helps nested seams lay flatter when joining rows later. This completed strip set will also measure approximately 21 1/2 inches (54.6cm) by 8 inches (20cm).
- Sub-cut the 8-inch Rectangles: With your quilting ruler and rotary cutter, carefully sub-cut each of the two 21 1/2-inch by 8-inch rectangles into four (4) individual strips, each measuring 2 inches (5cm) by 21 1/2 inches (54.6cm) long. You should now have a total of eight (8) 2-inch by 21 1/2-inch patchwork strips from these two initial assemblies.
- Assemble the Third Patchwork Row (2″ x 6″ strips): Now, take seven (7) of your 2-inch by 6-inch print strips and seven (7) of your 2-inch by 6-inch white strips. Arrange them in an alternating pattern, starting with a print strip. Stitch them together with a 1/4-inch seam allowance. Press seams consistently. This completed strip set will measure approximately 21 1/2 inches (54.6cm) by 6 inches (15.2cm).
- Assemble the Fourth Patchwork Row (2″ x 6″ strips): Repeat the process for the fourth patchwork row using the remaining seven (7) 2-inch by 6-inch print strips and seven (7) 2-inch by 6-inch white strips. Start with a white strip and alternate. Stitch and press as before, ensuring seam allowances are pressed in the opposite direction to help with nesting. This strip set will also measure approximately 21 1/2 inches (54.6cm) by 6 inches (15.2cm).
- Sub-cut the 6-inch Rectangles: Sub-cut each of these two 21 1/2-inch by 6-inch rectangles into three (3) individual strips, each measuring 2 inches (5cm) by 21 1/2 inches (54.6cm) long. You should now have a total of six (6) 2-inch by 21 1/2-inch patchwork strips from these two assemblies.
- Combine All Patchwork Strips: You now have a grand total of fourteen (14) individual 2-inch by 21 1/2-inch patchwork strips (eight from the 8-inch rectangles and six from the 6-inch rectangles). Carefully arrange these fourteen strips side by side, making sure the alternating colors create the desired pattern. Stitch all these rows together along their 21 1/2-inch edges, maintaining a precise 1/4-inch seam allowance. Take extra care to align the seams where the rows meet to create crisp, continuous lines across your patchwork. The goal is to achieve a single, beautiful 21 1/2-inch by 21 1/2-inch patchwork square. Press all these long seams in a consistent direction to minimize bulk.
Step 2: Quilting and Finishing Your Pillow Cover
With your stunning patchwork panel complete, it’s time to add the quilting dimension and assemble the pillow cover. This step involves creating a quilt sandwich, quilting through all layers, and constructing an easy envelope back.
- Prepare the Quilt Sandwich: First, ensure all seams on your patchwork top are pressed neatly. Now, lay your 23-inch by 23-inch (58.5cm x 58.5cm) backing fabric right side down on a flat, clean surface. Smooth it out thoroughly. Next, center your 22 1/2-inch by 22 1/2-inch (57cm x 57cm) cotton batting on top of the backing fabric. Finally, place your 21 1/2-inch patchwork square on top of the batting, ensuring it is centered. Gently smooth out any wrinkles from all three layers.
- Baste the Layers: Secure these three layers together. You can use curved basting pins, a temporary spray adhesive designed for quilting, or large hand basting stitches. This step is crucial to prevent shifting and puckering while quilting.
- Quilt Your Pillow Top: If you wish to create a guided quilting pattern, use a fabric marking tool (like a Frixion pen or chalk) to draw your desired quilting lines onto the patchwork top. Popular choices include straight lines parallel to the seams, diagonal lines, or simple grid patterns. Attach a walking foot to your sewing machine, which helps feed all three layers of fabric evenly, preventing distortion. Set your stitch length to approximately 3.0. Carefully quilt along your drawn guidelines or freehand your design, stitching through all three layers. Once quilting is complete, press the quilted panel with an iron to remove any marks from a Frixion pen, as heat will make them disappear.
- Trim and Square Up: After quilting, your pillow top might be slightly uneven. Use your quilting ruler and rotary cutter to carefully trim and square up the quilted panel to a precise 21 1/2-inch (54.6cm) square. This ensures clean, straight edges for the final assembly.
- Prepare the Envelope Back Panels: Take your two backing fabric pieces for the envelope closure: one 21 1/2 inches by 21 inches (54.6cm x 53.3cm) and one 21 1/2 inches by 29 1/2 inches (54.6cm x 75cm). For each piece, fold one of the 21 1/2-inch edges inwards by about 1/2 inch, press, then fold again by another 1/2 inch to create a clean, double-thick hem. Stitch these hems in place. This will create finished edges for the overlapping part of your pillow back.
- Assemble the Pillow Cover: Lay your quilted pillow top right side up on your work surface. Take the smaller of your two prepared backing panels (21 1/2″ x 21″) and place it right side down on top of the quilted front, aligning its un-hemmed raw edges with three sides of the quilted front (top, bottom, and one side). Now, take the larger backing panel (21 1/2″ x 29 1/2″) and place it right side down on top of the quilted front, aligning its un-hemmed raw edges with the remaining three sides, ensuring its hemmed edge overlaps the hemmed edge of the smaller panel by about 4 inches (10cm) in the middle. The hemmed edges of the back panels should be facing inwards, towards the center of the pillow.
- Secure and Stitch: Clip or pin all layers securely around the entire perimeter of the pillow cover. Using a 1/2-inch seam allowance, stitch all the way around the edges of the square, ensuring you catch all layers. For added durability, especially where the back panels overlap, stitch across those overlaps again on the side edges for reinforcement.
- Finish Raw Edges: To prevent fraying and give your pillow cover a professional finish, use a zigzag stitch or an overlock stitch all the way around the raw edges of the seam allowance on the inside of the pillow cover.
- Final Reveal: Carefully turn your pillow cover right side out through the envelope opening. Use a blunt tool, like a chopstick or a turning tool, to gently push out the corners, making them crisp. Give it a final press. Your beautiful, fast, and easy quilted patchwork pillow cover is now finished and ready to adorn your home!
Essential Tips for a Flawless Quilted Patchwork Pillow Cover
Achieving a professional-looking finish for your quilted pillow cover is a gratifying experience. Here are some essential tips to help you succeed, especially when working with patchwork and quilting:
- Pre-Wash Your Fabrics: Always pre-wash and dry all your fabrics before cutting. This prevents potential shrinkage and color bleeding after your project is complete, ensuring your pillow cover maintains its size and vibrant colors.
- Accurate Cutting is Key: In patchwork, every fraction of an inch matters. Use a sharp rotary cutter, a self-healing cutting mat, and a clear acrylic quilting ruler for precise, straight cuts. Take your time to ensure all strips are exactly the specified dimensions.
- Consistent Seam Allowance: A perfect 1/4-inch seam allowance is critical for patchwork. Many sewing machines have a 1/4-inch foot or markings on the needle plate. Practice on scraps to ensure your seam allowance is consistent throughout the project.
- Pressing Matters: Don’t underestimate the power of good pressing. Pressing seams correctly after each step helps pieces lie flat, prevents bulk, and ensures accurate alignment when joining subsequent pieces. For patchwork, decide whether to press seams open or to one side and be consistent. For this project, pressing seams to one side (alternating directions between rows) will help them nest neatly.
- Chain Piecing for Efficiency: To save time, particularly in Step 1 when assembling your strip sets, consider chain piecing. This involves feeding one set of strips after another through your sewing machine without lifting the presser foot or clipping threads in between. You then cut them apart and press.
- Choosing the Right Thread and Needle: Use a high-quality cotton or polyester thread that matches or blends with your fabrics. For piecing, an all-purpose thread is fine. For quilting, a slightly stronger, yet fine, quilting-specific thread can be beneficial. A universal needle (size 80/12 or 90/14) works well for most quilting projects.
- Invest in a Walking Foot: As mentioned, a walking foot is invaluable for quilting. It helps both the top and bottom layers feed through the machine at the same rate, preventing fabric shifting, puckering, and uneven stitches when quilting through multiple layers.
- Basting Techniques: Experiment with different basting methods (pins, spray adhesive, or large hand stitches) to find what works best for you to secure your quilt sandwich layers. Effective basting is crucial for smooth, even quilting.
- Square Up Your Quilted Top: After quilting, your fabric layers might shift slightly. Use your large quilting ruler and rotary cutter to carefully re-square your quilted panel to the final dimensions. This ensures a perfectly straight and symmetrical pillow cover.
- Don’t Rush the Finish: The finishing touches, like hemming the back panels and zigzagging the raw edges of the final seam, elevate the quality of your project. These small steps add durability and a professional appearance.
Unleash Your Creativity: Customizing Your Patchwork Pillow Cover
One of the most exciting aspects of any DIY project is the opportunity to infuse it with your personal style. While this tutorial provides a fantastic foundation for a fast and easy quilted patchwork pillow cover, the possibilities for customization are endless. Don’t be afraid to experiment and make this project uniquely yours!
- Fabric Selection: The most immediate way to customize your pillow is through fabric choice. Instead of just two colors, try three or more coordinating prints. Experiment with different fabric collections, themes (e.g., seasonal, holiday, geometric), or even upcycle old clothing or fabric scraps for a truly unique, eco-friendly touch. The contrast between your print and white fabrics can be softened or made more dramatic depending on your preference.
- Vary the Strip Sizes: While this tutorial uses 2-inch strips, you could adapt the technique by using wider or narrower strips for a different scale of patchwork. Wider strips will create a bolder, more modern look, while narrower strips will result in a finer, more intricate pattern. Just remember to adjust your total fabric requirements and cutting accordingly.
- Quilting Patterns: The quilting lines themselves offer another layer of design. Beyond simple straight lines, consider echoing the patchwork design, trying free-motion quilting (if you’re feeling adventurous!), or using decorative stitches built into your sewing machine. The quilting adds texture and defines the structure of your pillow.
- Pillow Size: This tutorial creates a 21 1/2-inch square pillow cover, suitable for a standard throw pillow. You can easily scale the project up or down to fit different pillow inserts. Just remember to adjust all fabric measurements proportionally for the patchwork top, batting, and backing panels.
- Embellishments: Add extra flair with subtle embellishments. Consider adding a small label, decorative buttons, or even piping around the edge for a more refined finish. Make sure any embellishments are securely attached and suitable for regular use and washing.
- Applying the Technique to Other Projects: The core “fast patchwork” technique you’ve learned here is incredibly versatile. Don’t limit it to just pillow covers! You can apply this method to create small quilts, placemats, table runners, tote bags, or even panels for garments. Once you master the strip assembly and sub-cutting, a world of quick quilting projects opens up.
Your Journey to Fast & Easy Quilting Begins Now!
Congratulations! You’ve successfully navigated the steps to create a stunning and cozy quilted patchwork pillow cover using Minki Kim’s incredibly efficient technique. What once felt like a time-consuming endeavor has been transformed into an accessible and enjoyable process, proving that beautiful handmade items don’t always require endless hours of work. This project is a testament to the fact that with smart techniques and a little creativity, anyone can achieve remarkable results in quilting.
This method not only saves you time but also opens up a world of possibilities for incorporating intricate patchwork into your home decor and gifting. Imagine the joy of personalizing your living space with handmade textiles that reflect your unique style, or crafting thoughtful, custom gifts for loved ones. The skills you’ve honed here—from precise cutting and consistent stitching to efficient strip assembly and meticulous finishing—are foundational for countless other quilting and sewing projects.
So, whether this is your first foray into quilting or another delightful addition to your crafting repertoire, we encourage you to embrace the satisfaction of creating something beautiful with your own hands. Don’t hesitate to experiment with different fabrics, explore new quilting patterns, and make this project truly your own. Share your creations, inspire others, and continue to enjoy the rewarding journey of textile artistry. Happy quilting!