
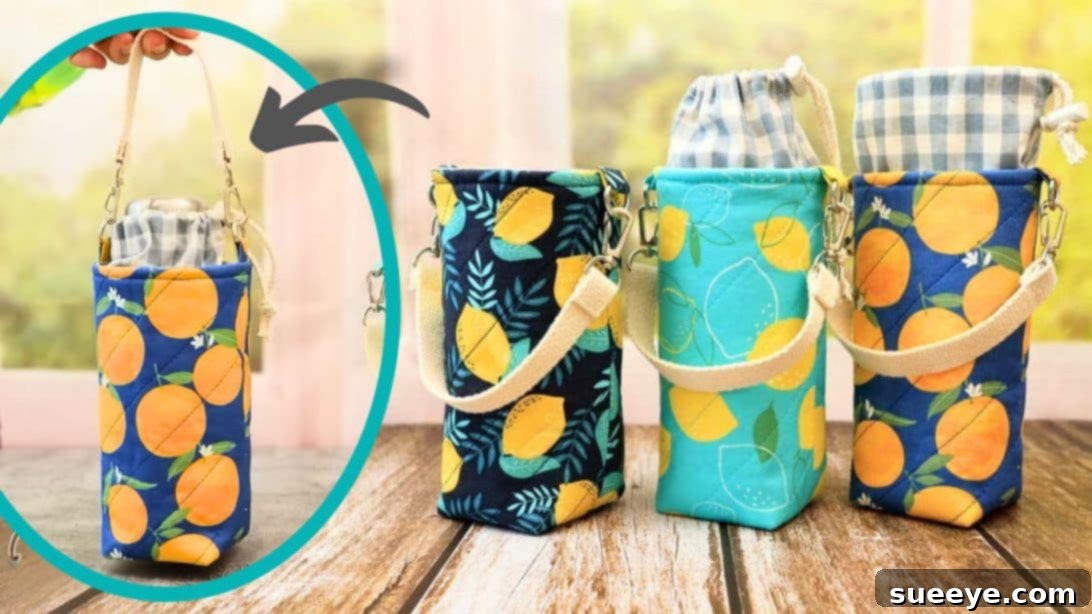
DIY Water Bottle Carrier Bag: Sew Your Own Adjustable Tumbler Holder
Are you constantly on the go, juggling your keys, phone, and that essential water bottle? Imagine a world where your favorite tumbler or water bottle is always securely by your side, leaving your hands free for everything else life throws at you. This fantastic DIY water bottle carrier bag is the perfect solution you’ve been searching for!
Like many, I carry my tumbler everywhere, from quick errands to long walks. The only frustration? Sometimes, my hands are just too full, and the small handle of my tumbler offers no practical way to carry it hands-free. This ingenious sewing project addresses that very problem, providing a comfortable and stylish way to tote your hydration. I even designed the strap to be fully adjustable, allowing me to wear it comfortably across my body or over a single shoulder.
I absolutely adore these DIY bottle holders, inspired by the creative brilliance of sewingtimes. The one I crafted fits my tumbler perfectly, snuggling it securely. I recently took it to a friend’s gathering, and it garnered a ton of compliments! Everyone loved the practicality and personalized touch. It’s undeniably a project worth investing your time in, and you’ll find yourself reaching for it daily.
Why Sew Your Own Water Bottle Carrier Bag?
Beyond solving the “too many things in my hands” dilemma, creating your own water bottle carrier offers a multitude of benefits:
- Ultimate Hands-Free Convenience: Free up your hands while walking, shopping, or hiking. No more fumbling or setting your bottle down in inconvenient places. Your water bottle is always accessible and secure.
- Personalized Style Statement: Forget generic store-bought carriers. With DIY, you get to choose fabrics that truly reflect your personality, match your favorite outfit, or even coordinate with other accessories. Express yourself through your choice of prints, colors, and textures.
- Sustainable and Eco-Friendly: Reduce waste by utilizing fabric scraps or repurposing old materials. This project promotes a sustainable lifestyle, giving new life to textiles and encouraging thoughtful consumption.
- Budget-Friendly Crafting: Creating your own bottle bag is often significantly more cost-effective than purchasing a similar high-quality, adjustable carrier. You save money while gaining a custom item.
- A Thoughtful Handmade Gift: A handmade bottle carrier makes an incredibly personal and practical gift for friends, family, or teachers. It shows care and effort, making it far more special than a store-bought item.
- Skill Enhancement for Sewers: This project is an excellent opportunity to practice various sewing techniques, including working with fusible fleece, attaching hardware, creating neat seams, and topstitching. It’s suitable for ambitious beginners to intermediate sewers looking to expand their repertoire.
- Keeps Your Drink Insulated: The addition of fusible fleece not only provides structure but also offers a degree of insulation, helping to keep your beverage cooler for longer on warm days.
Essential Materials for Your DIY Bottle Holder
Gathering all your materials before you begin will make the sewing process smooth and enjoyable. Here’s what you’ll need for your custom water bottle carrier bag:
- 2 pieces 6″ x 16 7/8″ printed rectangles: One for your outer fabric (the visible exterior) and one for the lining (the inside of the bag). Choose durable, washable cotton or canvas for best results.
- 1 piece of 11 1/8″ x 4″ printed rectangle (A): This piece will form the casing for your drawstring top. Again, a coordinating or contrasting cotton fabric works well.
- 2 pieces of 1 1/4″ x 2″ printed rectangles (B): These small pieces are crucial for creating the tabs that will hold your D-rings, allowing for the adjustable strap attachment.
- 2 pieces of 5/8″ wide D-rings: These metal rings are where your adjustable strap will connect. Ensure they are sturdy and the correct width for your webbing strap.
- 10″ long of a 5/8″ wide webbing strap: This will be the foundational piece for your adjustable shoulder strap. Nylon or cotton webbing is ideal for durability.
- 2 pieces of 5/8″ swivel snap hooks: These are the closures that attach your webbing strap to the D-rings on the bag, making the strap detachable and adjustable.
- 17 3/4″ cotton string: This string will be threaded through the top casing to create a drawstring closure, keeping your bottle secure.
- Cord lock: A small plastic mechanism that allows you to easily tighten and loosen the drawstring, securing it in place.
- 5 1/8″ x 16 1/8″ of fusible fleece: This is a key component for adding structure, padding, and a touch of insulation to your bottle bag. It fuses to your fabric with heat.
Step-by-Step Guide: How to Make a DIY Water Bottle Carrier Bag
Follow these detailed instructions to create your durable and stylish water bottle carrier. Precision in cutting and sewing will ensure a beautiful finish!
Step 1: Preparing the Fusible Fleece and Main Fabric
Begin by taking your fusible fleece. Measure 6 3/4″ down from the top edge and make a small mark. Repeat this measurement from the bottom edge, marking it precisely. Using a ruler, draw clear, straight lines across the fleece at both of these marks. Next, on the center of each drawn line, make two points that are 2 5/8″ apart. Connect these four points with straight lines, creating two smaller inner rectangles. Carefully cut out the two outer rectangles of the fusible fleece, discarding the central portion, to create the correct shape for your bag’s base.
Step 2: Fusing and Preparing the Outer Fabric and Lining
Take one of your main outer fabric rectangles (labeled ‘A’ in the original materials, referring to the 6″ x 16 7/8″ pieces). Position the cut fusible fleece piece directly on top of it, ensuring it is perfectly centered. Gently press with a warm iron to fuse the fleece in place, following the manufacturer’s instructions for your specific fusible fleece. This adds structure. Now, place this outer fabric piece with the fused fleece right sides together with your second main fabric piece (the lining). Carefully cut the outer rectangles along the center with a 3/8″ seam allowance. Set the lining piece aside for a moment. With the outer fabric (which now has the fleece fused to it), sew diagonally from the top corner to the bottom corner, creating a dart or pleat, which will help shape the bottom of the bag. Repeat this for the other side.
Step 3: Sewing the Side Seams of the Outer Fabric and Lining
Fold both your outer fabric piece and your lining piece in half, ensuring the right sides are facing each other. Carefully align the raw side edges. Sew down both sides of each piece with a precise 3/8″ seam allowance. Remember, for the lining piece, it is crucial to leave a 2-3 inch opening along one of the side seams. This opening will be used later to turn the entire bag right side out. Backstitch at the beginning and end of your seams for added durability.
Step 4: Creating the Boxed Corners
To give your bag a defined, flat bottom, we’ll create boxed corners. Open up the outer fabric piece and flatten it, bringing the side seam together with the bottom seam (the diagonal seam you sewed in Step 2) so that the raw edges align and form a point. Pin these corners together securely. Sew across these points with a 3/8″ seam allowance to close them, effectively creating a box shape. Trim any excess fabric from the seam allowances to reduce bulk. Repeat this exact process for the lining piece, creating its boxed corners as well.
Step 5: Preparing the D-Ring Tabs
Retrieve your two small rectangles (B). Fold the long sides of each rectangle lengthwise towards the center, pressing firmly to create neat, folded edges. Then, fold the entire strip in half again lengthwise, enclosing the raw edges, so you have a narrow, sturdy tab. Insert one of your 5/8″ wide D-rings into the fold of each tab. Now, flip your outer fabric bag (right side out) and determine where you want your strap attachments to be. Pin one tab with its D-ring securely to each side of the outer bag, ensuring they are centered and evenly spaced. Stitch these tabs in place firmly, backstitching multiple times for strength, as they will bear the weight of your bottle. Set the outer bag aside.
Step 6: Constructing the Drawstring Casing
Take your rectangle A (the 11 1/8″ x 4″ piece). Fold it in half lengthwise, right sides together, and press. Measure 1 5/8″ from the bottom raw edge and mark this point. Sew a seam 3/8″ from this mark all the way down to the bottom raw edge. Press the seams open for a neat finish, then sew them down flat. Next, fold 3/8″ from the top raw edge of this piece, pressing firmly. Then, fold another 5/8″ from that fold and press again. Stitch all the way around this folded edge, creating a channel for your drawstring cord.
Step 7: Attaching the Drawstring Casing to the Outer Bag
Now, carefully insert the unit you created in Step 6 (the drawstring casing) into the top opening of your outer bag. Make sure the folded part of the casing is facing down, towards the inside of the bag. Align the raw edges of the casing with the raw top edge of the outer bag. Pin them securely all the way around, ensuring even distribution. Stitch them together around the edges with a 3/8″ seam allowance, forming a secure attachment. This seam will be hidden later.
Step 8: Joining the Outer Bag and Lining
Place the outer bag (with the attached casing) inside the lining bag, ensuring their right sides are facing each other. Align the top raw edges perfectly, matching side seams if possible. Pin all the way around the top opening. Sew around this top edge with a 3/8″ seam allowance, securely joining the outer bag and the lining. Once sewn, reach into the opening you left in the lining (from Step 3) and carefully pull the entire bag right side out through this gap. Press the top seam neatly. Finally, hand-stitch or machine-stitch the opening in the lining closed, ensuring it’s completely sealed for a professional finish.
Step 9: Finishing the Top Edge
Once the bag is turned right side out and the lining opening is closed, gently tuck the lining completely inside the outer bag. Push the lining down firmly so that it sits neatly within the outer fabric. Smooth out any wrinkles. Now, sew around the very top outer edge of the bag, approximately 1/8″ to 1/4″ from the fold. This topstitching will secure the lining in place, give the bag a crisp, finished look, and prevent the lining from peeking out.
Step 10: Adding the Drawstring and Cord Lock
Take your 17 3/4″ cotton string and carefully thread it through the channel you created in Step 6. You can use a safety pin or a bodkin to help guide the string through the casing. Once the string is threaded all the way through and exits on the other side, bring both ends together. Attach your cord lock to both ends of the string. This mechanism will allow you to easily tighten and loosen the drawstring closure, keeping your bottle securely inside the bag.
Step 11: Assembling and Attaching the Adjustable Strap
Take your 10″ long piece of 5/8″ wide webbing strap. Thread one end of the webbing strap through one of your 5/8″ swivel snap hooks, folding it over by about 1 inch. Stitch it securely in place, backstitching multiple times for strength. Repeat this process for the other end of the webbing strap, attaching the second swivel snap hook. Now, simply clip the swivel snap hooks onto the D-rings you attached to the side of your bag in Step 5. Your adjustable water bottle carrier bag is now complete and ready for adventure!
Customization Ideas for Your Unique Bottle Carrier
The beauty of DIY is the endless potential for personalization. Here are a few ideas to make your bottle carrier truly one-of-a-kind:
- Fabric Play: Experiment with different fabric types! Consider waterproof canvas for extra durability, quilted fabric for added insulation, or even incorporate embroidery or patches for a personal touch.
- Add Pockets: Integrate small exterior pockets for essentials like your phone, keys, or cards. Simply sew a patch pocket onto your outer fabric piece before assembling the bag.
- Strap Variations: While this tutorial uses a webbing strap, you could create a fabric strap from coordinating material, braid a macrame strap, or even use a fancy chain for a more elegant look.
- Size Adjustments: If you have a different sized bottle, simply adjust the initial rectangle dimensions proportionately to fit. Remember to also adjust the fusible fleece and casing measurements.
- Embellishments: Add decorative trim, ric-rac, pompoms, or appliques to give your bag an extra pop of personality.
Care and Maintenance for Your Handmade Bottle Bag
To ensure your DIY water bottle carrier lasts for many adventures, proper care is essential. Generally, machine wash on a gentle cycle with cold water using a mild detergent. Air dry or tumble dry on low heat. Avoid high heat as it can damage the fusible fleece and potentially shrink your fabric. If your fabric is delicate or heavily embellished, hand washing might be preferable. Always check the care instructions for your specific fabric choices.
Troubleshooting Common Sewing Issues
Don’t get discouraged if you encounter a snag! Here are quick solutions to common problems:
- Uneven Seams: Practice makes perfect! Use a seam guide on your machine and press your seams after each step for neatness.
- Difficulty Turning Out: Ensure your lining opening is large enough (at least 2-3 inches). Trim seam allowances, especially in corners, to reduce bulk before turning.
- Cord Lock Not Holding: Double-check that your string is thick enough for the cord lock opening. If it’s too thin, it might slip. You can try knotting the ends of the string after the cord lock for extra security.
Your New Favorite Hands-Free Accessory
Congratulations! You’ve just completed a fantastic and incredibly practical DIY water bottle carrier bag. This project is more than just a simple sew; it’s about creating convenience, expressing your style, and embracing the joy of handmade craftsmanship. Say goodbye to fumbling for your bottle and hello to hands-free hydration. Wear it proudly, knowing you’ve crafted a unique accessory that’s as functional as it is fashionable. Don’t forget to share your amazing creations with fellow DIY enthusiasts!