
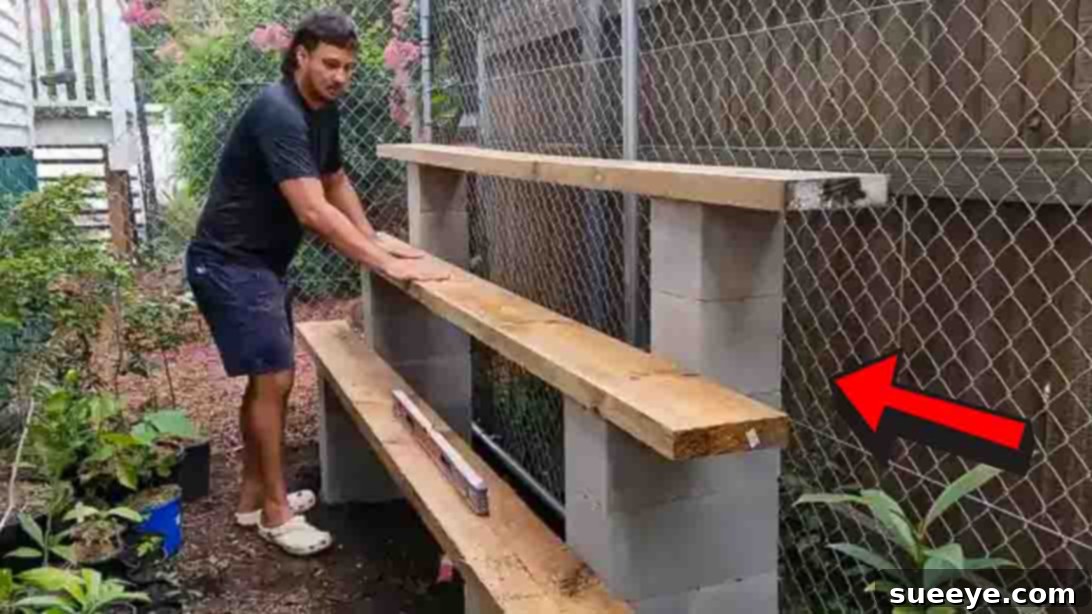
DIY Cinder Block Plant Shelf: Transform Your Outdoor Space with Style and Functionality
Are you dreaming of a more organized, vibrant, and stylish outdoor area? Transforming your garden, patio, or even a small balcony into a lush, well-curated haven doesn’t have to be an expensive or complicated endeavor. With just a few readily available cinder blocks and some sturdy wooden planks, you can construct an eye-catching and incredibly functional plant shelf that not only maximizes your vertical space but also introduces a trendy industrial chic aesthetic to your outdoor decor.
This DIY cinder block plant shelf project offers an ingenious blend of affordability, durability, and versatility. It’s an ideal solution for showcasing your diverse collection of potted plants, whether you’re cultivating aromatic herbs, vibrant flowers, cascading succulents, or leafy greens. Beyond its practicality, this project allows you to infuse your personality into your outdoor living areas, creating a unique display that reflects your taste and gardening passion. It’s a testament to how simple materials can be re-imagined to create something truly special and long-lasting.
Inspired by the brilliant tutorial from My Tropical Fruit Forest Life on YouTube, this guide will walk you through every step of building your own robust and beautiful plant shelf. Whether you’re a seasoned gardener looking for a new way to display your green treasures or a budding DIY enthusiast eager to tackle a rewarding project, you’ll find everything you need to know right here. Get ready to roll up your sleeves and craft a stunning centerpiece for your plants!
RELATED: DIY Cinder Block Planter Arrangement Tutorial
Why a Cinder Block Plant Shelf is Your Next Essential Garden Project
Before diving into the construction details, let’s explore the myriad reasons why a DIY cinder block plant shelf is an exceptional choice for enhancing your outdoor environment:
- Unbeatable Cost-Effectiveness: Cinder blocks are among the most economical building materials available. When combined with affordable timber planks, this project delivers a high-impact visual and functional upgrade at a fraction of the cost of pre-fabricated garden shelving or patio furniture. It’s smart budgeting for beautiful results.
- Exceptional Durability and Longevity: Concrete is a robust, weather-resistant material designed to withstand the elements. Your cinder block plant shelf will stand strong against sun, rain, and temperature fluctuations, providing a stable and reliable home for your plants year after year without warping, rotting, or rusting like other materials might.
- Remarkable Versatility and Customization: The modular nature of cinder blocks opens up a world of design possibilities. You can effortlessly adjust the shelf’s height, width, and number of tiers to perfectly fit any available space, from a sprawling garden to a compact balcony. Personalize it further by painting the blocks a vibrant color, staining the wood for a natural look, or even incorporating unique decorative elements.
- Superior Space Optimization: For gardeners with limited ground space, a vertical plant shelf is a game-changer. It allows you to cultivate and display a significantly larger collection of plants by utilizing vertical dimensions, turning previously unused areas into thriving, multi-level gardens. This vertical gardening approach is perfect for urban dwellers or anyone looking to maximize their planting potential.
- Modern Industrial Chic Aesthetic: Cinder blocks, once relegated to hidden foundations, have emerged as a darling of contemporary design. Their raw, minimalist texture, when paired with the natural warmth of wood, creates a striking contrast that perfectly complements modern, industrial, rustic, and even bohemian decor styles. It’s an instant upgrade to your garden’s visual appeal.
- Ease of Assembly and Low Maintenance: Unlike intricate carpentry, building a cinder block shelf requires only basic DIY skills and common tools. Once constructed, its simple design means minimal maintenance. A quick wipe-down is usually all that’s needed to keep it looking fresh.
Meticulous Planning: The Foundation of Your Dream Plant Display
A well-executed DIY project always begins with careful planning. Taking the time to consider these essential aspects will ensure your cinder block plant shelf perfectly meets your functional needs and enhances your outdoor aesthetic.
1. Strategic Site Selection and Layout
The first crucial step is to identify the ideal location for your plant shelf. Consider these factors:
- Sunlight Requirements: Assess the amount of direct and indirect sunlight the area receives throughout the day. This will help you choose plants that thrive in that specific light condition or adjust your shelf’s placement accordingly.
- Accessibility and Flow: Ensure the chosen spot allows for easy access for watering, pruning, and general plant care without obstructing pathways or high-traffic areas.
- Ground Levelness: While we will prepare a level foundation, starting on relatively flat ground will significantly simplify the initial digging and leveling process.
- Aesthetic Integration: Visualize how the finished shelf will complement your existing garden design, patio furniture, or home exterior. A quick sketch can often help in this visualization.
2. Design and Dimension Considerations
Decide on the overall scale and configuration of your plant shelf. Will it be a singular, elongated unit, or a series of smaller, modular sections? How many tiers would best suit your plant collection and space? Popular designs range from a simple two-tier structure to a more elaborate three-tier staggered setup. Accurately measure the maximum length, width, and height your chosen space can accommodate. These measurements are vital for determining the precise quantity of materials you’ll need.
3. Accurate Material Calculation
Once your design is finalized, you can calculate your material requirements. Typically, each vertical support will consist of stacked cinder blocks, and each shelf level will require timber planks of a specific length. It’s always a prudent idea to purchase a few extra blocks and an additional tube of construction adhesive to account for any unforeseen circumstances or minor adjustments during construction.
Essential Materials and Tools for Your Cinder Block Plant Shelf
Having all your materials and tools gathered and ready before you begin will make the construction process much smoother and more efficient. Here’s a detailed list of what you’ll need:
- Standard Concrete Blocks (approx. 10-15): These are the full-sized blocks, commonly referred to as ‘cinder blocks,’ though modern versions are usually made from concrete. They form the primary vertical supports for your shelving structure. The exact quantity will depend on the overall length and desired height of your shelf.
- Single Concrete Blocks / Cap Blocks (approx. 10-15): These are often half-sized blocks or solid cap blocks. They can be used for capping off columns, creating staggered patterns, or providing additional stability. The number needed will vary based on your specific design.
- Timber Sleepers or Planks (approx. 3-5, depending on length): These will serve as your actual shelves. Choose robust wood capable of supporting the weight of multiple potted plants. For outdoor use, consider pressure-treated timber, which offers excellent resistance to moisture, rot, and pests. Alternatively, you can use untreated wood and apply a high-quality outdoor wood sealant or stain for protection. Ensure the dimensions (thickness, width, length) are suitable for your desired shelf size.
- External Liquid Nails Construction Adhesive (2-3 tubes): This industrial-strength adhesive is critical for securely bonding the concrete blocks together and firmly attaching the timber planks. It must be rated for outdoor use and compatible with both concrete and wood. Always check the manufacturer’s recommendations for application and curing times.
- 5mm Gravel (1 – 20kg bag): This material is essential for creating a stable, well-draining, and level foundation. The gravel base prevents future settling of the structure and ensures excellent drainage away from the blocks, enhancing the shelf’s longevity.
Recommended Tools for a Smooth Build:
- Shovel or Spade: Indispensable for digging the foundation trench.
- Measuring Tape: Crucial for accurate layout, spacing, and material placement.
- Spirit Level (long preferred): Absolutely vital for ensuring that your foundation, each layer of blocks, and the timber shelves are perfectly horizontal and plumb.
- Rubber Mallet: Useful for gently tapping blocks into precise alignment and ensuring a snug fit without damaging the concrete.
- Heavy-Duty Work Gloves: Essential for protecting your hands from the rough texture of concrete and the adhesive.
- Safety Glasses: Always recommended when working with construction materials to protect your eyes from dust or debris.
- Caulking Gun: For efficient and precise application of the construction adhesive.
- Garden Hoe or Rake: Ideal for spreading and leveling the gravel in the trench.
- Utility Knife/Box Cutter: For opening adhesive tubes.
Step-by-Step Directions: Constructing Your Beautiful Plant Shelf
Follow these detailed instructions carefully to build a sturdy, level, and visually appealing cinder block plant shelf. Patience and precision at each stage will yield the best results.
Step 1: Preparing a Robust and Level Foundation
The stability and long-term integrity of your plant shelf depend entirely on a well-prepared and perfectly level foundation. Do not rush this critical initial step.
- Mark the Footprint: Using your measuring tape, clearly mark out the exact dimensions and position of your intended plant shelf on the ground. For larger structures, stakes and string can be very helpful in creating a precise outline. This initial layout helps confirm your design and material requirements.
- Excavate the Trench: With your shovel, dig a trench within the marked area. The trench should be slightly wider than your cinder blocks to allow for easy placement and adjustment, and long enough to match your shelf’s planned length. Aim for a consistent depth of approximately 3-4 inches (7-10 cm) to remove the soft topsoil and create space for the gravel base. Ensure the bottom of the trench is as flat and even as possible.
- Clear and Smooth: Remove any loose soil, stones, roots, or other debris from the excavated trench. A clean base promotes better gravel compaction and overall stability.
- Lay the Gravel Base: Pour the 5mm gravel into the prepared trench, distributing it evenly across the entire bottom surface.
- Level and Compact the Gravel: Use a garden hoe or rake to spread the gravel to a consistent depth across the entire trench. This is where your spirit level becomes indispensable: place it on various spots across the gravel to ensure it is perfectly level in all directions. Once leveled, firmly compact the gravel. You can do this by stepping on it repeatedly, or for a more even compaction, use a hand tamper. Proper compaction is essential to prevent future settling of the foundation, which could lead to an unstable or uneven shelf.
Step 2: Building the Cinder Block Columns and Attaching Shelves
With your perfectly level foundation ready, it’s time to construct the robust vertical supports for your plant display.
- Dry Fit the First Layer: Before applying any adhesive, carefully place the first layer of cinder blocks onto your compacted gravel base. For typical designs, this might involve arranging one full block and one half block (or two full blocks for a wider column) to form the base of each vertical support. Position them precisely where your columns will stand. Use your measuring tape to ensure accurate spacing between columns, and your spirit level to confirm that each block and the entire layer is perfectly level. Make any necessary adjustments now; this dry fit is crucial for error correction.
- Apply Adhesive to the Base Layer: Once you are completely satisfied with the dry-fit placement, lift each block from the first layer individually. Apply a generous, continuous bead of outdoor construction adhesive to the bottom surface of each block. Firmly press the blocks back into their designated positions on the gravel. If blocks in the same layer are adjacent, apply adhesive between their touching sides for enhanced stability.
- Stacking Subsequent Layers with Staggering: Apply a thick, continuous bead of construction adhesive to the entire top surface of the laid blocks. Now, carefully place the next layer of cinder blocks on top. For maximum structural integrity and strength, it is essential to stagger the blocks. This means that the vertical joints of the upper layer should be offset from the vertical joints of the layer directly beneath it, much like bricks in a traditional wall. Gently tap each block with a rubber mallet if needed to ensure a snug and level fit.
- Construct All Columns: Repeat the stacking, adhesive application, and staggering process for all your vertical columns. Ensure that all columns reach your desired final height and are perfectly aligned with each other. Use your spirit level frequently to check both vertical plumbness and horizontal levelness across the tops of the columns. Promptly wipe away any excess adhesive that oozes out for a cleaner, more professional finish. Allow the adhesive to cure fully according according to the manufacturer’s instructions before proceeding to the next step, typically several hours or overnight. This curing time is vital for establishing strong bonds.
- Install the Timber Shelves: Once the cinder block columns are completely cured and rock-solid, it’s time to add your timber shelves. Apply a substantial amount of construction adhesive to the top surface of each cinder block column where the timber plank will rest. Carefully position your timber planks across the adhesive-coated blocks, ensuring they are evenly spaced and perfectly aligned. Press down firmly along the entire length of each plank to ensure excellent contact with the adhesive.
- Final Curing and Accessorizing: Allow the adhesive that bonds the timber to the blocks to cure completely before placing any heavy potted plants or decorative items on the shelves. This final curing period guarantees maximum strength and stability for your finished plant display. Once cured, unleash your creativity and arrange your potted plants and garden decor as you desire!
Expert Tips for Success and Creative Customization Ideas
To ensure your DIY cinder block plant shelf project is not only successful but also truly reflects your personal style and maximizes its potential, consider these additional tips and customization ideas:
- Measure Thrice, Build Once: Accuracy is paramount. Always double-check your measurements for the trench, block spacing, and timber lengths. A spirit level should be your constant companion throughout the entire build.
- Prioritize Safety: Always wear heavy-duty gloves to protect your hands from the rough concrete blocks and the adhesive. Safety glasses are also highly recommended to shield your eyes from dust or stray debris.
- Optimal Weather Conditions: While external adhesives are formulated for outdoor durability, it’s always best to perform the construction on a dry day with moderate temperatures. This ensures ideal bonding and curing conditions for the strongest possible structure.
- Patience with Adhesive Curing: Resist the temptation to rush the curing process. Allow the construction adhesive ample time to set fully between layers and after the timber is placed. A fully cured bond ensures maximum strength, stability, and longevity for your shelf.
- Embrace Creative Customization:
- Paint Your Blocks: For a dramatic transformation, paint your cinder blocks with outdoor-grade masonry paint. White offers a clean, modern look; black provides sophisticated contrast; and bold colors can create a vibrant focal point in your garden.
- Stain or Seal the Wood: Enhance the natural beauty of your timber and provide added protection by applying an outdoor wood stain or sealant. This not only extends the wood’s lifespan but also allows you to match it to existing outdoor furniture.
- Incorporate Lighting: Drape solar-powered string lights or strategically place small LED puck lights on and around your shelf to create a magical ambiance in the evenings, highlighting your plants.
- Add Mobility: For smaller, lighter shelves, consider attaching heavy-duty caster wheels to the bottom layer of blocks. Ensure the wheels are rated to support the full weight of the shelf and all its potted inhabitants for easy repositioning.
- Vary Shelf Depths: Instead of using uniform planks, experiment with different widths of timber for varying shelf depths. This creates visual interest and can accommodate a wider range of pot sizes and plant types.
- Integrate Storage: Utilize the hollow cores of some cinder blocks as discreet storage spaces for small gardening tools, gloves, or seed packets.
- Thoughtful Plant Selection & Arrangement: Once your shelf is complete, the fun truly begins! Select plants that thrive in the light conditions of your chosen location. Arrange them aesthetically, considering varying heights, textures, and foliage colors for a dynamic and visually appealing display.
Maintenance and Longevity: Keeping Your Plant Shelf Beautiful for Years
While your cinder block plant shelf is exceptionally durable, a minimal amount of regular care will ensure it remains a stunning and functional feature in your garden for many seasons to come:
- Routine Cleaning: Periodically wipe down the blocks and wooden planks to remove accumulated dust, dirt, spiderwebs, or plant debris. A simple solution of mild soap and water can be used for a deeper clean if needed.
- Inspect for Integrity: Every few months, conduct a quick visual inspection of your shelf. Check that all blocks remain securely bonded and that the timber shelves are stable. If any joints show signs of loosening over an extended period, reapply construction adhesive as necessary.
- Wood Protection Reapplication: If you opted for untreated timber or even if it’s treated, consider re-applying a high-quality outdoor wood sealant or stain every 1-2 years. This is especially important in areas with intense sun exposure or heavy rainfall, as it will continue to protect the wood from UV damage, moisture, and potential rot.
- Winterizing (for harsh climates): In regions with severe winters, you might consider covering the wooden shelves or even the entire structure with a weather-resistant tarp. This added protection from extreme cold, heavy snow, and ice can significantly extend the lifespan of your beautiful plant display.
Your Easy DIY Cinder Block Plant Shelf: Create Your Outdoor Oasis Today!
Embarking on the project of building your own cinder block plant shelf is a deeply rewarding experience that offers both immense practical benefits and a significant boost to your outdoor aesthetic. With a modest investment of time and materials, you can construct a customized, incredibly durable, and effortlessly stylish display that transforms any patio, garden, or balcony into a vibrant, organized, and inviting green sanctuary.
From its robust, weather-resistant construction to its endless possibilities for personalization, this DIY solution is perfectly suited for showcasing your cherished plant collection and adding a distinct, handcrafted touch to your home. So, gather your materials, arm yourself with this comprehensive guide, and begin your journey to crafting a truly stunning and functional plant haven that you’ll enjoy for many years to come. Get ready to revel in the beauty and immense satisfaction of a space designed and brought to life by your very own hands!