
Master the Art of Pickled Red Onions: Your Go-To Recipe for Tangy Perfection!
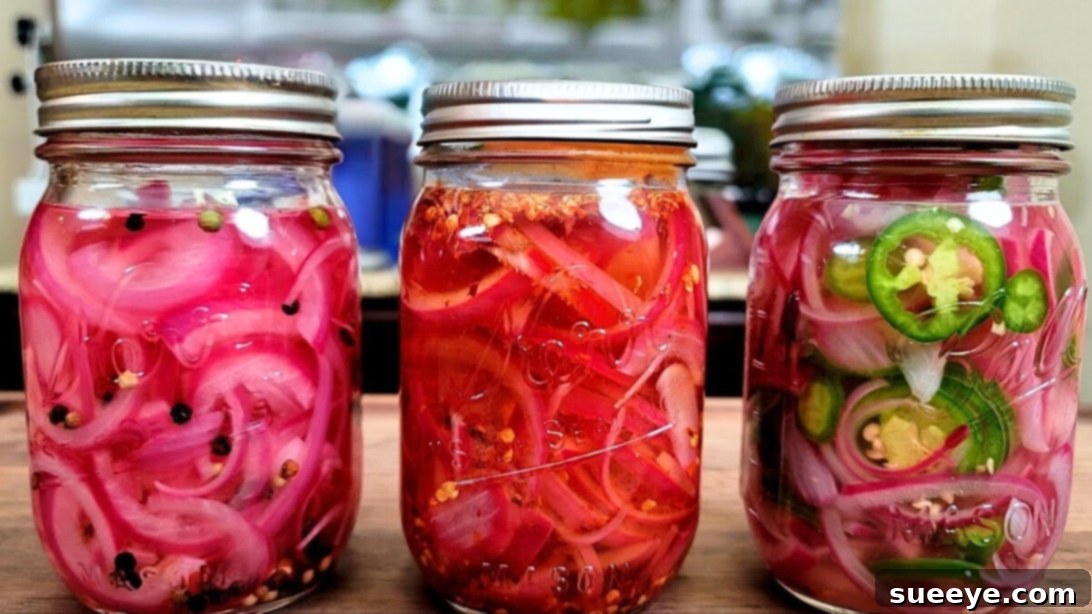
Are you ready to elevate your culinary creations with a simple yet incredibly impactful condiment? Look no further than this fantastic recipe for easy pickled red onions. Bursting with a vibrant color, irresistible crunch, and a delightful piquant-sweet flavor profile, these homemade pickled onions are a game-changer for any meal. From livening up your favorite BBQ dishes to adding a zesty kick to tacos, salads, and sandwiches, their versatility knows no bounds. Inspired by the expert techniques of Smokin’ Joe’s Pit BBQ, this guide not only provides a straightforward method but also introduces three incredible variations to customize your pickling experience. I’ve personally tried each one, and I can confidently say they are all absolutely delicious. Get ready to transform humble red onions into a flavor powerhouse!
Making your own pickled red onions is surprisingly simple, requiring minimal ingredients and effort, but yielding maximum flavor. This recipe is perfect for both beginner cooks and seasoned culinary enthusiasts looking to add a homemade touch to their meals. Forget store-bought versions; the fresh taste and satisfying crunch of homemade pickled onions are truly unparalleled. Let’s dive into the details and discover how you can create this amazing condiment right in your own kitchen.
Why Homemade Pickled Red Onions Are a Must-Have
There are countless reasons to add homemade pickled red onions to your regular rotation. Beyond their incredible taste, they offer a fresh perspective on countless dishes. Here’s why you should make them:
- Unbeatable Flavor & Texture: Unlike raw onions, which can be overpoweringly pungent, pickling transforms them into a delightful balance of sweet, tangy, and slightly spicy notes, all while retaining a satisfying crunch.
- Versatility at Its Best: These onions are not just a BBQ side dish; they are a universal enhancer. Imagine them topping your gourmet burgers, enriching your avocado toast, cutting through the richness of grilled meats, or adding a pop of color and flavor to any salad.
- Easy & Quick Preparation: With just a few common pantry staples and minimal hands-on time, you can have a batch of these vibrant onions ready to infuse in your fridge. No complicated canning equipment is needed!
- Cost-Effective: Red onions are inexpensive, and homemade pickling brine is even cheaper than buying specialty pickled products from the store.
- Control Over Ingredients: Making them yourself means you know exactly what goes into them. You can adjust the sweetness, saltiness, or spiciness to perfectly suit your palate and dietary preferences.
- Visual Appeal: Their beautiful pink-red hue adds an instant splash of color and elegance to any plate, making your food look as good as it tastes.
Essential Ingredients for Your Pickled Red Onions
Gathering your ingredients is the first step towards pickling perfection. This recipe uses readily available items that you likely already have or can easily find at any grocery store. The beauty lies in the simplicity of these components working together to create something truly extraordinary. Remember, fresh and quality ingredients always yield the best results.
- 2 Medium Red Onions: The star of our show! Red onions are preferred for their beautiful color and slightly milder flavor compared to yellow onions once pickled.
- 1 1/2 Cups Hot Water: Used for both the initial blanching process to mellow the onion’s bite and as a base for our brine.
- 1 1/2 Cups White Vinegar: The key acidic component that gives the onions their signature tang and acts as a preservative. Distilled white vinegar is classic, but you can experiment with apple cider vinegar for a fruitier note or rice vinegar for a milder Asian-inspired twist (though for this recipe, stick to white vinegar as specified).
- 2 Tablespoons Kosher Salt: Essential for flavor balance and drawing out moisture. Kosher salt is preferred over table salt as it lacks iodine and anti-caking agents, resulting in a cleaner flavor.
- 2 Tablespoons Sugar: To balance the acidity of the vinegar and enhance the overall sweet-and-sour profile. You can adjust this amount to your preference for a sweeter or tangier pickle.
- Jalapeño (1 whole, sliced): For the first variation, adding a fresh, vibrant heat and a lovely herbaceous note.
- 1 Tablespoon Crushed Red Pepper: For the second variation, delivering a different kind of spicy kick with textural interest.
- 1 Tablespoon Whole Peppercorns: For the third variation, offering a classic aromatic warmth and subtle spice without overwhelming the other flavors.
Important Note: You will need three clean, sterilized mason jars for this recipe. Sterilizing your jars is crucial for food safety and ensuring your pickled onions last longer. You can sterilize them by washing them thoroughly with hot, soapy water, rinsing well, and then either boiling them for 10 minutes or running them through a dishwasher’s hot cycle.
Step-by-Step Guide: Crafting Your Pickled Red Onions
Follow these detailed instructions carefully to ensure your pickled red onions turn out perfectly crunchy, tangy, and bursting with flavor. The process is straightforward, designed for ease and efficiency.
Step 1: Prepare Your Mason Jars
Begin by preparing your three mason jars. It is absolutely critical that they are meticulously sterilized, completely free from any dirt or residue, and thoroughly dry before you start. Proper sterilization eliminates bacteria that could spoil your pickles and ensures a longer shelf life for your delicious creation. A common method involves washing them in hot, soapy water, rinsing, and then either boiling them in water for at least 10 minutes or running them through a hot cycle in your dishwasher. Allow them to air dry completely or use a clean, lint-free cloth.
Step 2: Prepare and Blanch the Red Onions
Carefully peel the red onions, removing the papery outer layers and trimming off both ends. Slice each onion in half lengthwise. Then, using a sharp knife or a mandoline for consistency, slice the onion halves into very thin, uniform crescents. The thinner the slices, the quicker they will pickle and the better their texture will be. Place the thinly sliced onions into a colander, setting the colander over a bowl to catch any excess water. Pour 1 1/2 cups of hot water evenly over the onions in the colander and gently stir them. Let the onions sit in the hot water for exactly 1 minute. This crucial blanching step helps to mellow out the onions’ strong, pungent “oniony” flavor, resulting in a more palatable and sweet pickle. If you prefer a stronger, more assertive onion flavor, you can reduce the soaking time to about 30 seconds, or skip the hot water blanching entirely and place the raw onions directly into the mason jars for a truly robust taste. After blanching, drain the onions thoroughly.
Step 3: Prepare the Brine Mixture
In a separate medium-sized mixing bowl, combine the remaining 1 1/2 cups of hot water, 1 1/2 cups of white vinegar, 2 tablespoons of kosher salt, and 2 tablespoons of sugar. Whisk these ingredients together vigorously until the salt and sugar have completely dissolved. It’s important that no granules remain, ensuring a smooth and consistent brine. Taste the brine and adjust if necessary – you might prefer it a little sweeter or tangier, but these ratios provide a perfectly balanced starting point. Set this flavorful brine aside for a moment.
Step 4: Distribute the Onions
Evenly distribute the blanched, thinly sliced red onions among your three prepared mason jars. Pack them relatively tightly, but don’t overstuff them, as you’ll need space for the brine and additional flavorings. Aim for roughly equal amounts in each jar to ensure consistent pickling across all variations.
Step 5: Add Your Flavor Variations
Now for the exciting part – customizing your pickled red onions with distinct flavor profiles! This step allows you to enjoy three different types from one single batch.
- Jar 1 (Spicy & Fresh): Carefully slice the jalapeño into thin rounds (remove seeds for less heat, leave them in for more fire!). Add the entire sliced jalapeño to your first jar of onions. This will infuse a bright, herbaceous heat into the onions.
- Jar 2 (Warm & Piquant): To the second jar, add 1 tablespoon of crushed red pepper flakes. This variation offers a more direct, vibrant spiciness with a delightful visual appeal.
- Jar 3 (Classic & Aromatic): For the third and final jar, incorporate 1 tablespoon of whole black peppercorns. These will lend a classic, earthy, and aromatic warmth to the pickled onions, a timeless pairing.
Step 6: Fill with Brine and Chill
Carefully pour the prepared brine mixture over the onions in all three jars, ensuring that the onions are completely submerged. You may need to gently press the onions down with a spoon to ensure they are fully covered by the liquid. This is crucial for proper pickling and preservation. Securely cover each jar with its lid. Give each jar a good, gentle shake to distribute the brine and flavorings evenly. Finally, place the sealed jars in your refrigerator. For optimal flavor development and that perfect tangy crunch, let them sit and meld overnight, ideally for at least 12-24 hours, before enjoying. The longer they sit, the more the flavors will intensify!
The Magic of Pickled Red Onions: Flavor & Texture Profile
What makes pickled red onions so universally adored? It’s their dynamic flavor and texture profile that truly sets them apart. Raw red onions can be sharp and pungent, often overwhelming other flavors. However, the pickling process works a magical transformation. The vinegar’s acidity breaks down some of the harsh compounds, while the sugar balances the tartness, resulting in a complex sweet-and-sour harmony. This creates a condiment that is wonderfully tangy, subtly sweet, and incredibly refreshing. The initial crunch gives way to a tender bite, and the vibrant pink hue adds a delightful visual pop to any dish. Each of our three variations introduces another layer: the jalapeño offers a fresh, green heat; crushed red pepper delivers a straightforward, spicy kick; and whole peppercorns provide a classic, aromatic depth that complements the onion’s natural sweetness.
Serving Suggestions: Endless Culinary Possibilities
Once you have a batch of these delectable pickled red onions, you’ll find yourself reaching for them constantly. Their versatility is truly remarkable. Here are just a few ideas to inspire your culinary adventures:
- BBQ & Grilled Meats: As mentioned, they are the quintessential BBQ side dish! Pile them high on pulled pork sandwiches, grilled chicken, brisket, or hot dogs for a vibrant, tangy contrast.
- Tacos & Fajitas: A must-have topping for any Mexican-inspired dish. The bright tang cuts through the richness of meats and adds a fresh element.
- Burgers & Sandwiches: Elevate your everyday burger or sandwich from ordinary to extraordinary. They add a gourmet touch and a delightful crunch.
- Salads & Bowls: Sprinkle them over green salads, grain bowls, or even potato salad for an instant flavor and color boost.
- Avocado Toast & Eggs: A few slices on your morning avocado toast or alongside scrambled eggs can transform breakfast or brunch.
- Charcuterie Boards: Their vibrant color and tangy flavor make them a beautiful and delicious addition to any cheese and meat platter.
- Fish Tacos & Seafood: Their acidity pairs beautifully with the delicate flavors of fish and other seafood.
- Dips & Spreads: Chop them finely and stir them into cream cheese dips or hummus for an extra zing.
Storage and Shelf Life of Pickled Red Onions
Proper storage is key to enjoying your homemade pickled red onions for as long as possible. Once prepared, store the sealed jars in the refrigerator. Ensure the onions remain submerged in the brine; this is vital for maintaining their quality and preventing spoilage. If any onions are exposed to air, they can discolor or become soft more quickly. When stored correctly in an airtight container in the fridge, your pickled red onions can last for up to 2-3 weeks, sometimes even longer. Always use a clean utensil when retrieving onions from the jar to avoid introducing contaminants. Over time, the onions may become slightly softer, but their flavor will often deepen. Trust your senses: if they smell off or show any signs of mold, it’s best to discard them.
Expert Tips for the Best Pickled Red Onions Every Time
While this recipe is incredibly straightforward, a few expert tips can help you achieve truly exceptional results:
- Uniform Slicing: Aim for consistent, thin slices. This ensures even pickling and a better texture. A mandoline slicer can be a great tool for this, but a sharp knife and a steady hand work just as well.
- Don’t Skimp on Soaking: The hot water soak is crucial for mellowing the onion’s raw bite. Experiment with the soaking time to find your preferred pungency level.
- Quality Vinegar: While white vinegar is specified, high-quality distilled white vinegar can make a subtle difference. For future experiments, try apple cider vinegar for a fruitier, milder tang.
- Balance the Brine: The provided sugar and salt ratios are a great starting point. Don’t hesitate to adjust them slightly to match your personal preference for sweetness or saltiness. A little taste test of the brine before adding to the onions is always a good idea.
- Full Submersion: Always ensure the onions are completely covered by the brine. This is critical for both pickling effectively and preventing spoilage. You can use a small piece of parchment paper or a fermentation weight if needed to keep stubborn onion bits submerged.
- Patience is a Virtue: While technically edible after a few hours, the flavors truly meld and deepen after at least 12-24 hours in the refrigerator. Plan ahead for the best results!
Customization and Variations Beyond This Recipe
One of the joys of making pickled red onions at home is the endless potential for customization. While the three variations in this recipe are fantastic, don’t be afraid to get creative! Here are some ideas for future batches:
- Garlic & Herbs: Add a few cloves of sliced garlic, a sprig of fresh dill, or a bay leaf to the jars for an aromatic boost.
- Spices: Experiment with other whole spices like mustard seeds, coriander seeds, or a pinch of celery seeds for different flavor dimensions.
- Sweetness Level: Adjust the sugar content for a sweeter or tarter pickle. You can even try using a touch of honey or maple syrup for a different kind of sweetness.
- Vinegar Blends: Mix white vinegar with red wine vinegar for a slightly different color and deeper flavor, or try rice wine vinegar for a milder, Asian-inspired pickle.
- Citrus Zest: A strip of lemon or orange zest can add a bright, fragrant note to your brine.
- Shallots: While red onions are classic, this pickling method also works beautifully for shallots, offering a more delicate flavor.
Conclusion: Your New Favorite Condiment Awaits!
Congratulations! You are now equipped with the knowledge and steps to create your own batches of absolutely delicious, crunchy, and tangy pickled red onions. This simple recipe, inspired by the culinary wisdom of Smokin’ Joe’s Pit BBQ, is more than just a method; it’s an invitation to elevate every meal with minimal effort and maximum flavor. Whether you opt for the zesty kick of jalapeño, the vibrant warmth of crushed red pepper, or the classic aromatics of whole peppercorns, each variation promises to delight your palate and impress your guests.
Don’t underestimate the power of this humble condiment to transform ordinary dishes into extraordinary culinary experiences. They are fresh, vibrant, and packed with flavor, making them an indispensable addition to your kitchen repertoire. So, go ahead, gather your ingredients, follow these easy steps, and get ready to enjoy the incredible versatility and taste of homemade pickled red onions. Happy pickling!