
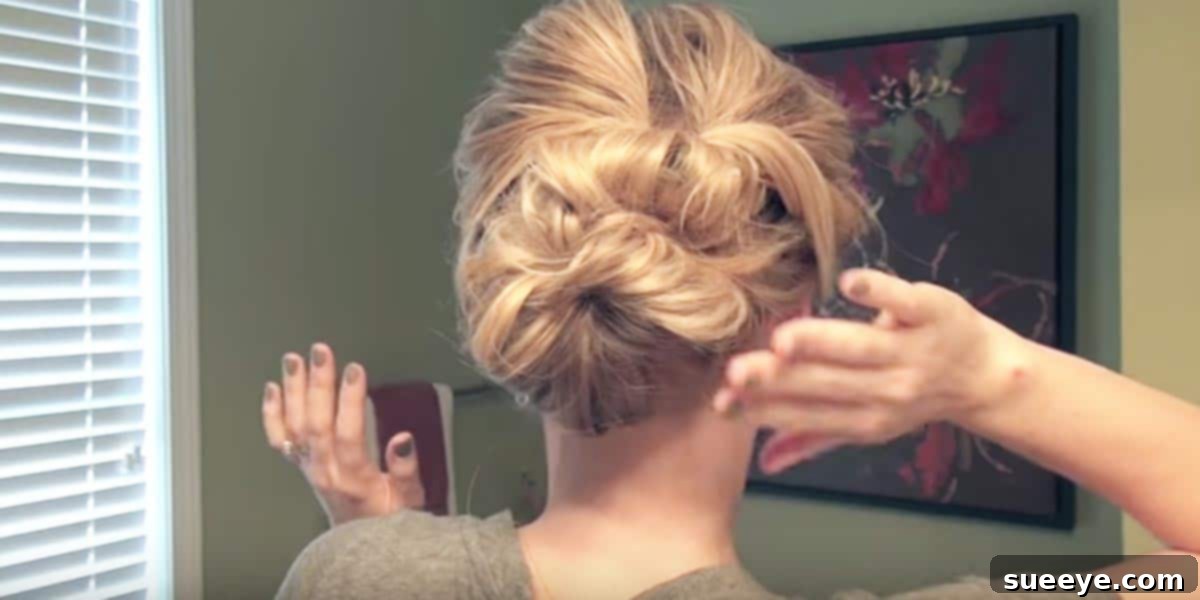
Mastering Chic Updos for Medium Length Hair: Your Ultimate Guide to Effortless Elegance
The decision to chop off long hair in favor of a modern, stylish lob can be incredibly liberating. I recently made this very change, trading my lengthy locks for a sleek, easy-to-manage mid-length cut. While I absolutely adore the refreshed look and the convenience it brings to my daily routine, a slight pang of regret set in when I realized a friend’s wedding was just around the corner. All my go-to elegant updos, which once felt so effortless, suddenly seemed to demand a few more inches than my newly shortened hair could offer. The challenge of creating a sophisticated hairstyle for a special occasion with medium-length hair became surprisingly real.
The Chic Appeal of the Lob and Its Unique Styling Considerations
The lob, or long bob, has undeniably cemented its place as a quintessential modern haircut. It strikes a perfect balance between the boldness of a bob and the versatility of longer hair, offering a fresh, sophisticated aesthetic that flatters many face shapes. Its popularity stems from its chic appearance, minimal daily styling requirements, and the sense of contemporary elegance it conveys. However, when it comes to formal events or special occasions, those very qualities can present a unique set of challenges. Traditional elaborate updos often rely on significant length to create voluminous twists, intricate braids, and gravity-defying buns.
For those of us sporting lobs or other medium-length styles, the dream of a picture-perfect updo might seem out of reach. Layers that frame the face beautifully on a daily basis can become tricky escape artists in a formal updo. The overall length, while perfect for a sleek straight look or soft waves, can feel inadequate when attempting a full, elegant bun or a classic French twist. Many believe that medium hair is simply “too short” for truly elegant updos, often resorting to leaving it down or opting for simple half-up styles. This article aims to debunk that myth entirely, proving that your medium-length hair is perfectly capable of achieving stunning, sophisticated looks for any event.
Unlocking Updo Potential: My Discovery of “The Small Things Blog”
Faced with my updo dilemma and determined not to let my new haircut dictate my formal styling options, I embarked on an intensive search for inspiration. YouTube became my go-to resource, where I scoured countless videos for “sexy summer updos for medium length hair” and “easy wedding hairstyles for lobs.” Amidst a sea of complicated tutorials and styles requiring impossibly long hair, I stumbled upon a hidden gem: a channel called “The Small Things Blog.” From the moment I watched my first video, I was instantly captivated and utterly fell in love.
Kate, the brilliant mind behind The Small Things Blog, possesses an extraordinary talent for demystifying complex hairstyles. Her channel is an absolute treasure trove, packed with simple, achievable hair tutorials specifically tailored for medium-length hair. What truly sets her apart is her remarkable ability to break down each step with such clarity and ease that even styling novices can follow along with confidence. Her instructions are not only practical but also deeply encouraging, making seemingly daunting updos feel entirely within reach. I spent a solid two hours one evening, mesmerized, going through nearly every single one of her tutorials. It was then that I realized my heart’s temporary ache for my long locks was unnecessary; I could absolutely rely on these super easy and undeniably pretty updo hairstyles for medium hair.
Beyond the Basics: Essential Tips for Styling Medium Length Hair for Updos
Achieving a flawless updo with medium-length hair isn’t just about the steps of the style itself; it’s also about proper preparation and utilizing the right tools. With a little foresight and a few key techniques, you can ensure your updo not only looks stunning but also holds up throughout your special occasion.
Prepping Your Hair for the Perfect Updo
- Texture is Key: For most updos, hair that isn’t freshly washed tends to hold style better. Day-old hair has a natural grip and texture that prevents it from slipping out of pins and elastics. If your hair is freshly washed, consider adding a texturizing spray or dry shampoo to create some grit and volume at the roots.
- Product Power: Arm yourself with the right arsenal of products. A good volumizing mousse applied to damp hair before blow-drying can add significant body. Texturizing sprays are invaluable for creating piecey, natural-looking texture. And, of course, a reliable hairspray (flexible or strong hold, depending on your desired outcome) is crucial for setting the style and taming flyaways.
- Tools of the Trade: Essential tools include a good quality teasing comb for root volume, plenty of bobby pins (in a color that matches your hair), clear elastic bands (or bands that blend in), and a strong hair tie. A curling iron or wand can also be beneficial for adding waves or curls to provide extra texture and manageability, especially for softer, romantic updos.
Working with Layers and Shorter Strands
One of the common challenges with medium-length hair, particularly lobs, is managing the layers that might be too short to reach the main updo structure. Don’t view these as obstacles, but opportunities! Shorter layers around the face can be intentionally left out to create soft, flattering tendrils, or gently curled and pinned back for a more polished finish. Use smaller, discreet bobby pins to secure any stray strands close to the scalp, blending them into the existing style. Sometimes, strategically placed bobby pins can help create the illusion of more length or volume where needed.
Elevate Your Look: Easy DIY Updos for Every Occasion
Inspired by the simplicity and elegance championed by The Small Things Blog, I’ve curated a selection of fantastic DIY updos that are perfectly suited for medium-length hair. These styles are not only beautiful but also surprisingly easy to achieve, making them ideal for weddings, special events, or simply when you want to feel extra polished.
1. The Effortless Twisted Low Bun
This updo is a testament to understated elegance. It’s classic, sophisticated, and incredibly versatile, making it perfect for formal events like weddings, elegant dinners, or even a chic office look. It requires minimal length, relying more on technique than sheer volume.
- Preparation: Start with hair that has a little grit; if it’s too clean, spray a texturizing spray through the mid-lengths and ends.
- Low Ponytail: Gather all your hair into a loose, low ponytail at the nape of your neck and secure it with a thin elastic band.
- Create a Gap: Above the elastic, use your fingers to create a small gap or “hole” in the hair.
- The Twist-Through: Flip your ponytail up and through the gap you just created, pulling it completely through to the other side. This creates a beautifully twisted effect at the base.
- Twist and Wrap: Take the tail of your twisted ponytail and begin to loosely twist it. Then, wrap this twisted section around the base of the ponytail, tucking the end underneath.
- Secure and Loosen: Secure the bun with several bobby pins, strategically placing them to hold it firmly in place. Gently tug at sections of the bun and the twisted base to create a softer, more voluminous, and less “perfect” look. Finish with a light mist of hairspray.
Why it works for medium hair: This style doesn’t demand extreme length for volume. The twisting action inherently creates fullness, and any layers simply add to the soft, romantic texture.
2. The Romantic Half-Up, Half-Down Twist
For those who love the idea of an updo but still want to showcase their hair’s length, this style offers the best of both worlds. It’s wonderfully romantic and perfectly suited for bridesmaids, garden parties, or even a sophisticated casual outing.
- Sectioning: Begin by parting your hair as desired. Take a section of hair from above your ear on one side and gently twist it towards the back of your head.
- Second Twist: Repeat the process on the other side, taking another section from above the opposite ear and twisting it back.
- Join and Secure: Bring both twisted sections together at the back of your head, just above the nape of your neck. Secure them with a small, clear elastic band or criss-cross bobby pins.
- Add Volume: Gently push the hair at the crown upwards with your fingers to create a little volume and lift.
- Curl the Ends: For added flair and romance, use a curling iron to create soft waves or curls in the remaining loose hair. Finger-comb them for a natural finish.
Benefits for a lob: This style beautifully frames the face while keeping the front sections neatly pulled back. The remaining length of the lob is allowed to shine, enhancing the cut’s natural appeal.
3. The Chic Braided Crown (Faux Braid for Shorter Layers)
This bohemian-chic style looks incredibly intricate but is surprisingly manageable for medium lengths. It’s fantastic for adding a festive touch or a touch of whimsical elegance to any outfit.
- Parting: Create a deep side part or a clean middle part, depending on your preference.
- First Braid: Starting from one side, near your temple, begin a French braid or Dutch braid along your hairline, moving towards the back of your head. Aim to incorporate new sections of hair as you go, keeping the braid relatively loose.
- Second Braid: Once you reach the back of your head or just behind your ear, secure that braid temporarily with a small elastic. Repeat the process on the other side, creating a second braid.
- Crossing and Pinning: Bring the two braids together at the back of your head. Cross them over each other, creating a ‘crown’ effect. Pin the ends securely underneath the opposite braid, tucking them out of sight.
- Volumize: Gently pull at the loops of the braids to make them appear thicker and softer, creating a fuller, more romantic look.
Adaptation for medium hair: If your layers are too short for a continuous French braid, you can create two regular braids on each side, then cross and pin them. Alternatively, try a “faux braid” by taking small sections, twisting them, and pinning them across your head to mimic a braid.
4. The Speedy Low Chignon with a Twist
This elegant chignon is a sophisticated choice that can be whipped up in minutes, making it perfect for busy mornings, last-minute events, or when you want to look effortlessly put-together.
- Gather Hair: Pull all your hair into a low ponytail at the nape of your neck. For a softer look, leave out two small sections of hair at the front, framing your face.
- Twist into a Bun: Loosely twist the ponytail and wrap it around its base to form a simple bun. Secure it with bobby pins. Don’t worry about perfection; a slightly messy bun often looks more chic.
- Twist Front Sections: Take one of the loose front sections and gently twist it back towards the bun. Wrap it around the bun and secure it with a pin.
- Repeat: Do the same with the other front section, twisting it back and wrapping it around the bun in the opposite direction.
- Refine: Gently pull out a few wisps around the face for a softer effect. Mist with hairspray to hold.
Why it’s a game-changer: This style creates the impression of a complex chignon without requiring perfectly uniform length, as the twisted sections add depth and mask any shorter layers within the bun.
5. The Playful Pin-Up Curls
Embrace a touch of retro glamour with this charming pin-up style. It adds volume, bounce, and a flirty appeal, making it ideal for a fun, stylish event.
- Curl Your Hair: Using a curling iron or hot rollers, curl all your hair. For a lob, focus on creating bouncy curls that add volume rather than length. Pin each curl up to cool for maximum hold.
- Add Volume at Crown: Once cooled, release the curls. Gently backcomb the hair at the crown of your head to create significant lift and volume. Smooth the top layer over the teasing.
- Pin Back Front Sections: Take a section of hair from one side, just above your temple, and sweep it back, pinning it securely behind your ear or slightly lower. Repeat on the other side, allowing some curls to cascade around your face.
- Secure Loose Ends: If you have shorter layers that tend to fall out, strategically use bobby pins to tuck them in, creating a neat yet voluminous silhouette.
- Final Touch: Finish with a flexible-hold hairspray to keep the curls bouncy and in place without stiffness.
Ideal for a lob: This style beautifully showcases the modern cut of a lob while adding the formal, bouncy texture of curls, creating a striking and playful contrast.
Beyond the Wedding: The Versatility of Medium Length Updos
While the initial motivation for exploring these updos was a wedding, their versatility extends far beyond formal events. These styles can be adapted for a myriad of occasions. The Effortless Twisted Low Bun, for instance, can be dressed down for a sophisticated office look or elevated with sparkling hair accessories for a gala. The Romantic Half-Up, Half-Down Twist is perfect for a weekend brunch or a casual date night. Even the more elaborate Braided Crown can be a stunning choice for a music festival or a summer picnic.
The key is to experiment and personalize each look. Adjust the tightness of the twists, the placement of the bun, or the volume at the crown to suit your personal style and the demands of the occasion. Developing a repertoire of these easy DIY updos not only solves the dilemma of styling medium-length hair for special events but also empowers you with the confidence to look and feel your best, no matter what your day brings.
Final Thoughts: Embracing Your Lob with Style and Confidence
My journey from regretting the “big chop” before a friend’s wedding to fully embracing the styling potential of my lob has been a revelation. It taught me that perceived limitations often just require a different approach and a little creative inspiration. The world of medium-length hair updos is rich with possibilities, offering elegant, chic, and surprisingly simple solutions for every occasion.
Thanks to amazing resources like The Small Things Blog, anyone can master these beautiful hairstyles with a bit of practice. I encourage you to watch her tutorials, experiment with these styles, and discover your own favorite looks. Don’t let the length of your hair dictate your style; instead, embrace the versatility of your lob or medium cut and confidently create stunning updos that turn heads. With these tips and tutorials, you’re now equipped to face any event with grace, style, and an undeniably chic updo.