
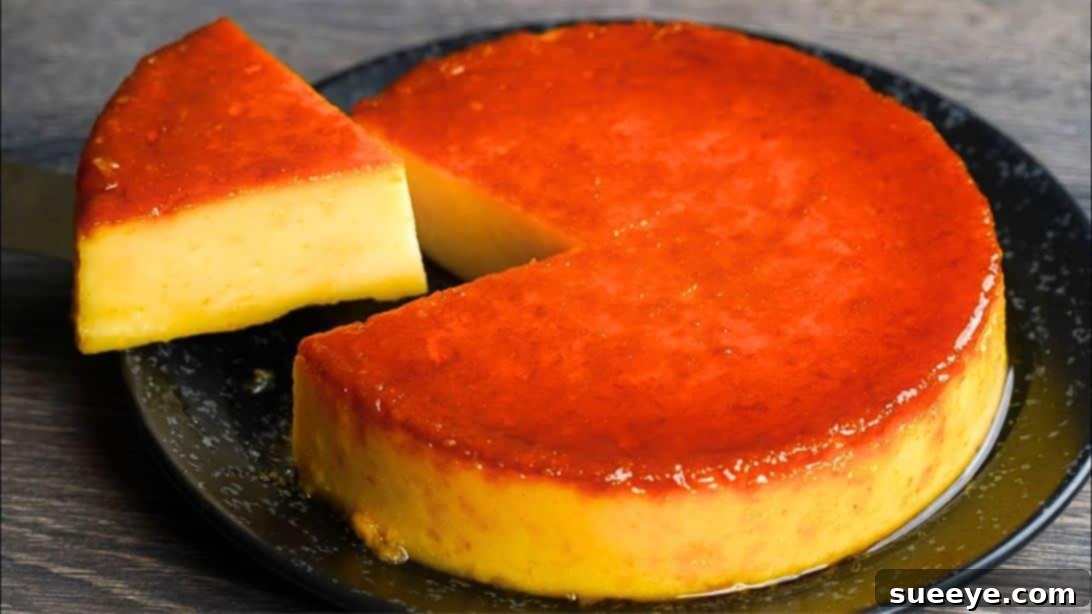
Easy 5-Ingredient No-Bake Custard Pudding: Your Stovetop Dessert Masterpiece
Are you searching for an incredibly delicious dessert that doesn’t demand hours in the kitchen or the use of an oven? Look no further! This fantastic no-bake custard pudding recipe, inspired by the creative culinary minds at N’Oven – Cake & Cookies on YouTube, is an absolute game-changer. It’s surprisingly easy to make, incredibly satisfying, and requires only 5 simple ingredients that you can effortlessly find at your local grocery store. Get ready to transform everyday staples into a luscious, creamy dessert right on your stovetop. This comprehensive guide will walk you through every step, ensuring your homemade custard pudding turns out perfectly every single time.
Forget complex baking techniques and lengthy ingredient lists. This recipe is designed for ease and accessibility, making it ideal for novice cooks and seasoned dessert enthusiasts alike. Whether you’re craving a sweet treat for yourself, preparing a delightful surprise for your family, or need a quick dessert for an impromptu gathering, this easy no-bake custard pudding fits the bill. Its smooth texture, rich flavor, and beautiful caramel topping make it an irresistible choice for any occasion. Discover the joy of creating a gourmet-tasting dessert with minimal effort and without ever turning on your oven!
Gather Your Simple Ingredients for This Delightful Pudding
One of the true beauties of this no-bake custard pudding recipe lies in its minimalist ingredient list. You’ll be amazed at the depth of flavor and luxurious texture you can achieve with just a few pantry essentials. We’ve broken down the ingredients into their respective components for clarity and ease of preparation.
For the Unique Bread Base:
- 6 slices of white bread (standard sandwich bread works perfectly). The bread serves as a clever base, providing structure and a subtle, comforting texture to our pudding. It effectively absorbs the rich custard mixture, creating a dense yet tender dessert.
For the Velvety Custard Mixture:
- 3 tablespoons of custard powder or cornstarch. This ingredient is our primary thickening agent. Custard powder typically contains cornstarch along with flavorings and coloring, which enhances the pudding’s traditional look and taste. If you opt for cornstarch, consider adding a touch of vanilla extract to the batter later for a similar flavor profile.
- ½ cup of cold milk. This small amount of milk is crucial for dissolving the custard powder or cornstarch into a smooth slurry. Mixing it with cold milk prevents the formation of lumps when it’s introduced to the hot milk later in the recipe, ensuring a perfectly smooth custard.
For the Irresistible Caramel Sauce:
- ¼ cup of granulated sugar. This sugar will be transformed into a beautiful, golden caramel layer that not only adds a touch of sophisticated sweetness but also provides a stunning visual appeal to your finished pudding.
- 1 tablespoon of water. A small amount of water helps the sugar dissolve more evenly and prevents it from crystallizing too quickly during the caramelization process, resulting in a smoother, more manageable caramel.
For the Rich Pudding Batter:
- 1½ cups of milk (whole milk is highly recommended for the creamiest, most decadent result, but 2% or even skim milk can be used if preferred, though the texture may be slightly lighter). This forms the main liquid base of our custard, ensuring a smooth and pourable consistency that will absorb the bread crumbs beautifully.
- 1/3 cup of granulated sugar. This sweetens the main custard batter, providing a balanced flavor profile that complements both the bread base and the caramel topping. You can adjust this amount slightly to suit your personal sweetness preference.
Step-by-Step Guide to Crafting Your No-Bake Custard Pudding
Follow these easy, detailed steps precisely, and you’ll be enjoying a delightful homemade custard pudding that looks and tastes like it came from a gourmet bakery. Precision is particularly important when making caramel, but don’t worry, we’ll guide you through each stage to ensure success.
Step 1: Prepare the Bread Crumbs and Create the Caramel Base
Begin by taking your 6 slices of white bread. Carefully cut off all the crusts from the sides of each slice. For this specific pudding, we aim for the soft, white part of the bread to create an incredibly smooth and uniform texture. Once the crusts are removed, tear or cut the white bread into small, manageable pieces. Transfer these pieces into a blender or food processor. Blend them thoroughly until they form fine, even bread crumbs. Set these bread crumbs aside; they will be cleverly incorporated into the custard to provide a unique structure and satisfying body to your pudding.
Next, prepare your essential custard slurry. In a small, separate bowl, whisk together the 3 tablespoons of custard powder (or cornstarch) and ½ cup of cold milk until the powder is completely incorporated and dissolved. It is absolutely vital to mix this thoroughly to ensure there are no lingering lumps, as these could affect the final texture of your pudding. Once the mixture is perfectly smooth, set this bowl aside for later use.
Now, let’s create the show-stopping caramel layer. Place a clean, heavy-bottomed pan or saucepan on your stovetop over medium heat. Add the ¼ cup of granulated sugar and 1 tablespoon of water to the pan. Allow the sugar to dissolve and begin to cook without stirring initially. You’ll observe the mixture beginning to bubble gently, and then it will gradually change color, transitioning from clear to a pale amber, and finally to a rich, golden brown. This process usually takes about 5-8 minutes. As soon as it reaches a deep amber color (be extremely careful not to burn it, as burnt caramel will taste bitter), immediately remove the pan from the heat. Gently move the pan around to ensure the caramel is evenly mixed. Promptly pour the hot caramel sauce into a 6-inch round cake pan. Swirl the pan to coat the entire bottom evenly with the hot caramel, then set it aside to cool slightly. As it cools, the caramel will firm up and create a beautiful, glossy layer.
Step 2: Craft the Delicious Custard Pudding Batter
For this crucial step, you’ll need another clean saucepan. Place it on your stovetop over medium-high heat. Pour in the 1½ cups of milk and 1/3 cup of granulated sugar. Bring this mixture to a gentle boil, stirring constantly to ensure that the sugar dissolves completely and, more importantly, to prevent the milk from scorching at the bottom of the pan. Once the mixture reaches a visible boil, immediately turn off the heat. This prevents the milk from boiling over and allows for a better, more controlled integration of the custard mixture.
Now, it’s time to add your prepared custard powder and milk slurry. While stirring the hot milk continuously and vigorously, gradually pour in the custard mixture. Keep stirring energetically for about 1-2 minutes until the entire mixture thickens slightly and evenly. The residual heat from the milk will activate the starch in the custard powder, causing it to thicken beautifully into a smooth, pourable custard. After it has thickened, gradually add the fine bread crumbs that you prepared earlier. Mix them into the custard until they are thoroughly combined and evenly distributed throughout the batter. The bread crumbs will absorb the custard, creating a cohesive, pudding-like batter. Ensure there are no dry spots of bread crumbs left.
Step 3: Steam, Chill, and Serve Your Exquisite Dessert
Carefully pour the prepared custard pudding batter from the saucepan into the caramel-lined 6-inch cake pan. Use a spatula to spread the batter evenly across the pan, ensuring a smooth and uniform top surface. Gently tap the pan on your kitchen counter a few times; this helps to release any trapped air bubbles and allows the batter to settle perfectly.
Next, prepare your steaming setup. Find a large pot that can comfortably accommodate your cake pan, and fill it with approximately 2-3 inches of water. Place a steaming rack or a heat-proof stand inside the pot, ensuring it is elevated above the water level so the cake pan does not sit directly in the water. Carefully place your cake pan, containing the pudding batter, onto the steaming rack. Cover the large pot with a tight-fitting lid to effectively trap the steam. Bring the water to a boil, then reduce the heat to medium-low to maintain a steady, gentle simmer. Allow the pudding to steam for approximately 30 to 35 minutes. To check for doneness, you can gently insert a clean toothpick into the center of the pudding; if it comes out mostly clean (a little moisture is acceptable for a pudding), it’s ready. Avoid over-steaming, which can unfortunately make the pudding rubbery.
Once the steaming is complete, carefully remove the cake pan from the hot pot using oven mitts or heat-resistant gloves. Allow the pudding to cool down completely to room temperature. This cooling phase is a critical step before chilling, as it helps the pudding stabilize. Once fully cooled, place the pudding, still in its pan, into the refrigerator. Let it chill for at least 1 hour, but for the best results and easiest unmolding, aim for 2-3 hours, or even overnight. Chilling allows the pudding to firm up perfectly and ensures it is refreshingly cool for serving.
When you’re ready to serve this masterpiece, run a thin, sharp knife around the inner edges of the cake pan to gently loosen the pudding from the sides. Place a serving plate upside down over the cake pan. Then, holding both the pan and the plate firmly together, quickly and confidently invert them. The pudding should gently release onto the plate, with the glistening, rich caramel sauce now beautifully topping your dessert. Serve immediately and savor every spoonful of this incredibly easy, elegantly presented, and utterly delicious no-bake custard pudding!
Why You’ll Adore This Easy No-Bake Custard Pudding
This recipe isn’t just another dessert; it’s a testament to how simple ingredients and straightforward methods can yield truly extraordinary results. Here’s why this particular custard pudding will likely become a beloved staple in your recipe collection and a go-to for any sweet craving:
- Effortlessly Simple: With only 5 core ingredients and a stovetop, anyone can master this dessert. There are no complicated techniques, obscure ingredients, or fancy equipment needed, making it accessible to cooks of all skill levels.
- No Oven Required: This is a massive advantage! It’s perfect for hot summer days when you want to avoid heating up your kitchen, ideal for small kitchens without much oven space, or simply when your oven is already occupied with other dishes.
- Quick Preparation: The active cooking time for this pudding is surprisingly minimal, allowing you to whip up a gourmet-tasting dessert in well under an hour (plus essential chilling time). It’s perfect for when you need a delicious treat on short notice.
- Budget-Friendly: All the ingredients are common, inexpensive pantry staples. This makes it an economical and smart choice for a crowd-pleasing treat that won’t break the bank.
- Versatile and Customizable: While utterly delicious on its own, this pudding serves as a fantastic, neutral base for various flavor additions and toppings, allowing you to get creative and personalize it to your taste.
- Crowd-Pleaser: Its creamy, smooth texture and the sweet, slightly bitter caramel finish appeal to almost everyone. It’s an ideal dessert for family dinners, potlucks, special occasions, or just a cozy night in.
- Make-Ahead Friendly: Since chilling is a required step, you can conveniently prepare this dessert hours in advance, or even the day before, freeing up your time closer to serving. This allows the flavors to meld beautifully and the pudding to set perfectly.
Expert Tips for the Perfect No-Bake Custard Pudding
To ensure your custard pudding turns out flawlessly, with that perfect consistency and gleaming caramel top, keep these helpful tips in mind. A little extra attention to detail can elevate your dessert from good to absolutely outstanding:
- Quality of Bread Matters: While any white sandwich bread works, using bread that is slightly stale can sometimes lead to finer crumbs when blended, which can contribute to a smoother pudding. Always remove the crusts completely for the smoothest, most refined texture.
- Preventing Lumps in Custard: This is crucial! Always dissolve the custard powder (or cornstarch) thoroughly in a small amount of cold milk first to create a perfectly smooth slurry. Adding it directly to hot milk almost guarantees the formation of stubborn lumps, which can ruin the pudding’s silky texture.
- Caramel Caution is Key: Caramelization is a beautiful but swift process! Keep a very close eye on the sugar and water mixture as it heats. Once it starts to turn amber, it can progress to burnt very, very fast. Remove it from the heat as soon as it reaches the desired golden-brown color. Have your cake pan ready and pour the caramel immediately, as it will start to set quickly.
- Constant Stirring for Smoothness: When heating the milk and sugar mixture, and especially after adding the custard slurry, stir continuously. This not only prevents scorching at the bottom of the pan but also ensures even thickening throughout the custard, resulting in a consistent, creamy texture.
- Ensure Even Steaming: A tight-fitting lid on your large pot is absolutely crucial for trapping steam effectively and ensuring the pudding cooks evenly. Make sure the water level in the pot is sufficient to steam for the entire duration but not so high that it touches the bottom of your cake pan.
- Patience with Chilling: Do not rush the chilling process. While 1 hour is the minimum, allowing 2-3 hours or even chilling overnight will yield a much firmer, more delightful pudding that unmolds perfectly and has a superior texture.
- Mastering the Unmolding Technique: Before attempting to unmold, run a thin, sharp knife around the edge of the pan to gently loosen the pudding from the sides. For the flip, a quick, confident inversion of the pan onto the serving plate is usually the most effective way to ensure a clean release.
Creative Variations and Delightful Serving Suggestions
While the classic no-bake custard pudding is a treat in itself, don’t hesitate to experiment with these creative variations and serving suggestions to customize it to your taste and impress your guests:
- Flavor Boosts:
- Vanilla Extract: For an enhanced classic flavor, stir in 1 teaspoon of good quality vanilla extract into the milk and sugar mixture just before adding the custard slurry.
- Warm Spices: A pinch of ground cardamom, cinnamon, or even nutmeg can add a wonderfully warm, aromatic, and comforting twist to your pudding.
- Coffee or Espresso Infusion: Dissolve a teaspoon of instant coffee or espresso powder in the hot milk for a sophisticated, coffee-infused pudding.
- Citrus Zest: A little finely grated orange or lemon zest can provide a bright, refreshing, and fragrant note that beautifully cuts through the richness.
- Almond Extract: For a different nutty aroma, a few drops of almond extract can be a delightful addition.
- Toppings Galore:
- Fresh Berries: A generous handful of fresh strawberries, raspberries, blueberries, or mixed berries adds a beautiful contrast in color, texture, and a lovely tartness to balance the sweetness.
- Whipped Cream: A dollop of freshly whipped cream is a classic and always welcome addition, adding an extra layer of richness and lightness.
- Toasted Nuts: Sprinkle some toasted slivered almonds, pistachios, chopped walnuts, or pecans for added crunch and a nutty depth of flavor.
- Chocolate Shavings: A delicate dusting of dark, milk, or white chocolate shavings can elevate the pudding for chocolate lovers and add an elegant touch.
- Toasted Coconut Flakes: For a tropical twist and delightful texture, sprinkle toasted coconut flakes over the top.
- Caramel Drizzle: If you’re feeling extra indulgent, prepare a second, small batch of caramel to drizzle artfully over the unmolded pudding.
- Individual Servings: Instead of one large cake pan, consider making individual puddings in smaller ramekins or heat-proof glasses. This makes for elegant presentation and portion control. Adjust steaming time as needed for smaller portions (likely shorter).
- Garnish with Mint: A fresh sprig of mint can add a pop of color and a subtle herbaceous aroma, making the dessert visually appealing.
Frequently Asked Questions (FAQs) About No-Bake Custard Pudding
Here are answers to some common questions you might have when preparing this delightful no-bake custard pudding:
Q: Can I use cornstarch instead of custard powder?
A: Yes, absolutely! If you don’t have custard powder, cornstarch works as an excellent substitute for thickening. For every 1 tablespoon of custard powder, use 1 tablespoon of cornstarch. However, since custard powder often contains vanilla flavoring and coloring, you might want to add about ½ teaspoon of vanilla extract to your milk and sugar mixture for flavor, and a tiny pinch of yellow food coloring if you desire the traditional custard hue.
Q: What kind of milk should I use for the best results?
A: Whole milk will consistently give you the creamiest, richest, and most luxurious pudding texture. However, 2% or even skim milk can be used if you prefer, though the resulting texture might be slightly less rich and a bit lighter. Non-dairy milks like almond or soy milk can also work, but the final texture and flavor may vary slightly from the traditional recipe.
Q: My caramel burned! What went wrong, and can I fix it?
A: Caramelization requires very careful attention. It’s crucial not to stir the sugar and water mixture too much initially and to remove it from the heat as soon as it reaches the desired amber color. High heat or cooking it for even a few seconds too long can cause it to burn quickly. Unfortunately, if caramel burns, it will taste distinctly bitter and cannot be salvaged; you’ll need to discard it and start fresh with new ingredients.
Q: How can I prevent lumps in my custard mixture?
A: The key to a lump-free custard is two-fold: First, always mix the custard powder (or cornstarch) with a small amount of cold milk until it’s a perfectly smooth, lump-free slurry *before* adding it to the hot milk. Second, once you add the slurry, pour it gradually into the hot milk while stirring continuously and vigorously. This ensures the starch disperses evenly without clumping.
Q: How long does this no-bake pudding last in the refrigerator?
A: This delightful no-bake custard pudding can be stored in an airtight container in the refrigerator for up to 3-4 days. It is always best enjoyed fresh and perfectly chilled.
Q: Can I make this pudding ahead of time for a party or special event?
A: Absolutely! This is an ideal make-ahead dessert. You can easily prepare it the day before, let it chill thoroughly overnight, and then simply unmold and serve when you are ready. This advanced preparation allows the flavors to meld beautifully and ensures the pudding sets to its perfect consistency, freeing up your time on the day of your event.
Q: Can I use brown sugar for the caramel?
A: While possible, granulated white sugar is recommended for caramel as it produces a clearer, more consistent caramel without the added molasses flavor that brown sugar would impart. Brown sugar caramel can be delicious but will have a different taste and slightly different texture.
Embracing the Joy of No-Bake Desserts
No-bake desserts hold a truly special place in the culinary world, cherished for their sheer convenience, incredible versatility, and undeniable deliciousness. They effortlessly eliminate the need for an oven, making them an absolute lifesaver for hot weather when you want to keep your kitchen cool, for cramped kitchens with limited oven space, or simply when you crave a quick sweet fix without the fuss and complexity of traditional baking. This easy no-bake custard pudding exemplifies the very best attributes of no-bake treats: it uses simple, accessible ingredients, requires minimal effort and cooking skills, and yields a truly delightful outcome that tastes both comforting and sophisticated. It’s a fantastic way to enjoy a gourmet-feeling dessert that feels sophisticated yet remains incredibly approachable for everyone.
Conclusion: Your Next Favorite Dessert Awaits!
This Easy 5-Ingredient No-Bake Custard Pudding recipe is a compelling testament to the fact that you don’t need complex techniques, a professional kitchen, or an extensive ingredient list to create something truly extraordinary. Inspired by the wonderful N’Oven – Cake & Cookies YouTube channel, this stovetop dessert promises a delightful culinary experience from start to finish. From the satisfying process of caramelizing sugar to the final, creamy bite, every moment of making and enjoying this pudding is a treat for the senses. So, gather your simple ingredients, follow our detailed and easy-to-understand steps, and prepare to impress yourself, your family, and your loved ones with this effortlessly elegant and incredibly tasty dessert. Happy cooking, and even happier eating!
All images are credited to N’Oven – Cake & Cookies via YouTube. We highly recommend visiting their channel and subscribing for more amazing culinary inspiration and easy-to-follow recipes!