
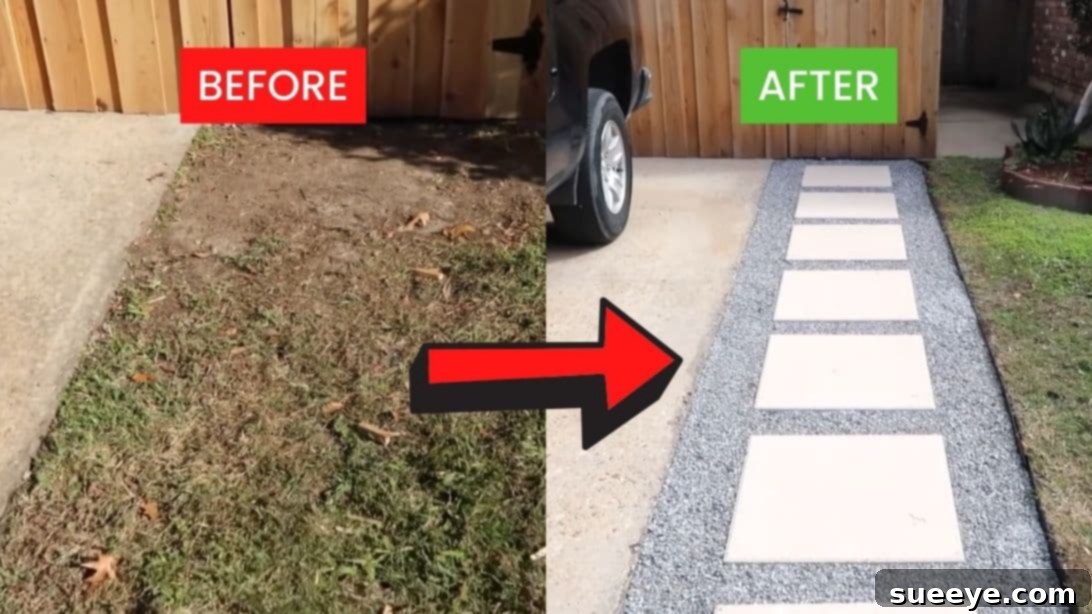
Transforming a neglected, muddy corner of your yard into a beautifully functional and aesthetically pleasing outdoor space is easier than you think. Say goodbye to standing water, slippery surfaces, and the general inconvenience of an unpaved area. With this comprehensive guide, you’ll learn how to build a durable DIY pathway complete with an integrated drainage system, ensuring longevity and year-round usability. This project, inspired by expert techniques, empowers homeowners to create a stunning walkway without the prohibitive cost of professional installation. Forget the intimidating notion that such a significant landscape upgrade requires specialized skills; with the right tools, clear instructions, and a methodical approach, you can achieve remarkable results efficiently and effectively. Get ready to enhance your home’s curb appeal and enjoy a functional path that truly stands the test of time and weather.
Embarking on a DIY project like a drainage pathway not only adds tangible value to your property but also offers the immense satisfaction of creating something beautiful with your own hands. This guide will walk you through every critical step, from initial planning and material selection to the final touches, ensuring your pathway is not just pretty but also performs exceptionally. A well-designed pathway with proper drainage prevents erosion, protects your home’s foundation by diverting water, and provides a clean, dry route through your garden, no matter the weather. Prepare to upgrade your outdoor living space with a project that is both rewarding and surprisingly accessible for the dedicated DIY enthusiast.
Whether you’re looking to connect different areas of your garden, create a welcoming entrance to a shed, or simply define a new walking route, a properly constructed paver pathway with adequate drainage is an invaluable addition. This tutorial aims to demystify the process, making it approachable for anyone willing to invest a little time and effort. We’ll detail each stage, providing insights into why certain steps are crucial and offering practical tips to ensure your project’s success. You’ll gain the confidence to tackle this significant home improvement, resulting in a professional-looking pathway that dramatically enhances your outdoor environment. For visual learners, external resources like video tutorials can complement this written guide, offering dynamic demonstrations of key techniques.
Essential Materials and Tools for Your Drainage Pathway Project
Before you break ground, gathering all necessary materials and tools is paramount. A well-stocked arsenal ensures a smooth, uninterrupted workflow and helps prevent costly delays. Each item on this list plays a specific role in creating a durable, well-drained, and visually appealing pathway. Investing in quality tools will not only make the job easier but also contribute to a higher quality finished product. Here’s a detailed breakdown of what you’ll need and why:
- Flat Head Shovel: This essential tool is perfect for initial digging, scraping, and maintaining a level trench bottom. Its straight edge allows for precise cuts and efficient material removal, crucial for the foundation of your pathway.
- Tamper (Large): A heavy-duty tamper is vital for compacting the various base layers of your pathway. Proper compaction is the secret to a stable, long-lasting path that won’t settle or shift over time. This larger version is ideal for broad areas.
- Leveling Rake: More than just a simple rake, a leveling rake with a straight edge is indispensable for evenly spreading and grading granular materials like gravel and sand, ensuring a consistent depth for your base layers.
- Sod Cutter: This specialized tool makes removing existing turf quick and efficient. While a shovel can be used, a sod cutter ensures a uniform depth of sod removal, leading to a neater and more precise excavation.
- Weed Barrier Fabric: This critical layer is placed directly on the excavated soil. It prevents weeds from growing up through your pathway and helps to separate the base aggregate from the native soil, preventing mixing and maintaining drainage effectiveness.
- Metal Edging: Essential for defining the pathway’s perimeter and holding the base materials and pavers securely in place. Metal edging offers a clean, crisp line and is durable, resisting movement and erosion. Securing it properly ensures the integrity of your path.
- #8 Limestone (or ‘Paver Base’): This finer grade of crushed limestone is typically used as the final layer on top of the pavers, filling the gaps between them. It helps interlock the pavers, providing stability and allowing surface water to drain through.
- #57 Limestone (or ‘Drainage Gravel’): This coarser, angular crushed limestone forms the primary drainage layer beneath your sand bed. Its open structure allows water to pass through freely, preventing hydrostatic pressure buildup and ensuring efficient drainage away from the pathway. It’s crucial for the long-term health of your pathway.
- Mason Sand (or ‘Paver Sand’): A fine, angular sand that creates a smooth, level bedding layer for your pavers. It allows for slight adjustments during paver placement, ensuring a perfectly level surface, and provides a cushion that prevents pavers from grinding against the base gravel.
- 24″ x 24″ Pavers: The star of your pathway! Choose pavers that complement your home’s aesthetic and are designed for outdoor use. Their size contributes to the overall look and pattern of your path. Ensure they are suitable for foot traffic and any occasional light loads.
- String and Stakes: Used to establish straight lines and accurate dimensions for your pathway layout. This simple yet effective system ensures your path is laid out precisely as planned, providing clear boundaries for excavation and paver placement.
- Smaller Tamper (or Hand Tamper): Useful for compacting sand and gravel in tighter spaces or for more precise compaction around edges and individual pavers after they are laid. Its smaller head allows for targeted force.
- Rope (or Spray Paint): For marking the initial perimeter of your pathway on the ground, guiding your excavation efforts. Rope provides a flexible visual guide that can be easily adjusted during the planning phase.
- Hammer/Mallet: For installing the metal edging and making minor adjustments to pavers during placement. A rubber mallet is ideal for pavers to avoid chipping.
- Wheelbarrow: Indispensable for transporting gravel, sand, and excavated soil efficiently around your work site, saving time and physical strain.
- Safety Gear: Always wear appropriate safety gear, including gloves, safety glasses, sturdy boots, and knee pads when working with tools and heavy materials.
Having these materials and tools ready before you begin will streamline the entire project, allowing you to focus on the craftsmanship rather than searching for missing items. Double-check quantities based on your pathway’s dimensions to avoid running short.
Detailed Step-by-Step Instructions: Building Your DIY Drainage Pathway
Step 1: Strategic Pathway Layout and Initial Planning
The success of your pathway begins with meticulous planning and layout. This initial stage is crucial for ensuring the path meets your aesthetic and functional requirements. Start by visualizing the path’s exact location, considering its purpose and how it integrates with your existing landscape. For a practical preview, cut out cardboard pieces to the exact dimensions of your chosen 24″ x 24″ pavers. Arrange these cardboard templates on the ground in your desired pathway location. This allows you to experiment with different spacing and patterns, providing a realistic visual of the finished product. Adjust the templates until you achieve your preferred spacing and overall look. For this particular project, aiming for a pathway that is 42 inches wide by 21 feet long, with a consistent depth of 5 inches, offers specific dimensions to work with. The 24-inch pavers will be spaced 6 inches apart, with a 9-inch border on each side of the pathway, creating a balanced and visually appealing arrangement. Once satisfied with the layout, take precise measurements of the total length, width, and the spacing between each paver. Use spray paint or landscape chalk to mark the exact perimeter of your pathway on the ground, creating a clear guide for the subsequent excavation.
Step 2: Precise Excavation and Base Preparation
With your pathway clearly marked, it’s time for excavation. Begin by using a sturdy rope to outline the exact perimeter once more, ensuring crisp lines. Then, take your sod cutter to remove the top layer of sod. Aim for a consistent depth of approximately 2 inches, carefully rolling the removed sod pieces and placing them into bags for disposal or repurposing. This initial sod removal ensures a clean start and prevents organic matter from decomposing beneath your path. Next, using the sod cutter again, or a flat-head shovel for more control, excavate the underlying dirt to a total depth of about 2.5 inches from the freshly exposed soil level, which means a total of 4.5 inches from the original ground level. This cumulative depth is crucial for accommodating the various base layers and the pavers themselves, while allowing for effective drainage. Use your flat head shovel to carefully remove the loosened dirt, striving for a level and consistent trench bottom. Proper excavation at this stage is fundamental; any unevenness will impact the stability and longevity of your finished pathway.
Step 3: Laying the Weed Barrier and Initial Drainage Layer
Once the trench is excavated and its base is as level as possible, it’s time to install the critical weed barrier fabric. Unroll the fabric, ensuring it covers the entire excavated area, extending slightly up the sides of the trench. Overlap any seams by at least 6-12 inches to prevent weeds from finding gaps. This barrier serves two primary purposes: preventing weed growth through your pathway and stabilizing the soil by preventing the mixing of your base layers with the underlying native soil. After laying the barrier, begin adding your first layer of drainage material: approximately 2 inches of #57 limestone gravel. This angular, coarse gravel is ideal for creating a robust drainage bed, allowing water to percolate through efficiently and preventing accumulation beneath the pavers. Use your leveling rake to meticulously spread the #57 limestone evenly across the entire pathway trench, aiming for a consistent 2-inch depth. The goal here is to create a solid, permeable foundation that will effectively manage water flow away from your pathway.
Step 4: Compacting the Drainage Gravel for Stability
With the #57 limestone gravel evenly spread, the next crucial step is compaction. Begin by lightly spraying the gravel with a garden hose. This dampens the material, allowing the particles to settle more effectively and bond together during compaction. Avoid saturating it, as too much water can hinder compaction. Once slightly damp, use your large tamper to compact the gravel thoroughly. Work in systematic, overlapping passes, covering the entire surface multiple times. Apply consistent downward pressure, ensuring every inch of the gravel bed is firmly compacted. The goal is to achieve a dense, stable, and unyielding base that will prevent future settling or shifting of your pathway. Proper compaction at this stage is absolutely vital for the long-term durability and structural integrity of your drainage pathway. A well-compacted base can withstand heavy foot traffic and environmental pressures for years.
Step 5: Installing the Pathway Edging
Once your base gravel is compacted, install the metal edging along the marked perimeter of your pathway. This edging serves to contain the base materials and pavers, preventing them from shifting or spreading over time, thus maintaining the clean lines and structural integrity of your path. Carefully position the metal edging, ensuring it follows your intended path shape precisely. Use a hammer or a rubber mallet to securely drive the edging stakes into the ground, typically every 2-3 feet or as recommended by the edging manufacturer. Ensure the top edge of the metal edging is level with, or slightly below, the anticipated finished height of your pavers, as this will create a seamless and tripping-hazard-free transition. Proper installation of the edging is key to defining your pathway’s boundaries and ensuring it remains neat and stable.
Step 6: Creating the Mason Sand Bed
Now it’s time to lay down the bedding layer for your pavers. Carefully add a uniform layer of mason sand (also known as paver sand) over the compacted gravel base. The ideal depth for this layer is typically around 1 inch, but consult your paver manufacturer’s recommendations. Use your leveling rake to spread the sand as evenly as possible. The mason sand provides a crucial cushioning layer for the pavers and allows for minute adjustments to achieve a perfectly level surface. Once the sand is spread, gently wet it with a garden hose – again, avoiding saturation. This light dampening helps the sand particles settle. Immediately after wetting, use your smaller tamper or hand tamper to firmly compact the sand bed. This creates a dense, stable foundation that will support your pavers without allowing them to sink or shift. Smooth and re-level the surface after compaction to ensure it is perfectly flat and ready for paver placement. Any imperfections in this layer will translate directly to uneven pavers.
Step 7: Laying the Pavers with Precision
This is where your pathway truly begins to take shape. Start laying your 24″ x 24″ pavers one by one, beginning from one end of the path and working your way across. Maintain the planned 6-inch distance between each paver. For optimal alignment, stretch a string line along the intended path as a guide; this will help you lay each paver in a perfectly straight line. Gently set each paver onto the compacted sand bed, avoiding dragging or disturbing the sand. Use a rubber mallet to tap each paver gently into place, ensuring it is firmly seated and level with adjacent pavers. Periodically check the levelness of your pavers. A helpful technique is to lay a 2×4 piece of lumber across several pavers and place a spirit level on top. If you have an existing driveway or other fixed reference point, you can also attach a string line to a 2×4 spanning the pavers and align it to ensure a consistent height and slope for drainage. Make any necessary adjustments by gently lifting a paver, adding or removing a small amount of sand, and then re-seating and re-leveling it. Consistency in spacing and levelness is paramount for both aesthetics and functionality.
Step 8: Filling Joints and Final Compaction for a Secure Pathway
With all pavers meticulously laid and leveled, the final step involves locking them into place and enhancing the pathway’s drainage capabilities. Generously spread the smaller grade of limestone, #8 limestone (often called paver joint sand or fine gravel), over the entire surface of your newly laid pathway. Use a stiff broom to sweep the #8 limestone into the gaps and joints between each paver. Ensure these gaps are thoroughly filled, as this material is crucial for interlock and stability. The fine limestone not only helps to stabilize the pavers, preventing lateral movement, but also allows rainwater to quickly drain down through the joints and into your underlying drainage layers. After sweeping, use a smaller tamper or, ideally, a vibrating plate compactor (which can often be rented) to compact the entire pathway. Make multiple passes over the entire surface. This final compaction vibrates the #8 limestone deeper into the joints, settling it firmly and creating a robust, interlocked surface. It also helps to settle the pavers into the sand bed, achieving maximum stability. Sweep away any excess limestone from the surface. Your beautiful, well-drained pathway is now complete and ready to enjoy! Remember to periodically check the joints and refill with #8 limestone as needed to maintain optimal stability and drainage over time.
Embrace the Beauty and Functionality of Your New DIY Pathway with Drainage
Congratulations! You have successfully transformed a challenging area into a stunning and highly functional pathway designed for optimal water management. This DIY project is a testament to the fact that significant home improvements are well within reach for dedicated individuals. A well-executed drainage pathway not only elevates the aesthetic appeal of your landscape but also provides tangible benefits that enhance your outdoor living experience for years to come.
The strategic incorporation of specific limestone grades, a robust weed barrier, and careful compaction techniques ensures that your pathway will stand strong against the elements. You’ve created a resilient surface that directs water away from critical areas, preventing erosion, safeguarding your property’s foundation, and eliminating muddy, slippery conditions. This thoughtful design means your path will remain dry and accessible, inviting you to enjoy your garden year-round, regardless of weather conditions.
Beyond its practical advantages, your new pathway adds significant curb appeal and potentially increases your property value. It defines outdoor spaces, guides movement through your garden, and creates an inviting visual flow. The satisfaction of walking on a path you’ve meticulously crafted yourself, knowing it’s built to last, is truly unparalleled.
To ensure your pathway remains pristine and functional, consider these simple maintenance tips. Periodically sweep the surface to remove debris, and check the paver joints for any loss of #8 limestone. Replenishing these joints as needed will maintain the interlock and continue to facilitate proper drainage. Occasionally, a gentle wash with a hose can keep the pavers looking fresh. With minimal care, your DIY drainage pathway will continue to be a source of pride and an invaluable asset to your home for many seasons.
Now, step back and admire your handiwork. You’ve not just built a path; you’ve crafted a durable, beautiful, and intelligently designed feature that will enhance your enjoyment of your outdoor space. Embrace the newfound freedom from muddy feet and discover the joy of a perfectly paved journey through your own backyard oasis.