
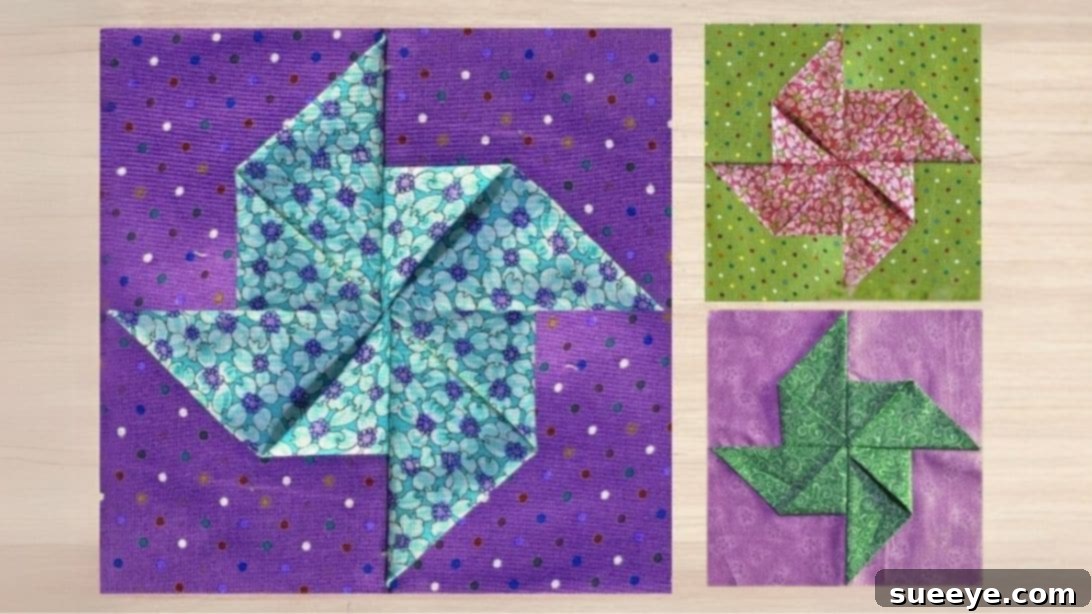
Master the Easy 3D Dimensional Pinwheel Quilt Block: A Step-by-Step Guide for Beginners
The pinwheel quilt block is a timeless classic in the quilting world, beloved for its simplicity, charm, and endless versatility. While traditional pinwheels lay flat, creating a dynamic visual, imagine adding another layer of intrigue – a stunning three-dimensional effect that makes your quilt truly pop! This guide will walk you through creating an easy 3D dimensional pinwheel quilt block, a project that is not only beginner-friendly but also incredibly rewarding. Get ready to transform ordinary fabric squares into an extraordinary design that evokes the playful spirit of childhood paper pinwheels.
Whether you’re new to quilting or looking for a fresh twist on a beloved pattern, this 3D pinwheel block offers a unique blend of ease and visual impact. It’s a fantastic way to introduce a sense of depth and movement into your quilting projects, making them stand out with a sophisticated, yet deceptively simple technique. This particular variation, which we’ll explore in detail, is one of my personal favorites for its captivating beauty and straightforward execution. You’ll soon discover why so many quilters are enchanted by its unique charm and the dynamic texture it brings to any textile creation.
RELATED: Easy Pinwheel Quilt Block Tutorial
The visual appeal of this pattern is undeniable. It instantly conjures images of colorful paper pinwheels spinning in the breeze, a nostalgic reminder of simple joys. Unlike a flat image, the folded fabric catches light and casts subtle shadows, enhancing the perception of movement and making your quilt a true conversation starter. If you’re eager to bring this charming design to life in your own home, you’re in luck! We’ll be following a clear and concise video tutorial by Tulip Square, ensuring that every step is easy to understand and replicate. You’ll be amazed at how quickly you can create these beautiful, dimensional blocks, even if you consider yourself a novice quilter.
As you embark on this creative journey, remember that precision is key in quilting, but so is enjoyment. Don’t be afraid to experiment with fabric choices – bold contrasts will highlight the 3D effect, while subtle variations can create a more nuanced texture. Make each block truly your own! The steps provided are designed to be highly accessible, making the entire process fun and gratifying. Let’s gather our materials and dive into the wonderful world of 3D quilting, creating a masterpiece that will be cherished for years to come.
Here’s another pattern you might want to try: How to Make a Wonky Pinwheel Quilt Block
Why Choose the 3D Dimensional Pinwheel Block?
Beyond its stunning aesthetics, the 3D dimensional pinwheel block offers several advantages for quilters of all levels, making it a compelling choice for your next project:
- Unrivaled Visual Depth: The inherent dimensionality of this block creates an incredible optical illusion, making the pinwheel blades appear to rise off the surface of the quilt. This depth adds a dynamic quality and a tactile richness that flat blocks simply cannot achieve, captivating the eye from every angle.
- Surprisingly Beginner-Friendly: Despite its sophisticated appearance, the construction technique is remarkably straightforward. It primarily relies on fundamental sewing skills like accurate cutting, precise folding, and consistent seam allowances, making it an excellent project for those new to quilting who want impressive results without complex maneuvers.
- Exceptional Design Versatility: This block is a true chameleon, adapting beautifully to a myriad of quilting projects. From grand, full-sized quilts and cozy baby blankets to charming wall hangings, decorative throw pillows, or even unique tote bag panels and placemats, its striking design enhances any textile creation.
- A Playground for Fabric Selection: The 3D pinwheel block provides a fantastic opportunity to unleash your creativity with fabric choices. Playing with contrasting colors and patterns – for example, a vibrant print for the folded blades against a solid background – dramatically highlights the dimensionality and creates a stunning visual impact.
- Valuable Skill Building: Working through the steps of this block helps hone several essential quilting skills. You’ll practice meticulous fabric cutting, master precise seam allowances, and learn the critical art of correct pressing techniques, all of which are foundational for more advanced quilting endeavors.
- Quick Gratification: Because each block is relatively quick to construct, you can see tangible progress rapidly, which is incredibly motivating. This makes it perfect for those who want to create a beautiful item without committing to a lengthy, intricate project from the outset.
Essential Materials for Your 3D Dimensional Pinwheel Quilt Block
Before you begin your creative journey, gathering all your materials is crucial for a smooth and enjoyable quilting experience. The beauty of this block lies in its simplicity, requiring just a few key fabric pieces and standard quilting tools. Opting for good quality materials will always yield a more professional and lasting finish.
- Fabric Squares:
- Four Colored Squares: These squares will form the vibrant “blades” of your pinwheel and are key to creating the captivating dimensional effect. Choose a fabric that you absolutely love, perhaps a bold print or a rich solid color, that will stand out and define the movement of the pinwheel.
- Four Background Squares: These squares will serve as the stable base for your pinwheel blades. Opt for a fabric that either complements your colored squares harmoniously or provides a striking contrast, allowing the dimensional elements to truly pop. Light solids, tone-on-tone prints, or subtle blender fabrics work exceptionally well here.
- Important Note on Sizing: It is absolutely critical that all eight squares (four colored and four background) are cut to the exact same dimensions. Consistency in size is the bedrock of successful quilting; it ensures your block comes together neatly, lies perfectly flat, and squares up beautifully. While the tutorial doesn’t specify a precise size, a common starting point for a single block might be 5-inch, 6-inch, or 8-inch squares, depending on your desired final block size. For example, if you aim for a finished block that is 10 inches square, you might start with 5.5-inch squares to account for seam allowances. Always consider your desired finished block size and factor in 1/2 inch for seam allowances (1/4 inch on each side) when cutting your initial squares.
Recommended Quilting Tools for Precision and Ease:
Having the right tools at hand will make the process much more efficient and enjoyable, helping you achieve professional-looking results:
- Rotary Cutter, Self-Healing Cutting Mat, and Acrylic Quilting Ruler: These three tools are fundamental for precise and accurate fabric cutting, which is the cornerstone of successful quilting. A sharp blade on your rotary cutter is non-negotiable for clean cuts.
- Sewing Machine: A reliable sewing machine is a must. A quarter-inch foot (1/4″ foot) attachment is highly recommended as it helps maintain a consistent 1/4″ seam allowance, which is standard in quilting and critical for blocks to fit together perfectly.
- Iron and Ironing Board: Crucial for pressing seams open or to one side at various stages of construction. Proper pressing helps the block lie flat, reduces bulk, and contributes significantly to the overall professional finish of your quilt.
- Fabric Pins or Wonder Clips: To hold fabric pieces together securely before and during sewing, preventing shifting and ensuring accurate alignment.
- High-Quality Matching Thread: Choose a polyester or cotton thread that matches or blends seamlessly with your fabrics. A good quality thread reduces breakage and ensures durable seams.
- Seam Ripper: Every quilter’s essential companion, just in case a seam needs a little adjustment. Don’t view it as a failure, but as a tool for perfection!
How to Make Your 3D Dimensional Pinwheel Quilt Block: Step-by-Step Instructions
Now that you have all your materials meticulously prepared, let’s dive into the exciting creation process. Follow these detailed steps carefully, paying attention to accuracy, and you’ll soon have a beautiful and dynamic 3D pinwheel block ready to be incorporated into your next quilting masterpiece.
Step 1: Preparing Your Dimensional Pinwheel Blades
This initial step is where the magic of the 3D effect truly begins. Precision in folding here will ensure your pinwheel has crisp, defined “blades” that visually pop from the background.
Take one of your chosen colored squares. Carefully fold it in half diagonally, bringing one corner to meet the opposite corner precisely. Take your time to align the raw edges perfectly to ensure a perfectly straight fold. Once aligned, use your fingers to firmly press along the fold line, creating a sharp crease. This technique is known as “finger pressing.” For an even crisper and more permanent fold, you can gently touch it with a warm, dry iron, using a pressing cloth if your fabric is delicate. Next, with the square still folded diagonally, take one of the corners along the *folded edge* and fold it up towards the middle point of that diagonal fold. This second fold creates the unique “pocket” or dimensional element of your pinwheel blade. Securely pin this newly folded corner in place to prevent it from shifting during subsequent handling and sewing. You’ll immediately notice how this simple yet ingenious fold begins to give your flat square an intriguing new, three-dimensional shape.
It is absolutely vital to repeat this exact process with all four of your colored squares. The key to a cohesive and harmonious pinwheel design is consistency: ensure that you fold each square in the *same direction* – for example, always folding the bottom-left corner up to the center of the diagonal. This uniformity in folding direction is paramount for the pinwheel to swirl correctly and for the 3D elements to align beautifully when the block is finally assembled. Refer to the photo below for a clear visual guide on how your folded squares should look at this stage, confirming your preparation is on track.
Step 2: Attaching the Dimensional Blades to Background Squares
Now we’ll begin to combine your beautifully folded colored squares with your plain background squares, forming the individual units that will eventually coalesce into your complete pinwheel block.
Take one of your designated background squares. Carefully position one of your prepared, folded colored squares on top of it. It’s crucial to align the straight, unfolded raw edges of the colored square precisely with two perpendicular edges of the background square. Ensure that the folded corner of the colored square points inwards, towards what will become the center of your overall block. The raw edges of both squares should be perfectly flush along these two aligned sides. This meticulous placement is absolutely critical for achieving the correct final appearance and the intended swirling motion of your 3D pinwheel.
With the pieces perfectly aligned, sew a seam along both of the straight, aligned edges. The tutorial specifically suggests using a 1/8″ seam allowance for this step. This slightly smaller seam allowance, which deviates from the standard 1/4″ typically used in quilting, is intentionally chosen here. It’s often employed when attaching folded fabric elements to ensure the fold maintains its crispness and sharpness, and that the dimensional effect is preserved without being compromised or ‘swallowed’ by a larger seam allowance. Sew slowly and carefully, guiding your fabric to maintain a consistent seam line along both edges. After sewing, lightly press the seam open or gently press it towards the background fabric to reduce bulk and prepare the unit for the next stage. Repeat this exact process for the remaining three background squares and their corresponding three folded colored squares. As before, consistency is paramount: ensure you place the folded pieces in the *exact same position and orientation* on each background square. This meticulous attention to detail guarantees that all the pinwheel blades will “swirl” in the same direction, creating a cohesive, balanced, and visually stunning overall block.
Step 3: Assembling Your 3D Pinwheel Quilt Block
This is the exhilarating final stage where all your individual units come together to form the complete 3D pinwheel quilt block. Watch as your creation truly takes on its intended, captivating shape!
First, take your four completed units (each consisting of a background square with a dimensional blade attached) and arrange them in a “four-patch” layout on your design wall or a flat surface. Visualize how the pinwheel will ultimately look: the folded corners of each unit should meet precisely in the center, forming the iconic pinwheel swirl. Take a moment to experiment with the orientation of each unit, rotating them as needed, until the pinwheel effect is exactly as you desire and the dimensional elements flow harmoniously. Refer closely to the provided photo below for the correct visual arrangement. Once you are completely satisfied with the layout and orientation, it’s time to begin sewing them together.
Start by sewing the units into pairs. For instance, sew the top-left unit to the top-right unit, and then sew the bottom-left unit to the bottom-right unit. For these seams, use a precise 1/4″ seam allowance. Accuracy here is crucial for your block to square up correctly. After sewing each pair, carefully press the seams. You can either press the seams open to distribute bulk evenly or press them towards the pinwheel part of the block (the side with the folded fabric). Pressing towards the darker fabric or ‘open’ generally helps to reduce bulk at the seams and ensures a flatter, more professional finish. When pressing towards the pinwheel part, it can subtly help to define and enhance the 3D effect.
Finally, take your two newly sewn halves (the top row and the bottom row) and place them right sides together. Meticulously align the center seam where the two halves meet. This intersection is often referred to as the “point” of the pinwheel, and careful alignment here will ensure it looks sharp and clean. Pin securely, especially at this critical intersection, to prevent any shifting while sewing. Sew these two halves together using a consistent 1/4″ seam allowance. After sewing, give your finished block a final, thorough press. You can press this final center seam open or choose a direction that minimizes bulk and lies flat. Once pressed, you can optionally trim your block to your desired final size, ensuring all sides are perfectly straight and all corners are at 90 degrees. Congratulations! You’ve successfully created a stunning 3D dimensional pinwheel quilt block, ready to be admired or incorporated into a larger project.
Creative Ideas for Your 3D Dimensional Pinwheel Quilt Block
Once you’ve mastered creating this captivating 3D pinwheel block, a world of creative possibilities opens up. The unique dimensionality of these blocks makes them perfect for a wide range of projects, adding a sophisticated touch to any item. Here are just a few inspiring ideas for incorporating your newly made blocks into beautiful and functional projects:
- Stunning Quilts: The most obvious and rewarding application is to assemble multiple 3D pinwheel blocks to create a full-sized quilt. Experiment with different arrangements – a simple grid layout highlights the individual blocks, while alternating them with solid squares or other complementary blocks can create fascinating secondary patterns. You can also play with rotating some blocks to create a more dynamic, swirling design across the entire quilt. The dimensional effect will add incredible texture, visual interest, and a luxurious feel to your finished quilt, making it a true heirloom.
- Decorative Pillows: One or two beautifully crafted 3D pinwheel blocks can make a gorgeous focal point for a throw pillow cover. This is a relatively quick project that allows you to showcase your favorite fabrics and add a unique, handmade touch to your living room, bedroom, or nursery decor. Imagine a cluster of these pillows on a couch!
- Charming Table Runners: Create a series of these striking blocks and stitch them together end-to-end to form a unique and elegant table runner. This is perfect for adding a pop of color, texture, and handmade charm to your dining table, coffee table, or sideboard, making everyday meals feel a bit more special.
- Unique Wall Hangings: A single large 3D pinwheel block, or a small grouping of several blocks, can be framed or simply backed and bound to create a striking piece of wall art. This is an excellent way to brighten up any room, adding a personal touch and a focal point that will draw the eye with its three-dimensional quality.
- Tote Bags and Pouches: Integrate a 3D pinwheel block as a feature panel on a handmade tote bag, cosmetic pouch, or even a personalized book cover. It adds a sophisticated, custom, and tactile element to everyday items, making them stand out from mass-produced accessories.
- Baby Quilts: The playful nature and gentle movement suggested by the pinwheel design make it an ideal choice for baby quilts. Choose soft, colorful, and tactile fabrics to create a comforting and visually stimulating blanket that will be cherished by little ones for years.
- Placemats or Coasters: For a smaller, quick project, use a single block as a unique placemat or scale down the squares to create a set of dimensional coasters. These make wonderful handmade gifts.
Pro Tips for Success in 3D Quilting
To ensure your 3D dimensional pinwheel quilt block turns out perfectly and brings you immense satisfaction, keep these professional tips in mind:
- Mindful Fabric Selection: Always opt for high-quality quilting cotton. It’s stable, easy to work with, and holds its shape and folds well. When choosing fabrics, consider how different colors and patterns will interact. High contrast between the colored squares and background squares will significantly enhance the 3D effect, making the folds and dimension more apparent.
- Relentless Accuracy in Cutting: Precision begins with cutting. Use a sharp rotary cutter, a non-slip acrylic ruler, and a self-healing cutting mat. Even a slight inaccuracy of an eighth or a sixteenth of an inch in your initial cuts can accumulate and throw off your block’s alignment, leading to frustrating wonky corners. “Measure twice, cut once” is the quilter’s mantra.
- Consistent Seam Allowances are Critical: Maintain your 1/4″ seam allowance (and 1/8″ where specifically noted for the folded edges) consistently across all your sewing. A quarter-inch foot (1/4″ foot) on your sewing machine is an invaluable tool for achieving this uniformity, ensuring your blocks fit together perfectly and square up correctly.
- Master the Art of Pressing: Pressing is just as important as sewing, if not more so. Pressing seams correctly at each stage ensures your blocks lie flat, reduces bulk at seam intersections, and helps in squaring up your blocks. Avoid ‘ironing’ (gliding the iron back and forth) and instead ‘press’ (lift and place the iron) to prevent stretching your fabric.
- Consider Chain Piecing: If you’re planning to make multiple 3D pinwheel blocks for a larger project, consider chain piecing identical steps. This technique involves sewing pieces one after another without cutting the thread in between, saving both time and thread, and significantly speeding up the construction process.
- Embrace Patience and Enjoy the Process: Quilting is a craft that generously rewards patience and attention to detail. Don’t rush through the steps, especially when aligning fabrics or pressing. Allow yourself to enjoy the tactile experience of working with fabric and the meditative rhythm of sewing. Every stitch contributes to your unique creation.
- Test Your Stitch Length: Before starting, do a test stitch on a scrap of your fabric. Ensure your stitch length is appropriate (usually 2.0-2.5mm for quilting) and that your tension is balanced.
- Squaring Up: After assembling your final block, use your ruler and rotary cutter to carefully square it up to the desired finished size. This step ensures all blocks are uniform, making final quilt assembly much easier and more precise.
Final Thoughts on Your 3D Dimensional Pinwheel Quilt Block
Congratulations on completing your 3D dimensional pinwheel quilt block! This pattern, with its clever folds and vibrant, dynamic energy, offers a truly unique aesthetic to any quilting project you choose to undertake. It stands as a beautiful testament to how simple techniques, when executed with care and precision, can yield incredibly impressive and visually rich results, transforming flat fabric into a dynamic, eye-catching design that invites a second look.
The satisfaction of creating something beautiful and tangible with your own hands is immense, and this block is a perfect example of that profoundly rewarding experience. Whether you’re planning to assemble a grand, heirloom-quality quilt, a charming small project to adorn your home, or a thoughtful handmade gift, the skills you’ve honed by making this 3D pinwheel will undoubtedly serve you well in all your future quilting endeavors. We hope you had as much fun making this block as we did sharing this detailed tutorial and all our tips with you. May your creative journey be filled with joy and inspiration. Happy quilting, and please don’t hesitate to share your amazing creations with us and the broader quilting community!