
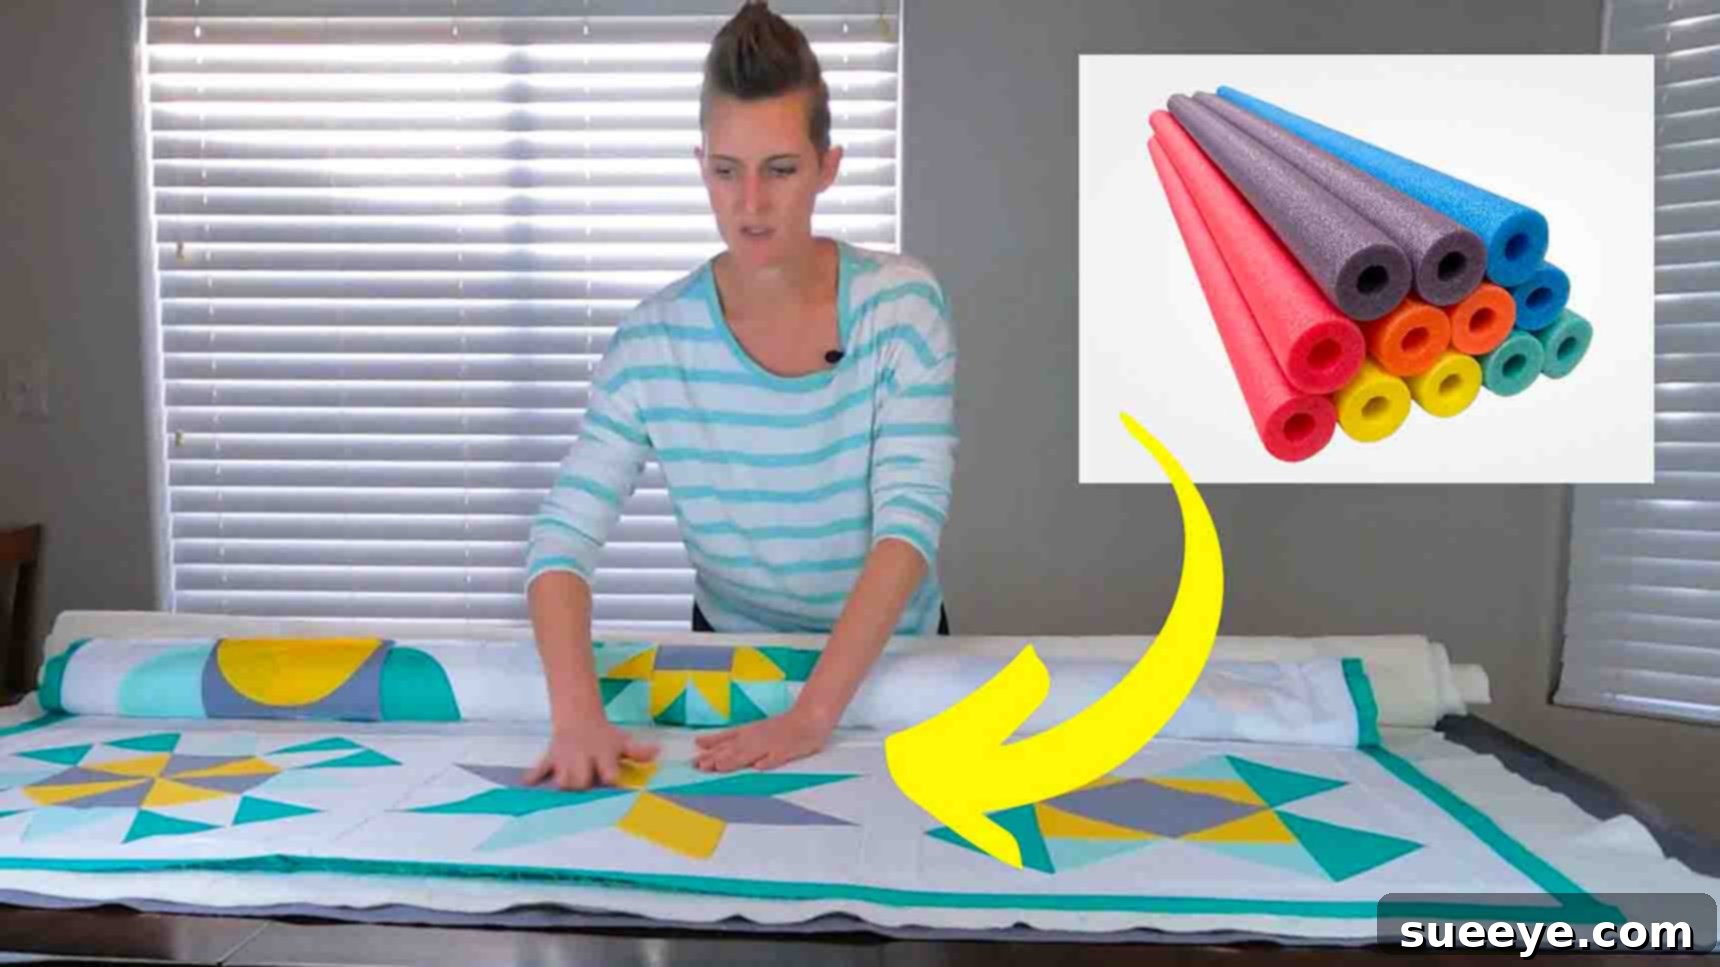
Quilting, a beloved art form, brings immense joy and creative satisfaction. However, even the most passionate quilters often find one particular step less than thrilling: basting. The process of securing the three layers of a quilt—the top, batting, and backing—can be cumbersome, leading to backaches, endless crawling on the floor, and frustrating wrinkles. But what if there was a way to transform this tedious task into an effortless and even enjoyable part of your quilting journey? Prepare to have your quilting life revolutionized! Thanks to an ingenious technique shared by On Williams Street on YouTube, quilters worldwide are now discovering the magic of the pool noodle basting method. This innovative hack leverages simple, affordable pool noodles to make basting a breeze, regardless of whether you prefer pin basting or spray basting. Dive in to discover how this super effective method will change the way you quilt forever.
Why Embrace the Pool Noodle Basting Method for Your Quilts?
Before we delve into the step-by-step instructions, let’s explore why the pool noodle basting method has become a game-changer for so many quilters. This technique isn’t just about making basting easier; it’s about enhancing your entire quilting experience, offering a multitude of benefits:
- Ergonomic Comfort: Say goodbye to kneeling, crouching, and crawling on the floor. This method allows you to comfortably baste your quilt on a dining table or any large flat surface, significantly reducing strain on your back and knees. It makes quilting more accessible and enjoyable for everyone.
- Flawless Smoothness: Achieving a perfectly smooth basted quilt is crucial for a professional finish. The pool noodle method excels at keeping your layers taut and aligned throughout the process, minimizing wrinkles, puckers, and shifted fabric. This precision ensures your stitches will lay beautifully, without unsightly bumps or tucks.
- Space Efficiency: Not everyone has the luxury of a dedicated quilting studio with ample floor space. This method efficiently utilizes a standard table, making large quilt basting feasible even in smaller living areas. You only need enough space to unroll one section at a time.
- Increased Speed and Efficiency: By breaking down the basting process into manageable sections, you can work more quickly and methodically. The continuous rolling and unrolling action, combined with the secure tension provided by the noodles, streamlines the entire process, saving you valuable time.
- Versatility for All Basting Types: Whether you’re a devout fan of temporary spray adhesive or prefer the precision of safety pins, the pool noodle method seamlessly integrates with your chosen basting technique. It provides a stable and organized framework for both approaches.
- Cost-Effective Solution: Pool noodles are incredibly inexpensive and widely available, especially during warmer months. This makes the pool noodle method an economical alternative to specialized basting frames or tools, proving that effective solutions don’t always require a hefty investment.
- Improved Control and Precision: Working in smaller, controlled sections gives you greater oversight over each layer. You can meticulously smooth out any potential issues before moving on, ensuring a high level of accuracy and quality in your finished basted quilt.
Embracing this method means transforming quilt basting from a dreaded chore into an efficient, comfortable, and satisfying part of your creative process.
Essential Materials for Your Pool Noodle Basting Setup
One of the beauties of this method lies in its simplicity and the minimal number of materials required. Gather these essentials, and you’ll be ready to embark on a smoother basting journey:
- 3 Pool Noodles: These are the stars of our show. When selecting your pool noodles, aim for the longest and firmest ones you can find. Longer noodles are ideal for handling wider quilt sections, and firmer noodles offer better stability and tension. Standard foam noodles work perfectly.
- Your Quilt Project: This includes the three fundamental layers of your quilt:
- Quilt Backing: The bottom layer, often a single piece of fabric or pieced fabric.
- Quilt Batting: The middle layer, providing warmth and dimension.
- Quilt Top: Your beautifully pieced design, the uppermost layer.
- A Large, Flat Work Surface: A dining table, a large craft table, or even a cleared floor space (though the table is preferred for ergonomics) will serve as your basting station. Ensure it’s clean and smooth.
- Basting Method Supplies: Depending on your preference:
- For Spray Basting: A can of temporary fabric adhesive spray (e.g., 505 basting spray).
- For Pin Basting: Plenty of curved safety pins (curved pins make it easier to penetrate multiple layers of fabric).
- Optional: Quilt Clips or Binder Clips: These can be useful for temporarily securing the ends of your quilt layers to the noodles or keeping rolled sections tidy.
With these few items, you’re well-equipped to tackle even the largest of quilt projects with unprecedented ease.
Step-by-Step Guide to Pool Noodle Quilt Basting
Let’s walk through the process, breaking it down into two main phases: preparing your layers and then the actual basting.
Step 1: Preparing Your Quilt Layers on Pool Noodles
The foundation of this method lies in correctly rolling each quilt layer onto its own pool noodle. This ensures smooth, organized access during the basting process.
- Prepare Your Workspace: Begin by clearing your dining table or chosen large, flat work surface. Ensure it’s clean and free of any debris that could snag or mark your fabric.
- Roll the Quilt Backing:
- Lay your quilt backing fabric on the table, right side DOWN. This is crucial as it will be the bottom layer of your quilt sandwich.
- Position one of your pool noodles along one short edge of the backing fabric.
- Starting from the bottom edge and rolling upwards, carefully roll the backing fabric onto the pool noodle.
- As you roll, make sure the fabric is kept as tight and smooth as possible, without wrinkles. Keep the edges lined up and even. This ensures consistent tension across the entire backing.
- Once the entire backing is rolled onto the noodle, set it aside.
- Roll the Quilt Batting:
- Next, take your quilt batting. Lay it flat on your table. Batting typically doesn’t have a “right” or “wrong” side, but ensure it’s smooth.
- Place a second pool noodle along one short edge of the batting.
- Roll the batting onto this noodle, just as you did with the backing. Maintain a tight, even roll, ensuring there are no creases or bumps. Batting can be a bit trickier due to its loft, so take your time to keep it smooth.
- Set this rolled batting noodle aside.
- Roll the Quilt Top:
- Finally, lay your beautiful quilt top on the table, right side UP. This will be the top layer of your quilt sandwich.
- Position your third pool noodle along one short edge of the quilt top.
- Carefully roll the quilt top onto the noodle, keeping it taut, smooth, and perfectly aligned at the edges.
- Once rolled, you should now have three separate pool noodles, each holding one layer of your quilt project.
Step 2: The Basting Process – Section by Section
Now that your layers are neatly rolled, it’s time to assemble your quilt sandwich section by section, ensuring a perfectly basted finish. This method is incredibly versatile, adapting to both spray and pin basting techniques.
- Set Up Your First Section:
- Position your table so you can work comfortably.
- Place the rolled quilt backing noodle at one end of your table, allowing a generous section (e.g., 1-2 feet) of the backing to unroll onto the table surface. Smooth it out meticulously, ensuring there are no wrinkles.
- Next, place the rolled batting noodle above the backing noodle. Unroll a corresponding section of the batting, carefully lining it up along the bottom edge of the unrolled backing. Smooth the batting thoroughly.
- Finally, place the rolled quilt top noodle above the batting noodle. Unroll a matching section of the quilt top, aligning it perfectly with the batting and backing below. Ensure all three layers are smooth and perfectly aligned at the edges.
- Baste the First Section (Choose Your Method):
- If Spray Basting:
- Once your first section of backing, batting, and top are unrolled and perfectly smooth, carefully lift the quilt top. Hold it up and away from the batting.
- Evenly spray a light coat of temporary fabric adhesive onto the batting layer. Make sure to spray from the recommended distance for even coverage.
- Gently lower the quilt top back onto the sprayed batting, starting from the center and smoothing outwards with your hands to eliminate any air bubbles or wrinkles.
- Repeat the process for the batting and backing: carefully lift the batting layer, spray the backing, and then smooth the batting back down.
- Take your time to ensure all layers are perfectly adhered and smooth.
- If Pin Basting:
- After unrolling and aligning all three layers for the first section, begin inserting your curved safety pins.
- Start from the center of the section and work your way outwards.
- Ensure your pins go through all three layers, approximately 3-4 inches apart, creating a dense grid to hold the layers securely.
- Pay special attention to the edges and any areas with intricate piecing.
- If Spray Basting:
- Advance to the Next Section:
- Once your first section is basted (either sprayed or pinned), it’s time to move on.
- Carefully push all three pool noodles together towards the edge of the table where you’ve just basted. This shifts the basted section off the working area and brings the unbasted portions into position.
- Now, unroll the next section of your quilt backing onto the table. Smooth it out.
- Next, unroll the corresponding section of your quilt batting, carefully aligning it with the backing. Smooth it out.
- Finally, unroll the next section of your quilt top, aligning it precisely with the batting and backing.
- Repeat and Continue:
- Repeat the basting process (either spray or pin basting) for this new section, following the same steps as before.
- Continue this cycle of unrolling, smoothing, basting, and advancing the noodles until your entire quilt project is fully basted.
Pro Tips for Flawless Pool Noodle Basting
To ensure your pool noodle basting experience is as smooth and successful as possible, consider these expert tips:
- Choose Your Noodles Wisely: Opt for standard, cylindrical foam pool noodles. Avoid novelty shapes or those with internal holes that might make rolling difficult. Longer noodles are always better for larger quilts.
- Maintain Consistent Tension: The key to wrinkle-free basting is consistent tension. As you roll and unroll, always keep the fabric taut but not stretched. This prevents sagging or bunching.
- Align Edges Meticulously: Regularly check that the edges of your fabric layers are perfectly aligned. This attention to detail will save you headaches later. A slight misalignment in one section can compound over the length of the quilt.
- Smooth Aggressively: Use your hands, a brayer, or a quilter’s ruler to smooth out each layer as you unroll it. Work from the center outwards to push any air bubbles or wrinkles to the edges.
- Consider Fabric Grain: If your fabrics have a noticeable grain, try to roll them so the grain runs parallel to the noodle. This can help prevent distortion.
- Ventilation for Spray Basting: If you’re spray basting, ensure you’re in a well-ventilated area. Open windows or use a fan (not blowing directly on your work). Follow the manufacturer’s instructions for holding the can at the correct distance for optimal adhesion.
- Pin Spacing for Pin Basting: For pin basting, maintain a consistent pin density. A common guideline is to place pins every 3-4 inches in a grid pattern. Use curved safety pins for ease of insertion.
- Work in Manageable Sections: Don’t try to unroll too much fabric at once. Working in 1-2 foot sections (or whatever is comfortable on your table) gives you better control and prevents fabric from getting out of hand.
- Take Breaks: Basting, even with this easier method, can be demanding. If you’re working on a large quilt, take breaks to stretch and refocus. This helps maintain accuracy and prevents fatigue.
- Have a Helper for Large Quilts: For king-sized or particularly unwieldy quilts, an extra set of hands can be invaluable, especially during the initial rolling onto the noodles and for keeping layers aligned.
Troubleshooting Common Basting Challenges
Even with the most efficient methods, challenges can sometimes arise. Here’s how to address a few common issues you might encounter:
- Wrinkles or Bubbles Appear:
- Prevention: Ensure each layer is thoroughly smoothed as it’s unrolled. Use your hands or a brayer to work from the center to the edges. Keep tension consistent when rolling.
- Fix: If you spot a wrinkle or bubble, gently lift the affected layer (if spray basted, this might require careful peeling) and re-smooth it. For pin basting, remove pins in the area, smooth, and re-pin.
- Fabric Layers Are Not Aligned:
- Prevention: Pay close attention when initially laying out and rolling each layer. As you unroll sections, constantly check and adjust the edges of each layer to ensure they line up perfectly.
- Fix: If a section is slightly off, carefully shift the layers until they align before basting that section. If already basted with spray, you might need to gently peel and reposition.
- Spray Adhesive Feels Too Sticky or Not Sticky Enough:
- Too Sticky: You might be applying too much spray or holding the can too close. Use lighter, even coats. Ensure adequate ventilation and allow a moment for the spray to become tacky, not soaking wet.
- Not Sticky Enough: You might be spraying too far away or not applying enough adhesive. Make sure to cover the entire area evenly. Check the expiry date on your spray.
- Pool Noodles Keep Rolling Away:
- Prevention/Fix: If your table surface is very smooth, the noodles might roll easily. You can place non-slip mats or small weights at the ends of the noodles to keep them in place. Alternatively, small clamps or binder clips can be used to temporarily secure the noodles to the table edge if your table allows.
Conclusion: Embrace a Smoother Quilting Journey with Pool Noodles
The quest for an easier, more efficient basting method is a common one among quilters, and the pool noodle technique truly delivers. What once was a source of frustration, back pain, and a daunting mess spread across the floor can now be transformed into a comfortable, organized, and remarkably stress-free process. By utilizing these simple, inexpensive pool noodles, you gain greater control over your quilt layers, achieve smoother results, and reclaim your workspace and your back.
This method brilliantly adapts to your preferred basting style, whether you love the quick adhesion of spray basting or the reliable security of pins. It’s a testament to the ingenuity within the quilting community, turning an ordinary household item into an extraordinary quilting tool. So, if you’ve been putting off basting your latest masterpiece, or if you’re simply tired of the traditional struggles, now is the perfect time to give the pool noodle method a try. You’ll be amazed at how this simple hack can elevate your quilting experience, allowing you to focus on the joy of stitching and creating, rather than the chore of preparation. Watch the video tutorial from On Williams Street, gather your materials, and prepare to embark on a smoother, more enjoyable quilting journey!