
DIY Garage Door Bumper: Protect Your Car & Walls with a Pool Noodle Hack
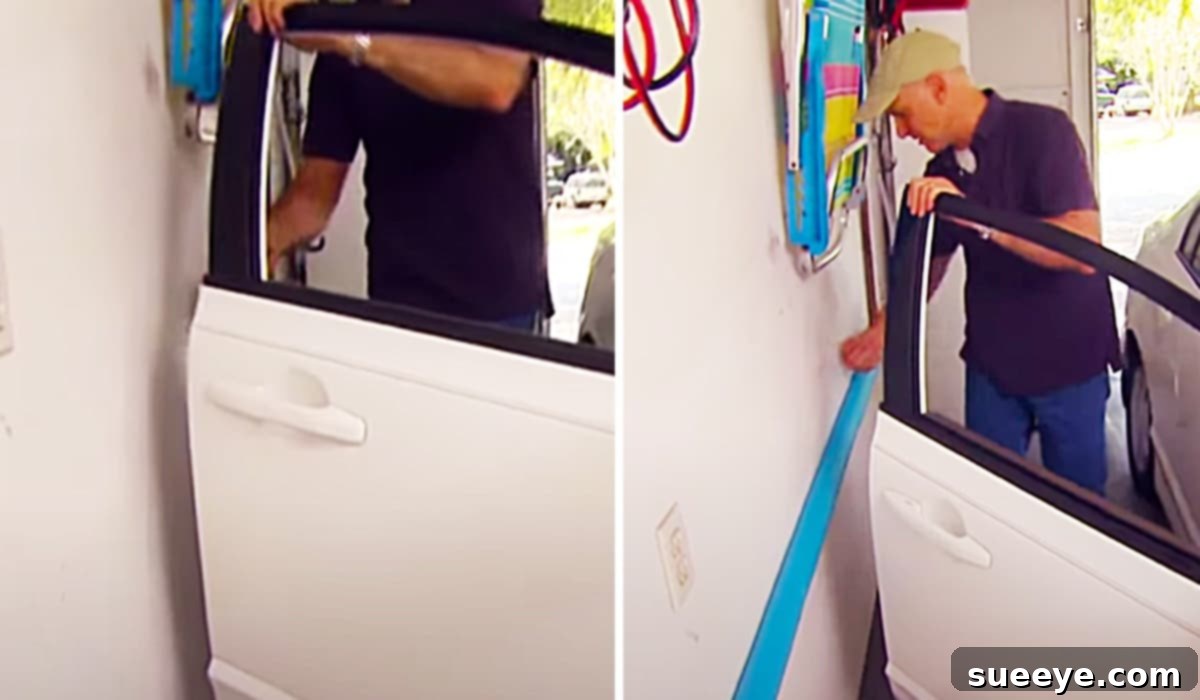
For many car owners, the daily ritual of parking in the garage can often be fraught with the fear of an accidental bump or scrape. That cringe-worthy moment when your car door unexpectedly makes contact with the garage wall, leaving an unsightly gash in your sheetrock or, worse, a dent in your vehicle, is all too familiar. Tight spaces, new drivers, or even a momentary lapse in concentration can lead to costly and frustrating damage. But what if there was an incredibly simple, affordable, and even colorful solution to this common garage conundrum? We’ve found an ingenious DIY hack that leverages the humble pool noodle to create the perfect bumper, offering superior protection for both your car and your garage walls. This brilliant idea, showcased in a video tutorial by Today’s Homeowner With Danny Lipford on YouTube, is a true game-changer for anyone looking to safeguard their vehicles and home without breaking the bank.
The Common Garage Conundrum: Why Every Driver Needs a Bumper
Garages, while essential for vehicle protection and storage, often present a unique set of challenges. Their confined nature, especially in older homes or multi-car setups, leaves little room for error. Picture this: you’ve had a long day, you pull into the garage, perhaps a little too close to the wall, and *thud* – the unmistakable sound of your car door hitting the sheetrock. The result is often a chipped paint job on your car, a scuffed or dented wall, and a significant amount of regret. These minor collisions can add up, leading to expensive body shop repairs for your car or extensive drywall patching and repainting for your garage. Traditional solutions, such as expensive foam panels or bulky wall guards, can be costly and difficult to install, often requiring specialized tools or professional help. This DIY pool noodle bumper offers a refreshing alternative, providing robust protection with minimal effort and expense.
Enter the Pool Noodle: Your Unexpected Garage Guardian
Who would have thought that a common pool noodle, typically used for floating in water, could become your garage’s best friend? Their inherent properties – lightweight, flexible, durable foam construction – make them ideal candidates for impact absorption. When strategically placed, a pool noodle acts as a soft, forgiving barrier, absorbing the shock of an errant car door and preventing direct contact with hard surfaces. This not only protects your car’s paint and bodywork but also preserves the integrity of your garage walls. Beyond their practical utility, pool noodles come in a vibrant array of colors, allowing you to add a surprisingly cheerful touch to an otherwise utilitarian space. They’re incredibly inexpensive, readily available at most discount stores, and remarkably easy to work with, making them the perfect material for a quick and effective home improvement project.
What You’ll Need: Gathering Your Garage Bumper Supplies
One of the most appealing aspects of this DIY garage bumper project is the minimal list of materials required. You likely have some of these items already, making it an even more budget-friendly endeavor. Here’s what you’ll need to gather:
- A Pool Noodle: The star of our project! Consider the length and diameter based on your specific needs. Standard noodles work well, but thicker ones might offer even greater cushioning. You can choose a color that blends in or stands out, adding a fun element to your garage.
- Long Screws: Opt for screws that are long enough to pass through the entire diameter of the pool noodle and securely penetrate your wall material (e.g., drywall, wood studs, masonry). General-purpose screws (like #8 or #10, 2-3 inches long) are usually sufficient. If dealing with masonry, you might need specific masonry screws and anchors.
- A Drill: A cordless or corded power drill will be essential for driving the screws. Ensure you have appropriate drill bits – a pilot hole bit slightly smaller than your screw’s diameter is highly recommended to prevent wood splitting and guide the screw accurately.
- Measuring Tape: Crucial for accurately determining where your car door makes contact and how long your pool noodle bumper needs to be.
- Pencil or Marker: For marking the precise location on your wall where the bumper will be installed.
- Utility Knife or Sharp Knife: If you need to cut the pool noodle to a specific length. A serrated knife or bread knife can also work well for a clean cut.
- Level (Optional but Recommended): To ensure your bumper is installed perfectly straight, giving it a professional look.
- Safety Glasses: Always a good idea when working with power tools.
Your Step-by-Step Guide to Installing Your Pool Noodle Bumper
Installing this DIY garage bumper is incredibly straightforward and can be completed in just a few minutes, even for those with minimal DIY experience. Follow these easy steps to protect your garage and vehicle:
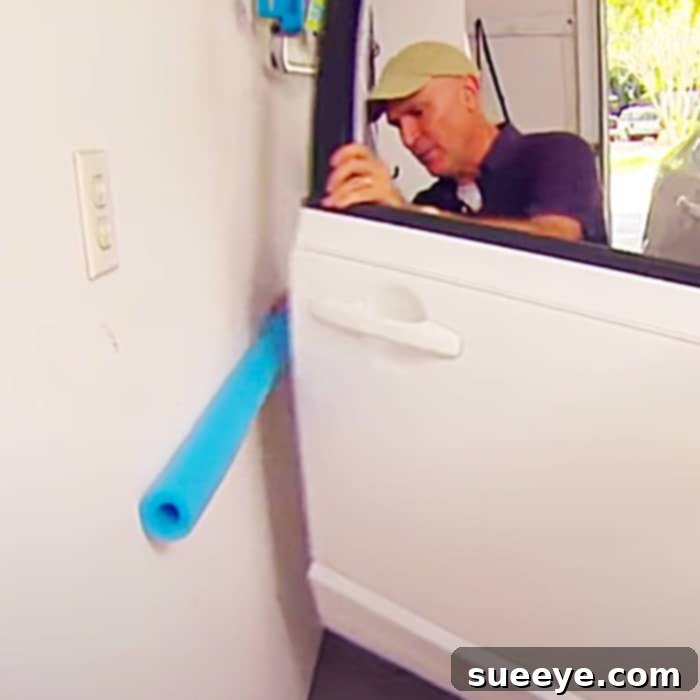
- Identify the Impact Zone: Begin by carefully pulling your car into the garage as you normally would. Open your car door fully, or to the point where it typically makes contact with the wall. Pay close attention to the exact spot on the wall where the door edge or side would hit. This is your primary impact zone. Use a pencil or marker to make a clear mark on the wall at this precise height and location. For comprehensive protection, consider marking several spots along the anticipated contact path.
- Measure and Cut (If Needed): Once you’ve identified the optimal placement, measure the desired length for your pool noodle bumper. You might want a short section just for the door edge, or a longer one to protect a larger area. If your pool noodle is too long, use a utility knife or a sharp serrated knife to cut it cleanly to the required dimension.
- Position the Pool Noodle: Hold the cut pool noodle against the wall, aligning it with the marks you made in step one. Ensure it covers the critical impact zone effectively. If you’re using a level, now is the time to ensure the noodle is perfectly horizontal for a neat installation.
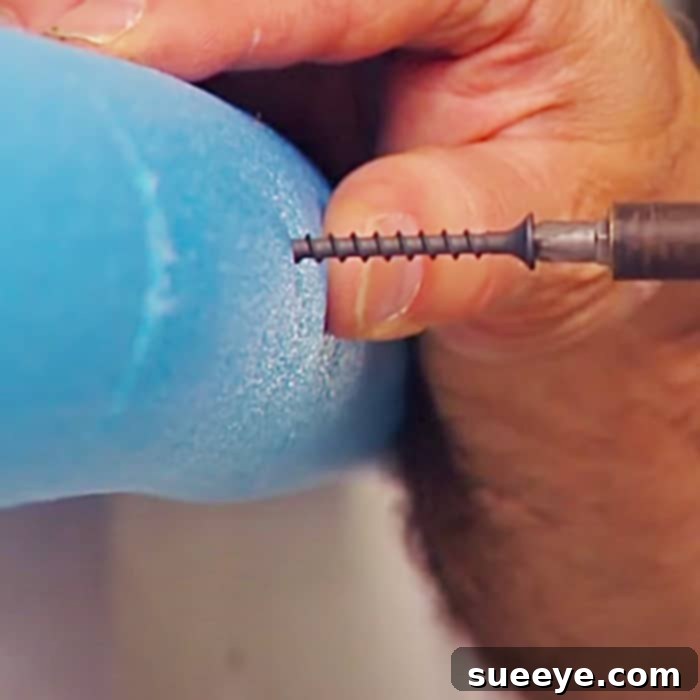
- Drill Pilot Holes (Recommended): While you can often drive screws directly through the foam, drilling small pilot holes through the pool noodle first can make the process easier and prevent the noodle from tearing or twisting. Use a drill bit that is slightly smaller than the diameter of your screws. Drill a pilot hole through the noodle at each point where you plan to insert a screw. For most standard noodles, 2-3 screws spaced evenly along its length should suffice for stability.
- Secure the Bumper to the Wall: With the pilot holes drilled (or if you’re skipping them), place the pool noodle back against the wall, aligning it with your marks. Now, using your drill, drive the long screws directly through the pool noodle and into the wall. Ensure the screws penetrate deep enough into the wall material to provide a secure hold. Be careful not to overtighten the screws, as this can compress the foam too much or damage the wall. The goal is to create a firm, protective barrier.
Beyond Protection: The Many Benefits of Your New Garage Bumper
The advantages of this simple pool noodle garage bumper extend far beyond just preventing dents and dings. It’s a comprehensive solution that offers numerous benefits for every homeowner:
- Exceptional Cost-Effectiveness: Compared to repairing car bodywork or extensive drywall damage, the cost of a pool noodle and a few screws is negligible. This DIY project provides significant protection for a minimal investment.
- Effortless DIY Project: No specialized skills or tools are required. Anyone can complete this project in under 30 minutes, making it an accessible home improvement for all.
- Comprehensive Damage Prevention: This bumper effectively shields your car doors from scratches, dings, and dents, while simultaneously protecting your garage walls (sheetrock, paint, concrete, or brick) from impact marks and structural damage.
- Versatile Application: While primarily used for car doors, these noodle bumpers can also be strategically placed to protect against other garage hazards, such as swinging bicycle handlebars, opening trunk lids, or even as a soft barrier for children’s play areas within the garage.
- Customizable Aesthetics: With pool noodles available in a rainbow of colors, you can choose one that complements your garage’s existing decor or adds a splash of unexpected cheerfulness. You can even use different colors for different parking spots or car doors.
- Quick to Install and Replace: Should your noodle bumper ever become worn or damaged from repeated impacts, it’s incredibly easy to unscrew and replace it with a fresh one, ensuring continuous protection.
- Reduced Stress: Knowing your car and garage are protected gives you peace of mind, eliminating that nagging worry every time you pull into or out of your parking spot.
Personalizing Your Garage Protection: Tips and Tricks
This pool noodle hack is wonderfully adaptable. Consider these tips to personalize and maximize your garage protection:
- Multiple Noodle Placement: If you have more than one car or need protection at different heights (e.g., for a top-heavy SUV vs. a low-slung sedan), install multiple noodles or longer sections to cover all potential impact points.
- Color Coding: Assign different colored noodles to different parking spots or specific vehicles for an organized and fun look.
- Beyond Walls: Don’t limit the noodles to walls. You can attach shorter sections to garage posts, columns, or even the edge of shelves to prevent accidental bumps from various angles.
- Alternative Mounting: While screws are highly effective, for temporary solutions or less frequent use, heavy-duty double-sided tape or strong adhesive strips could be considered, though screws offer superior long-term stability.
Ensuring Lasting Protection: Simple Maintenance Tips
While pool noodle bumpers are remarkably durable, a little maintenance can ensure they continue to provide optimal protection for years to come:
- Periodic Inspection: Every few months, quickly check your noodle bumpers. Ensure they are still securely attached and that the screws haven’t loosened.
- Damage Assessment: If a noodle has sustained significant impact damage, becoming heavily compressed or torn, it’s a good idea to replace it. A fresh noodle will offer maximum shock absorption.
- Cleaning: If your garage tends to get dusty, you can easily wipe down the pool noodle with a damp cloth to keep it looking fresh.
This brilliant and incredibly easy DIY project, inspired by the practical wisdom of Today’s Homeowner With Danny Lipford, offers a perfect blend of functionality, affordability, and simplicity. Say goodbye to the anxiety of tight garage spaces and the expense of accidental damage. With just a few basic materials and a few minutes of your time, you can transform your garage into a safer, more protected environment for both your vehicle and your home. This is truly one of those “why didn’t I think of that?” ideas that delivers immediate and lasting value. Give it a try, and enjoy the peace of mind that comes with a perfectly protected garage!