
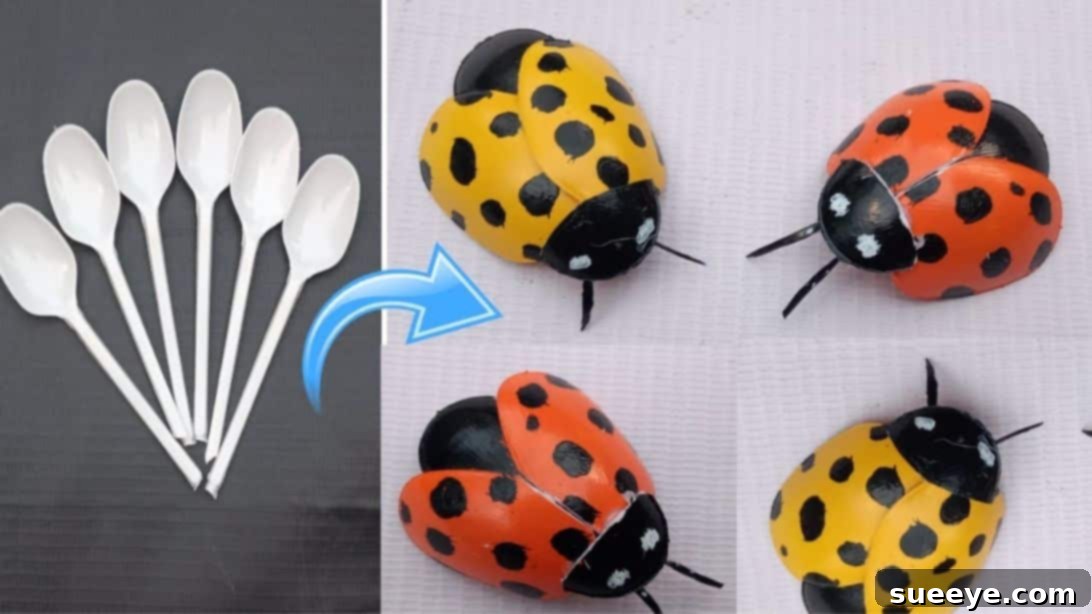
Transform Used Plastic Spoons into Adorable DIY Ladybugs: An Easy Upcycling Craft Guide
In a world increasingly conscious of environmental impact, finding creative ways to reduce waste has become a priority for many. Instead of contributing to landfills, imagine giving everyday items a new lease on life. One such item, often discarded without a second thought, is the humble plastic spoon. What if we told you these seemingly useless utensils could be transformed into something truly delightful and decorative?
Get ready to unleash your inner artist and make a positive impact with a simple yet captivating craft project: turning used plastic spoons into charming ladybugs! This brilliant idea, inspired by the creative minds at Asit Craft Ideas, offers a fantastic opportunity to repurpose plastic utensils rather than tossing them into the trash. While we always advocate for using reusable metal spoons to minimize waste, if plastic spoons are a necessity in certain situations, then giving them a second life through recycling or upcycling is undoubtedly the next best step.
This comprehensive guide will walk you through every step of creating these adorable ladybugs, perfect for adding a touch of whimsy to your garden, brightening up your home, or even as unique, handmade gifts. It’s a fun, engaging, and incredibly easy project that you can enjoy with your children, fostering both creativity and an appreciation for sustainable practices.
Why Upcycle Plastic Spoons? The Environmental and Creative Benefits
Plastic waste is a global challenge, with billions of plastic items ending up in oceans and landfills each year, taking hundreds of years to decompose. Disposable plastic cutlery, in particular, contributes significantly to this problem due to its single-use nature. By choosing to upcycle plastic spoons, you’re not just making a pretty decoration; you’re actively participating in a movement to reduce waste and promote a more sustainable lifestyle. Upcycling gives items a higher value or new purpose than their original use, making it an excellent form of creative reuse.
Beyond the environmental advantages, upcycling fosters immense creative benefits. It encourages problem-solving, imaginative thinking, and hands-on learning, making it a valuable activity for individuals of all ages. For children, craft projects like making ladybugs from plastic spoons enhance fine motor skills, color recognition, and patience. For adults, it’s a relaxing and rewarding hobby that can tap into unused creative potential. Plus, creating something beautiful from discarded materials provides a wonderful sense of accomplishment and pride.
This particular project is a testament to how simple materials can yield stunning results. It proves that you don’t need expensive supplies to create engaging art. With just a few basic items you might already have around the house, you can transform ordinary plastic waste into extraordinary decorative pieces. It’s a small step that contributes to a larger goal: a cleaner, greener planet, filled with more handmade beauty.
Unveiling the Charm of DIY Plastic Spoon Ladybugs
Ladybugs, with their vibrant red shells and distinctive black spots, are universally adored symbols of good luck, happiness, and natural beauty. Their simple, recognizable form makes them an ideal subject for crafting, especially when working with unconventional materials like plastic spoons. The convex shape of the spoon bowl perfectly mimics the rounded back of a ladybug, requiring minimal modification to achieve a realistic and charming effect. This natural fit is what makes plastic spoons such an ingenious choice for this particular craft.
Once completed, these adorable DIY ladybugs offer a multitude of decorative possibilities. Imagine them perched on the leaves of your houseplants, adding a cheerful splash of color to your kitchen windowsill, or nestled among the flowers in your garden, becoming delightful, weather-resistant ornaments. They can be glued onto garden stakes to create unique plant markers, used as charming embellishments for homemade greeting cards, or even strung together to form a whimsical garland for a child’s bedroom or a garden party. With a small magnet attached to their underside, they can become playful fridge magnets, bringing a smile to your face every time you reach for a snack.
Their versatility extends to educational purposes as well. They can be used as props in storytelling, as visual aids for teaching about insects, or simply as delightful companions for imaginative play. The inherent cuteness of a ladybug ensures that these crafts will be cherished, whether as a personal decoration or a thoughtful, handmade gift for friends and family. This project truly embodies the spirit of crafting: creating joy and beauty from the simplest of things.
Essential Materials for Your Plastic Spoon Ladybug Project
One of the many appealing aspects of this craft is the minimal and easily accessible list of materials required. Most items you might already have on hand, making this an economical and convenient project to embark on. Gathering your supplies beforehand will ensure a smooth and enjoyable crafting experience, allowing you to focus on the creative process without interruption.
- Plastic Spoons: You’ll need at least four spoons for each ladybug. Look for standard-sized spoons. Make sure they are clean and dry before you start painting.
- Acrylic Paint: Specifically, black, white, and a chosen color for the ladybug’s body (traditionally red, but feel free to experiment with pink, orange, or even blue for whimsical variations!). Acrylic paints are ideal as they adhere well to plastic and dry quickly, offering a durable finish.
- Scissors: A good pair of sharp scissors is essential for cutting the plastic spoon handles. If crafting with children, ensure you have child-safe scissors for them or supervise closely.
- Hot Glue Gun and Glue Sticks: A hot glue gun provides a strong, fast-drying bond crucial for assembling the different parts of the ladybug. Always exercise caution when using a hot glue gun, especially around children.
- Paint Brushes: You’ll need at least one small, fine-tipped brush for details like the spots and eyes, and potentially a slightly larger one for painting the main body color.
- Optional: Clear sealant spray (for added durability, especially if placed outdoors), glitter, markers for extra details, or googly eyes for a fun touch.
Step-by-Step Guide: Crafting Your Own Plastic Spoon Ladybugs
Ready to transform your spoons into delightful insects? Follow these easy instructions to create your own collection of charming ladybugs. Remember to allow adequate drying time between painting steps to avoid smudging.
Step 1: Preparing the Wings and Adding Color
Begin by selecting two plastic spoons that will become your ladybug’s wings. Using your chosen primary color (e.g., vibrant red, sunny yellow, or bright pink), carefully paint the top, bowl-shaped part of these two spoons. Focus on the convex outer surface, leaving the handles unpainted for now. Apply an even coat, ensuring full coverage. If the paint appears thin, allow the first coat to dry completely before applying a second. Patience during this drying phase is key to achieving a smooth, professional finish. Set these aside in a safe place to air dry thoroughly.
Step 2: Spotting the Wings and Shaping Them
Once your colored spoon wings are completely dry, it’s time to add the iconic ladybug spots. Take a small, fine-tipped brush and your black paint. Carefully paint small, distinct dots on the back of each colored spoon. The number and size of the spots are entirely up to your artistic preference – you can make them symmetrical or random, sparse or dense. After applying the spots, allow the black paint to dry completely. While they are drying, take your scissors and carefully cut off the handles from these two painted spoons. You’ll want to trim the sides a little bit as well, shaping them into more distinct wing-like forms. These pieces are now ready to be attached as the ladybug’s distinctive wings.
Step 3: Crafting the Body Base
Now, grab two more clean plastic spoons. These will form the main body structure of your ladybug. Paint both of these spoons entirely with black paint. Ensure a solid, opaque coat, covering both the bowl and the handle. Again, allow them to dry completely. Once dry, take one of the black-painted spoons and cut off its handle. This will serve as the base body piece to which the wings will be attached. The other black spoon, which still has its handle, will be partially used for the head and antennas.
Step 4: Assembling the Wings to the Body
With your body piece and wings prepared, it’s time for assembly. Take the black spoon that you painted black and had its handle cut off (this is your main body base). Apply a small bead of hot glue to the upper right side of its back, near where the handle used to be. Quickly but carefully, press one of your colorful, spotted wings onto the glue, ensuring it’s positioned correctly and angled slightly outwards, mimicking a ladybug’s natural wing placement. Hold it in place for a few seconds until the glue sets. Repeat this process for the other wing on the left side, ensuring both wings are symmetrical and securely attached to the black body base.
Step 5: Shaping the Head and Antennas
Next, take the second black-painted spoon (the one with the handle still intact). Carefully cut off the top, bowl-shaped part, about halfway through its length. You can trim the sides a little to give it a more rounded, head-like appearance. This piece will serve as the ladybug’s head. Apply a dab of hot glue to the front upper part of the main body (between the wings) and firmly attach the newly cut black ‘head’ piece. Hold until secure. Now, take the remaining handle piece from the black spoon you just cut, or another thin strip of plastic. Cut two very thin, short strips from this plastic – these will be your ladybug’s antennas. Apply tiny dots of hot glue to the top of the head and carefully attach each antenna, positioning them slightly apart and curving upwards if desired.
Step 6: Bringing Your Ladybug to Life: The Eyes
The final touch that truly brings your ladybug to life is adding the eyes. Take a small, clean, fine-tipped brush and your white paint. Carefully paint two small white circles on the front of the black head, ensuring they are symmetrical and proportional to the head size. Let the white paint dry completely. For an added touch of realism and expressiveness, you can use a tiny dot of black paint with an even finer brush or the tip of a toothpick to add pupils to the center of each white eye. Once all the paint is dry, your adorable plastic spoon ladybug is complete and ready to be displayed!
Tips for Perfect Plastic Spoon Ladybugs
To ensure your ladybug crafting experience is as smooth and successful as possible, consider these helpful tips:
- Paint Quality: Use good quality acrylic paints. They offer vibrant colors, good coverage on plastic, and are water-resistant once dry.
- Drying Time: Patience is crucial! Always allow each layer of paint to dry completely before adding the next color or handling the pieces. Rushing can lead to smudges and a less polished look.
- Safety First: When working with hot glue guns, ensure proper ventilation and supervise children closely. For cutting plastic spoons, adult supervision is recommended for younger crafters due to the potential for sharp edges.
- Experiment with Colors: While classic red ladybugs are charming, don’t shy away from experimenting! Try painting your wings blue, yellow, green, or even multi-colored for a truly unique and whimsical collection.
- Adding Shine: For an extra durable and glossy finish, especially if your ladybugs will be outdoors, consider spraying them with a clear acrylic sealant once all the paint is dry. This will protect them from the elements and keep their colors vibrant.
- Googly Eyes: If painting small eyes seems too fiddly, small googly eyes can be hot-glued onto the head for an instant, playful look.
- Batch Crafting: This project is perfect for making multiple ladybugs at once. Prepare all your wings, then all your bodies, then assemble in a production line fashion to save time.
Creative Ways to Display Your Upcycled Ladybugs
Once you’ve finished crafting your charming plastic spoon ladybugs, the fun doesn’t stop there! Here are some imaginative ways to display them and integrate them into your home and garden decor:
- Garden Decorations: Attach a small wooden dowel or sturdy wire to the bottom of the ladybug with hot glue. Push these into your potted plants or directly into your garden beds. They’ll add a cheerful touch to your foliage and flowers.
- Plant Markers: Write the name of herbs or flowers on the back of the ladybug or on a small piece of wood attached to it, turning them into adorable and functional plant markers.
- Fridge Magnets: Glue a small, strong magnet to the flat underside of the ladybug’s body. They make delightful and personalized magnets for your refrigerator or any magnetic surface.
- Wall Decor: Arrange several ladybugs in a charming cluster on a wall in a child’s room, a craft room, or even a whimsical kitchen. Use small adhesive dots or a dab of hot glue to secure them.
- Gift Embellishments: Attach a ladybug to the top of a wrapped gift or a handmade card for an extra special and personalized touch.
- Party Favors: Craft a collection of ladybugs to give away as charming party favors for nature-themed birthdays or garden parties.
- Mobile or Garland: String multiple ladybugs together with fishing line or thin thread to create a delightful mobile for a nursery or a playful garland to hang across a window or doorway.
- Keychains: Attach a small keyring to a sturdy part of the ladybug for a unique, handmade keychain.
- Fairy Garden Accents: Integrate them into miniature fairy gardens, bringing a touch of color and whimsy to tiny landscapes.
Beyond Ladybugs: Exploring Other Plastic Spoon Crafts
The world of upcycling plastic spoons extends far beyond just ladybugs. Once you get a taste for transforming these everyday items, you’ll find endless possibilities for creative reuse. Many crafters have discovered innovative ways to turn plastic spoons into stunning decorative pieces, demonstrating incredible ingenuity and artistry. For example, have you ever considered creating delicate butterflies that seem to flutter right off your wall? The same principles of cutting, painting, and assembling can be applied to mimic the intricate beauty of these winged insects. If you loved making these ladybugs, you might also enjoy learning how to make butterflies from plastic spoons, adding another dimension to your upcycled garden art.
Taking it a step further, the bowls of plastic spoons can be meticulously arranged and glued together to create incredibly unique and elegant home decor items. Imagine the textural possibilities! One popular and often breathtaking project is the creation of lampshades. When carefully cut and layered, the spoon bowls resemble scales or petals, diffusing light beautifully and creating a stunning focal point in any room. If you’re looking for a more ambitious and impactful upcycling project that truly showcases the transformative power of plastic spoons, explore the idea of a DIY plastic spoon lampshade. These projects highlight how ordinary objects, when viewed through a creative lens, can become extraordinary works of art, contributing to both aesthetic appeal and environmental consciousness.
Conclusion: Crafting a Greener, More Creative Future
Transforming used plastic spoons into these charming ladybugs is more than just a craft; it’s a small but significant step towards a more sustainable and creative lifestyle. This project, inspired by the innovative spirit of Asit Craft Ideas, offers a delightful way to repurpose materials that would otherwise end up as waste, fostering both artistic expression and environmental responsibility.
By following our easy step-by-step guide, you’ve not only created adorable decorations but also contributed to reducing plastic pollution, one spoon at a time. Whether you choose to adorn your garden, brighten your living space, or share them as thoughtful gifts, these handmade ladybugs are sure to bring joy and spark conversations about the beauty of upcycling. So, gather your supplies, invite your loved ones, and embark on this wonderful journey of turning trash into treasure. What other creative ways will you find to give new life to old items?