
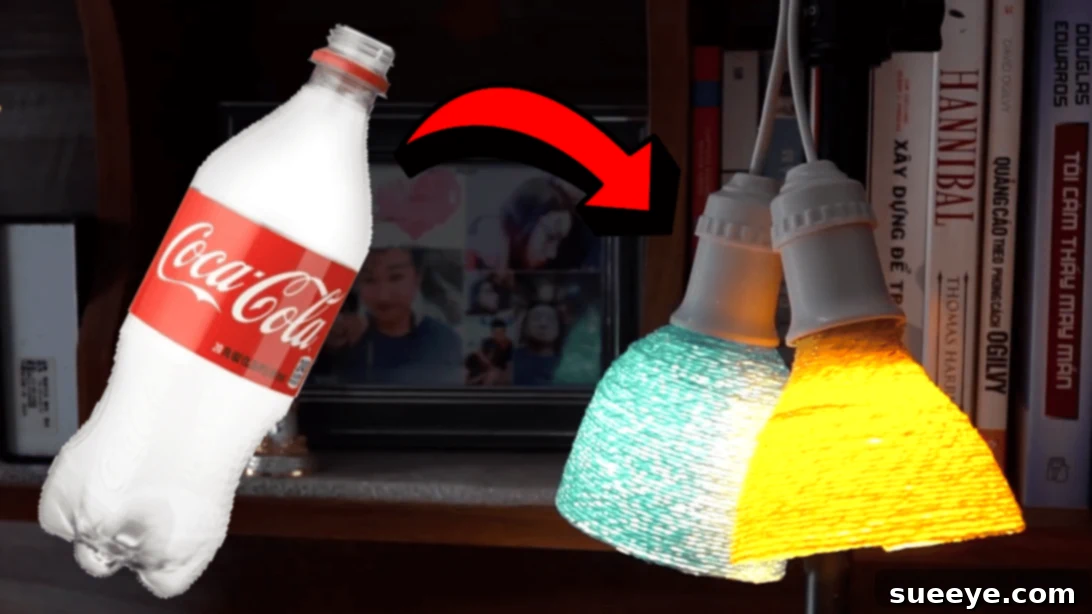
DIY Rope Lampshade: Upcycle Plastic Bottles for Beautiful Outdoor Lighting
As the weather warms and longer evenings invite outdoor gatherings, there’s nothing quite like the soft glow of ambient lighting to set the perfect mood. Many of us dream of transforming our yards and patios into inviting havens for family and friends. While browsing online for unique lighting solutions, I was captivated by the charm of light bulb-shaped string lights. However, I wanted to infuse them with a personal touch and a vibrant splash of color. This led me down a creative path: crafting my very own lampshades from recycled materials.
Inspired by an ingenious project from Recycle Craft, I decided to adapt their concept to create a series of colorful rope lampshades. Instead of using large plastic containers, I opted for smaller plastic bottles that would perfectly cradle individual light bulbs, giving each light a distinct, handcrafted enclosure. By experimenting with various colored ropes, I aimed to create a playful and visually dynamic lighting display that would truly stand out. This project not only adds a unique aesthetic to any space but also offers a fantastic way to repurpose plastic, contributing to a more sustainable lifestyle. Join me in discovering how simple and rewarding it is to make these charming lampshades.
Why Choose This DIY Rope Lampshade Project?
Beyond the undeniable aesthetic appeal, crafting your own rope lampshades from plastic bottles offers a myriad of benefits. Firstly, it’s an incredibly cost-effective solution for anyone looking to enhance their outdoor or indoor decor without breaking the bank. Most of the materials, especially the plastic bottles, are items you might already have around your home, turning potential waste into beautiful treasures. Secondly, this project champions sustainability. By upcycling plastic bottles, you’re actively reducing landfill waste and minimizing your environmental footprint, transforming disposable items into lasting decorative pieces.
Furthermore, the customization possibilities are virtually limitless. You can choose ropes in any color, thickness, or texture to match your existing decor, complement a specific theme, or simply express your personal style. Whether you prefer vibrant hues for a festive look or natural tones for a more rustic feel, the control is entirely in your hands. The resulting lampshades diffuse light beautifully, creating a warm, inviting ambiance perfect for garden parties, patio dinners, or even cozy indoor nooks. They add a unique, artisanal touch that store-bought lighting often lacks, making your space truly one-of-a-kind. It’s an engaging, hands-on activity that yields stunning, functional decor, proving that creativity and eco-consciousness can go hand-in-hand.
Materials You’ll Need for Your Eco-Friendly Lampshades
Gathering your materials before you begin will ensure a smooth and enjoyable crafting experience. Most of these items are readily available, making this a truly accessible DIY project.
- Plastic Bottles: Select bottles that are appropriately sized for your light bulbs. Clear, thin-walled bottles are often easier to work with, but any clean plastic bottle will do. Ensure they are thoroughly washed and dry.
- Colored Thin Rope: The star of the show! Choose a variety of colors to make your lampshades vibrant and fun. Cotton or synthetic ropes with a diameter of 2-4mm work best for easy wrapping and a refined finish.
- Hand Saw or Craft Knife: For cleanly cutting the plastic bottles. A sharp craft knife can be effective, but a small hand saw might offer more control for thicker plastics. Always exercise caution.
- Scissors: Essential for cutting your rope to length and for any minor adjustments.
- Hot Glue Gun and Glue Sticks: Your primary adhesive for securing the rope. A reliable hot glue gun will ensure your ropes stay firmly in place throughout the wrapping process.
- Mod Podge (or similar craft sealant): This will provide a protective, durable coating for your rope lampshades, helping them maintain their shape and adding a subtle sheen. It also helps to stiffen the rope once dry.
- Paintbrush: For even application of Mod Podge. A medium-sized brush will work well for covering the rope surfaces.
- Light Bulbs: Choose LED bulbs if possible, as they produce less heat, which is safer for this type of lampshade. Small, decorative bulbs often look best.
- Lamp Socket Extension or String Lights: This is what your lampshades will attach to. If using string lights, ensure they have individual sockets that can accommodate your handmade shades.
Step-by-Step Guide: Crafting Your Recycled Rope Lampshades
Step 1: Preparing Your Plastic Bottle Base
The foundation of your lampshade starts with a clean, empty plastic bottle. Begin by carefully cutting off the top portion of the bottle, just below the neck where it starts to widen. The goal is to create an opening that is wide enough to accommodate your light bulb’s socket comfortably but also provides a stable base for wrapping the rope. Use a hand saw or a sharp craft knife for a clean cut, ensuring the edges are as even and smooth as possible. Uneven edges can make the initial rope attachment tricky. Once cut, take the end of your chosen colored rope and secure it to the very edge of this newly created opening using a dab of hot glue. This initial anchor point is crucial for a neat start to your lampshade.
Step 2: Expert Rope Wrapping Technique
With the rope securely attached, begin wrapping it around the plastic bottle. Work in tight, consecutive coils, ensuring each new loop sits snugly against the previous one. As you wrap, apply small dots of hot glue at regular intervals to hold the rope firmly in place. This prevents the rope from unraveling later and ensures a durable structure. Pay close attention to maintaining consistent tension in the rope as you wrap to avoid gaps or uneven sections. Continue this process, spiraling the rope downwards around the bottle. The height you aim for should be sufficient to fully cover your chosen light bulb when inserted, typically reaching past the bottle’s ‘shoulder’ where the label usually sits. This ensures the bulb is encased, allowing the rope to diffuse the light beautifully.
Step 3: Sealing and Shaping Your Lampshade
Once you’ve wrapped the rope to your desired height and secured the end with hot glue, it’s time to apply the Mod Podge. Using a paintbrush, generously apply Mod Podge all over the wrapped rope, ensuring every strand is fully coated. This step is vital as the Mod Podge acts as a stiffener, helping the lampshade maintain its shape once it’s removed from the plastic bottle. It also adds a protective layer, making the lampshade more durable. Once fully coated, set the bottle aside in a well-ventilated area and allow it to dry completely. This might take several hours or even overnight, depending on the humidity and thickness of the Mod Podge layer. Patience here is key for a strong, well-formed lampshade.
Step 4: Assembling Your Unique Lighting Fixture
After the Mod Podge has thoroughly dried and hardened, it’s time for the exciting reveal. Carefully twist and gently pull the hardened rope shade off the plastic bottle mold. It should separate relatively easily. Now, take your lamp socket extension or string light socket. Insert the small opening of your newly created rope shade over the socket. Push it firmly but gently until it sits securely. Next, carefully insert your light bulb into the socket, twisting it tightly until it is properly secured and making good contact. With the bulb in place, your unique, handcrafted lampshade is ready! Find the perfect spot in your yard, patio, or indoor space to hang it. Plug in your light extension and switch on the light to admire the warm, diffused glow of your creation.
Tips for Customizing Your DIY Lampshades
The beauty of DIY lies in its endless possibilities for personalization. Here are some ideas to make your rope lampshades truly unique:
- Vary Rope Textures and Colors: Don’t limit yourself to thin, smooth rope. Experiment with thicker jute, sisal, or even braided fabrics for different textures. Combine two or three colors in a single lampshade by switching ropes mid-wrap for a striped or spiraled effect.
- Different Bottle Shapes and Sizes: Explore various plastic bottle shapes – from wider soda bottles to taller water bottles – to create an eclectic collection of lampshades. Each shape will produce a subtly different silhouette and light diffusion.
- Add Embellishments: Before applying Mod Podge, consider adding small beads, faux flowers, or even dried leaves between the rope layers for an extra decorative touch. Ensure any added elements are heat-safe if using traditional bulbs (though LEDs are recommended).
- Multiple Hanging Options: While perfect for string lights, these shades can also be adapted for single pendant lights or even small table lamps. Just ensure the opening fits your lamp socket securely.
- Weatherproofing for Outdoors: If your lampshades will be exposed to the elements, consider applying an outdoor-grade sealant or clear varnish over the dried Mod Podge for extra protection against moisture and UV rays.
Caring for Your Outdoor Rope Lampshades
To ensure your beautiful, handcrafted lampshades last for many seasons, a little care and maintenance go a long way. If you’ve placed your lampshades outdoors, especially in areas exposed to direct sunlight or rain, regular checks are advisable. Over time, sunlight can cause colors to fade, and moisture might weaken the Mod Podge or the rope itself. Consider bringing them indoors during harsh weather conditions like heavy rain, snow, or strong winds. For general cleaning, a gentle dusting with a soft brush or a quick wipe with a damp cloth (if sealed) should suffice. Avoid harsh chemicals, as these can degrade the rope or sealant. If any part of the rope loosens, a small dab of hot glue can quickly fix it. With proper care, these upcycled beauties will continue to illuminate your gatherings for years to come.
Beyond the Yard: Other Uses for Your Handmade Lampshades
While these rope lampshades are perfectly suited for enhancing outdoor ambiance, their charm isn’t limited to the garden or patio. Bring them indoors to add a touch of rustic elegance or playful color to your interior spaces. Imagine a cluster of these shades hanging over a kitchen island, casting a warm glow, or a single shade as a unique bedside lamp. They can also serve as fantastic decorative elements for children’s rooms, adding a whimsical touch, especially if made with bright, contrasting colors. For special events, these lampshades can be part of a larger decorative scheme for birthday parties, baby showers, or intimate weddings, offering a personalized and eco-conscious decor choice. They also make thoughtful, handmade gifts for friends and family, showcasing your creativity and care.
Frequently Asked Questions (FAQ)
Q: Can I use different types of rope?
A: Absolutely! While thin synthetic or cotton rope is easy to work with and provides a smooth finish, feel free to experiment with jute, sisal, macrame cord, or even yarn for different textures and looks. Just ensure your chosen rope is flexible enough to wrap tightly and can be adequately secured with hot glue and Mod Podge.
Q: How can I make these lampshades waterproof for outdoor use?
A: While Mod Podge offers some water resistance, for true waterproofing, you can apply an additional layer of an outdoor-specific clear sealant or marine-grade varnish over the dried Mod Podge. Ensure the product you choose is non-yellowing and suitable for crafts. It’s still recommended to bring them indoors during heavy downpours or prolonged wet weather to maximize their lifespan.
Q: What kind of light bulbs are best for these lampshades?
A: We highly recommend using LED light bulbs. LEDs consume less energy and, crucially, produce very little heat compared to traditional incandescent bulbs. This is a safety consideration, as excessive heat could potentially damage the plastic bottle mold or the rope over time. Warm white LEDs will enhance the cozy ambiance created by the rope shades.
Q: How long does the Mod Podge take to dry?
A: Drying time for Mod Podge can vary depending on the thickness of the application, the type of rope, and environmental factors like humidity. Generally, it takes several hours to be dry to the touch, but it’s best to allow a full 24 hours for complete curing and hardening before attempting to remove the shade from the bottle.
This simple yet impactful DIY project transforms everyday plastic waste into stunning, custom lighting fixtures. Not only will you add a unique charm to your home or garden, but you’ll also enjoy the satisfaction of creating something beautiful and sustainable with your own hands. So, gather your materials, unleash your creativity, and light up your life with these charming rope lampshades!