
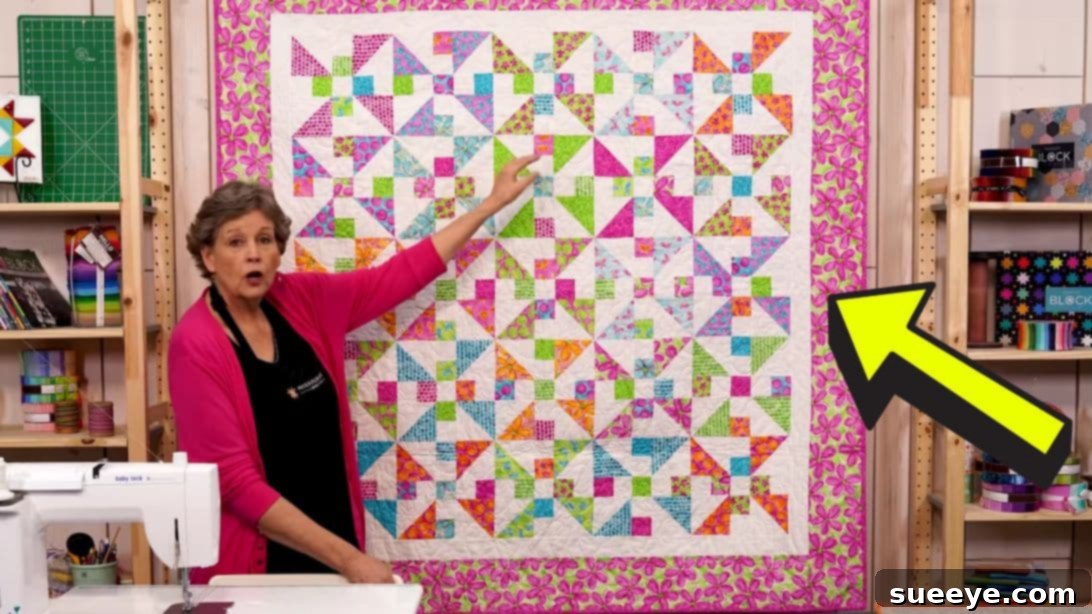
Embark on a delightful quilting journey with this comprehensive tutorial for the charming Pinwheel Frolic Quilt Block, expertly guided by Jenny Doan of Missouri Star Quilt Company. Renowned for her clear, engaging instructions, Jenny makes complex quilting techniques accessible to everyone, from novice sewers to seasoned crafters looking for a fun, quick project. This particular pattern, highlighted in an easy-to-follow video tutorial, is not only super enjoyable to construct but also remarkably simple, yielding stunning results that will bring a touch of handmade warmth to any space. What makes this project even more versatile is the bonus lesson on creating a complementary pillowcase, perfect for completing a coordinated look or practicing your newfound skills on a smaller scale. If you’re eager to transform beautiful fabrics into a cherished heirloom or a thoughtful gift, then follow the detailed instructions below. Prepare to discover the immense satisfaction of creating your very own Pinwheel Frolic Quilt, a design you’ll undoubtedly adore crafting as much as we did!
The Pinwheel Frolic Quilt is a fantastic project that beautifully showcases the magic of Half-Square Triangles (HSTs) and clever fabric placement. It’s designed to be approachable, making it an excellent choice for those new to quilting, while still offering enough creative freedom for experienced quilters to play with color and layout. Jenny Doan’s method ensures that each step is broken down, demystifying the quilting process and building your confidence with every seam. Get ready to dive into your fabric stash and create something truly special!
Materials You’ll Need for Your Pinwheel Frolic Quilt
To begin your Pinwheel Frolic Quilt adventure, gathering the right materials is crucial. This list is carefully curated to ensure you have everything necessary for a smooth and enjoyable quilting experience, leading to a beautifully finished project. The quantities provided are for a standard quilt size, but remember, quilting is all about creativity, so feel free to adjust as needed for different dimensions.
- Two (2) packs of 5-inch print squares: Often referred to as “charm packs” in the quilting world, these pre-cut squares are a fantastic way to introduce a variety of coordinating patterns and colors without the need for extensive cutting. Choose prints that complement each other and align with the aesthetic you envision for your quilt.
- Two (2) packs of 5-inch background squares: These squares will serve as the contrasting element to your print fabrics, allowing your pinwheel designs to truly pop. A solid white, cream, or light grey is a classic choice, but don’t hesitate to experiment with subtle textures or light-colored prints for a unique effect.
- ½ yard of fabric, for the inner border: The inner border provides a subtle frame around your quilt blocks, separating them from the main outer border and adding a touch of definition. Select a color that harmonizes with your chosen print and background fabrics, perhaps picking up one of the less dominant colors in your print squares.
- 1¼ yards of fabric, for the outer border: This wider border will frame the entire quilt, giving it a polished and finished appearance. It’s an opportunity to use a bolder coordinating print or a solid color that anchors the entire design. Consider how this fabric will interact with the overall color scheme.
- ¾ yard of binding fabric: The binding is the final edge that encases the raw edges of your quilt, providing durability and a professional finish. It can be a contrasting color for a dramatic pop, or a matching fabric for a seamless look. Strips for binding are typically cut at 2½ inches wide.
- 4¼ yards of backing fabric: The backing fabric forms the underside of your quilt. While often unseen, it’s an integral part of the quilt’s overall feel and drape. You can choose a single wide-back fabric or piece together standard-width fabrics to achieve the desired size. This is a great place to use a favorite larger print or a super soft flannel for extra coziness.
- Quilter’s Ruler: An essential tool for accurate cutting and measuring. A clear acrylic ruler with visible grid lines will be your best friend throughout this project.
- Marking Pen, Pencil, or Chalk: For drawing precise lines on your fabric, especially for creating Half-Square Triangles. Ensure your chosen marker is easily removable or disappears after a short time.
- Scissors or Rotary Cutter and a Cutting Mat: While scissors are fine for small cuts, a rotary cutter and self-healing mat will significantly speed up your cutting process and ensure greater accuracy for straight lines and multiple layers of fabric.
- Needle and Thread: For any hand-sewing adjustments or attaching binding if preferred, though most of this project will be machine-sewn. High-quality thread is always recommended for durability.
- Iron, for pressing: Pressing seams open or to one side is critical for flat, accurate quilt blocks. A good steam iron is invaluable for achieving crisp, professional results.
- Sewing Machine: The workhorse of your quilting studio. Ensure it’s in good working order and has a fresh needle suitable for quilting cottons.
Step-by-Step Guide to Making the Pinwheel Frolic Quilt
Creating the Pinwheel Frolic Quilt is an incredibly rewarding process, and Jenny Doan’s method makes it both fun and straightforward. Follow these detailed steps to bring your beautiful quilt to life. Precision in cutting and pressing will be your keys to success!
Step 1: Constructing Your Half-Square Triangles (HSTs) and Sashing Units
The Pinwheel Frolic Quilt relies heavily on the beauty of Half-Square Triangles (HSTs) and well-placed sashing to create its dynamic design. This first step focuses on creating these foundational elements.
- Prepare Your Fabric Squares: Take one 5-inch background square and one 5-inch print square. Place them right sides together, ensuring all edges align perfectly. This exact alignment is crucial for accurate HSTs.
- Mark Your Sewing Lines: On the wrong side of the lighter fabric square (typically your background fabric), use your preferred marking tool (pen, pencil, or chalk) and a ruler to draw a precise diagonal line from one corner to the opposite corner. This line will serve as your cutting guide.
- Stitch the Seams: Now, using your sewing machine, sew a seam ¼ inch away from the marked diagonal line on both sides. This means you will have two parallel seam lines, each ¼ inch from your drawn center line. Maintain a consistent ¼-inch seam allowance throughout your quilting project for the best results.
- Cut and Press Your HSTs: Carefully cut along the drawn diagonal line that separates your two sewn lines. You will now have two fabric units. Open each unit, pressing the seam allowances towards the darker fabric to “hide” the seam and create a flat, crisp Half-Square Triangle. Alternatively, you can press the seams open for even less bulk, especially if you plan to nest seams later.
- Trim for Accuracy: Even with careful sewing, HSTs often need a slight trim to ensure they are perfectly square and measure the desired size (which, after a 5-inch start and ¼-inch seams, will likely be 4½ inches square, though always measure to confirm). Use your quilter’s ruler and rotary cutter to trim off any excess fabric, making sure your HSTs are perfectly square. This step is vital for ensuring your blocks fit together accurately later on.
- Repeat for More HSTs: Continue creating Half-Square Triangles using the remaining 5-inch print and background squares. The number of HSTs you’ll need depends on your desired quilt size, so consult a pattern or make enough to construct several blocks.
- Create Sashing Units: Sashing units are strips of fabric that separate your quilt blocks, adding structure and often a visual break. To make sashing, you’ll typically cut strips of fabric from your background or a coordinating solid. For this pattern, some sashing might also involve smaller HSTs or fabric squares. Ensure your sashing strips are cut to consistent widths and lengths as specified by your overall design. For a simple sashing unit, you may simply need to cut fabric strips from your background fabric to a size that matches the finished size of your HSTs (e.g., 4½ inches long by a narrower width like 2 inches).
Step 2: Assembling Blocks and the Quilt Top
With your HSTs and sashing units prepared, it’s time to bring them together to form the distinct Pinwheel Frolic blocks and then assemble the entire quilt top.
- Construct Additional Sashing Pieces (if needed for the design): Some quilt patterns, including variations of the Pinwheel Frolic, incorporate sashing made from squares. Take another 1 background square and 1 print square. Place them right sides together, and this time, sew around all four sides of the square with a ¼-inch seam allowance.
- Cut and Press These Sashing Squares: After sewing, cut these sewn squares in half both horizontally and vertically. This will yield four smaller square units. Press these open, again pressing seams towards the darker fabric or open. Trim these units if necessary to ensure they are perfectly square and consistent in size. These can be used as cornerstones in your sashing or as part of more complex sashing designs.
- Layout Your Quilt Block: Before sewing, arrange your Half-Square Triangles and sashing units on a design wall or a flat surface according to the Pinwheel Frolic pattern. Typically, HSTs are rotated to create a pinwheel effect, and sashing is placed between them to define the block’s structure. For a standard Pinwheel Frolic block, you’ll often have a central fabric square surrounded by HSTs and sashing. The “frolic” part often comes from the dynamic arrangement of these elements.
- Sew Block Units Together: Begin by sewing the individual rows of your block together. Take two adjacent units, place them right sides together, and sew with a consistent ¼-inch seam allowance. Chain piecing can be a great time-saver here if you’re making many blocks. Press the seams between units, alternating the direction of your pressing for each row. This will allow you to “nest” your seams when joining rows, reducing bulk and improving accuracy.
- Join the Rows: Once your rows are sewn, carefully align the seams of adjacent rows, pin them in place, and sew the rows together with a ¼-inch seam allowance. Again, press these seams. Continue this process until your complete Pinwheel Frolic block is formed.
- Create More Blocks: Repeat the entire process (steps 1 and 2) to create the desired number of Pinwheel Frolic blocks for your quilt.
- Assemble the Quilt Top: Once you have all your individual blocks, lay them out to form the full quilt top. This is where you can experiment with different arrangements and rotations to create a visually appealing design. Once you are satisfied with the layout, sew the blocks together in rows, and then sew the rows together, always maintaining that consistent ¼-inch seam allowance and pressing regularly.
- Add Borders: Measure your quilt top’s length and width carefully, taking multiple measurements to average out any slight inconsistencies. Cut your inner border fabric to the correct lengths and widths, then attach the side borders first, pressing seams towards the border. Then attach the top and bottom borders, pressing again. Repeat this process for the outer border fabric, which gives your quilt a grander finish.
- Complete the Quilt Sandwich: You’re almost there! Once the quilt top is complete, you’ll create the “quilt sandwich.” Layer your backing fabric (right side down), then your batting (the fluffy middle layer), and finally your quilt top (right side up). Smooth out all layers, ensuring there are no wrinkles or puckers. Secure these layers together with basting pins, spray basting, or long hand stitches.
- Quilt Your Layers: Now comes the actual quilting! You can choose to machine quilt with various stitch patterns (straight lines, free-motion designs) or hand quilt for a more traditional look. The quilting stitches hold all three layers together and add texture and durability.
- Attach the Binding: The final step in finishing your quilt is to attach the binding. Prepare your binding strips by sewing them end-to-end to create one long strip. Fold this strip in half lengthwise and press. Attach the binding to the raw edge of your quilt, either by machine or hand, using a ¼-inch seam allowance. Fold it over to the back and hand-stitch or machine-stitch it down for a clean, durable edge.
Congratulations! You have successfully completed your Pinwheel Frolic Quilt. This project allows for endless creativity in fabric choice and block arrangement, making each quilt truly unique.
Tips for Quilting Success
To ensure your Pinwheel Frolic Quilt turns out beautifully, keep these expert tips in mind:
- Accurate Cutting is Key: Invest in a good rotary cutter and ruler, and always double-check your measurements before making a cut. Even slight inaccuracies can compound over many blocks.
- Press, Don’t Iron: When quilting, “press” your seams by lifting and placing the iron down, rather than sliding it. This prevents fabric distortion. Pressing frequently, after each major seam, helps create flat, crisp blocks.
- Consistent Seam Allowance: A perfect ¼-inch seam allowance is crucial. Use a special ¼-inch presser foot on your machine if you have one, or mark a guide on your machine’s throat plate with masking tape.
- Sharp Needle: Change your sewing machine needle frequently, especially when starting a new project or changing fabric types. A sharp needle prevents skipped stitches and fabric snags.
- Pre-wash Your Fabrics (Optional but Recommended): Some quilters prefer to pre-wash their fabrics to prevent shrinkage and color bleeding after the quilt is finished. If you do this, pre-wash all fabrics in the same way.
- Square Up Your Blocks: After assembling each block, use your ruler and rotary cutter to “square it up,” trimming it to its exact finished size. This ensures all blocks are consistent and fit together perfectly.
- Patience is a Virtue: Quilting is a journey, not a race. Take your time with each step, enjoy the process, and don’t be afraid to unpick and re-sew if something isn’t quite right.
Customizing Your Pinwheel Frolic Quilt
The beauty of the Pinwheel Frolic design lies in its versatility. Here are some ideas to make your quilt uniquely yours:
- Color Palette Exploration: Instead of just two contrasting colors, try using a gradient of colors for your pinwheels, or incorporate a rainbow effect. Play with warm and cool tones, or create a monochromatic quilt for a sophisticated look.
- Fabric Play: While cotton is standard, don’t shy away from mixing in other fabric types like linen blends (for a rustic feel) or even a touch of flannel for extra softness, especially in the backing. Ensure all fabrics have similar care requirements.
- Alternate Layouts: Once you have your Pinwheel Frolic blocks, experiment with rotating them in different directions on your design wall. This can create secondary patterns and optical illusions, adding another layer of interest to your quilt.
- Embellishments: Consider adding simple hand embroidery to some of the solid areas of your blocks or borders, or attach small fabric appliques for personalized touches.
Caring for Your Handmade Quilt
Once your beautiful Pinwheel Frolic Quilt is complete, proper care will ensure it remains a cherished item for years to come:
- First Wash: For the first wash, use a gentle cycle with cold water and a mild, dye-free detergent. Add a color catcher sheet to absorb any potential dye bleeding. Tumble dry on low heat or air dry flat to prevent excessive shrinkage.
- Ongoing Care: For subsequent washes, continue to use cold water and a gentle cycle. Avoid harsh detergents, bleach, and fabric softeners, as these can degrade the fabric and batting over time.
- Drying: Air drying flat is ideal to maintain the quilt’s shape and prevent stress on the seams. If using a dryer, use a low heat setting and remove the quilt while slightly damp to finish air drying.
- Storage: Store your quilt folded or rolled in a clean, breathable cotton pillowcase or sheet, away from direct sunlight and extreme temperatures. Avoid storing in plastic containers long-term, as this can trap moisture.
*A heartfelt thank you goes out to Missouri Star via YouTube for providing the inspiration and valuable visuals used in this comprehensive tutorial. Jenny Doan’s passion for quilting and her ability to simplify complex patterns are truly remarkable. If you’ve enjoyed learning how to create this beautiful Pinwheel Frolic Quilt and appreciate her clear teaching style, we highly recommend you visit her official YouTube channel. Subscribe for an endless supply of creative quilting ideas, insightful tutorials, and a vibrant community of fellow crafters. Happy quilting!